As you should have noticed in the previous section, you can
function just fine as a developer connected to the Internet as
long as the critical Internet resources are available when they
are needed to populate your localRepository cache.
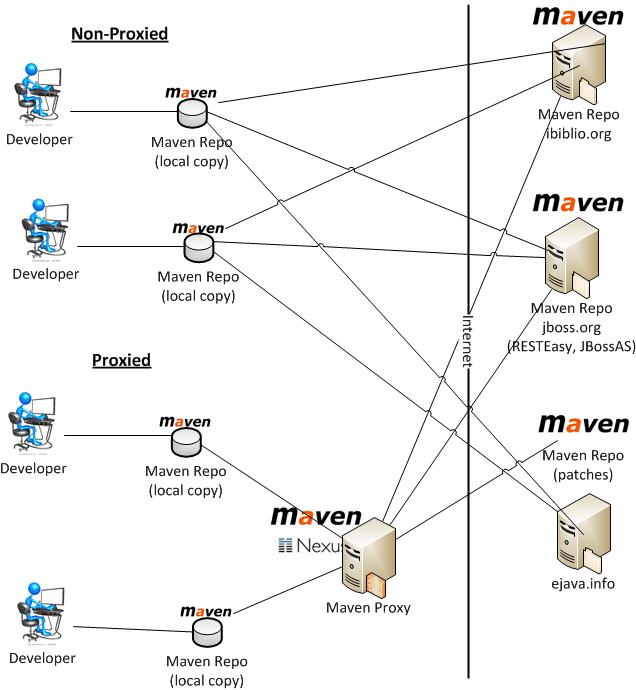
However, if you were part of a larger development team you would
not want each separate developer reaching out the Internet to
locate a common dependency. There is both a speed and failure
issue with that type of setup.
The steps listed in this chapter are not necessary
for class because you work alone and you have a localRepository
cache. In fact -- I urge you not to follow them unless you feel
the strong desire to dig deeper in this enterprise development
setup. However, it does provide you with some experience in
setting up and using a realistic production maven environment.
Still here? Okay -- lets get started...
In the previous section we installed and setup Maven in a stand-alone client mode. In that mode the individual environment communicated directly with the external Internet organizations to obtain missing artifacts. In this section we will add a proxy server between the developer and the Internet so that one or more developers can share what has already been downloaded and be completely isolated from network and remote outages. Ideally this proxy would be placed on a shared server somewhere on your local Intranet with access to the outside Internet. The instructions will act as though you are installing it locally. It is your decision whether to use it and where to install it. If you do not install and configure a proxy -- you will notice small delays in your builds while your local maven client checks Internet sources for new artifacts and updates to existing artifacts.
This procedure will take you through a manual download and setup of the Nexus OSS software and have you go thru a manual setup of all items. Use this approach if you want a minor amount of experience in setting up the sever.
Download the Nexus OSS Software from Sonatype http://www.sonatype.org/nexus/go
Unzip the the compressed file to your filesystem. There will be two directories created; one for the software (
nexus-(version)) and another for the repository caches (sonatype-work)$ tar tzf ~/Downloads/nexus-x.x.x-xx-bundle.tar.gz ... $ ls nexus-x.x.x-xx/ sonatype-work/ nexus-x.x.x-xx/: LICENSE.txt NOTICE.txt bin conf lib logs nexus tmp sonatype-work/: README.txt nexus
The server will listen on port 8081 on all interfaces (0.0.0.0) by default. Modify
nexus-x.x.x-xx/conf/nexus.propertiesif you want something different.$ more nexus-x.x.x-xx/conf/nexus.properties ... # Jetty section application-port=8081 application-host=0.0.0.0 ...
Locate the startup script in the NEXUS_HOME/bin directory.
$ ls nexus-x.x.x-xx/bin/
jsw  nexus  nexus.bat
Tip
Linux users might want to register this script in /etc/init.d. If you also configure it to automatically start at boot -- supply a value for
RUN_AS_USERto keep the server from running as root. I also needed to change "su - $RUN_AS_USER" to "su -m $RUN_AS_USER..." because of the way my legacy nexus account was setup for nologin.Use the script appropriate for your platform to start and perform other controls on the server.
$ nexus-x.x.x-xx/bin/nexus
Usage: nexus-x.x.x-xx/bin/nexus { console | start | stop | restart | status | dump }

$ nexus-x.x.x-xx/bin/nexus start
Starting Nexus OSS...
Started Nexus OSS.
Note
The above command attempts to run Nexus as a service. If you do not have the permission on your system to register nexus as a service, you can optionally run it as an interactive command.
$ nexus-x.x.x-xx/bin/nexus console
/etc/init.d/nexus console
Running Nexus OSS...
wrapper  | --> Wrapper Started as Console
wrapper  | Launching a JVM...
jvm 1    | Wrapper (Version 3.2.3) http://wrapper.tanukisoftware.org
jvm 1    |   Copyright 1999-2006 Tanuki Software, Inc.  All Rights Reserved.
jvm 1    |
jvm 1    | 2012-04-26 12:14:38.531:INFO:oejs.Server:jetty-7.5.4.v20111024
The specific error observed on Windows was
wrapper | The nexus-webapp service is not installed - The specified service does not exist as an installed service. (0x424)
Access the Web UI for Nexus OSS http://localhost:8081/nexus
Login with the default account of admin/admin123
Change the admin password (or not) using Security->Change Password
Add remote repositories
Click on Views/Repositories->Repositories
Click the +Add...Proxy Repository
Fill in the data for the repositories in the following Repositories table. Use default values for anything not included in the table.
Press Save
Table 5.1. Repositories
Repository ID Repository Name Repository Policy Remote Storage Location jboss-nexus JBoss Nexus Release https://repository.jboss.org/nexus/content/groups/public-jboss/ apache-repo Apache Repo Release https://repo.maven.apache.org/maven2/ exoplatform Exoplatform Release http://maven2.exoplatform.org/maven/ webdev-snapshot Webdev Snapshot Snapshot http://webdev.jhuep.com/~jcs/maven2-snapshot webdev-releases Webdev Releases Release http://webdev.jhuep.com/~jcs/maven2/ Note
If the provided list is missing any sources, check for a current list of repositories and plugin repositories in ejava-build/dependencies/pom.xml from the class source tree and add those as well.
Note
Nexus will check each repository as they are added. Try restarting if things get stuck.
$ service nexus restart
Stopping Nexus OSS...
Stopped Nexus OSS.
Starting Nexus OSS...
Started Nexus OSS.
SSL Errors? java.security.NoSuchAlgorithmException
It seems that Nexus has some SSL errors with Java8 and OpenJDK that did not exist with earlier versions of the JDK. See the following and either switch to Oracle's JDK or switch to HTTP (non-HTTPS) URLs. https://issues.sonatype.org/browse/NEXUS-7999
Add the created repositories to the Public Repositories
Select
Public Repositoriesline towards the top of the repositories list.Select repositories form the right Available column and add them to the left column. Specify them last in the following order
JBoss Nexus
Apache Repo
Exoplatform
Webdev Snapshots
Webdev Releases
Press Save
Add the following to the
.m2/settings.xmlfile in your HOME directory to enable use of the proxy
...

    <offline>false</offline>

...

    <mirrors>

        <mirror>

          <id>nexus</id>

          <mirrorOf>*</mirrorOf>

          <url>http://localhost:8081/nexus/content/groups/public</url>

        </mirror>

    </mirrors>


    <profiles

        ...
Test your configuration using
$ mvn clean test
[INFO] Scanning for projects...
Downloading: http://localhost:8081/nexus/content/groups/public/org/eclipse/wst/css/core/maven-metadata.xml
Downloaded: http://localhost:8081/nexus/content/groups/public/org/eclipse/wst/css/core/maven-metadata.xml (376 B at 0.4 KB/sec)
If you have Eclipse installed at this point, have it re-process your settings.xml by going to
Window->Preferences->Maven->User Settings->Update Settings