In this chapter we will be importing the project into the Eclipse IDE, running a few project goals, and demonstrating a debug session. IDEs provide very useful code navigation and refactoring tools to name only a few features. However, one of the unique tools offered by the IDEs is the ability to step through the code in a debugging session. Please do not end this exercise before becoming comfortable with the ability to use the debugger.
Note
Maven/Eclipse integration was once the most volatile aspects of the environment. However, over the years the two have been designed to work well together as long as you keep things Maven-centric.
Warning
The Maven/Eclipse integration is a Maven-first approach where the Eclipse project always follows the Maven pom.xml. That is on of the main reasons this exercise started you with a pom.xml file first and progressed later to the IDE. It is wrong (or at least non-portable) to manually adjust the build path of a project within Eclipse. You must adjust the build path of a project by editing the pom.xml and having Eclipse automatically detect and follow that change.
ex1 ~= firstSimpleModuleEx
The exercise asked you to name your module "ex1". This portion of the exercise demonstrates actions within Eclipse in a posted solution in your examples tree call "firstSimpleModuleEx". You may/should continue to use your "ex1" solution from the previous chapters but know that firstSimpleModuleEx (as posted) has a few minor tweeks to its pom.xml to allow it to be distributed with the rest of the class examples as part of the class site.
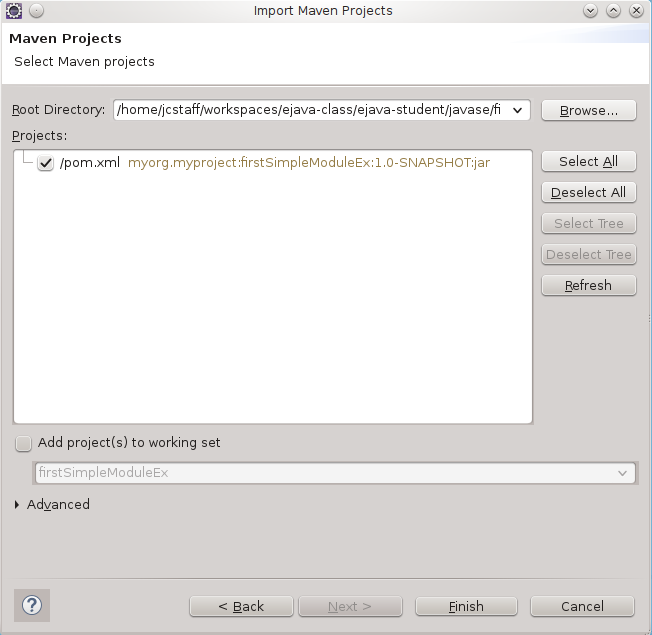
Select File->Import->Maven->Existing Maven Projects, navigate to the directory with the project you have been working with and select OK.
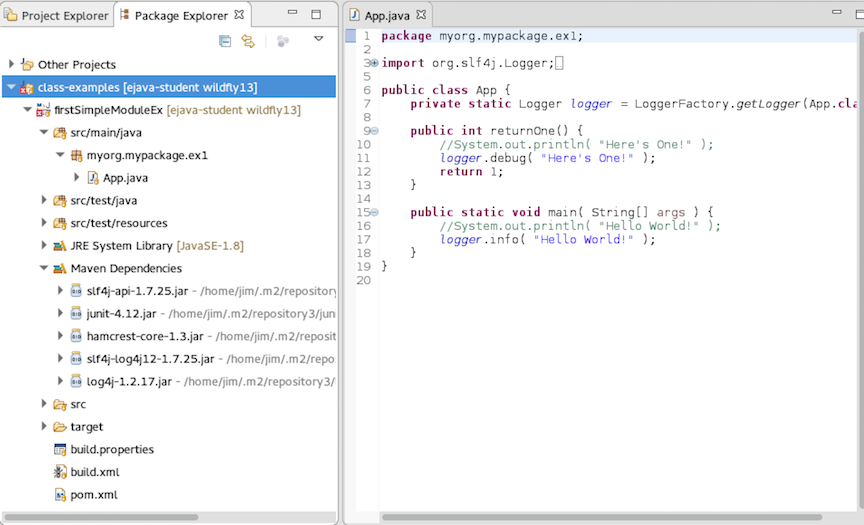
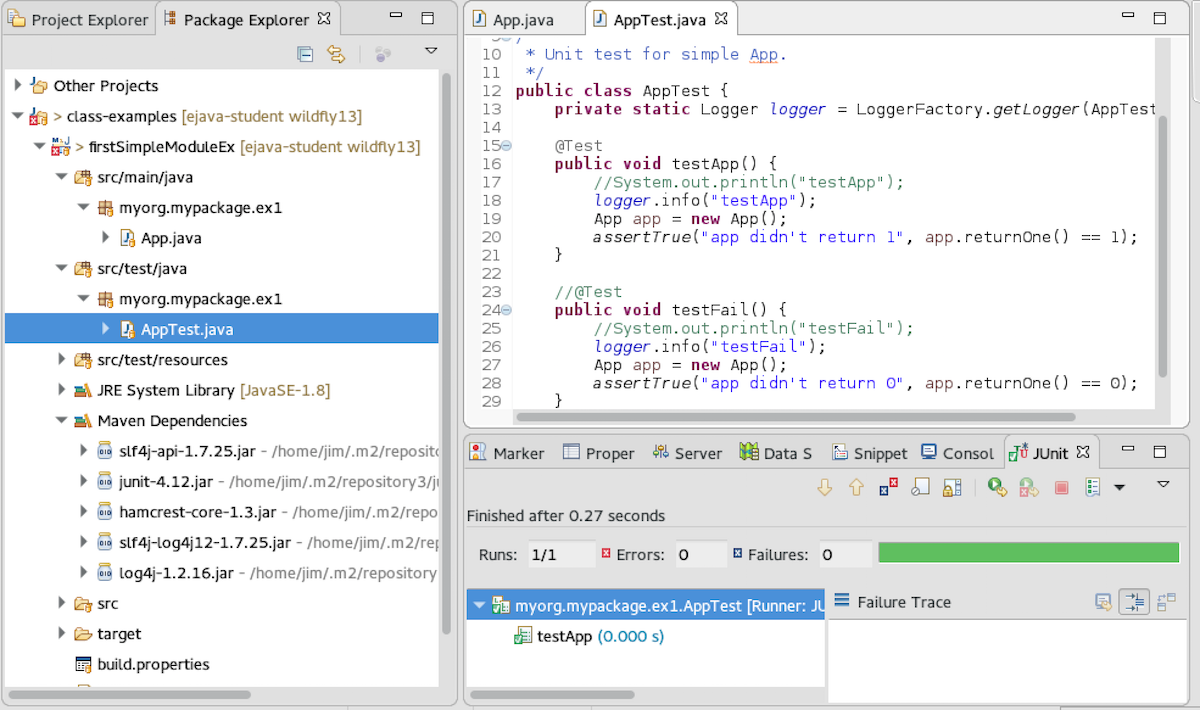
The project should successfully import. Note that Eclipse has imported the project configuration from the Maven POM and has done at least the following...
Created three build packages; src/main/java, src/test/java, and src/test/resources. Had there been a src/main/resources we would have had a fourth build package added.
Defined the project for use with Java 8.
Added five Maven dependencies. Notice how the path to these dependencies are from the localRepository.
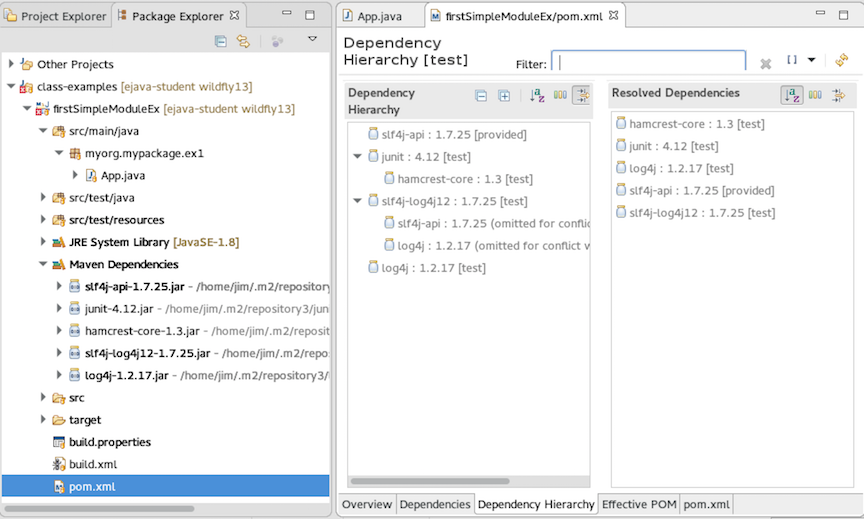
Four of these dependencies (slf-api, junit, slf-log4j, and log4j) were through direct references. The fifth (hamcrest-core) is through a transitive dependency from junit. You can visualize this transitive dependency by opening the pom.xml and selecting the dependency hierarchy tab at the bottom of the window.
You can get a text version of the dependency heirarchy using the Maven dependency:tree goal.
$ mvn dependency:tree
...
[INFO] ------------------------------------------------------------------------
[INFO] Building JavaSE::Simple Module Exercise Solution 1.0-SNAPSHOT
[INFO] ------------------------------------------------------------------------
[INFO]
[INFO] --- maven-dependency-plugin:2.8:tree (default-cli) @ firstSimpleModuleEx ---
[INFO] myorg.myproject:firstSimpleModuleEx:jar:5.0.0-SNAPSHOT
[INFO] +- org.slf4j:slf4j-api:jar:1.7.25:provided
[INFO] +- junit:junit:jar:4.12:test
[INFO] |  \- org.hamcrest:hamcrest-core:jar:1.3:test
[INFO] +- org.slf4j:slf4j-log4j12:jar:1.7.25:test
[INFO] \- log4j:log4j:jar:1.2.17:test
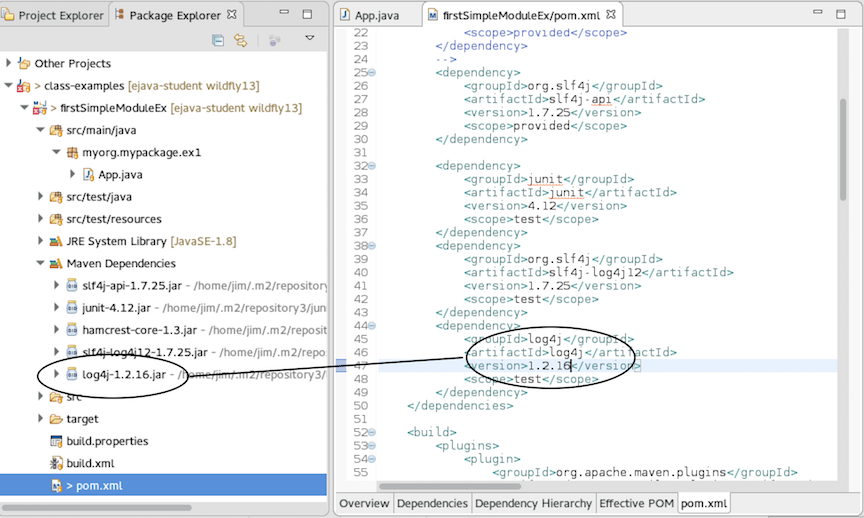
Make a small edit to the pom.xml and notice the change in the Maven Dependencies within Eclipse. Switch back and forth between these two settings and watch the value under Maven Dependencies follow the edits (be sure to save the file between edits).
        <dependency>

            <groupId>log4j</groupId>

            <artifactId>log4j</artifactId>

            <version>1.2.17</version>

            <scope>test</scope>

        </dependency>
        <dependency>

            <groupId>log4j</groupId>

            <artifactId>log4j</artifactId>

            <version>1.2.16</version>

            <scope>test</scope>

        </dependency>
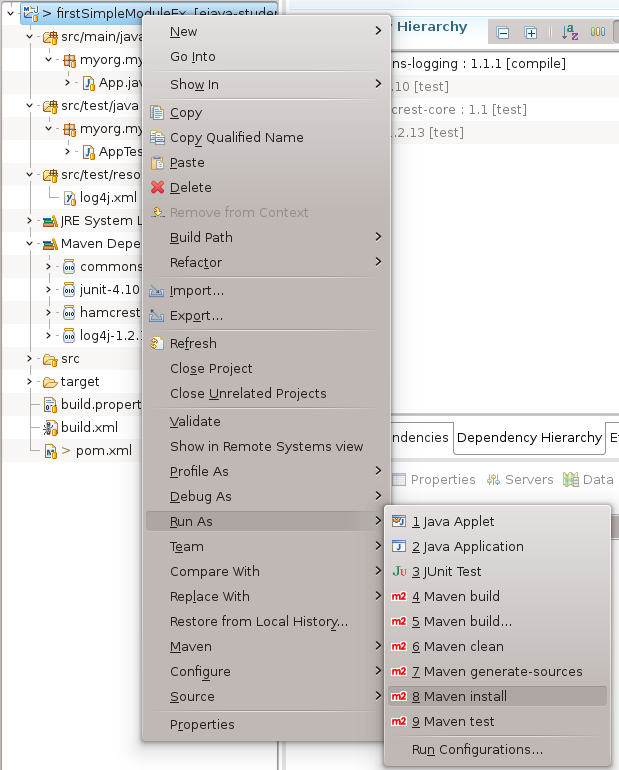
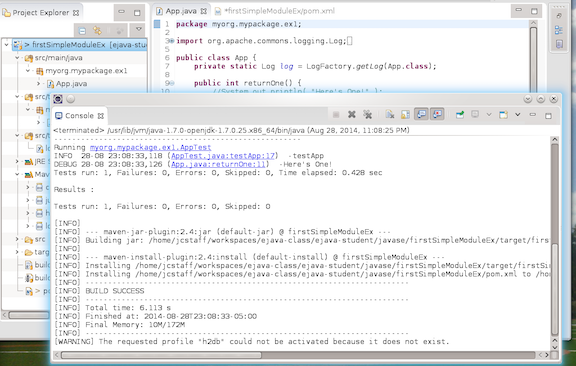
Right-click on the pom.xml file or project folder and execute Run As->"Maven install". You can also get back to this window through the Run As option on the toolbar once you have the project selective. This mode runs the JUnit test you wrote within the context of the full maven project. All pre-test and post-test setup and teardown you wired into the Maven command line build will be executed.
Note that you can create a separate window for any of the Eclipse tabs. Using dual monitors -- I commonly display the IDE on one page the the Console output on another when using debug statements.
Rerun the tests as a JUnit test. This mode runs the JUnit test raw within Eclipse. This is very efficient for making and testing Java code changes but will not run any maven setup or teardown plugins (which is not always required or can be avoided).
Always Make Projects Eclipse/JUnit-Friendly
Maven is a very useful and powerful tool. However, there is a point where the information from Maven has been captured by the IDE and we don't need to run full Maven builds (e.g., RunAs: Maven Install). As you saw from the RunAs: JUnit test we were able to run the unit test and run it exceptionally fast without Maven. I strongly recommend making your unit tests Eclipse/JUnit-friendly so that you can work efficiently in certain areas. That means hard-code reasable defaults without relying on the maven-surefire-plugin passing in properties from the outside environment. Allow overrides, but code in a usable default into the test.
There are two primary ways to use the debugger; separate/remote process and embedded (within Eclipse). The second is much easier to use but is limited by what you can execute within the Eclipse IDE. The first takes a minor amount of setup but can be re-used to debug code running within application servers on your local and remote machines.
Lets start with a remote debugging session by recalling the profile you were asked to add to either your pom.xml or settings.xml. If you have not done so, you can add it to either at this time.
    <profiles>
        <profile> <!-- tells surefire to run JUnit tests with remote debug -->
            <id>debugger</id>
            <activation>
                <property>
                    <name>debugger</name>
                </property>
            </activation>
            <properties>
                <surefire.argLine>-Xrunjdwp:transport=dt_socket,server=y,suspend=y,address=8000 -Xnoagent -Djava.compiler=NONE</surefire.argLine>
            </properties>
        </profile>

    </profiles>
Add a definition for the "surefire.argLine" within the maven-surefire-plugin declaration. Surefire is already being pulled into the project, this declaration just specifies the extra configuration along with a specific version. Maven will start complaining ig you leave off that version.
            <plugin>
                <groupId>org.apache.maven.plugins</groupId>
                <artifactId>maven-surefire--plugin</artifactId>
                <version>2.17</version>
                <configuration>
                    <argLine>${surefire.argLine}</argLine>
                </configuration>
            </plugin>
Uncomment (or re-add) your failure test in AppTest.java.
    @Test

    public void testFail() {

        //System.out.println("testFail");

        log.info("testFail");

        App app = new App();

        assertTrue("app didn't return 0", app.returnOne() == 0);

    }
Execute a Run As Maven test. My selecting the project, right clicking and chosing the right target. You should see the following error in the console.
Running myorg.mypackage.ex1.AppTest
INFO  28-08 23:52:31,809 (AppTest.java:testApp:17)  -testApp
DEBUG 28-08 23:52:31,821 (App.java:returnOne:11)  -Here's One!
INFO  28-08 23:52:31,829 (AppTest.java:testFail:25)  -testFail
DEBUG 28-08 23:52:31,831 (App.java:returnOne:11)  -Here's One!
Tests run: 2, Failures: 1, Errors: 0, Skipped: 0, Time elapsed: 0.409 sec <<< FAILURE!
testFail(myorg.mypackage.ex1.AppTest)  Time elapsed: 0.016 sec  <<< FAILURE!
java.lang.AssertionError: app didn't return 0
    at org.junit.Assert.fail(Assert.java:93)
    at org.junit.Assert.assertTrue(Assert.java:43)
    at myorg.mypackage.ex1.AppTest.testFail(AppTest.java:27)
Click on the hyperlink to one of the lines in the project source code in the failure stack trace. Place a breakpoint at that line by double-clicking on the line number. A blue ball should appear to the left of the numbers.
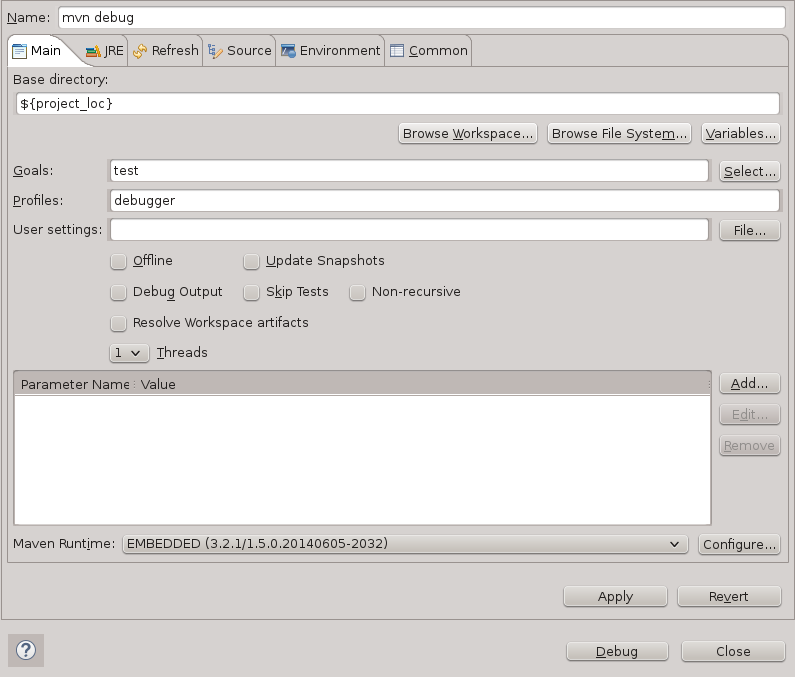
Debug As->Maven build..., change the base directory to a re-usable ${project_loc} variable, assign the "test" goal, and activate the "debugger" profile. Click "Debug" when finished. It will automatically save.
You should see the Maven build start but pause before executing the first JUnit test. Think of this as the "server-side" of the debugger session.
[INFO] --- maven-surefire-plugin:2.17:test (default-test) @ firstSimpleModuleEx ---
[INFO] Surefire report directory: /home/jcstaff/workspaces/ejava-class/ejava-student/javase/firstSimpleModuleEx/target/surefire-reports

-------------------------------------------------------
 T E S T S
-------------------------------------------------------
Listening for transport dt_socket at address: 8000
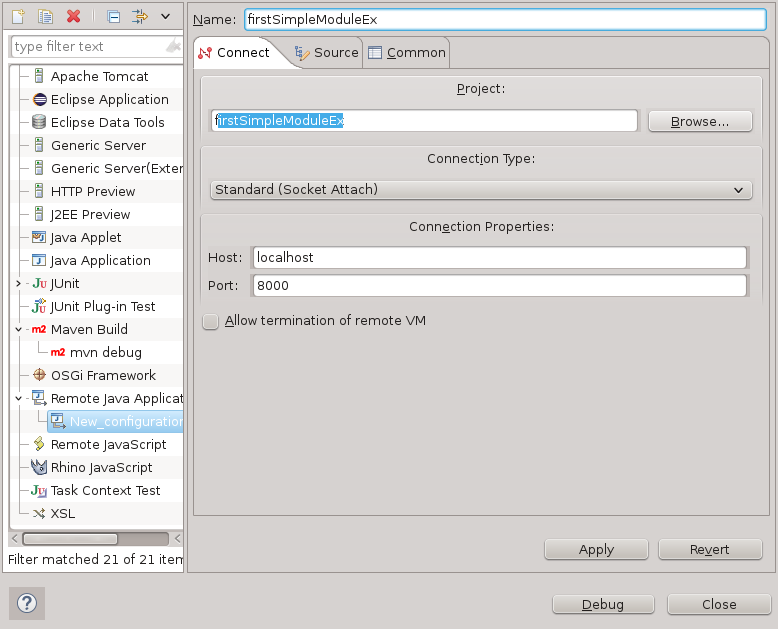
Start the "client-side" of the debugger session by clicking on the bug pulldown at the top of the window. Select debug configurations, double click on Remote Java Application, select your project, and notice the localhost:8000 that came up agrees with your server-side configuration. Press "Debug" when you are ready and answer the prompt to change you view.
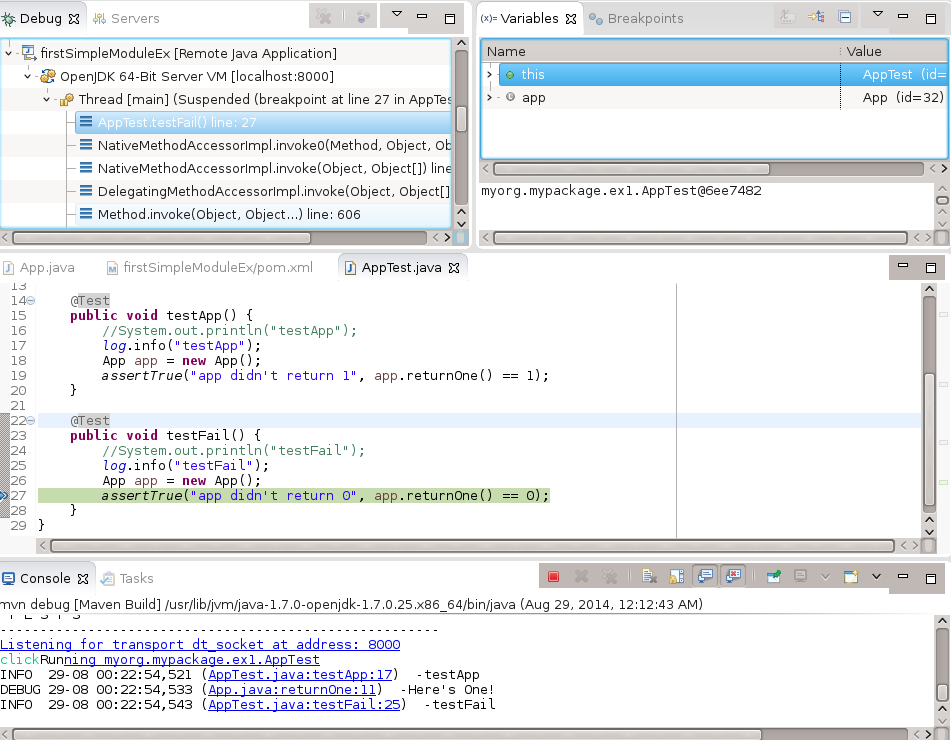
The IDE should switch to a debugger view and be waiting at the line you set the breakpoint on. From here you can look at the state of any variables (we don't have any) and step into the next call.
Once you are done with the debugging session you can click continue (agreen right arrow at top) or detach from the server (red swiggly line at top).
Terminate the debugger session, retun to one of the JavaEE or Java-based views. Select a specific JUnit test, test method, package, or entire application and click Debug As JUnit test.
Note the IDE again switches to the Debug view and is stopped at the breakpoint. You may step into the call, look at the state of any variable, or terminate the program (red square at top of window).
Debug-As Junit Test Is Even Easier
I walked you through the harder debugging session setup that is only necessary when the problem is occurring in code running in a remote JVM. If the code can be executed using "Run-As -> JUnit Test", then simply set a breakpoint and use "Debug-As -> JUnut Test"
In this chapter, you were able to integrate your Maven and Eclipse environments. This allows you to leverage the Maven plugins as your core build system and leverage Eclipse for developing the content.
As mentioned, Eclipse will be the primary demonstration environment in class, but you may use other IDEs, like NetBeans, to match personal preferences. It is my belief that anything Eclipse can do -- the other leading IDEs can do as well. There have been many occasions where students very familiar with an alternate IDE have picked up the Maven aspects and handled the integration with their IDE without issue.
You have now completed this exercise and as a part of it you were able to create a project tree, build/test the project manually, build/test the project using Ant build tool, build/test the project using the Maven build system, and integrate the project with an IDE for faster and more detailed development. We have covered a lot but clearly we have only touched a small amount of what can be done. Luckily one doesn't have to know how to do it all right away in order to be productive.
