Up until now we have kept our focus away from the IDE and onto the filesystem and Maven configurations to give better insight into the structure of a multi-module application and to show how IDE-agnostic the build process is. This will be very important when you check in your modules to be built/tested by a build server (e.g., CruiseControl, Hudson, or Jenkins). However, we want to speed up the process to do actual development. We want to spend as much of our time as possible within a development/test-bench that promotes the efficient development of Java code. The command-line builds will still be leveraged but all those copy/pastes/edits I asked you do would more than likely be created with the use of a Java/JavaEE-knowledgeable IDE. The examples in this section use Eclipse. Any other credible IDE (e.g., NetBeans, IntelliJ) should work in a similar manner and offer comparable functionality.
In this section we want to break the cycle of having to issue a heavyweight Maven build every time we want to run an IT test. We can do this by making JUnit tests "IDE-friendly". What I mean by that is ... allow the IDE environment to derive usable values without relying on system properties being passed in from failsafe. Failsafe won't be involved with running your JUnit tests within the IDE. That means you can either get the usable values thru reasonable defaults or through the use of filtered property files in the classpath. Looking up the JNDI name for a remote EJB provides an excellent example of both techniques.
To derive properties for the InitialContext -- we used filtered property files.
#jndi.properties
java.naming.factory.initial=${java.naming.factory.initial}
java.naming.factory.url.pkgs=${java.naming.factory.url.pkgs}
java.naming.provider.url=${java.naming.provider.url}
#java.naming.security.principal=${jndi.user}
#java.naming.security.credentials=${jndi.password}
That got expanded by our initial Maven build to contain the following. The Maven/Eclipse plugin (m2e) within Eclipse will continue to keep this up to date. It has a plugin the provides understanding of what the maven-resource-plugin would do outside of the IDE and re-creates that functionality within the IDE environment.
#jndi.properties
java.naming.factory.initial=org.wildfly.naming.client.WildFlyInitialContextFactory
java.naming.factory.url.pkgs=
java.naming.provider.url=http-remoting://127.0.0.1:8080
#java.naming.security.principal=known
#java.naming.security.credentials=password1!
There is nothing magical about jndi.properties. We can add more properties to that file (not common) or create other property files (e.g., it.properties) to be filtered and made available to the IT test. However, our other option was to pass in a system property (-DpropertyName=value) using the failsafe configuration.
<plugin>

    <groupId>org.apache.maven.plugins</groupId>

    <artifactId>maven-failsafe-plugin</artifactId>

    <configuration>

        <systemPropertyVariables>

            <jndi.name.reservation>ejb:basicejb-ear/basicejb-ejb/ReservationEJB!org.myorg.basicejb.ejb.ReservationRemote</jndi.name.reservation>

        </systemPropertyVariables>

    </configuration>

</plugin>
Anticipating the system property might not always be available or necessary in 99-100% of the IT tests once we stablized some values, we started processing the system properties by deriving a reasonable default. This can be overriden but when not overriden it will work 99%-100% of the time as well.
private static final String reservationJNDI = System.getProperty("jndi.name.reservation",

    "ejb:basicejb-ear/basicejb-ejb/ReservationEJB!"+ReservationRemote.class.getName());
Let's show this in action by loading our application into the IDE, deploying the EAR and WAR, and executing the IT tests from within Eclipse.
If you have not already done so, import your multi-module project into the IDE. For Eclipse that involves using Right-Click, Import Existing Maven Projects,
Tip
We made several incremental changes to the plugins as we built the end-to-end application. If you initially loaded the project prior to making many of these incremental changes Eclipse could have some issues upgrading the "facet" of a particular module on the fly. That was the case in my environment so I ...
Removed all modules related to this assignment from Eclipse
Deleted all .settings directories and .project and .classpath files from the filesystem
Re-imported the modules fresh and everything cleared with the "facet" JavaEE versions.
Right Click on a Working Group or Select File
Select "Import Existing Maven Projects"
Navigate to the root module
Click OK. Eclipse will show you a list of modules at and under the root module.
Select all modules in the tree. They should now show up in the various explorer tabs
Leverage existing Maven configuration to deploy the EAR and WAR artifacts to the server.
This can be done at the command line command line using techniques you are already familiar with.
$ mvn pre-integration-test
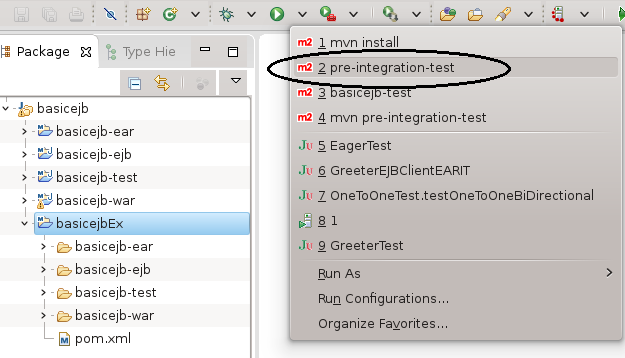
The Eclipse/Maven integration can also provide access to that functionality through a re-usable Maven Build Run Configuration.
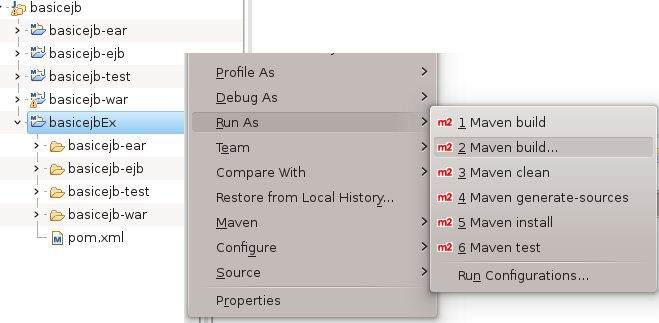
Right Click on the Root Module and select "Run As"
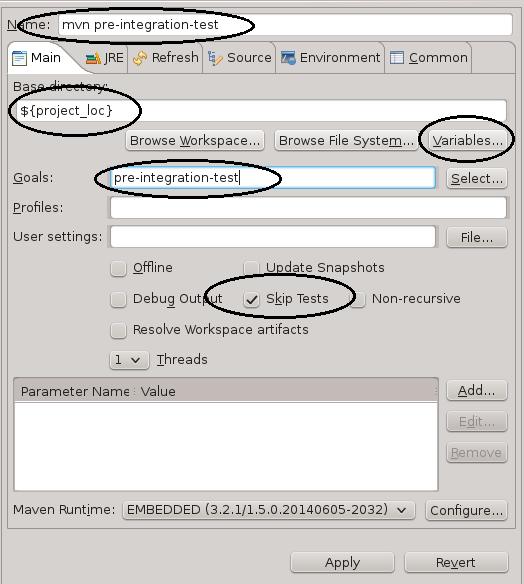
Select "Maven build...". An "Edit Configuration" panel is displayed
Type "mvn pre-integration-test" for Name
Type or select the variable "${project_loc}" for Base directory
Type "pre-integration-test" for Goals
Select "Skip Tests" option
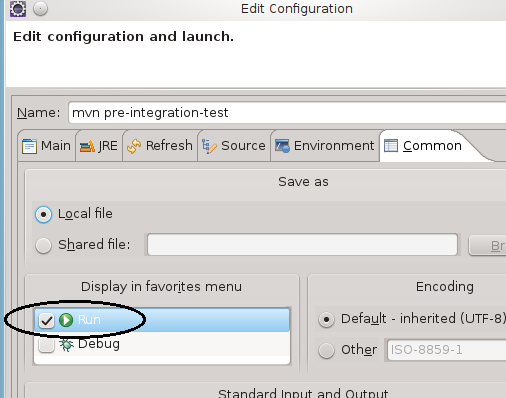
Click on the "Common" tab
Select "Run" in the Display in favorites menu
Click Apply to save the run configuration
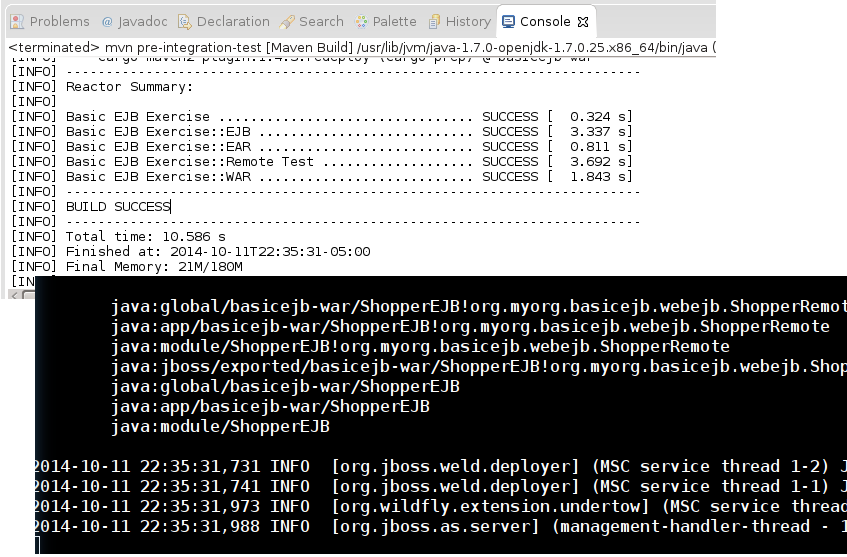
Click Run to have it start and deploy the WAR and EAR to the server. This should provide the same output you experienced previously at the command line. The Maven command output is displayed in an Eclipse Console window and the server output is available in the server console and server.log
Select the root module again
With the root module actively selected, click the down-arrow to the right of the green circle with the white arrow.
Select the "mvn pre-integration-test" build configuration you pinned to this menu by selecting it as a favorite in the "Common" tab
Notice that the EAR and WAR get re-built and re-deployed again. You can use this or the command-line technique at any time to achieve the same goal of deploying the application(s) to the server. If you want to deploy just the EAR or WAR -- select that specific module. However, keep in mind that the build will be constrained to that module and will not pick up changes in upsteam modules that have not installed those changes into the local repository.
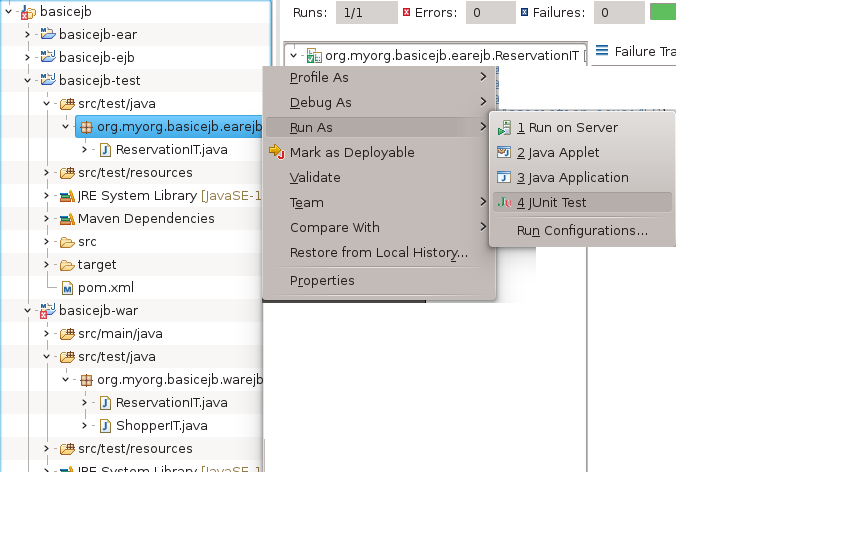
Run the IT tests by selecting either the module, folder, or package with the IT tests or the specific IT test or specific test method and right-click, Run As, JUnit test.
You should see the IT test run, the IT test communicate with the EJB on the server, and see activity in the server.log.
Make a change to the ReservationIT to invoke ping() several times in a row in a for-loop.
@Test

public void testPing() throws NamingException {

    logger.info("*** testPing ***");

    for (int i=0; i<10; i++) {

        reservationist.ping();

    }

}
Rerun the ReservationIT#testPing() @Test method once your changes are complete. Notice you get multiple sets of debug on the server.
2014-10-11 23:42:19,474 DEBUG [org.myorg.basicejb.ejb.ReservationEJB] (EJB default - 8) *** ReservationEJB.init() ***
2014-10-11 23:42:19,475 DEBUG [org.myorg.basicejb.ejb.ReservationEJB] (EJB default - 8) ping called
2014-10-11 23:42:19,475 DEBUG [org.myorg.basicejb.ejb.ReservationEJB] (EJB default - 8) *** ReservationEJB.destroy() ***
2014-10-11 23:42:19,521 DEBUG [org.myorg.basicejb.ejb.ReservationEJB] (EJB default - 7) *** ReservationEJB.init() ***
2014-10-11 23:42:19,522 DEBUG [org.myorg.basicejb.ejb.ReservationEJB] (EJB default - 7) ping called
2014-10-11 23:42:19,522 DEBUG [org.myorg.basicejb.ejb.ReservationEJB] (EJB default - 7) *** ReservationEJB.destroy() ***
...
Set a breakpoint inside the for-loop where the method calls reservationist.ping() and chose Debug As this time.
Keep clicking the green, right-facing arrow at the top or the yellow step over/into arrows to move forward. Notice that you have access to the state variables of the IT test while you move forward with the test.
Getting to the point where you can run and debug the IT test within the IDE is a significant amount of the work involved with being able to debug the code on the server-side. At this point you have that code surrounded and now all you have to do is peek inside. Lets look at how this is done with a remote server first.
Start the server with the debug option
wildfly-13.0.0.Final$ ./bin/standalone.sh -c standalone.xml --debug 8787
...
=========================================================================

Listening for transport dt_socket at address: 8787
18:23:37,054 INFO  [org.jboss.modules] (main) JBoss Modules version 1.8.5.Final
Note
The server to run normally until connected to a debugger client and a breakpoint is hit. Until then there is no noticeable impact so you can leave this setting active on your development server instance all the time.
Attach a debugger client to the server using the following...
Select the RMI Test module to make it the active project within Eclipse.
Click on the arrow to the right of the green bug icon on the top menu bar and select Debug Configurations...
Create a new "Remote Java Application"
Change the Port to 8787 to match your JBoss configuration.
Select the Source tab, click Add..., select Java Project and press Add. A selection box of Eclipse projects is displayed for your to select from.
Select all modules that are a part of this application and press OK to continue.
Click Debug to start the debugging session. Nothing exiting will occur until we set and cause a breakpoint to be hit.
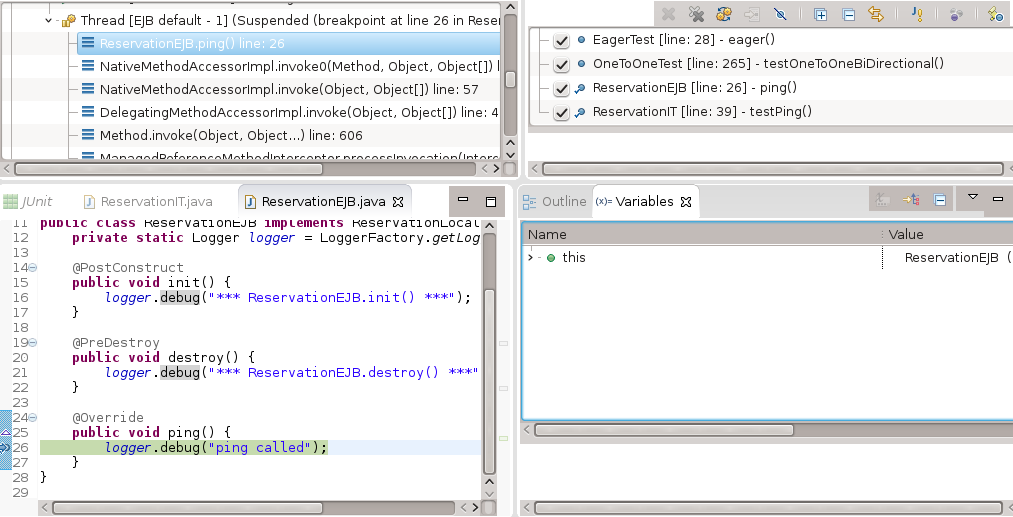
Create a breakpoint in the ReservationEJB ping() call and re-run the IT test in either Run As or Debug As mode. Your selection there only pertains to the IT test and not what you do on the client. Notice you are now stopped on the server-side.
Click the red bent line icon on the top menu bar to detach from the server and release control of the execution.
In the previous section we showed how the stand-alone server required some setup but was very easy to establish a debugging session once much of the one-time setup was complete. In this method we are going to show how that setup can get even easier if you are willing and able to run the application server in the same JVM as the IDE.
Shutdown the standalone server instance.
Activate the JavaEE profile, select the server you setup in the environment setup instructions, right click, and select Debug. The server should start as usual.
The server will restart and likely still have the EAR and WAR deployed from the previous section. Ignore that they are already deployed and re-deploy using the "mvn pre-integration-test" Build Configuration you created earlier. Be sure to have the appropriate module selected prior to executing this Build Configuration so that ${project.loc} can get assigned a project.
Select the ReservationIT and execute it using Debug As. It matters what you select this time because both the client IT test and server will be part of the same debugging session.
You should be soon looking at a breakpoint in ReservationIT.ping(). Select continue in order to hit the breakpoint on the server-side. If you get a prompt asking for the path to the source for the EJB register the java projects as you did in the section prior to this.
Note
I have found that I always have to restart the test for the new source paths to take effect.
At this point you are in a similar state as with the stand-alone server. However, if you click the red box icon for stop, you will kill both the IT test and the server. In the standalone server environment the kill only stops the IT test.
- Running IT tests within IDE
Much faster code, compile, test development cycle
Enables debugging
- Standalone server
More complex but not complicated
Consistent with debugging true remote server
Some independence between remote and local code
Embedded Server
Easy to setup
Requires server to be local
Local and remote code accessed seemlessly
