The following three areas (Config, Logging, and Testing) map out the different portions of "Assignment 1". It is broken up to provide some focus.
-
Each of the areas (1a Config, 1b Logging, and 1c Testing) are separate but are to be turned in together, under a single root project tree. There is no relationship between the classes used in the three areas — even if they have the same name. Treat them as separate.
-
Each of the areas are further broken down into parts. The parts of the Config area are separate. Treat them that way by working in separate module trees (under a common grandparent). The individual parts for Logging and Testing overlap. Once you have a set of classes in place — you build from that point. They should be worked/turned in as a single module each (one for Logging and one for Testing; under the same parent as Config).
A set of starter projects is available in assignment-starter/homesales-starters.
It is expected that you can implement the complete assignment on your own.
However, the Maven poms and the portions unrelated to the assignment focus are commonly provided for reference to keep the focus on each assignment part.
Your submission should not be a direct edit/hand-in of the starters.
Your submission should — at a minimum:
-
use you own Maven groupIds
-
use your own Java package names
-
extend either
spring-boot-starter-parentorejava-build-parent
Your assignment submission should be a single-rooted source tree with sub-modules or sub-module trees for each independent area part. The assignment starters — again can be your guide for mapping these out.
|-- assignment1-homesales-autoconfig
|   |-- pom.xml
|   |-- sales-autoconfig-app
|   |-- sales-autoconfig-autosales
|   `-- sales-autoconfig-starter
|-- assignment1-homesales-beanfactory
|   |-- pom.xml
|   |-- sales-beanfactory-app
|   |-- sales-beanfactory-homesales
|   `-- sales-beanfactory-iface
|-- assignment1-homesales-configprops
|   |-- pom.xml
|   `-- src
|-- assignment1-homesales-logging
|   |-- pom.xml
|   `-- src
|-- assignment1-homesales-propertysource
|   |-- pom.xml
|   `-- src
|-- assignment1-homesales-testing
|   |-- pom.xml
|   `-- src
`-- pom.xml
1. Assignment 1a: App Config
-
2022-09-14: Removed reference to SalesDTO.id. Only name is needed
-
2022-09-14: Corrected expected printed output for configuration sources (added application- prefix)
-
2022-09-19: Corrected some sales.preference property callouts
-
2022-09-26: Corrected typo in autoconfig example output and added line spacing between command and output
1.1. @Bean Factory Configuration
1.1.1. Purpose
In this portion of the assignment, you will demonstrate your knowledge of configuring a decoupled application integrated using Spring Boot. You will:
-
implement a service interface and implementation component
-
package a service within a Maven module separate from the application module
-
implement a Maven module dependency to make the component class available to the application module
-
use a @Bean factory method of a @Configuration class to instantiate a Spring-managed component
1.1.2. Overview
In this portion of the assignment you will be implementing a component class and defining that as a Spring bean using a @Bean factory located within the core application JAR.
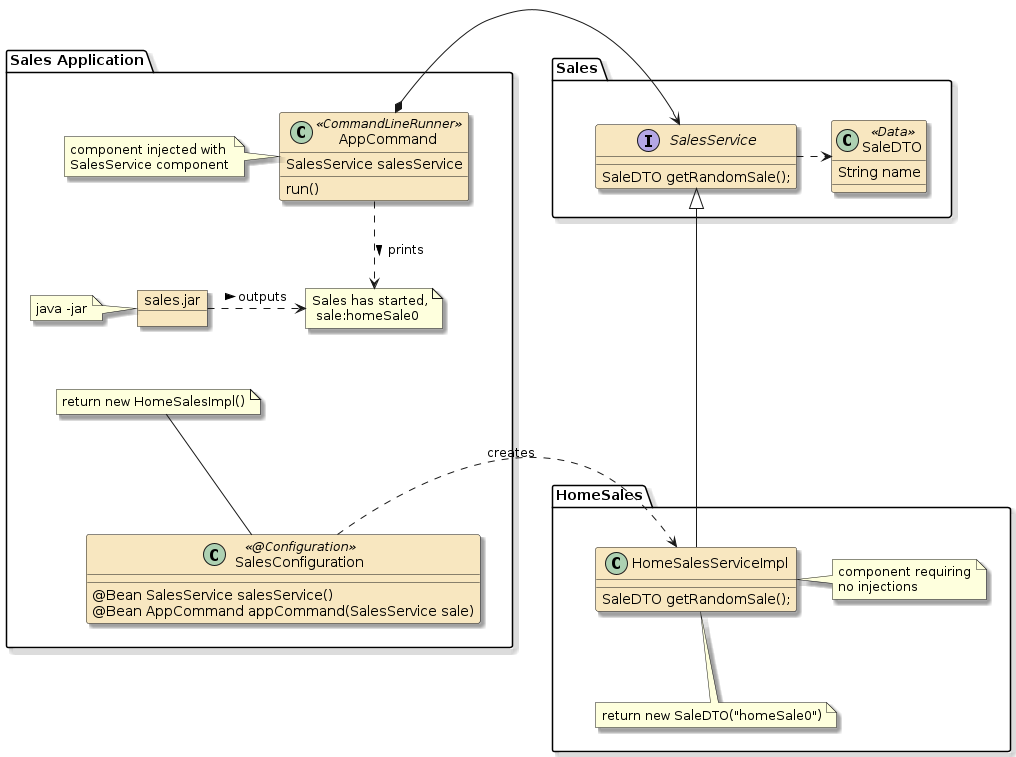
1.1.3. Requirements
-
Create an interface module with
-
a
SaleDTOclass withnameproperty. This is a simple data class. -
a
SalesServiceinterface with agetRandomSale()method. This method returns a singleSaleDTOinstances.
-
-
Create a HomeSale implementation module with
-
a HomeSale implementation of the
SalesServiceinterface that returns aSaleDTOname with "homeSale" within it (e.g., "homeSale0").
-
-
Create an application module with
-
a class that
-
implements
CommandLineRunnerinterface -
has the
SalesServicecomponent injected using constructor injection -
a
run()method that-
calls the
SalesServicefor a random HomeSaleDTO -
prints a startup message with the DTO name
-
relies on a
@Beanfactory to register it with the container and not a@Componentmechanism
-
-
-
a
@Configurationclass with two@Beanfactory methods-
one
@Beanfactory method to instantiate aSalesServicehomeSale implementation -
one
@Beanfactory method to instantiate theAppCommandinjected with aSalesServicebean (not a POJO)@Beanfactories that require external beans, can have the dependencies injected by declaring them in their method signature. Example:TypeB factoryB(TypeA beanA) {return new TypeB(beanA); }That way the you can be assured that the dependency is a fully initialized bean versus a partially initialized POJO.
-
-
a
@SpringBootApplicationclass that initializes the Spring Context — which will process the@Configurationclass
-
-
Turn in a source tree with three or more complete Maven modules that will build and demonstrate a configured Spring Boot application.
1.1.4. Grading
Your solution will be evaluated on:
-
implement a service interface and implementation component
-
whether an interface module was created to contain interface and data dependencies of that interface
-
whether an implementation module was created to contain a class implementation of the interface
-
-
package a service within a Maven module separate from the application module
-
whether an application module was created to house a
@SpringBootApplicationand@Configurationset of classes
-
-
implement a Maven module dependency to make the component class available to the application module
-
whether at least three separate Maven modules were created with a one-way dependency between them
-
-
use a @Bean factory method of a @Configuration class to instantiate Spring-managed components
-
whether the
@Configurationclass successfully instantiates theSalesServicecomponent -
whether the
@Configurationclass successfully instantiates the startup message component injected with aSalesServicecomponent.
-
1.1.5. Additional Details
-
The
spring-boot-maven-plugincan be used to both build the Spring Boot executable JAR and execute the JAR to demonstrate the instantiations, injections, and desired application output. -
A quick start project is available in
assignment-starter/homesales-starters/assignment1-homesales-beanfactory. Modify Maven groupId and Java package if used.
1.2. Property Source Configuration
1.2.1. Purpose
In this portion of the assignment, you will demonstrate your knowledge of how to flexibly supply application properties based on application, location, and profile options. You will:
-
implement value injection into a Spring Component
-
define a default value for the injection
-
specify property files from different locations
-
specify a property file for a basename
-
specify properties based on an active profile
-
specify a both straight properties and YAML property file sources
1.2.2. Overview
You are given a Java application that prints out information based on injected properties, defaults, a base property file, and executed using different named profiles. You are to supply several profile-specific property files that — when processed together — produce the required output.
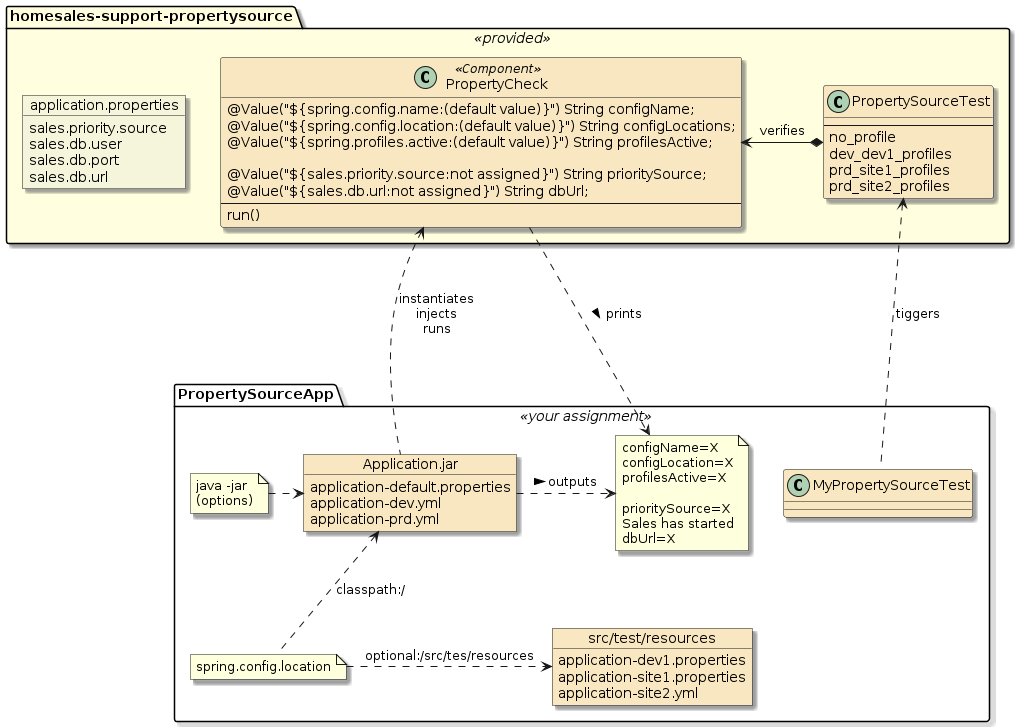
This assignment involves very little - to no new Java coding (the "assignment starter" has all you need). It is designed as a puzzle where — given some constant surroundings — you need to determine what properties to supply and in which file to supply them, to satisfy all listed test scenarios.
The assignment is structured into two modules: app and support
-
app - is your assignment. The skeletal structure is provided in
homesales-starter/assignment2-homesales-propertysource -
support - is provided is provided in the
homesales-starter/homesales-support-propertysourcemodule and is to be used, unmodified through a Maven dependency. It contains a defaultapplication.propertiesfile with skeletal values, a component that gets injected with property values, and a unit integration test that verifies the program results.
The homesales-support-propertysource module provides the following resources.
- PropertyCheck Class
-
This class has property injections defined with default values when they are not supplied. This class will be in your classpath and automatically packaged within your JAR.
public class PropertyCheck implements CommandLineRunner { @Value("${spring.config.name:(default value)}") String configName; @Value("${spring.config.location:(default value)}") String configLocations; @Value("${spring.profiles.active:(default value)}") String profilesActive; @Value("${sales.priority.source:not assigned}") String prioritySource; @Value("${sales.db.url:not assigned}") String dbUrl; - application.properties File
-
This file provides a template of a database URL with placeholders that will get populated from other property sources. This file will be in your classpath and automatically packaged within your JAR.
#application.properties
sales.priority.source=application.properties
sales.db.user=user
sales.db.port=00000
(1)
sales.db.url=mongodb://${sales.db.user}:${sales.db.password}@${sales.db.host}:${sales.db.port}/test?authSource=admin
1 sales.db.urlis built from several property placeholders.passwordis not specified. - PropertySourceTest Class
-
a unit integration test is provided that can verify the results of your property file population. This test will run automatically during the Maven build.
public class PropertySourceTest {
    static final String CONFIG_LOCATION="classpath:/,optional:file:src/test/resources/";
    class no_profile {
        @Test
        void has_expected_sources() throws Exception {
        @Test
        void has_generic_files_in_classpath() {
        @Test
        void has_no_credential_files_in_classpath() {
    class dev_dev1_profiles {
        @Test
        void has_expected_sources() throws Exception {
    class prd_site1_profiles {
        @Test
        void has_expected_sources() throws Exception {
    class prd_site2_profiles {
        @Test
        void has_expected_sources() throws Exception {
1.2.3. Requirements
| The starter module has much of the setup already defined. |
-
Create a dependency on the support module. (provided in starter)
<dependency> <groupId>info.ejava.assignments.propertysource.homesales</groupId> <artifactId>homesales-support-propertysource</artifactId> <version>${ejava.version}</version> </dependency> -
Add a @SpringBootApplication class with main() (provided in starter)
package info.ejava_student.starter.assignment1.propertysource.sales; import info.ejava.assignments.propertysource.sales.PropertyCheck; @SpringBootApplication public class PropertySourceApp { -
Provide the following property file sources. (provided in starter)
application.propertieswill be provided through the dependency on the support module and will get included in the JAR.src/main/resources:/ (1) application-default.properties application-dev.yml (3) application-prd.properties src/test/resources/ (2) application-dev1.properties application-site1.properties application-site2.yml (3)1 src/main/resourcesfiles will get packaged into JAR and will automatically be in the classpath at runtime2 src/test/resources are not packaged into the JAR and will be referenced by a command-line parameter to add them to the classpath 3 example uses of YAML files yml files must be expressed as a YAML fileapplication-dev.yml and application-site2.yml must be expressed using YAML syntax -
Enable the unit integration test from the starter when you are ready to test — by removing
@Disabled.package info.ejava_student.starter.assignment1.propertysource.sales; import info.ejava.assignments.propertysource.sales.PropertySourceTest; ... //we will cover testing in a future topic, very soon @Disabled //enable when ready to start assignment public class MyPropertySourceTest extends PropertySourceTest { -
Use a constant base command. This part of the command remains constant.
$ java -jar target/*-propertysource-1.0-SNAPSHOT-bootexec.jar --spring.config.location=classpath:/,optional:file:src/test/resources/ (1)1 this is the base command for 4 specific commands that specify profiles active The only modification to the command line will be the conditional addition of a profile activation.
--spring.profiles.active= (1)1 the following 4 commands will supply a different value for this property -
Populate the property and YAML files so that the scenarios in the following paragraph are satisfied. The default starter with the "base command" and "no active profile" set, produces the following by default.
$ java -jar target/*-propertysource-1.0-SNAPSHOT-bootexec.jar --spring.config.location=classpath:/,optional:file:src/test/resources/

configName=(default value)
configLocation=classpath:/,optional:file:src/test/resources/
profilesActive=(default value)
prioritySource=application-default.properties
Sales has started
dbUrl=mongodb://user:NOT_SUPPLIED@NOT_SUPPLIED:00000/test?authSource=admin
Any property value that does not contain a developer/site-specific value (e.g., defaultUser and defaultPass) must be provided by a property file packaged into the JAR (i.e., source src/main/resources)Any property value that does contain a developer/site-specific value (e.g., dev1pass and site1Pass) must be provided by a property file in the file:part of the location path and not in the JAR (i.e., sourcesrc/test/resources).Complete the following 4 scenarios:
-
No Active Profile Command Result
configName=(default value)
configLocation=classpath:/,optional:file:src/test/resources/
profilesActive=(default value)
prioritySource=application-default.properties
Sales has started
dbUrl=mongodb://defaultUser:defaultPass@defaulthost:27027/test?authSource=admin
You must supply a populated set of configuration files so that, under this option, user:NOT_SUPPLIED@NOT_SUPPLIED:00000becomesdefaultUser:defaultPass@defaulthost:27027. -
dev,dev1 Active Profile Command Result
--spring.profiles.active=dev,dev1configName=(default value) configLocation=classpath:/,optional:file:src/test/resources/ profilesActive=dev,dev1 prioritySource=application-dev1.properties Sales has started dbUrl=mongodb://devUser:dev1pass@127.0.0.1:17027/test?authSource=admin -
prd,site1 Active Profile Command Result
--spring.profiles.active=prd,site1configName=(default value) configLocation=classpath:/,optional:file:src/test/resources/ profilesActive=prd,site1 prioritySource=application-site1.properties Sales has started dbUrl=mongodb://prdUser:site1pass@db.site1.net:27017/test?authSource=admin -
prd,site2 Active Profile Command Result
--spring.profiles.active=prd,site2configName=(default value) configLocation=classpath:/,optional:file:src/test/resources/ profilesActive=prd,site2 prioritySource=application-site2.properties Sales has started dbUrl=mongodb://prdUser:site2pass@db.site2.net:27017/test?authSource=admin
-
-
Turn in a source tree with a complete Maven module that will build and demonstrate the
@Valueinjections for the 4 different active profile settings.
1.2.4. Grading
Your solution will be evaluated on:
-
implement value injection into a Spring Component
-
whether
@Componentattributes were injected with values from property sources
-
-
define a default value for the injection
-
whether default values were correctly accepted or overridden
-
-
specify property files from different locations
-
whether your solution provides property values coming from multiple file locations
-
any property value that does not contain a developer/site-specific value (e.g.,
defaultUseranddefaultPass) must be provided by a property file within the JAR -
any property value that contains developer/site-specific values (e.g.,
dev1passandsite1pass) must be provided by a property file outside of the JAR
-
-
the given
application.propertiesfile may not be modified -
named
.propertiesfiles are supplied as properties files -
named
.yml(i.e.,application-dev.yml) files are supplied as YAML files
-
-
specify properties based on an active profile
-
whether your output reflects current values for
dev1,site1, and`site2profiles
-
-
specify both straight properties and YAML property file sources
-
whether your solution correctly supplies values for at least 1 properties file
-
whether your solution correctly supplies values for at least 1 YAML file
-
1.2.5. Additional Details
-
The
spring-boot-maven-plugincan be used to both build the Spring Boot executable JAR and demonstrate the instantiations, injections, and desired application output. -
A quick start project is available in
assignment-starter/homesales-starter/assignment1-homesales-propertysourcethat supplies much of the boilerplate file and Maven setup. Modify Maven groupId and Java package if used. -
An integration unit test (
PropertySourceTest) is provided within the support module that can automate the verifications. -
Ungraded Question to Ponder: How could you at runtime, provide a parameter option to the application to make the following output appear?
Alternate OutputconfigName=homesales configLocation=(default value) profilesActive=(default value) prioritySource=not assigned Race Registration has started dbUrl=not assigned
1.3. Configuration Properties
1.3.1. Purpose
In this portion of the assignment, you will demonstrate your knowledge of injecting properties into a @ConfigurationProperties class to be injected into components - to encapsulate the runtime configuration of the component(s).
You will:
-
map a Java @ConfigurationProperties class to a group of properties
-
create a read-only @ConfigurationProperties class using @ConstructorBinding
-
define a Jakarta EE Java validation rule for a property and have the property validated at runtime
-
generate boilerplate JavaBean methods using Lombok library
-
map nested properties to a @ConfigurationProperties class
-
reuse a @ConfigurationProperties class to map multiple property trees of the same structure
-
use @Qualifier annotation and other techniques to map or disambiguate an injection
1.3.2. Overview
In this assignment, you are going to finish mapping a YAML file of properties to a set of Java classes and have them injected as @ConfigurationProperty beans.
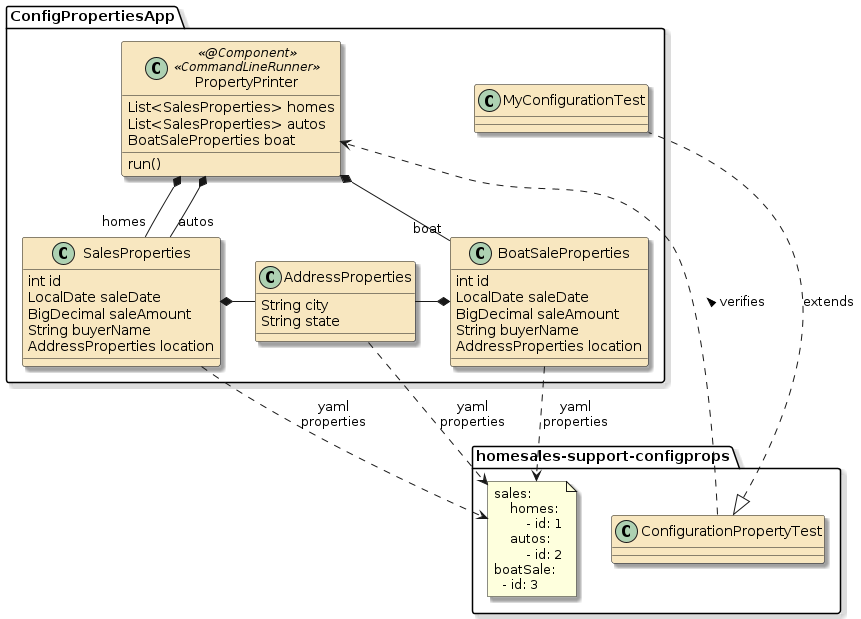
BoatSaleProperties is a straight-forward, single use bean that can have the class directly mapped to a specific property prefix.
SalesProperties will be mapped to two separate prefixes — so the mapping cannot be applied directly to that class.
Keep this in mind when wiring up your solution.
An integration unit test is supplied and can be activated when you are ready to test your progress.
1.3.3. Requirements
-
Given the following read-only property classes, application.yml file, and
@Component…-
read-only property classes
@ConstructorBinding
@Value
public class SalesProperties {
    private int id;
    private LocalDate saleDate;
    private BigDecimal saleAmount;
    private String buyerName;
    private AddressProperties location;
}
@ConstructorBinding @Value public class BoatSaleProperties { private int id; private LocalDate saleDate; private BigDecimal saleAmount; private String buyerName; private AddressProperties location; }@ConstructorBinding @Value public class AddressProperties { private final String city; private final String state; }Lombok @Valueannotation defines the class to be read-only by only declaring getter()s and no setter()s. This will require use of constructor binding.The property classes are supplied in the starter module.
-
application.ymlYAML filesales: homes: - id: 1 saleDate: 2010-07-01 (6) saleAmount: 100.00 (1) buyerName: Joe Camper location: city: Jonestown state: PA #... autos: - id: 2 sale-date: 2000-01-01 sale-amount: 1000 (2) buyer_name: Itis Clunker (3) location: city: Dundalk state: MD boatSale: id: 3 SALE_DATE: 2022-08-01 (4) SALE_AMOUNT: 200_000 BUYER-NAME: Alexus Blabidy (5) LOCATION: city: Annapolis state: MD1 lower camelCase 2 lower kabob-case 3 lower snake_case 4 upper SNAKE-CASE 5 upper KABOB-CASE 6 LocalDate parsing will need to be addressed The full contents of the YAML file can be found in the
homesales-support/homesales-support-configpropssupport project. YAML was used here because it is easier to express and read the nested properties.Notice that multiple text cases (upper, lower, snake, kabob) are used to map the the same Java properties. This demonstrates one of the benefits in using
@ConfigurationPropertiesover@Valueinjection — configuration files can be expressed in syntax that may be closer to the external domain.Note that the
LocalDatewill require additional work to parse. That is provided to you in the starter project and described later in this assignment. -
@Componentwith constructor injection and getters to inspect what was injected//@Component @Getter @RequiredArgsConstructor public class PropertyPrinter implements CommandLineRunner { private final List<SalesProperties> homes; private final List<SalesProperties> autos; private final BoatSaleProperties boat; @Override public void run(String... args) throws Exception { System.out.println("homes:" + format(homes)); System.out.println("autos:" + format(autos)); System.out.println("boat:" + format(null==boat ? null : List.of(boat))); } private String format(List<?> sales) { return null==sales ? "(null)" : String.format("%s", sales.stream() .map(r->"*" + r.toString()) .collect(Collectors.joining(System.lineSeparator(), System.lineSeparator(), ""))); } }The source for the
PropertyPrintercomponent is supplied in the starter module. Except for getting it registered as a component, there should be nothing needing change here.
-
-
When running the application, a
@ConfigurationPropertiesbeans will be created to represent the contents of the YAML file as two separateList<SalesProperties>objects and a BoatSaleProperties object. When properly configured, they will be injected into the@Component, and and it will output the following.homes: *SalesProperties(id=1, saleDate=2010-07-01, saleAmount=100.0, buyerName=Joe Camper, location=AddressProperties(city=Jonestown, state=PA)) *SalesProperties(id=4, saleDate=2021-05-01, saleAmount=500000, buyerName=Jill Suburb, location=AddressProperties(city=, state=MD)) (1) *SalesProperties(id=5, saleDate=2021-07-01, saleAmount=1000000, buyerName=M.R. Bigshot, location=AddressProperties(city=Rockville, state=MD)) autos: *SalesProperties(id=2, saleDate=2000-01-01, saleAmount=1000, buyerName=Itis Clunker, location=AddressProperties(city=Dundalk, state=MD)) boat: *BoatSaleProperties(id=3, saleDate=2022-08-01, saleAmount=200000, buyerName=Alexus Blabidy, location=AddressProperties(city=Annapolis, state=MD))1 one of the homeSales addresses is missing a city The "assignment starter" supplies most of the Java code needed for the PropertyPrinter. -
Configure your solution so that the
BoatSalePropertiesbean is injected into thePropertyPrintercomponent along with the List of home and autoSalesProperties. There is a skeletal configuration supplied in the application class. Most of your work will be within this class.@SpringBootApplication public class ConfigPropertiesApp { public static void main(String[] args) public List<SalesProperties> homes() { return new ArrayList<>(); } public List<SalesProperties> autos() { return new ArrayList<>(); } } -
Turn in a source tree with a complete Maven module that will build and demonstrate the configuration property processing and output of this application.
1.3.4. Grading
Your solution will be evaluated on:
-
map a Java @ConfigurationProperties class to a group of properties
-
whether Java classes were used to map values from the given YAML file
-
-
create a read-only @ConfigurationProperties class using @ConstructorBinding
-
whether read-only Java classes, using
@ConstructorBindingwere used to map values from the given YAML file
-
-
generate boilerplate JavaBean methods using Lombok library
-
whether lombok annotations were used to generate boilerplate Java bean code
-
-
map nested properties to a @ConfigurationProperties class
-
whether nested Java classes were used to map nested properties from a given YAML file
-
-
reuse a @ConfigurationProperties class to map multiple property trees of the same structure
-
whether multiple property trees were instantiated using the same Java classes
-
-
use @Qualifier annotation and other techniques to map or disambiguate an injection
-
whether multiple
@ConfigurationPropertybeans of the same type could be injected into a@Componentusing a disambiguating technique.
-
1.3.5. Additional Details
-
A starter project is available in
homesales-starter/assignment1-homesales-configprops. Modify Maven groupId and Java package if used. -
I included an additional, general purpose
LocalDateConverter@Componentin the starter with the property classes. This is a necessary option to successfully parse the date expressed in the YAML file and have it injected as aLocalDatein the@ConfigurationPropertiesclass.YAML Text Sourcesales: homes: - id: 1 saleDate: 2010-07-01Text to LocalDate Converterimport org.springframework.boot.context.properties.ConfigurationPropertiesBinding; import org.springframework.core.convert.converter.Converter; ... @Component @ConfigurationPropertiesBinding public class LocalDateConverter implements Converter<String, LocalDate> { @Override public LocalDate convert(String source) { return null==source ? null : LocalDate.parse(source); } }Java LocalDate Injectionpublic class BoatSaleProperties { private int id; private LocalDate saleDate;Without the converter, we would get the following type of error.
Text Conversion Error without ConverterFailed to bind properties under 'sales.homes[0].sale-date' to java.time.LocalDate: ... DateTimeParseException: Text '2010-07-01' could not be parsed at index 4) -
The
spring-boot-maven-plugincan be used to both build the Spring Boot executable JAR and demonstrate the instantiations, injections, and desired application output. -
The support project contains an integration unit test that verifies the
PropertyPrintercomponent was defined and injected with the expected data. It is activated through a Java class in the starter module. Activate it when you are ready to test.//we will cover testing in a future topic, very soon @Disabled //remove to activate when ready to test public class MyConfigurationTest extends ConfigurationPropertyTest { } -
Ungraded Question to Ponder: What change(s) could be made to the application to validate the properties and report the following error?
Alternate OutputBinding validation errors on sales.homes[1].location ... codes [sales.homes[1].location.city,city]; arguments []; default message [city]]; default message [must not be blank]
1.4. Auto-Configuration
1.4.1. Purpose
In this portion of the assignment, you will demonstrate your knowledge of developing @Configuration classes used for Auto-Configuration of an application.
You will:
-
Create a
@Configurationclass or@Beanfactory method to be registered based on the result of a condition at startup -
Create a Spring Boot Auto-configuration module to use as a "Starter"
-
Bootstrap Auto-configuration classes into applications using a
spring.factoriesmetadata file -
Create a conditional component based on the presence of a property value
-
Create a conditional component based on a missing component
-
Create a conditional component based on the presence of a class
-
Define a processing dependency order for Auto-configuration classes
1.4.2. Overview
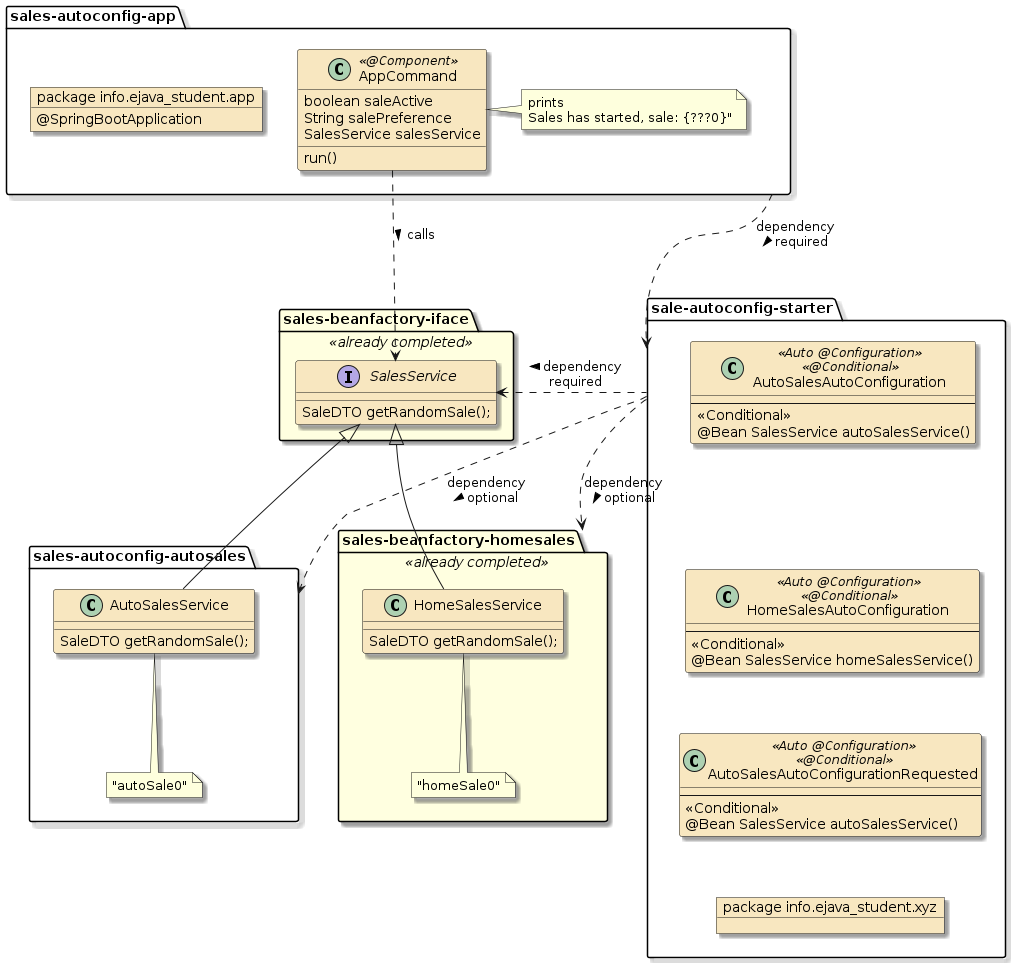
In this assignment, you will be building a starter module, with a prioritized list of Auto-Configuration classes that will bootstrap an application depending on runtime environment.
This application will have one (1) type of SalesService out of a choice of two (2) based on the environment at runtime.
|
Make the @SpringBootApplication class package independent of @Configuration class packages
The Java package for the @SpringBootApplication class must not be a parent or at the same Java package as the @Configuration classes.
Doing so, would place the @Configuration classes in the default component scan path and make them part of the core application — versus a conditional extension of the application.
|
1.4.3. Requirements
| You have already implemented the SalesService interface and HomeSales implementation modules in your Bean Factory solution. You will reuse them through a Maven dependency. AutoSales implementation is a copy of HomeSales implementation with name changes. |
-
Create a SalesService interface module (already completed for beanfactory)
-
Add an interface to return a random sale as a
SaleDTOinstance
-
-
Create a HomeSales implementation implementation module (already completed for beanfactory)
-
Add an implementation of the interface to return a SaleDTO with "home" in the name property.
-
-
Create a AutoSales implementation implementation module (new)
-
Add an implementation of the interface to return a SaleDTO with "auto" in the name property.
-
-
Create an Application Module with a
@SpringBootApplicationclass-
Add a
CommandLineRunnerimplementation class that gets injected with aSalesServicebean and prints "Sales has started" with the name of sale coming from the injected bean.-
Account for a null implementation injected when there is no implementation such that it still quietly prints the state of the component.
-
Include an injection (by any means) for properties
sales.activeandsales.preferenceto print their values
-
-
Add a
@Beanfactory for theCommandLineRunnerimplementation class — registered as "appCommand".-
Make the injection of the SalesService optional to account for when there is no implementation
@Autowired(required=false)
-
-
Do not place any direct Maven dependencies from the Application Module to the SaleService implementation modules.
At this point you are have mostly repeated the bean factory solution except that you have eliminated the @Beanfactory for theSalesServicein the Application module, added a AutoSale implementation option, and removed a few Maven module dependencies.
-
-
Create a Sale starter Module
-
Add a dependency on the SalesService interface module
-
Add a dependency on the SalesService implementation modules and make them "optional" (this is important) so that the application module will need to make an explicit dependency on the implementation for them to be on the runtime classpath.
-
Add conditional three
@Configurationclasses-
one that provides a
@Beanfactory for the AutoSalesService implementation class-
Make this conditional on the presence of the AutoSale class(es) being available on the classpath
-
-
one that provides a
@Beanfactory for the HomeSalesService implementation class-
Make this conditional on the presence of the HomeSale class(es) being available on the classpath
-
-
A third that provides a another
@Beanfactory for the AutoSale implementation class-
Make this conditional on the presence of the AutoSale class(es) being available on the classpath
-
Make this also conditional on the property
sales.preferencehaving the value ofautos.
-
-
-
Set the following priorities for the
@Configurationclasses-
make the AutoSale/property
@Configurationthe highest priority -
make the HomeSale
@Configurationfactory the next highest priority -
make the AutoSale
@Configurationfactory the lowest priorityYou can use org.springframework.boot.autoconfigure.AutoConfigureOrderto set a relative order — with the lower value having a higher priority.
-
-
Disable all SalesService implementation
@Beanfactories if the propertysales.activeis present and has the valuefalseTreat falseas being not the valuetrue. Spring Boot does not offer a disable condition, so you will be looking to enable when the property istrueor missing. -
Perform necessary registration steps within the Starter module to make the
@Configurationclasses visible to the application bootstrapping.If you don’t know how to register an Auto- @Configurationclass and bypass this step, your solution will not work.Spring Boot only prioritizes explicitly registered @Configurationclasses and not nested classes@Configurationclasses within them.
-
-
Augment the Application module pom to address dependencies
-
Add a dependency on the Starter Module
-
Create a profile (
homes) that adds a direct dependency on the HomeSales implementation module. The "assignment starter" provides an example of this. -
Create a profile (
autos) that adds a direct dependency on the AutoSales implementation module.
-
-
Verify your solution will determine its results based on the available classes and properties at runtime. Your solution must have the following behavior
-
no Maven profiles active and no properties provided
$ mvn dependency:list -f *-autoconfig-app | egrep 'ejava-student.*module'
(starter module)
(interface module)
(1)

$ mvn clean package
$ java -jar *-autoconfig-app/target/*-autoconfig-app-*-bootexec.jar

sales.active=(not supplied)
sales.preference=(not supplied)
Sales is not active (2)
1 no SalesService implementation jars in dependency classpath 2 no implementation was injected because none in the classpath -
homesonly Maven profile active and no properties provided$ mvn dependency:list -f *-autoconfig-app -P homes | egrep 'ejava-student.*module' (starter module) (interface module) (HomeSales implementation module) (1) $ mvn clean package -P homes $ java -jar *-autoconfig-app/target/*-autoconfig-app-*-bootexec.jar sales.active=(not supplied) sales.preference=(not supplied) Sales has started, sale:{homeSales0} (2)1 HomeSales implementation JAR in dependency classpath 2 HomeSalesService was injected because only implementation in classpath -
autosonly Maven profile active and no properties provided$ mvn dependency:list -f *-autoconfig-app -P autos | egrep 'ejava-student.*module' (starter module) (interface module) (AutoSales implementation module) (1) $ mvn clean package -P autos $ java -jar *-autoconfig-app/target/*-autoconfig-app-*-bootexec.jar sales.active=(not supplied) sales.preference=(not supplied) Sales has started, sale:{autoSales0} (2)1 AutoSales implementation JAR in dependency classpath 2 AutoSalesService was injected because only implementation in classpath -
homesandautosMaven profiles active$ mvn dependency:list -f *-autoconfig-app -P autos,homes | egrep 'ejava-student.*module' (starter module) (interface module) (HomeSales implementation module) (1) (AutoSales implementation module) (2) $ mvn clean install -P autos,homes $ java -jar *-autoconfig-app/target/*-autoconfig-app-*-bootexec.jar sales.active=(not supplied) sales.preference=(not supplied) Sales has started, sale:{homeSales0} (3)1 HomeSales implementation JAR in dependency classpath 2 AutoSales implementation JAR in dependency classpath 3 HomeSalesService was injected because of higher-priority -
homesandautosMaven profiles active and Spring propertySale.preference=autos$ mvn clean install -P autos,homes (1) java -jar sales-autoconfig-app/target/sales-autoconfig-app-1.0-SNAPSHOT-bootexec.jar --sales.preference=autos (2) sales.active=(not supplied) sales.preference=autos Sales has started, sale:{autoSales0} (3)1 HomeSale and AutoSale implementation JARs in dependency classpath 2 sales.preferenceproperty supplied withautosvalue3 AutoSalesService implementation was injected because of preference specified -
homesandautosMaven profiles active and Spring propertysales.active=false$ mvn clean install -P autos,homes (1) $ java -jar sales-autoconfig-app/target/sales-autoconfig-app-1.0-SNAPSHOT-bootexec.jar --sales.active=false (2) sales.active=false sales.preference=(not supplied) Sales is not active (3)1 HomeSale and AutoSale implementation JARs in dependency classpath 2 sales.activeproperty supplied withfalsevalue3 no implementation was injected because feature deactivated with property value
-
-
Turn in a source tree with a complete Maven module that will build and demonstrate the Auto-Configuration property processing and output of this application.
1.4.4. Grading
Your solution will be evaluated on:
-
Create a
@Configurationclass/@Beanfactory method to be registered based on the result of a condition at startup-
whether your solution provides the intended implementation class based on the runtime environment
-
-
Create a Spring Boot Auto-configuration module to use as a "Starter"
-
whether you have successfully packaged your
@Configurationclasses as Auto-Configuration classes outside the package scanning of the@SpringBootApplication
-
-
Bootstrap Auto-configuration classes into applications using a
spring.factoriesmetadata file-
whether you have bootstrapped your Auto-Configuration classes so they are processed by Spring Boot at application startup
-
-
Create a conditional component based on the presence of a property value
-
whether you activate or deactivate a
@Beanfactory based on the presence or absence of a specific the a specific property
-
-
Create a conditional component based on a missing component
-
whether you activate or deactivate a
@Beanfactory based on the presence or absence of a specific@Component
-
-
Create a conditional component based on the presence of a class
-
whether you activate or deactivate a
@Beanfactory based on the presence or absence of a class -
whether your starter causes unnecessary dependencies on the Application module
-
-
Define a processing dependency order for Auto-configuration classes
-
whether your solution is capable of implementing the stated priorities of which bean implementation to instantiate under which conditions
-
1.4.5. Additional Details
-
A starter project is available in
homesales-starter/assignment1-homesales-autoconfig. Modify Maven groupId and Java package if used. -
A unit integration test is supplied to check the results. We will cover testing very soon. Activate the test when you are ready to get feedback results. The test requires:
-
All classes be below the
info.ejava_studentJava package -
The component class injected with the dependency have the bean identity of
appCommand. -
The injected service made available via
getSalesService()method within appCommand.
-
2. Assignment 1b: Logging
2.1. Application Logging
2.1.1. Purpose
In this portion of the assignment, you will demonstrate your knowledge of injecting and calling a logging framework. You will:
-
obtain access to an SLF4J Logger
-
issue log events at different severity levels
-
format log events for regular parameters
-
filter log events based on source and severity thresholds
2.1.2. Overview
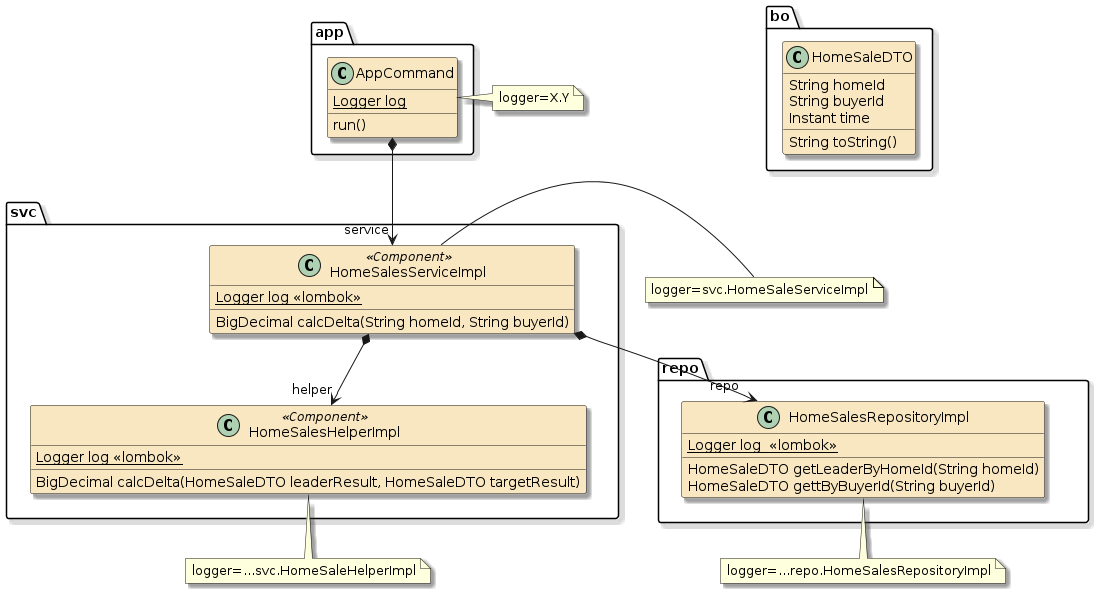
In this portion of the assignment, you are going to implement a call thread through a set of components that are in different Java packages that represent at different levels of the architecture.
Each of these components will setup an SLF4J Logger and issue logging statements relative to the thread.
2.1.3. Requirements
| All data is fake and random here. The real emphasis should be placed on the logging events that occur on the different loggers and not on creating a realistic HomeSale result. |
-
Create several components in different Java sub-packages (app, svc, and repo)
-
an
AppCommandcomponent class in theappJava sub-package -
a
HomeSalesServiceImplcomponent class in thesvcJava sub-package -
a
HomeSalesHelperImplcomponent class in thesvcJava sub-package -
a
HomeSalesRepositoryImplcomponent class in therepoJava sub-package
-
-
Implement a chain of calls from the
AppCommand@Componentrun() method through the other components.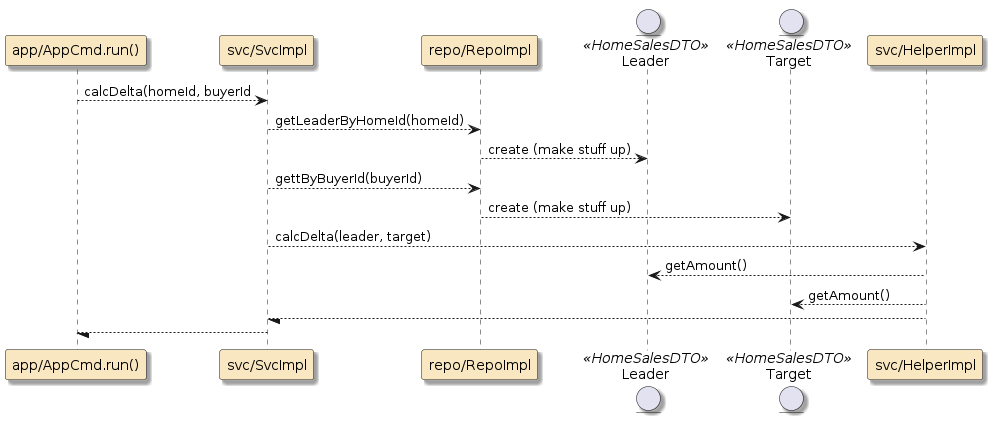 Figure 4. Required Call Sequence
-
AppCommand.run() calls ServiceImpl.calcDelta(homeId, buyerId) with a
homeIdandbuyerIdto determine how far the buyer is behind the leader . -
ServiceImpl.calcDelta(homeId, buyerId) calls RepositoryImpl (getLeaderByHomeId(homeId) and getByBuyerId(buyerId)) to get
HomeSaleDTOs-
RepositoryImpl can create transient instances with provided Ids and random remaining properties
-
-
ServiceImpl.calcDelta(homeId, buyerId) also calls ResultsHelper.calcDelta() to get the delta between the two
HomeSaleDTOs -
HelperImpl.calcDelta(leader, target) calls HomeSaleDTO.getAmount() on the two provided
HomeSaleDTOinstances to determine the delta
-
-
Implement a
toString()method inHomeSaleDTOthat includes thehomeId,buyerId, andtimeinformation. -
Instantiate an SLF4J
Loggerinto each of the four components-
manually instantiate a static final
Loggerwith the name "X.Y" inAppCommand -
leverage the Lombok library to instantiate a
Loggerwith the name based on the Java package and name of the hosting class for all other components
-
-
Implement logging statements in each of the methods
-
the severity of RepositoryImpl logging events are all TRACE
-
the severity of HelperImpl.calcDelta() logging events are DEBUG and TRACE (there must be at least two — one of each and no other levels)
-
the severity of ServiceImpl.calcDelta() logging events are all INFO and TRACE (there must be at least two — one of each and no other levels)
-
the severity of AppCommand logging events are all INFO (and no other levels)
-
-
Output available race results information in log statements
-
Leverage the LSF4J parameter formatting syntax when implementing the log
-
For each of the INFO and DEBUG statements, include only the
HomeSaleDTOproperty values (i.e., homeId, buyerId, timeDelta)Use direct calls on individual properties for INFO and DEBUG statementsi.e., homeSale.getHomeId(), homeSale.getBuyerId(), etc. -
For each of the TRACE statements, include the inferred
HomeSaleDTO.toString()method.Use inferred toString() on passed object on TRACE statementsi.e., log.debug("…", homeSale) — no direct calls totoString()
-
-
Supply two profiles
-
the root logger must be turned off by default (e.g., in
application.properties) -
an
app-debugprofile that turns on DEBUG and above priority (e.g., DEBUG, INFO, WARN, ERROR) logging events for all loggers in the application, including "X.Y" -
a
repo-onlyprofile that turns on only log statements from the repo class(es).
-
-
Wrap your solution in a Maven build that executes the JAR three times with:
-
(no profile) - no logs should be produced
-
app-debugprofile-
DEBUG and higher priority logging events from the application (including "X.Y") are output to console
-
no TRACE messages are output to the console
-
-
repo-onlyprofile-
logging events from repository class(es) are output to the console
-
no other logging events are output to the console
-
-
2.1.4. Grading
Your solution will be evaluated on:
-
obtain access to an SLF4J Logger
-
whether you manually instantiated a Logger into the AppCommand
@Component -
whether you leveraged Lombok to instantiate a Logger into the other
@Components -
whether your App Command
@Componentwas named "X.Y" -
whether your other
@Componentloggers were named after the package/class they were declared in
-
-
issue log events at different severity levels
-
where logging statements issued at the specified verbosity levels
-
-
format log events for regular parameters
-
whether SLF4J format statements were used when including variable information
-
-
filter log events based on source and severity thresholds
-
whether your profiles set the logging levels appropriately to only output the requested logging events
-
2.1.5. Other Details
-
You may use any means to instantiate/inject the components (i.e.,
@Beanfactories or@Componentannotations) -
You are encouraged to use Lombok to declare constructors, getter/setter methods, and anything else helpful except for the manual instantiation of the "X.Y" logger in
AppCommand. -
A starter project is available in
homesales-starter/assignment1-homesales-logging. It contains a Maven pom that is configured to build and run the application with the following profiles for this assignment:-
no profile
-
app-debug -
repo-only -
appenders -
appendersandtrace
Modify Maven groupId and Java package if used.
-
-
There is an integration unit test (
MyLoggingNTest) provided in the starter module. We will discuss testing very soon. Enable this test when you are ready to have the results evaluated.
2.2. Logging Efficiency
2.2.1. Purpose
In this portion of the assignment, you will demonstrate your knowledge of making suppressed logging efficient. You will:
-
efficiently bypass log statements that do not meet criteria
2.2.2. Overview
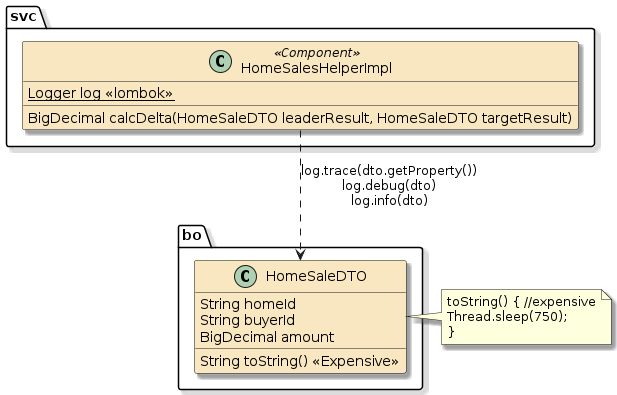
In this portion of the assignment, you are going to increase the cost of calling toString() on the business object and work to only pay that penalty when needed.
| Make your changes to the previous logging assignment solution. Do not create a separate module for this work. |
2.2.3. Requirements
-
Update the
toString()method inHomeSaleDTOto be expensive to call-
artificially insert a 750 milliseconds delay within the
toString()call
-
-
Refactor your log statements, if required, to only call
toString()when TRACE is active-
leverage the SLF4J API calls to make that as simple as possible
-
2.2.4. Grading
Your solution will be evaluated on:
-
efficiently bypass log statements that do not meet criteria
-
whether your
toString()method paused the calling thread for 750 milliseconds only for TRACE verbosity when TRACE threshold is activated -
whether the calls to
toString()are bypassed when priority threshold is set higher than TRACE -
the simplicity of your solution
-
2.2.5. Other Details
-
Include these modifications with the previous work on this overall logging assignment. Meaning — there will not be a separate module turned in for this portion of the assignment.
-
The
app-debugshould not exhibit any additional delays. Therepo-onlyshould exhibit a 4 (2x2sec) second delay. -
There is an integration unit test (
MyLoggingEfficiencyNTest) provided in the starter module. We will discuss testing very soon. Enable this test when you are ready to have the results evaluated.
2.3. Appenders and Custom Log Patterns
2.3.1. Purpose
In this portion of the assignment, you will demonstrate your knowledge of assigning appenders to loggers and customizing logged events. You will:
-
filter log events based on source and severity thresholds
-
customize log patterns
-
customize appenders
-
add contextual information to log events using Mapped Diagnostic Context
-
use Spring Profiles to conditionally configure logging
2.3.2. Overview
In this portion of the assignment you will be creating/configuring a few basic appenders and mapping loggers to them — to control what, where, and how information is logged. This will involve profiles, property files, and a logback configuration file.
| Make your changes to the original logging assignment solution. Do not create a separate module for this work. |

| Except for setting the MDC, you are writing no additional code in this portion of the assignment. Most of your work will be in filling out the logback configuration file and setting properties in profile-based property files to tune logged output. |
2.3.3. Requirements
-
Declare two Appenders as part of a custom Logback configuration
-
CONSOLE to output to stdout
-
FILE to output to a file
target/logs/appenders.log
-
-
Assign the Appenders to Loggers
-
root logger events must be assigned to the CONSOLE Appender
-
any log events issued to the "X.Y" Logger must be assigned to both the CONSOLE and FILE Appenders
-
any log events issued to the "…svc" Logger must also be assigned to both the CONSOLE and FILE Appenders
-
any log events issued to the "…repo" Logger must only be assigned to the FILE Appender
Remember "additivity" rules for inheritance and appending assignment These are the only settings you need to make within the Appender file. All other changes can be done through properties. However, there will be no penalty (just complexity) in implementing other mechanisms.
-
-
Add an
appendersprofile that-
automatically enacts the requirements above
-
sets a base of INFO severity and up for all loggers with your application
-
-
Add a
requestIdproperty to the Mapped Diagnostic Context (MDC)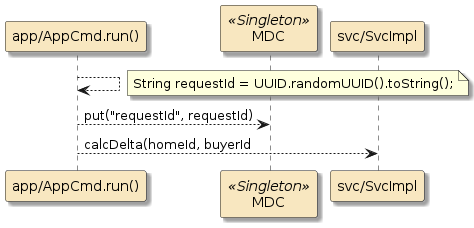 Figure 6. Initialize Mapped Diagnostic Context (MDC)
-
generate a random/changing value using a 36 character UUID String
Example: UUID.randomUUID().toString()⇒d587d04c-9047-4aa2-bfb3-82b25524ce12 -
insert the value prior to the first logging statement — in the
AppCommand@Component.
-
-
Declare a custom logging pattern in the
appendersprofile that includes the MDCrequestIdvalue in each log statements written by the FILE Appender-
The MDC
requestIdis only output by the FILE Appender. Encase the UUID within square[]brackets so that it can be found in a pattern search more easilyExample: [d587d04c-9047-4aa2-bfb3-82b25524ce12] -
The MDC
requestIdis not output by the CONSOLE Appender
-
-
Add an additional
traceprofile that-
activates logging events at TRACE severity and up for all loggers with your application
-
adds method and line number information to all entries in the FILE Appender but not the CONSOLE Appender. Use a format of
method:lineNumberin the output.Example: run:27Optional: Try defining the logging pattern once with an optional property variable that can be used to add method and line number expression versus repeating the definition twice.
-
-
Apply the
appendersprofile to-
output logging events at INFO severity and up to both CONSOLE and FILE Appenders
-
include the MDC
requestIdin events logged by the FILE Appender -
not include method and line number information in events logged
-
-
Apply the
appendersandtraceprofiles to-
output logging events at TRACE severity and up to both CONSOLE and FILE Appenders
-
continue to include the MDC
requestIdin events logged by the FILE Appender -
add method and line number information in events logged by the FILE Appender
-
2.3.4. Grading
Your solution will be evaluated on:
-
filter log events based on source and severity thresholds
-
whether your log events from the different Loggers were written to the required appenders
-
whether a log event instance appeared at most once per appender
-
-
customize log patterns
-
whether your FILE Appender output was augmented with the
requestIdwhenappendersprofile was active -
whether your FILE Appender output was augmented with method and line number information when
traceprofile was active
-
-
customize appenders
-
whether a FILE and CONSOLE appender were defined
-
whether a custom logging pattern was successfully defined for the FILE Logger
-
-
add contextual information to log events using Mapped Diagnostic Context
-
whether a
requestIdwas added to the Mapped Data Context (MDC) -
whether the
requestIdwas included in the customized logging pattern for the FILE Appender when theappendersprofile was active
-
-
use Spring Profiles to conditionally configure logging
-
whether your required logging configurations where put in place when activating the
appendersprofile -
whether your required logging configurations where put in place when activating the
appendersandtraceprofiles
-
2.3.5. Other Details
-
You may use the default Spring Boot LogBack definition for the FILE and CONSOLE Appenders (i.e., include them in your logback configuration definition).
Included Default Spring Boot LogBack definitions<configuration> <include resource="org/springframework/boot/logging/logback/defaults.xml"/> <include resource="org/springframework/boot/logging/logback/console-appender.xml"/> <include resource="org/springframework/boot/logging/logback/file-appender.xml"/> ... -
Your
appendersandtraceprofiles may re-define the logging pattern for the FILE logger or add/adjust parameterized definitions. However, try to implement an optional parameterization as your first choice to keep from repeating the same definition. -
The following snippet shows an example resulting logfile from when
appendersand thenappenders,traceprofiles were activated. Yours may look similar to the following:Example target/logs/appenders.log - "appenders" profile active$ rm target/logs/appenders.log $ java -jar target/assignment1-*-logging-1.0-SNAPSHOT-bootexec.jar --spring.profiles.active=appenders $ head target/logs/appenders.log head target/logs/appenders.log (1) 21:46:01.335 INFO -- [c934e045-1294-43c9-8d22-891eec2b8b84] Y : HomeSales has started (2)1 requestIdis supplied in all FILE output whenappendersprofile active2 no method and line number info supplied Example target/logs/appenders.log - "appenders,trace" profiles active$ rm target/logs/appenders.log $ java -jar target/assignment1-*-logging-1.0-SNAPSHOT-bootexec.jar --spring.profiles.active=appenders,trace $ head target/logs/appenders.log $ head target/logs/appenders.log (1) 21:47:33.784 INFO -- [0289d00e-5b28-4b01-b1d5-1ef8cf203d5d] Y.run:27 : HomeSales has started (2)1 requestIdis supplied in all FILE output whenappendersprofile active2 method and line number info are supplied -
There is a set of unit integration tests provided in the support module. We will cover testing very soon. Enable them when you are ready to evaluate your results.
3. Assignment 1c: Testing
The following parts are broken into different styles of conducting a pure unit test and unit integration test — based on the complexity of the class under test. None of the approaches are deemed to be "the best" for all cases.
-
tests that run without a Spring context can run blazingly fast, but lack the target runtime container environment
-
tests that use Mocks keep the focus on the subject being tested, but don’t verify end-to-end integration
-
tests that assemble real components provide verification of end-to-end capability but can introduce additional complexities and performance costs
It is important that you come away knowing how to implement the different styles of unit testing so that they can be leveraged based on specific needs.
3.1. Demo
The assignment1-homesales-testing assignment starter contains a @SpringBootApplication main class and a some demonstration code that will execute at startup when using the demo profile.
$ mvn package -Pdemo
06:34:21.217  INFO -- BuyersServiceImpl : buyer added: BuyerDTO(id=null, firstName=warren, lastName=buffet, dob=1930-08-30)
06:34:21.221  INFO -- BuyersServiceImpl : invalid buyer: BuyerDTO(id=null, firstName=future, lastName=buffet, dob=2022-08-25), [buyer.dob: must be greater than 12 years]
You can follow that thread of execution through the source code to get better familiarity with the code you will be testing.
3.2. Unit Testing
3.2.1. Purpose
In this portion of the assignment, you will demonstrate your knowledge of implementing a unit test for a Java class. You will:
-
write a test case and assertions using JUnit 5 "Jupiter" constructs
-
leverage the AssertJ assertion library
-
execute tests using Maven Surefire plugin
3.2.2. Overview
In this portion of the assignment, you are going to implement a test case with 2 unit tests for a completed Java class.
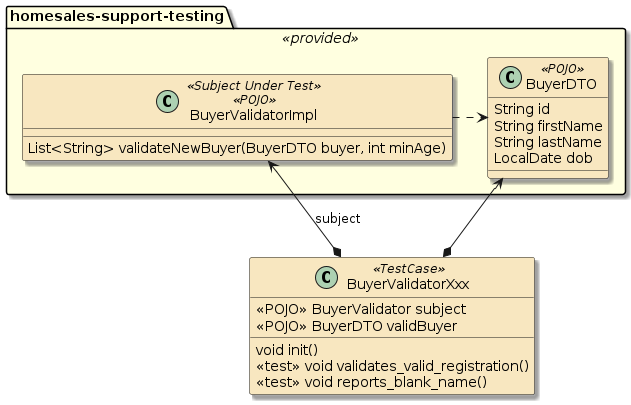
The code under test is 100% complete and provided to you in a separate homesales-support-testing module.
<dependency>
    <groupId>info.ejava.assignments.testing.homesales</groupId>
    <artifactId>homesales-support-testing</artifactId>
    <version>${ejava.version}</version>
</dependency>
Your assignment will be implemented in a module you create and form a dependency on the implementation code.
3.2.3. Requirements
-
Start with a dependency on supplied and completed
BuyerValidatorImplandBuyerDTOclasses in thehomesales-support-testingmodule. You only need to understand and test them. You do not need to implement or modify anything being tested.-
BuyerValidatorImplimplements avalidateNewBuyermethod that returns aList<String>with identified validation error messages -
BuyerDTOmust have the following to be considered valid for registration:-
null
id -
non-blank
firstNameandlastName -
dobolder than minAge
-
-
-
Implement a plain unit test case class for
BuyerValidatorImpl-
the test must be implemented without the use of a Spring context
-
all instance variables for the test case must come from plain POJO calls
-
tests must be implemented with JUnit 5 (Jupiter) constructs.
-
tests must be implemented using AssertJ assertions. Either BDD or regular form of assertions is acceptable.
-
-
The unit test case must have an
init()method configured to execute "before each" test-
this can be used to initialize variables prior to each test
-
-
The unit test case must have a test that verifies a valid BuyerDTO will be reported as valid.
-
The unit test case must have a test method that verifies an invalid BuyerDTO will be reported as invalid with a string message for each error.
-
Name the test so that it automatically gets executed by the Maven Surefire plugin.
3.2.4. Grading
Your solution will be evaluated on:
-
write a test case and assertions using JUnit 5 "Jupiter" constructs
-
whether you have implemented a pure unit test absent of any Spring context
-
whether you have used JUnit 5 versus JUnit 4 constructs
-
whether your
init()method was configured to be automatically called "before each" test -
whether you have tested with a valid and invalid
BuyerDTOand verified results where appropriate
-
-
leverage AssertJ assertion libraries
-
whether you have used assertions to identify pass/fail
-
whether you have used the AssertJ assertions
-
-
execute tests using Maven Surefire plugin
-
whether your unit test is executed by Maven surefire during a build
-
3.2.5. Additional Details
-
A quick start project is available in
homesales-starter/assignment1-homesales-testing, but-
copy the module into your own area
-
modify at least the Maven groupId and Java package when used
-
-
You are expected to form a dependency on the
homesales-support-testingmodule. The only things present in yoursrc/mainwould be demonstration code that is supplied to you in the starter — but not part of any requirement.
3.3. Mocks
3.3.1. Purpose
In this portion of the assignment, you will demonstrate your knowledge of instantiating a Mock as part of unit testing. You will:
-
implement a mock (using Mockito) into a JUnit unit test
-
define custom behavior for a mock
-
capture and inspect calls made to mocks by subjects under test
3.3.2. Overview
In this portion of the assignment, you are going to again implement a unit test case for a class and use a mock for one of its dependencies.
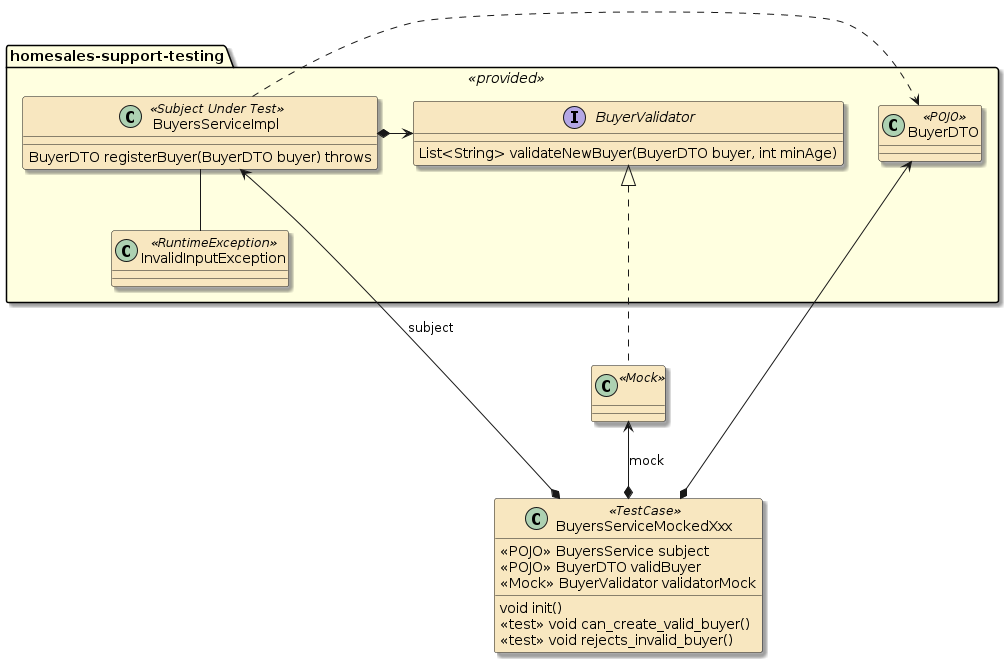
3.3.3. Requirements
-
Start with a dependency on supplied and completed
BuyersServiceImpland other classes in thehomesales-support-implmodule. You only need to understand and test them. You do not need to implement or modify anything being tested.-
BuyersServiceImplimplements acreateBuyermethod that-
validates the buyer using a
BuyerValidatorinstance -
assigns the
idif valid -
throws an exception with the error messages from the validator if invalid
-
-
-
Implement a unit test case for the
BuyersServiceto verify validation for a valid and invalidBuyerDTO-
the test case must be implemented without the use of a Spring context
-
all instance variables for the test case, except for the mock, must come from plain POJO calls
-
tests must be implemented using AssertJ assertions. Either BDD or regular form of assertions is acceptable.
-
a Mockito Mock must be used for the
BuyerValidatorinstance. You may not use theBuyerValidatorImplclass as part of this test
-
-
The unit test case must have an
init()method configured to run "before each" test and initialize theBuyersServiceImplwith the Mock instance forBuyerValidator. -
The unit test case must have a test that verifies a valid registration will be handled as valid.
-
configure the Mock to return an empty
List<String>when asked to validate the buyer.Understand how the default Mock behaves before going too far with this. -
programmatically verify the Mock was called to validate the
BuyerDTOas part of the test criteria
-
-
The unit test case must have a test method that verifies an invalid registration will be reported with an exception.
-
configure the Mock to return a
List<String>with errors for the buyer -
programmatically verify the Mock was called to validate the
BuyerDTOas part of the test criteria
-
-
Name the test so that it automatically gets executed by the Maven Surefire plugin.
|
This assignment is not to test the Mock. It is a test of the Subject using a Mock
You are not testing or demonstrating the Mock.
Assume the Mock works and use the capabilities of the Mock to test the subject(s) they are injected into.
Place any experiments with the Mock in a separate Test Case and keep this assignment focused on testing the subject (with the functioning Mock).
|
3.3.4. Grading
Your solution will be evaluated on:
-
implement a mock (using Mockito) into a JUnit unit test
-
whether you used a Mock to implement the
BuyerValidatoras part of this unit test -
whether you used a Mockito Mock
-
whether your unit test is executed by Maven surefire during a build
-
-
define custom behavior for a mock
-
whether you successfully configured the Mock to return an empty collection for the valid buyer
-
whether you successfully configured the Mock to return a collection of error messages for the invalid buyer
-
-
capture and inspect calls made to mocks by subjects under test
-
whether you programmatically checked that the Mock validation method was called as a part of registration using Mockito library calls
-
3.3.5. Additional Details
-
This portion of the assignment is expected to primarily consist of one additional test case added to the
src/testtree. -
You may use BDD or non-BDD syntax for this test case and tests.
3.4. Mocked Unit Integration Test
3.4.1. Purpose
In this portion of the assignment, you will demonstrate your knowledge of implementing a unit integration test using a Spring context and Mock beans. You will:
-
to implement unit integration tests within Spring Boot
-
implement mocks (using Mockito) into a Spring context for use with unit integration tests
3.4.2. Overview
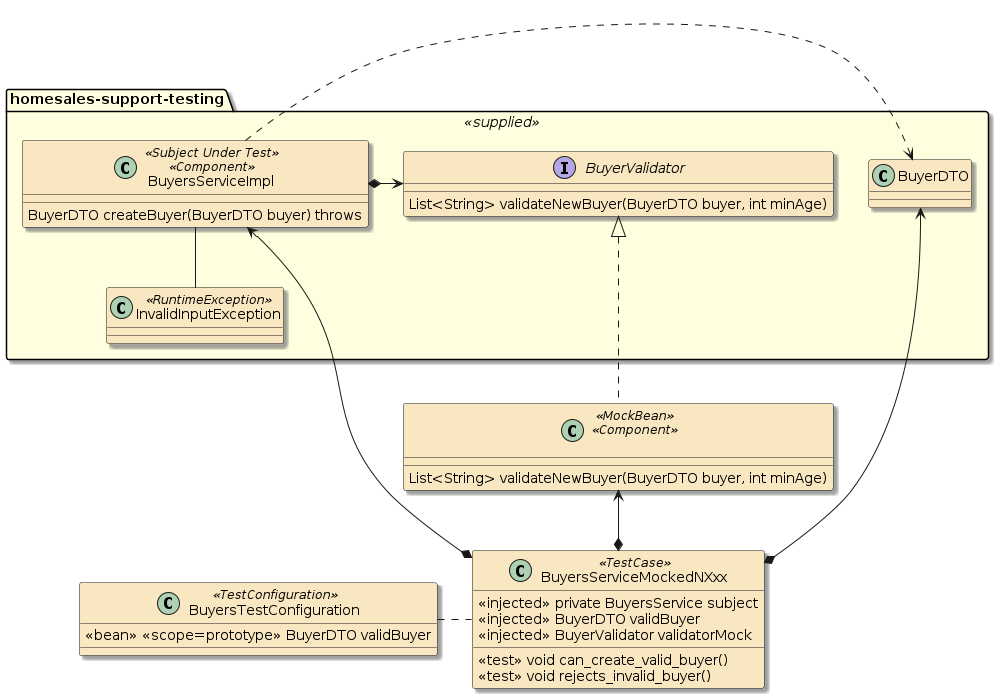
In this portion of the assignment, you are going to implement an injected Mock bean that will be injected by Spring into both the BuyersServiceImpl @Component for operational functionality and the unit integration test for configuration and inspection commands.
3.4.3. Requirements
-
Start with a supplied, completed, and injectable 'BuyersServiceImpl' versus instantiating one like you did in the pure unit tests.
-
Implement a unit integration test for the
BuyersServicefor a valid and invalidBuyerDTO-
the test must be implemented using a Spring context
-
all instance variables for the test case must come from injected components — even trivial ones.
-
the
BuyerValidatormust be implemented as Mockito Mock/Spring bean and injected into both theBuyerValidatorImpl@Componentand accessible in the unit integration test. You may not use theBuyerValidatorImplclass as part of this test. -
define and inject a
BuyerDTOfor a valid buyer as an example of a bean that is unique to the test. This can come from a@Beanfactory
-
-
The unit integration test case must have a test that verifies a valid registration will be handled as valid.
-
The unit integration test case must have a test method that verifies an invalid registration will be reported with an exception.
-
Name the unit integration test so that it automatically gets executed by the Maven Surefire plugin.
3.4.4. Grading
Your solution will be evaluated on:
-
to implement unit integration tests within Spring Boot
-
whether you implemented a test case that instantiated a Spring context
-
whether the subject(s) and their dependencies were injected by the Spring context
-
whether the test case verified the requirements for a valid and invalid input
-
whether your unit test is executed by Maven surefire during a build
-
-
implement mocks (using Mockito) into a Spring context for use with unit integration tests
-
whether you successfully declared a Mock bean that was injected into the necessary components under test and the test case for configuration
-
3.4.5. Additional Details
-
This portion of the assignment is expected to primarily consist of
-
adding one additional test case added to the
src/testtree -
adding any supporting
@TestConfigurationor other artifacts required to define the Spring context for the test -
changing the Mock to work with the Spring context
-
-
Anything you may have been tempted to simply instantiate as
private X x = new X();can be changed to an injection by adding a@(Test)Configuration/@Beanfactory to support testing. The point of having the 100% injection requirement is to encourage encapsulation and reuse among Test Cases for all types of test support objects. -
You may add the
BuyersTestConfigurationto the Spring context using either of the two annotation properties-
@SpringBootTest.classes -
@Import.value
-
-
You may want to experiment with applying @Scope(ConfigurableBeanFactory.SCOPE_PROTOTYPE) versus the default @Scope(ConfigurableBeanFactory.SCOPE_SINGLETON) to you injected Buyer and generate a random name in the
@Beanfactory. Every injectedSCOPE_SINGLETON(default) gets the same instance.SCOPE_PROTOTYPEgets a separate instance. Useful to know, but not a graded part of the assignment.
3.5. Unmocked/BDD Unit Integration Testing
3.5.1. Purpose
In this portion of the assignment, you will demonstrate your knowledge of conducting an end-to-end unit integration test that is completely integrated with the Spring context and using Behavior Driven Design (BDD) syntax. You will:
-
make use of BDD acceptance test keywords
3.5.2. Overview
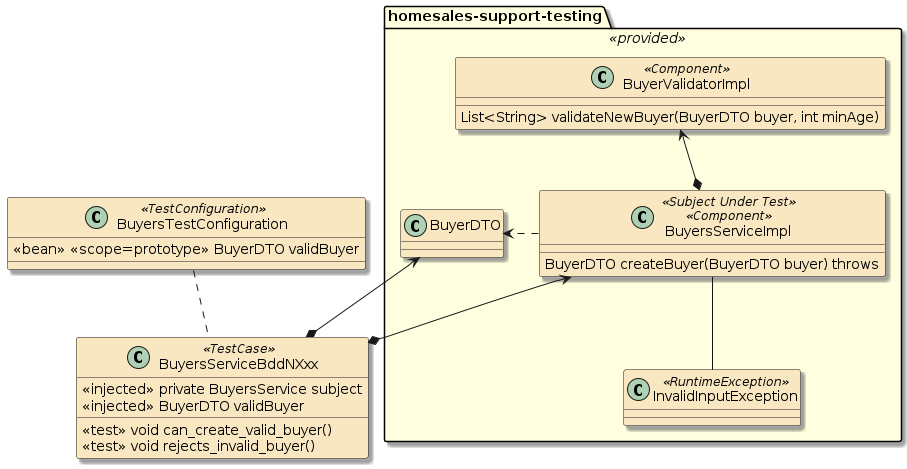
In this portion of the assignment, you are going to implement an end-to-end unit integration test case for two classes integrated/injected using the Spring context with the syntactic assistance of BDD-style naming.
3.5.3. Requirements
-
Start with a supplied, completed, and injectable
BuyersServiceImplby creating a dependency on thehomesales-support-testingmodule. There are to be no POJO or Mock implementations of any classes under test. -
Implement a unit integration test for the
BuyersServicefor a valid and invalidBuyerDTO-
the test must be implemented using a Spring context
-
all instance variables for the test case must come from injected components
-
the
BuyerValidatormust be injected into theBuyersServiceImplusing the Spring context. Your test case will not need access to that component. -
define and inject a
BuyerDTOfor a valid buyer as an example of a bean that is unique to the test. This can come from a@Beanfactory from a Test Configuration
-
-
The unit integration test case must have
-
a display name defined for this test case that includes spaces
-
a display name generation policy for contained test methods that includes spaces
-
-
The unit integration test case must have a test that verifies a valid registration will be handled as valid.
-
use BDD (
then()) alternative syntax for AssertJ assertions
-
-
The unit integration test case must have a test method that verifies an invalid registration will be reported with an exception.
-
use BDD (
then()) alternative syntax for AssertJ assertions
-
-
Name the unit integration test so that it automatically gets executed by the Maven Surefire plugin.
3.5.4. Grading
Your solution will be evaluated on:
-
make use of BDD acceptance test keywords
-
whether you provided a custom display name for the test case that included spaces
-
whether you provided a custom test method naming policy that included spaces
-
whether you used BDD syntax for AssertJ assertions
-
3.5.5. Additional Details
-
This portion of the assignment is expected to primarily consist of adding a test case that
-
is based on the Mocked Unit Integration Test solution, which relies primarily on the beans of the Spring context
-
removes any Mocks
-
defines a names and naming policies for JUnit
-
changes AssertJ syntax to BDD form
-
-
The "custom test method naming policy" can be set using either an @Annotation or property. The properties approach has the advantage of being global to all tests within the module.