1. Introduction
In previous sections we looked closely at how to authenticate a user obtained from a demonstration user source. The focus was on the obtained user and the processing that went on around it to enforce authentication using an example credential mechanism. There was a lot to explore with just a single user relative to establishing the security filter chain, requiring authentication, supplying credentials with the call, completing the authentication, and obtaining the authenticated user identity.
In this chapter we will focus on the UserDetailsService framework that supports
the AuthenticationProvider so that we can implement multiple users,
multiple user information sources, and to begin storing those users in
a database.
1.1. Goals
You will learn:
-
the interface roles in authenticating users within Spring
-
how to configure authentication and authentication sources for use by a security filter chain
-
how to implement access to user details from different sources
-
how to implement access to user details using a database
1.2. Objectives
At the conclusion of this lecture and related exercises, you will be able to:
-
build various
UserDetailsServiceimplementations to host user accounts and be used as a source for authenticating users -
build a simple in-memory
UserDetailsService -
build an injectable
UserDetailsService -
build a
UserDetailsServiceusing access to a relational database -
configure an application to display the database UI
-
encode passwords
2. AuthenticationManager
The focus of this chapter is on providing authentication to stored users and
providing details about them. To add some context to this, lets begin the
presentation flow with the AuthenticationManager.
AuthenticationManager is an abstraction the code base looks for in
order to authenticate a set of credentials. Its input and output are
of the same interface type — Authentication — but populated differently
and potentially implemented differently.
The input Authentication primarily supplies the principal
(e.g., username) and credentials (e.g., plaintext password).
The output Authentication of a successful authentication supplies
resolved UserDetails and provides direct access to granted
authorities — which can come from those user details and will be
used during later authorizations.
Although the credentials (e.g., encrypted password hash) from
the stored UserDetails is used to authenticate, it’s contents
are cleared before returning the response to the caller.

2.1. ProviderManager
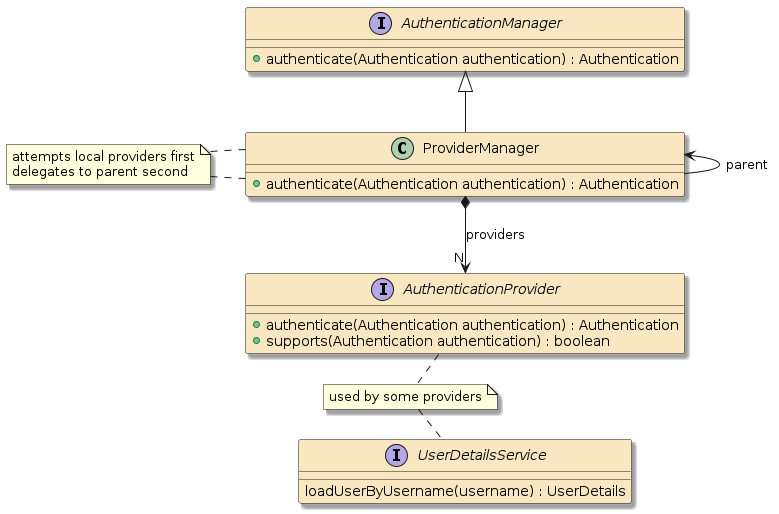
The AuthenticationManager is primarily implemented
using the ProviderManager class and delegates authentication
to its assigned AuthenticationProviders and/or parent
AuthenticationManager to do the actual authentication.
Some AuthenticationProvider classes are based off a UserDetailsService
to provide UserDetails. However, that is not always the case — therefore the diagram below does not show a direct relationship
between the AuthenticationProvider and UserDetailsService.
2.2. AuthenticationManagerBuilder
It is the job of the AuthenticationManagerBuilder to assemble an AuthenticationManager with the required AuthenticationProviders and — where appropriate — UserDetailsService.
The AuthenticationManagerBuilder is configured during the assembly of the SecurityFilterChain in both the legacy WebSecurityConfigurerAdapter and modern Component-based approaches.
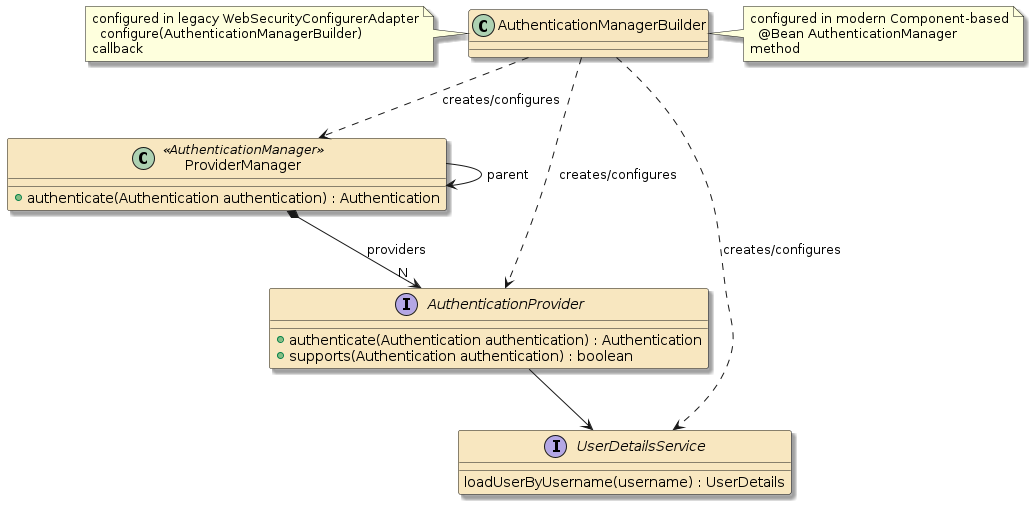
One can custom-configure the AuthenticationProviders for the AuthenticationManagerBuilder in the legacy WebSecurityConfigurerAdapter approach by overriding the configure() callback.
@Configuration(proxyBeanMethods = false)
public static class APIConfiguration extends WebSecurityConfigurerAdapter {
    @Override
    protected void configure(AuthenticationManagerBuilder auth) throws Exception {
        ... (1)
}| 1 | can custom-configure AuthenticationManagerBuilder here during a configure() callback |
One can custom-configure the AuthenticationProviders for the AuthenticationManagerBuilder in the modern Component-based approach by obtaining it from an injected HttpSecurity object using the getSharedObject() call.
@Bean
public AuthenticationManager authnManager(HttpSecurity http, ...) throws Exception {
    AuthenticationManagerBuilder builder =
                       http.getSharedObject(AuthenticationManagerBuilder.class);
    ...(1)

    builder.parentAuthenticationManager(null); //prevent from being recursive (2)
    return builder.build();
}| 1 | can obtain and custom-configure AuthenticationManagerBuilder using injected HttpSecurity object |
| 2 | I found the need to explicitly define "no parent" in the modern Component-based approach |
2.3. AuthenticationManagerBuilder Builder Methods
We can use the local builder methods to custom-configure the AuthenticationManagerBuilder.
These allow us to assemble one or more of the well-known AuthenticationProvider types.
The following is an example of configuring an InMemoryUserDetailsManager that our earlier examples used in the previous chapters.
However, in this case we get a chance to explicitly populate with users.
| This is an early example demonstration toy |
PasswordEncoder encoder = ...
builder.inMemoryAuthentication()  (1)
        .passwordEncoder(encoder) (2)
        .withUser("user1").password(encoder.encode("password1")).roles() (3)
        .and()
.withUser("user2").password(encoder.encode("password1")).roles();| 1 | adds a UserDetailsService to AuthenticationManager implemented in memory |
| 2 | AuthenticationProvider will need a password encoder to match passwords during authentication |
| 3 | users placed directly into storage must have encoded password |
2.3.1. Assembled AuthenticationProvider
The results of the builder configuration are shown below where the builder
assembled an AuthenticationManager (ProviderManager) and populated it with an
AuthenticationProvider (DaoAuthenticationProvider) that can work
with the UserDetailsService (InMemoryUserDetailsManager) we identified.
The builder also populated the UserDetailsService with
two users: user1 and user2 with an encoded password using the
PasswordEncoder also set on the AuthenticationProvider.

2.3.2. Builder Authentication Example
With that in place — we can authenticate our two users using the UserDetailsService
defined and populated using the builder.
$ curl http://localhost:8080/api/authn/hello?name=jim -u user1:password1
hello, jim :caller=user1

$ curl http://localhost:8080/api/authn/hello?name=jim -u user2:password1
hello, jim :caller=user2

$ curl http://localhost:8080/api/authn/hello?name=jim -u userX:password -v
< HTTP/1.1 403
2.4. AuthenticationProvider
The AuthenticationProvider can can answer two (2) questions:
|

|
2.5. AbstractUserDetailsAuthenticationProvider
For username/password authentication, Spring provides an
AbstractUserDetailsAuthenticationProvider that supplies the core
authentication workflow that includes:
-
a
UserCacheto storeUserDetailsfrom previous successful lookups -
obtaining the
UserDetailsif not already in the cache -
pre and post-authorization checks to verify such things as the account locked/disabled/expired or the credentials expired.
-
additional authentication checks where the password matching occurs
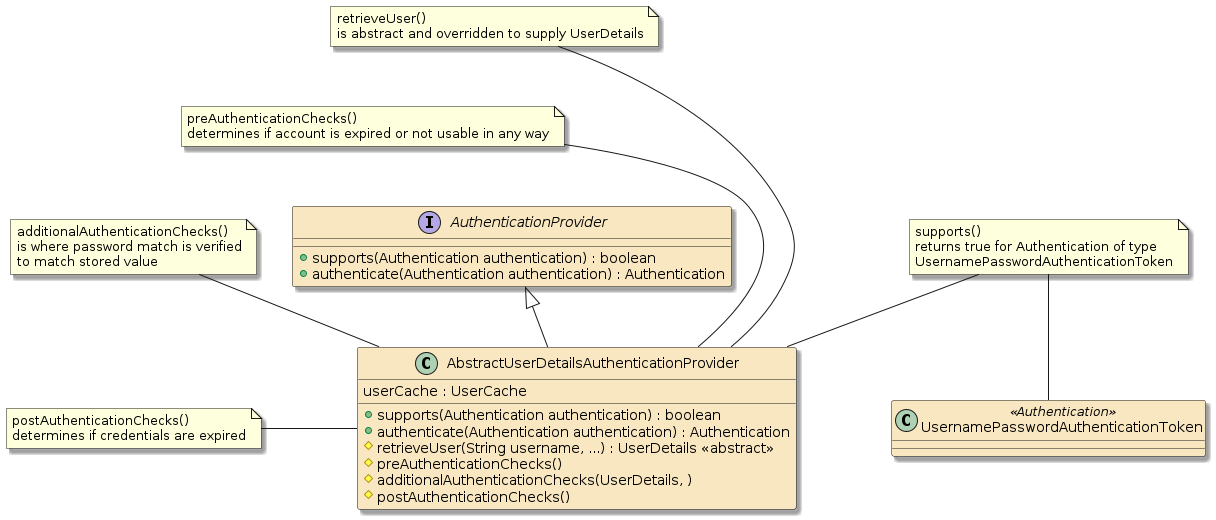
The instance will support any authentication
token of type UsernamePasswordAuthenticationToken but will need
at least two things:
-
user details from storage
-
a means to authenticate presented password
2.6. DaoAuthenticationProvider
Spring provides a concrete DaoAuthenticationProvider extension of the
AbstractUserDetailsAuthenticationProvider class that works directly with:
-
UserDetailServiceto obtain theUserDetails -
PasswordEncoderto perform password matching
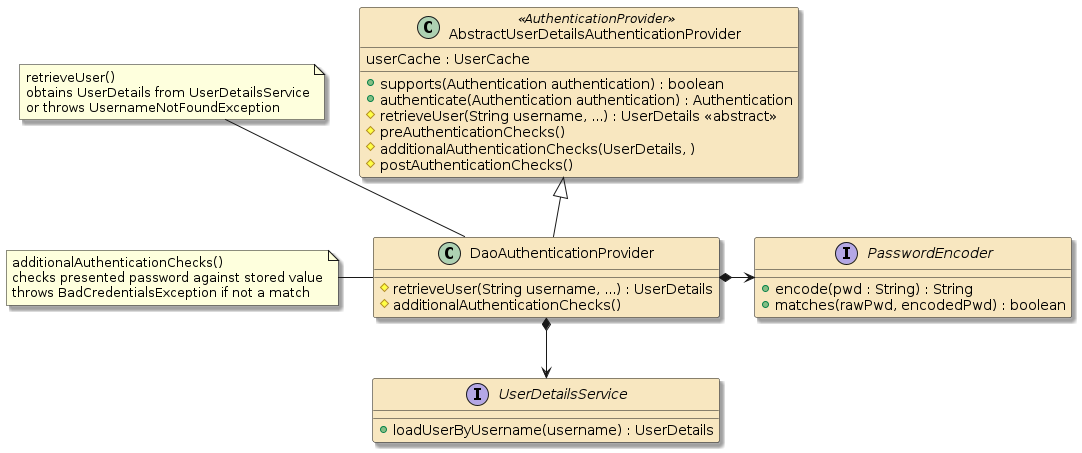
Now all we need is a PasswordEncoder and UserDetailsService
to get all this rolling.
2.7. UserDetailsManager
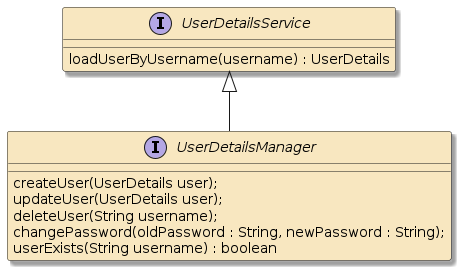
Before we get too much further into the details of the UserDetailsService, it will be good to be reminded that the interface supplies only a single loadUserByUsername() method.
There is an extension of that interface
to address full lifecycle |
|
3. AuthenticationManagerBuilder Configuration
At this point we know the framework of objects that need to be in place for authentication to complete and how to build a toy InMemoryUserDetailsManager using builder methods within the AuthenticationManagerBuilder class.
In this section we will learn how we can configure additional sources with less assistance from the AuthenticationManagerBuilder.
3.1. Fully-Assembled AuthenticationManager
We can directly assign a fully-assembled AuthenticationManager to other SecurityFilterChains by first exporting it as a @Bean.
-
The legacy
WebSecurityConfigurerAdapterapproach provides aauthenticationManagerBean()helper method that can be exposed as a@Beanby the derived class.@Bean AuthenticationManager — legacy WebSecurityConfigurerAdapter approach@Configuration public class APIConfiguration extends legacy WebSecurityConfigurerAdapter { @Bean @Override public AuthenticationManager authenticationManagerBean() throws Exception { return super.authenticationManagerBean(); } -
The modern Component-based approach builds an
AuthenticationManagerin a@Beanfactory method using a builder accessible from the injectedHttpSecurity.@Bean AuthenticationManager — modern Component-based approach@Bean public AuthenticationManager authnManager(HttpSecurity http,...) throws Exception { AuthenticationManagerBuilder builder = http.getSharedObject(AuthenticationManagerBuilder.class); ... builder.parentAuthenticationManager(null); //prevent from being recursive return builder.build(); }
With the fully-configured AuthenticationManager exposed as a @Bean, we can look to directly wire it into the other SecurityFilterChains.
3.2. Directly Wire-up AuthenticationManager
We can directly set the AuthenticationManager to one created elsewhere.
The following examples shows setting the AuthenticationManager during the building of the SecurityFilterChain.
-
legacy
WebSecurityConfigurerAdapterapproachAssigning Parent AuthenticationManager — legacy WebSecurityConfigurerAdapter Approach@Configuration @Order(500) @RequiredArgsConstructor public static class H2Configuration extends WebSecurityConfigurerAdapter { private final AuthenticationManager authenticationManager; (1) @Override protected void configure(HttpSecurity http) throws Exception { http.requestMatchers(m->m.antMatchers(...)); ... http.authenticationManager(authenticationManager); (2) } }1 AuthenticationManagerassembled elsewhere and injected in this@Configurationclass2 injected AuthenticationManagerto be theAuthenticationManagerfor what this builder builds -
modern Component-based approach
Assigning AuthenticationManager — modern Component-based Approach@Order(500) @Bean public SecurityFilterChain h2SecurityFilters(HttpSecurity http,(1) AuthenticationManager authMgr) throws Exception { http.securityMatchers(cfg->cfg.requestMatchers(...)); ... http.authenticationManager(authMgr); (2) return http.build(); }1 AuthenticationManagerassembled elsewhere and injected in this@Beanfactory method2 injected AuthenticationManagerto be theAuthenticationManagerfor what this builder builds
3.3. Directly Wire-up Parent AuthenticationManager
We can instead set the parent AuthenticationManager using the SecurityAuthenticationManagerBuilder.
-
The following example shows setting the parent
AuthenticationManagerduring aWebSecurityConfigurerAdapter.configure()callback in the legacy WebSecurityConfigurerAdapter approach.Assigning Parent AuthenticationManager — legacy WebSecurityConfigurerAdapter Approach@Configuration @Order(500) @RequiredArgsConstructor public static class H2Configuration extends WebSecurityConfigurerAdapter { private final AuthenticationManager authenticationManager; @Override protected void configure(AuthenticationManagerBuilder auth) throws Exception { auth.parentAuthenticationManager(authenticationManager); (1) } }1 injected AuthenticationManagerto be the parentAuthenticationManagerof what this builder builds -
The following example shows setting the parent
AuthenticationManagerduring the build of theSecurityFilterChainusinghttp.getSharedObject().Assigning Parent AuthenticationManager — modern Component-based Approach@Order(500) @Bean public SecurityFilterChain h2SecurityFilters(HttpSecurity http, AuthenticationManager authMgr) throws Exception { ... AuthenticationManagerBuilder builder = http.getSharedObject(AuthenticationManagerBuilder.class); builder.parentAuthenticationManager(authMgr); (1) return http.build();1 injected AuthenticationManagerto be the parentAuthenticationManagerof what this builder builds
3.4. Define Service and Encoder @Bean
Another option in supplying a UserDetailsService is to define a globally accessible UserDetailsService @Bean to inject to use with our builder.
However, in order to pre-populate the UserDetails passwords, we must use a PasswordEncoder that is consistent with the AuthenticationProvider this UserDetailsService will be combined with.
We can set the default PasswordEncoder using a @Bean factory.
@Bean (1)
public PasswordEncoder passwordEncoder() {
    return ...
}| 1 | defining a PasswordEncoder to be injected into default AuthenticationProvider |
@Bean
public UserDetailsService sharedUserDetailsService(PasswordEncoder encoder) { (1)
    User.UserBuilder ubuilder = User.builder().passwordEncoder(encoder::encode);
    List<UserDetails> users = List.of(
            ubuilder.username("user1").password("password2").roles().build(),
            ubuilder.username("user3").password("password2").roles().build()
    );
    return new InMemoryUserDetailsManager(users);
}| 1 | using an injected PasswordEncoder for consistency |
| 2 | using different UserDetails builder than before — setting password encoding function |
| 3 | username user1 will be in both UserDetailsService with different passwords |
3.4.1. Inject UserDetailService
We can inject the fully-assembled UserDetailsService into the AuthenticationManagerBuilder — just like before with the inMemoryAuthentication, except this time the builder has no knowledge of the implementation being injected.
We are simply injecting a UserDetailsService.
The builder will accept it and wrap that in an AuthenticationProvider
WebSecurityConfigurerAdapter Approach@Configuration
@Order(0)
@RequiredArgsConstructor
public static class APIConfiguration extends WebSecurityConfigurerAdapter {
private final List<UserDetailsService> userDetailsServices;(1)
@Override
protected void configure(AuthenticationManagerBuilder auth) throws Exception {
...
for (UserDetailsService uds: userDetailsServices) {
auth.userDetailsService(uds); (2)
}
}| 1 | injecting UserDetailsService into configuration class |
| 2 | adding additional UserDetailsService to create additional AuthenticationProvider |
The same can be done in the modern Component-based approach and during the equivalent builder configuration I demonstrated earlier with the inMemoryAuthentication.
The only difference is that I found the more I custom-configured the AuthenticationManagerBuilder, I would end up in a circular configuration with the AuthenticationManager pointing to itself as its parent unless I explicitly set the parent value to null.
@Bean
public AuthenticationManager authnManager(HttpSecurity http,
                List<UserDetailsService> userDetailsServices ) throws Exception { (1)
    AuthenticationManagerBuilder builder = http.getSharedObject(AuthenticationManagerBuilder.class);
    ...
    for (UserDetailsService uds : userDetailsServices) {
        builder.userDetailsService(uds); (2)
    }

    builder.parentAuthenticationManager(null); //prevent from being recursive
    return builder.build();
}| 1 | injecting UserDetailsService into bean method |
| 2 | adding additional UserDetailsService to create additional AuthenticationProvider |
3.4.2. Assembled Injected UserDetailsService
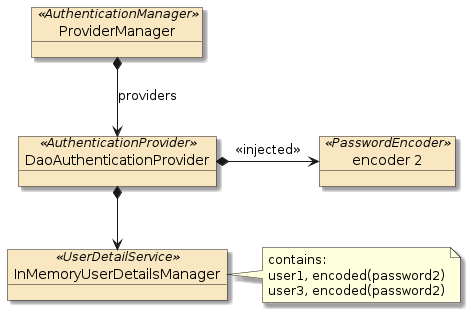
The results of the builder configuration are shown below where the builder
assembled an AuthenticationProvider (DaoAuthenticationProvider)
based on the injected UserDetailsService (InMemoryUserDetailsManager).
The injected UserDetailsService also had two users — user1 and user3 — added with an encoded password based on the injected PasswordEncoder bean.
This will be the same bean injected into the AuthenticationProvider.
3.4.3. Injected UserDetailsService Example
With that in place, we can now authenticate user1 and user3 using the assigned
passwords using the AuthenticationProvider with the injected UserDetailService.
$ curl http://localhost:8080/api/authn/hello?name=jim -u user1:password2
hello, jim :caller=user1

$ curl http://localhost:8080/api/authn/hello?name=jim -u user3:password2
hello, jim :caller=user3

$ curl http://localhost:8080/api/authn/hello?name=jim -u userX:password -v
< HTTP/1.1 403
3.5. Combine Approaches
As stated before — the ProviderManager can delegate to multiple
AuthenticationProviders before authenticating or rejecting an authentication
request. We have demonstrated how to create an AuthenticationManager multiple
ways. In this example, I am integrating the two AuthenticationProviders into
a single AuthenticationManager.
//AuthenticationManagerBuilder auth
PasswordEncoder encoder = ... (1)
auth.inMemoryAuthentication().passwordEncoder(encoder)
    .withUser("user1").password(encoder.encode("password1")).roles()
    .and()
    .withUser("user2").password(encoder.encode("password1")).roles();
for (UserDetailsService uds : userDetailsServices) { (2)
    builder.userDetailsService(uds);
}| 1 | locally built AuthenticationProvider will use its own encoder |
| 2 | @Bean-built UserDetailsService injected and used to form second AuthenticationProvider |
3.5.1. Assembled Combined AuthenticationProviders
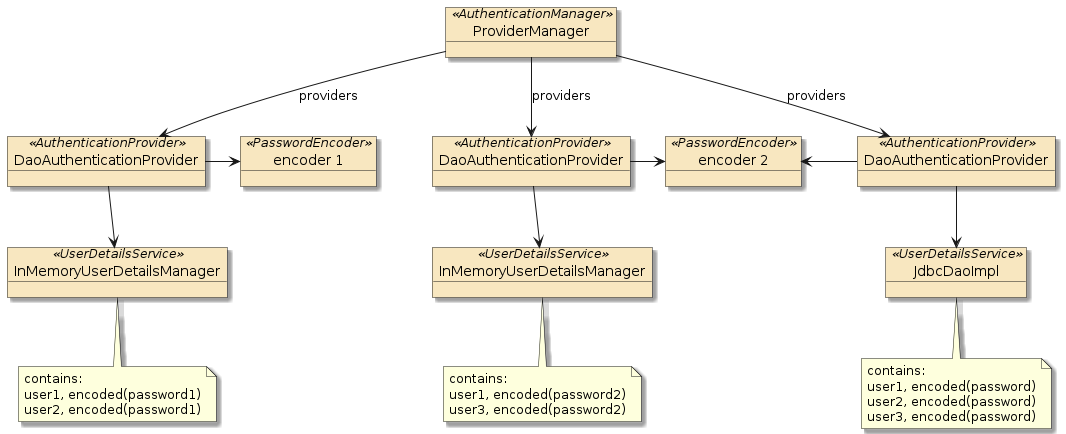
The resulting AuthenticationManager ends up with two custom-configured AuthenticationProviders.
Each AuthenticationProviders are
-
implemented with the
DaoAuthenticationProviderclass -
make use of a
PasswordEncoderandUserDetailsService

The left |
The right |
The two were brought together by one of our configuration approaches and now we have two sources of credentials to authenticate against.
3.5.2. Multiple Provider Authentication Example
With the two AuthenticationProvider objects defined, we can now login as
user2 and user3, and user1 using both passwords. The user1 example shows that
an authentication failure from one provider still allows it to be inspected
by follow-on providers.
$ curl http://localhost:8080/api/authn/hello?name=jim -u user1:password1
hello, jim :caller=user1

$ curl http://localhost:8080/api/authn/hello?name=jim -u user1:password2
hello, jim :caller=user1

$ curl http://localhost:8080/api/authn/hello?name=jim -u user2:password1
hello, jim :caller=user2

$ curl http://localhost:8080/api/authn/hello?name=jim -u user3:password2
hello, jim :caller=user3
4. UserDetails
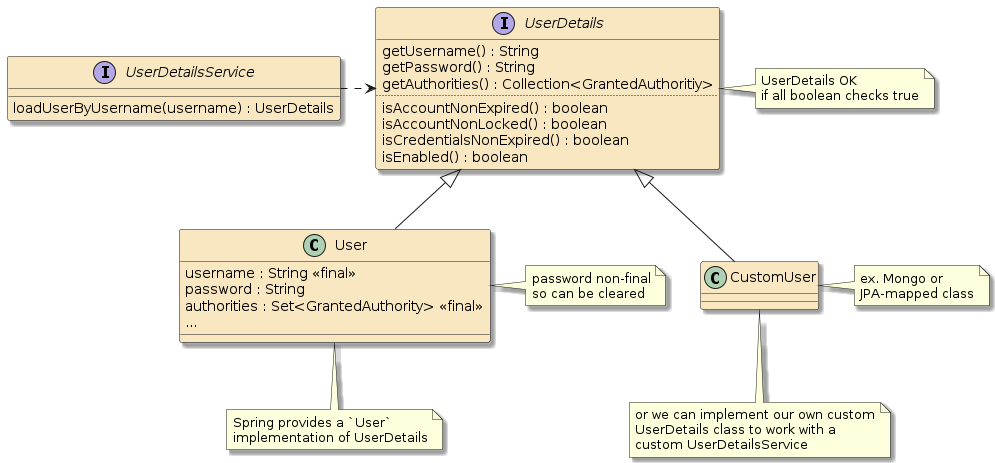
So now we know that all we need is to provide a UserDetailsService instance and Spring will take care of most of the rest.
UserDetails is an interface that we can implement any way we want.
For example — if we manage our credentials in MongoDB or use
Java Persistence API (JPA), we can create the proper classes for that mapping.
We won’t need to do that just yet because Spring provides a User class that
can work for most POJO-based storage solutions.
5. PasswordEncoder
I have made mention several times about the PasswordEncoder and earlier covered how it is
used to create a cryptographic hash. Whenever we configured a PasswordEncoder for our
AuthenticationProvider we have the choice of many encoders. I will highlight three of them.
5.1. NoOpPasswordEncoder
The NoOpPasswordEncoder is what it sounds like. It does nothing when encoding the plaintext
password. This can be used for early development and debug but should not — obviously — be used with real credentials.
5.2. BCryptPasswordEncoder
The BCryptPasswordEncoder uses a very strong Bcrypt algorithm and (the algorithm) likely should be
considered the default in production environments.
5.3. DelegatingPasswordEncoder
The DelegatingPasswordEncoder is a jack-of-all-encoders.
It has one default way to encode — using BCrypt — but can validate passwords of numerous algorithms.
This encoder writes and relies on all passwords starting with an {encoding-key} that indicates the type of encoding to use.
{noop}password
{bcrypt}$2y$10$UvKwrln7xPp35c5sbj.9kuZ9jY9VYg/VylVTu88ZSCYy/YdcdP/Bq
Use the PasswordEncoderFactories class to create a DelegatingPasswordEncoder
populated with a full compliment of encoders.
import org.springframework.security.crypto.factory.PasswordEncoderFactories;

@Bean
public PasswordEncoder passwordEncoder() {
    return PasswordEncoderFactories.createDelegatingPasswordEncoder();
}|
DelegatingPasswordEncoder encodes one way and matches multiple ways
DelegatingPasswordEncoder encodes using a single, designated encoder
and matches against passwords encoded using many alternate encodings — thus
relying on the password to start with a {encoding-key}.
|
6. JDBC UserDetailsService
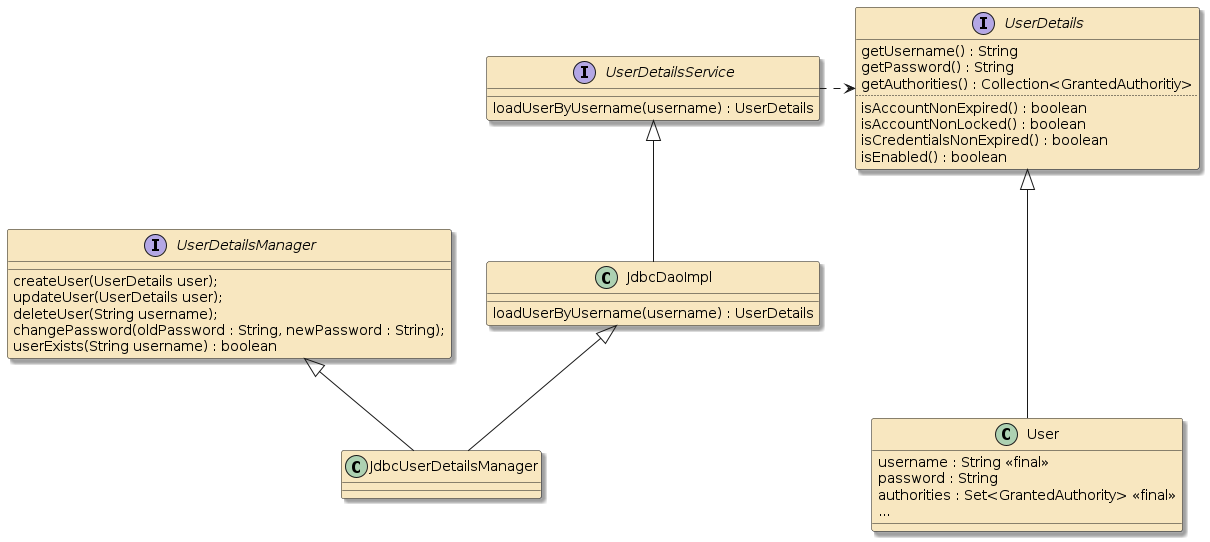
Spring provides two Java Database Connectivity (JDBC) implementation classes
that we can easily use out of the box to begin storing UserDetails in a database:
-
JdbcDaoImpl- implements just the coreUserDetailsServiceloadUserByUsernamecapability -
JdbcUserDetailManager- implements the fullUserDetailsManagerCRUD capability
|
JDBC is a database communications interface containing no built-in mapping
JDBC is a low-level interface to access a relational database from Java.
All the mapping between the database inputs/outputs and our Java business objects are done outside of JDBC.
There is no automatic mapping like with Java Persistence API (JPA).
|
JdbcUserDetailManager extends JdbcDaoImpl. We only need JdbcDaoImpl
since we will only be performing authentication reads and not yet be implementing
full CRUD (Create, Read, Update, and Delete) with databases.
However, there would have been no harm in using
the full JdbcUserDetailManager implementation in the examples below and
simply ignored the additional behavior.
To use the JDBC implementation, we are going to need a few things:
-
A relational database - this is where we will store our users
-
Database Schema - this defines the tables and columns of the database
-
Database Contents - this defines our users and passwords
-
javax.sql.DataSource- this is a JDBC wrapper around a connection to the database -
construct the
UserDetailsService(and potentially expose as a@Bean) -
inject and add JDBC
UserDetailsServicetoAuthenticationManagerBuilder
6.1. H2 Database
There are
several lightweight databases that are very good for development
and demonstration (e.g.,
h2,
hsqldb,
derby,
SQLite).
They commonly offer in-memory, file-based, and server-based instances with
minimal scale capability but extremely simple to administer. In general,
they supply an interface that is compatible with the more enterprise-level
solutions that are more suitable for production. That makes them an ideal
choice for using in demonstration and development situations like this.
For this example, I will be using the h2 database but many others could
have been used as well.
6.2. DataSource: Maven Dependencies
To easily create a default DataSource, we can simply add a compile
dependency on spring-boot-starter-data-jdbc and a runtime dependency
on the h2 database. This will cause our application to start with a
default DataSource connected to the an in-memory database.
<dependency>
    <groupId>org.springframework.boot</groupId>
    <artifactId>spring-boot-starter-data-jdbc</artifactId>
</dependency>
<dependency>
    <groupId>com.h2database</groupId>
    <artifactId>h2</artifactId>
    <scope>runtime</scope>
</dependency>
6.3. JDBC UserDetailsService
Once we have the spring-boot-starter-data-jdbc and database dependency in place,
Spring Boot will automatically create a default javax.sql.DataSource that can be
injected into a @Bean factory so that we can create a JdbcDaoImpl to implement
the JDBC UserDetailsService.
import javax.sql.DataSource;
...
@Bean
public UserDetailsService jdbcUserDetailsService(DataSource userDataSource) {
    JdbcDaoImpl jdbcUds = new JdbcDaoImpl();
    jdbcUds.setDataSource(userDataSource);
    return jdbcUds;
}
From there, we can inject the JDBC UserDetailsService — like the in-memory version we injected earlier and add it to the builder.
6.4. Autogenerated Database URL
If we restart our application at this point, we will get a generated database URL using a UUID for the name.
H2 console available at '/h2-console'. Database available at
                   'jdbc:h2:mem:76567045-619b-4588-ae32-9154ba9ac01c'
6.5. Specified Database URL
We can make the URL more stable and well-known by setting the
spring.datasource.url property.
spring.datasource.url=jdbc:h2:mem:usersH2 console available at '/h2-console'. Database available at 'jdbc:h2:mem:users'
|
h2-console URI can be modified
We can also control the URI for the h2-console by setting the
spring.h2.console.path property.
|
6.6. Enable H2 Console Security Settings
The h2 database can be used headless, but also comes with a convenient UI that will allow us to inspect the data in the database and manipulate it if necessary. However, with security enabled — we will not be able to access our console by default. We only addressed authentication for the API endpoints. Since this is a chapter focused on configuring authentication, it is a good exercise to go through the steps to make the h2 UI accessible but also protected. The following will:
-
require users accessing the
/h2-console/**URIs to be authenticated -
enable FORM authentication and redirect successful logins to the
/h2-consoleURI -
disable frame headers that would have placed constraints on how the console could be displayed
-
disable CSRF for the
/h2-console/**URI but leave it enabled for the other URIs -
wire in the injected
AuthenticationManagerconfigured for the API
6.6.1. H2 Configuration - legacy WebSecurityConfigurerAdapter Approach
@Configuration
@Order(500)
@RequiredArgsConstructor
public static class H2Configuration extends WebSecurityConfigurerAdapter {
    private final AuthenticationManager authenticationManager; (1)

    @Override
    protected void configure(HttpSecurity http) throws Exception {
        http.requestMatchers(m->m.antMatchers("/login","/logout", "/h2-console/**"));
        http.authorizeRequests(cfg->cfg.antMatchers("/login","/logout").permitAll());(2)
        http.authorizeRequests(cfg->cfg.antMatchers("/h2-console/**").authenticated());(3)
        http.csrf(cfg->cfg.ignoringAntMatchers("/h2-console/**")); (4)
        http.headers(cfg->cfg.frameOptions().disable()); (5)
        http.formLogin().successForwardUrl("/h2-console"); (6)
        http.authenticationManager(authenticationManager); (7)
    }
}| 1 | injected AuthenticationManager bean exposed by APIConfiguration |
| 2 | apply filter rules to H2 UI URIs as well as login/logout form |
| 3 | require authenticated users by the application to reach the console |
| 4 | turn off CSRF only for the H2 console |
| 5 | turn off display constraints for the H2 console |
| 6 | route successful logins to the H2 console |
| 7 | use pre-configured AuthenticationManager for authentication to UI |
6.6.2. H2 Configuration — modern Component-based Approach
The following modern Component-based configuration addresses the URI builder changes in Spring Security 6.
I needed to constrain the use of /error to the URI and request for text/html so that it did not interfere with the API errors.
The use of the non-SpringMVC H2DB UI triggered the mandatory use of explicit URI builder calls to resolve ambiguous matching requirements.
import static org.springframework.security.web.util.matcher.RegexRequestMatcher.regexMatcher;
import org.springframework.security.web.util.matcher.MediaTypeRequestMatcher;

@Order(500)
@Bean
public SecurityFilterChain h2SecurityFilters(HttpSecurity http, (1)
        AuthenticationManager authMgr) throws Exception {
    MediaTypeRequestMatcher htmlRequestMatcher =
            new MediaTypeRequestMatcher(MediaType.TEXT_HTML);
    htmlRequestMatcher.setUseEquals(true);

    http.securityMatchers(cfg->cfg
            .requestMatchers("/h2-console*","/h2-console/**") (2)
            .requestMatchers("/login", "/logout")
            .requestMatchers(RequestMatchers.allOf(
                    htmlRequestMatcher, //only want to service HTML error pages
                    AntPathRequestMatcher.antMatcher("/error")
                ))
    );
    http.authorizeHttpRequests(cfg->cfg
            .requestMatchers(regexMatcher(HttpMethod.GET,".+(.css|.jsp|.gif)$")).permitAll()
            .anyRequest().authenticated() (3)
    );
    http.formLogin(cfg->cfg
        .permitAll() //applies permitAll to standard login URIs
        .successForwardUrl("/h2-console") (6)
    );
    http.csrf(cfg->cfg.ignoringRequestMatchers(antMatcher("/h2-console/**"))); (4)
    http.headers(cfg-> cfg.frameOptions(fo->fo.disable())); (5)

    http.authenticationManager(authMgr);//reuse applications authz users (7)
    return http.build();
}| 1 | injected AuthenticationManager bean exposed by API Configuration |
| 2 | apply filter rules to H2 UI URIs as well as login/logout form |
| 3 | require authenticated users by the application to reach the console |
| 4 | turn off CSRF only for the H2 console |
| 5 | turn off display constraints for the H2 console |
| 6 | route successful logins to the H2 console |
| 7 | use pre-configured AuthenticationManager for authentication to UI |
6.7. Form Login
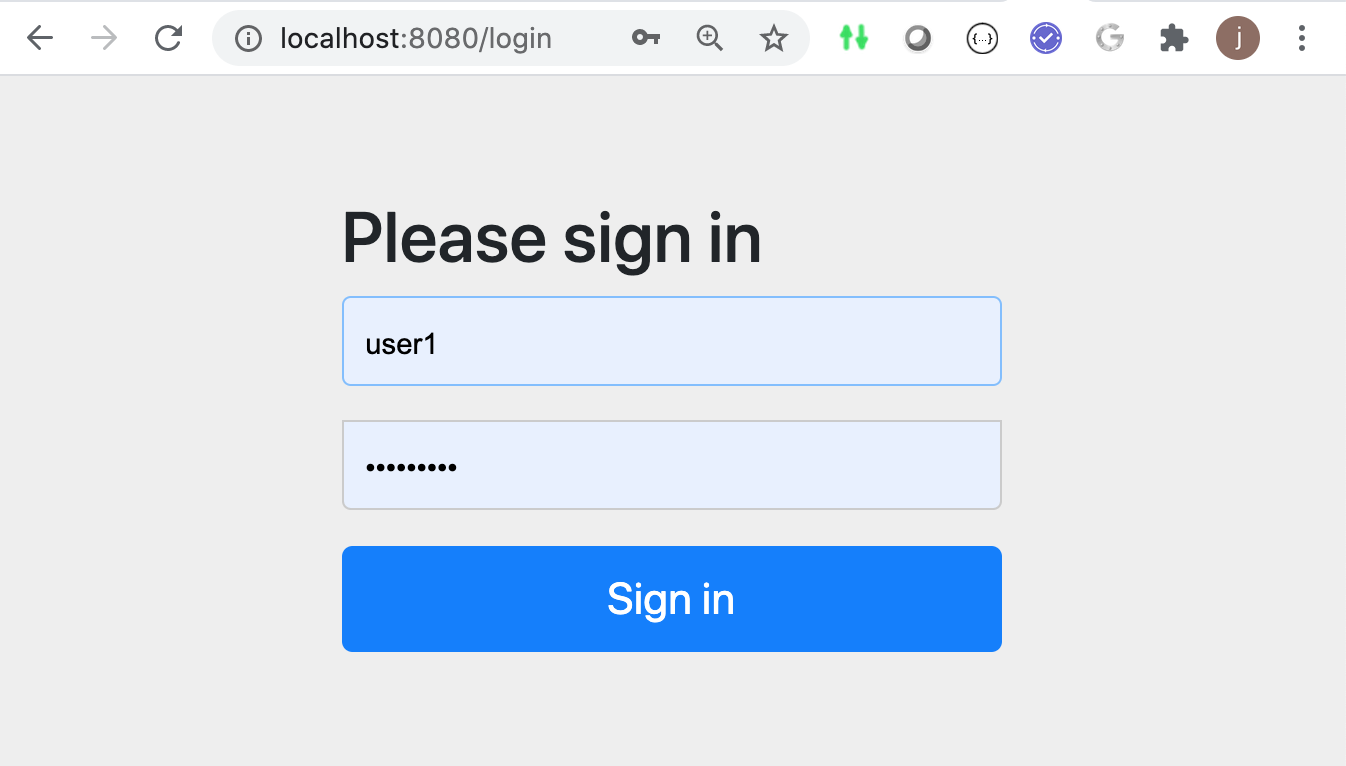
When we attempt to reach a protected URI within the application with FORM authentication active — the FORM authentication form is displayed. We should be able to enter the site using any of the username/passwords
available to the |
|
| If you enter a bad username/password at the point in time you will receive a JDBC error since we have not yet setup the user database. |
6.8. H2 Login
|
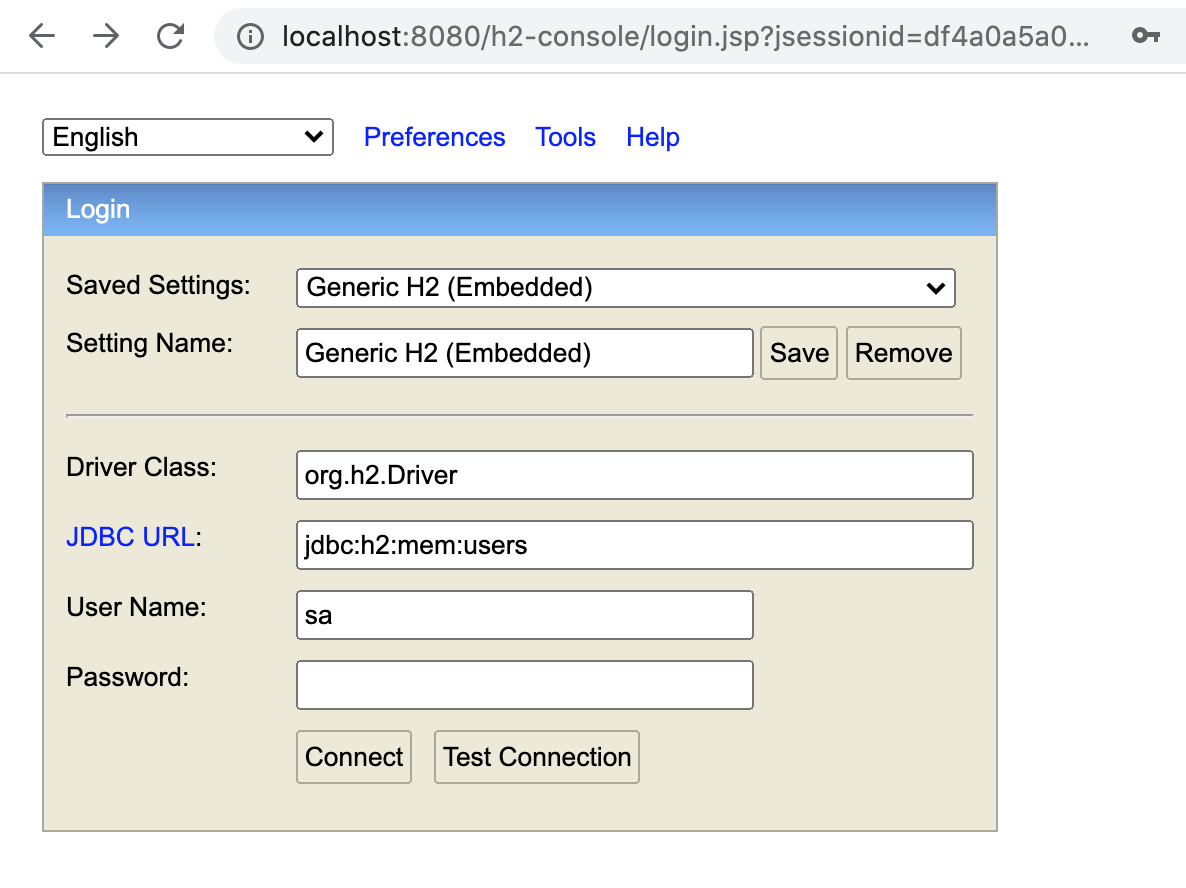
Once we get beyond the application FORM login, we are presented with the
H2 database login. The JDBC URL should be set to the value of the
|
6.9. H2 Console
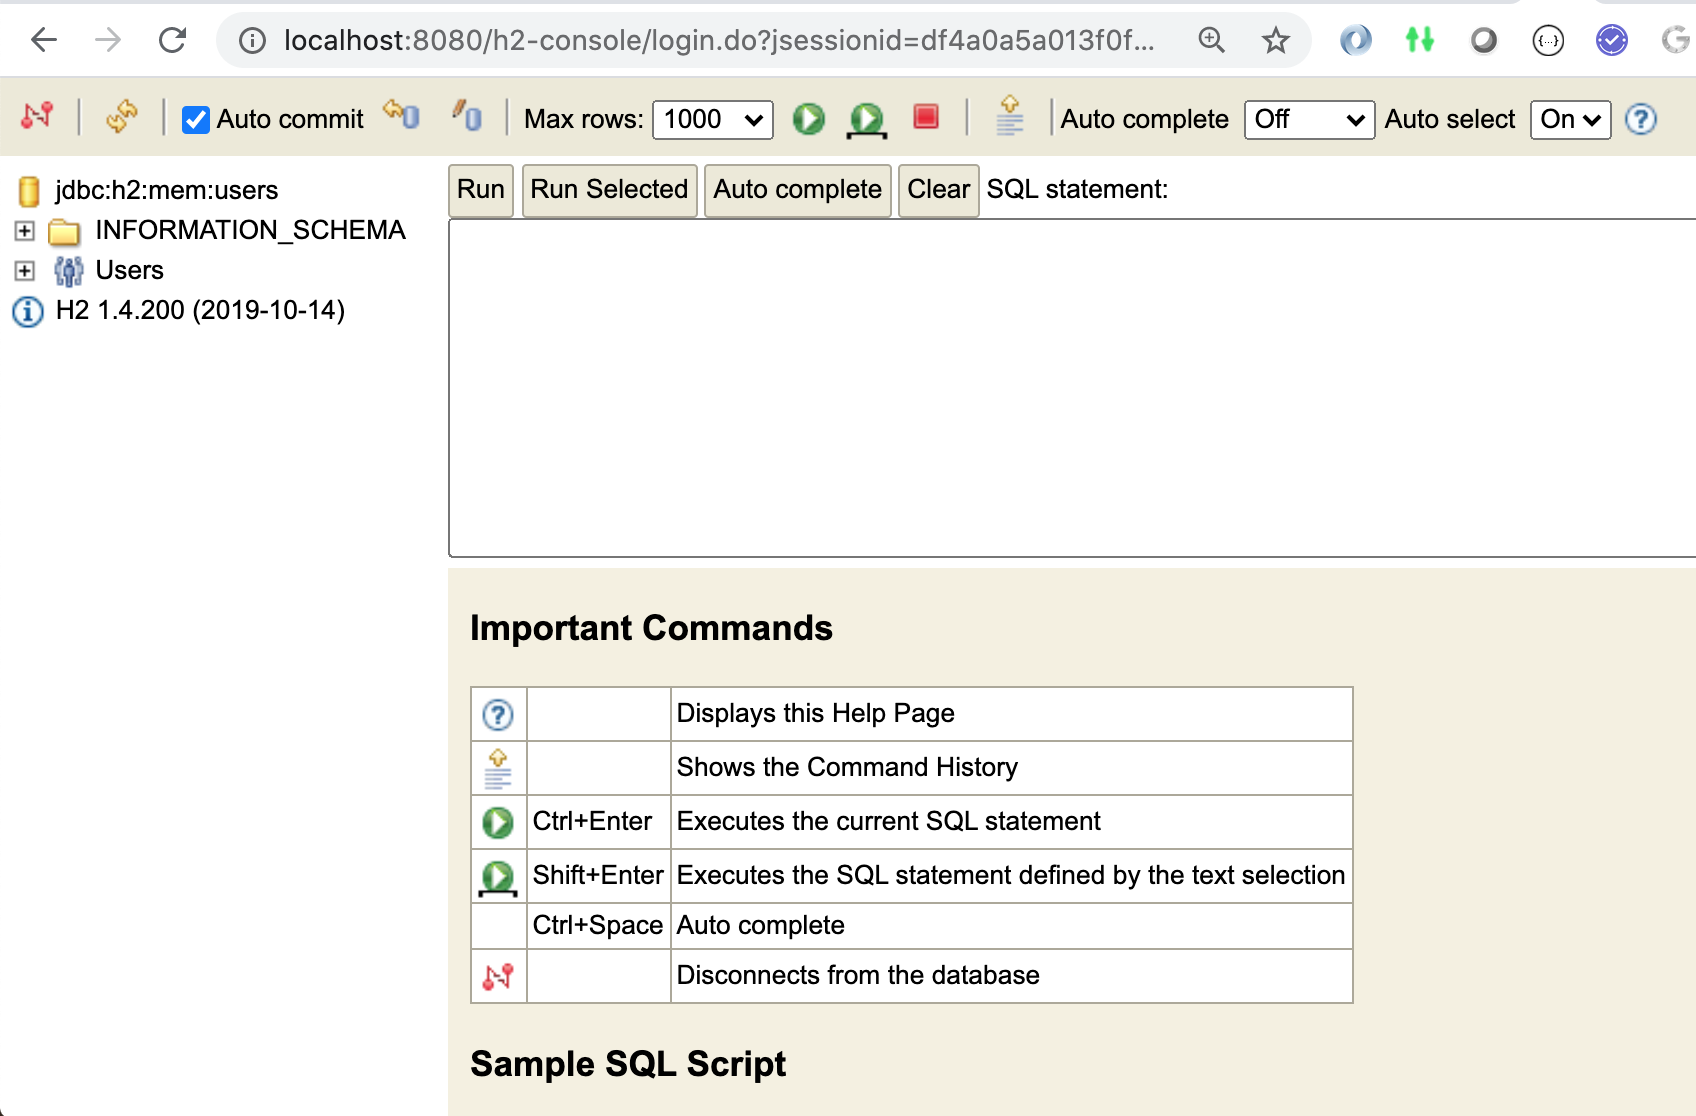
Once successfully logged in, we are presented with a basic but functional SQL interface to the in-memory H2 database that will contain our third source of users — which we need to now setup. |
|
6.10. Create DB Schema Script
From the point in time when we added the spring-boot-starter-jdbc dependency, we were ready to add database schema — which is the definition of tables, columns, indexes, and constraints of our database.
Rather than use a default filename, it is good to keep the schemas separated.
The following file is being placed in the src/main/resources/database directory
of our source tree. It will be accessible to use within the classpath when we restart
the application. The bulk of this implementation comes from the
Spring Security Documentation Appendix. I have increased the size of the password
column to accept longer Bcrypt encoded password hash values.
--users-schema.ddl (1)
drop table authorities if exists; (2)
drop table users if exists;

create table users( (3)
      username varchar_ignorecase(50) not null primary key,
      password varchar_ignorecase(100) not null,
      enabled boolean not null);

create table authorities ( (4)
  username varchar_ignorecase(50) not null,
  authority varchar_ignorecase(50) not null,
  constraint fk_authorities_users foreign key(username) references users(username));(5)
create unique index ix_auth_username on authorities (username,authority); (6)| 1 | file places in `src/main/resources/database/users-schema.ddl |
| 2 | dropping tables that may exist before creating |
| 3 | users table primarily hosts username and password |
| 4 | authorities table will be used for authorizing accesses after successful identity authentication |
| 5 | foreign key' constraint enforces that `user must exist for any authority |
| 6 | unique index constraint enforces all authorities are unique per user and places
the foreign key to the users table in an efficient index suitable for querying |
The schema file can be referenced through the spring.database.schema property by
prepending classpath: to the front of the path.
spring.datasource.url=jdbc:h2:mem:users
spring.sql.init.schema-locations=classpath:database/users-schema.ddl| Spring Security provides a schema file with the basics of what is included here. The path is also referenced by JdbcDaoImpl.DEFAULT_USER_SCHEMA_DDL_LOCATION |
6.11. Schema Creation
The following shows an example of the application log when the schema creation in action.
Executing SQL script from class path resource [database/users-schema.ddl]
SQL: drop table authorities if exists
SQL: drop table users if exists
SQL: create table users( username varchar_ignorecase(50) not null primary key,
    password varchar_ignorecase(100) not null, enabled boolean not null)
SQL: create table authorities ( username varchar_ignorecase(50) not null,
    authority varchar_ignorecase(50) not null,
    constraint fk_authorities_users foreign key(username) references users(username))
SQL: create unique index ix_auth_username on authorities (username,authority)
Executed SQL script from class path resource [database/users-schema.ddl] in 48 ms.
H2 console available at '/h2-console'. Database available at 'jdbc:h2:mem:users'
6.12. Create User DB Populate Script
The schema file took care of defining tables, columns, relationships, and constraints.
With that defined, we can add population of users. The following user passwords
take advantage of knowing we are using the DelegatingPasswordEncoder and we made
{noop}plaintext an option at first.
The JDBC UserDetailsService requires that all valid users have at least one authority
so I have defined a bogus known authority to represent the fact the username is known.
--users-populate.sql
insert into users(username, password, enabled) values('user1','{noop}password',true);
insert into users(username, password, enabled) values('user2','{noop}password',true);
insert into users(username, password, enabled) values('user3','{noop}password',true);

insert into authorities(username, authority) values('user1','known');
insert into authorities(username, authority) values('user2','known');
insert into authorities(username, authority) values('user3','known');
We reference the population script thru a property and can place that in the application.properties file.
spring.datasource.url=jdbc:h2:mem:users
spring.sql.init.schema-locations=classpath:database/users-schema.ddl
spring.sql.init.data-locations=classpath:database/users-populate.sql
6.13. User DB Population
After the wave of schema commands has completed, the row population will take place filling the tables with our users, credentials, etc.
Executing SQL script from class path resource [database/users-populate.sql]
SQL: insert into users(username, password, enabled) values('user1','{noop}password',true)
SQL: insert into users(username, password, enabled) values('user2','{noop}password',true)
SQL: insert into users(username, password, enabled) values('user3','{noop}password',true)
SQL: insert into authorities(username, authority) values('user1','known')
SQL: insert into authorities(username, authority) values('user2','known')
SQL: insert into authorities(username, authority) values('user3','known')
Executed SQL script from class path resource [database/users-populate.sql] in 7 ms.
H2 console available at '/h2-console'. Database available at 'jdbc:h2:mem:users'
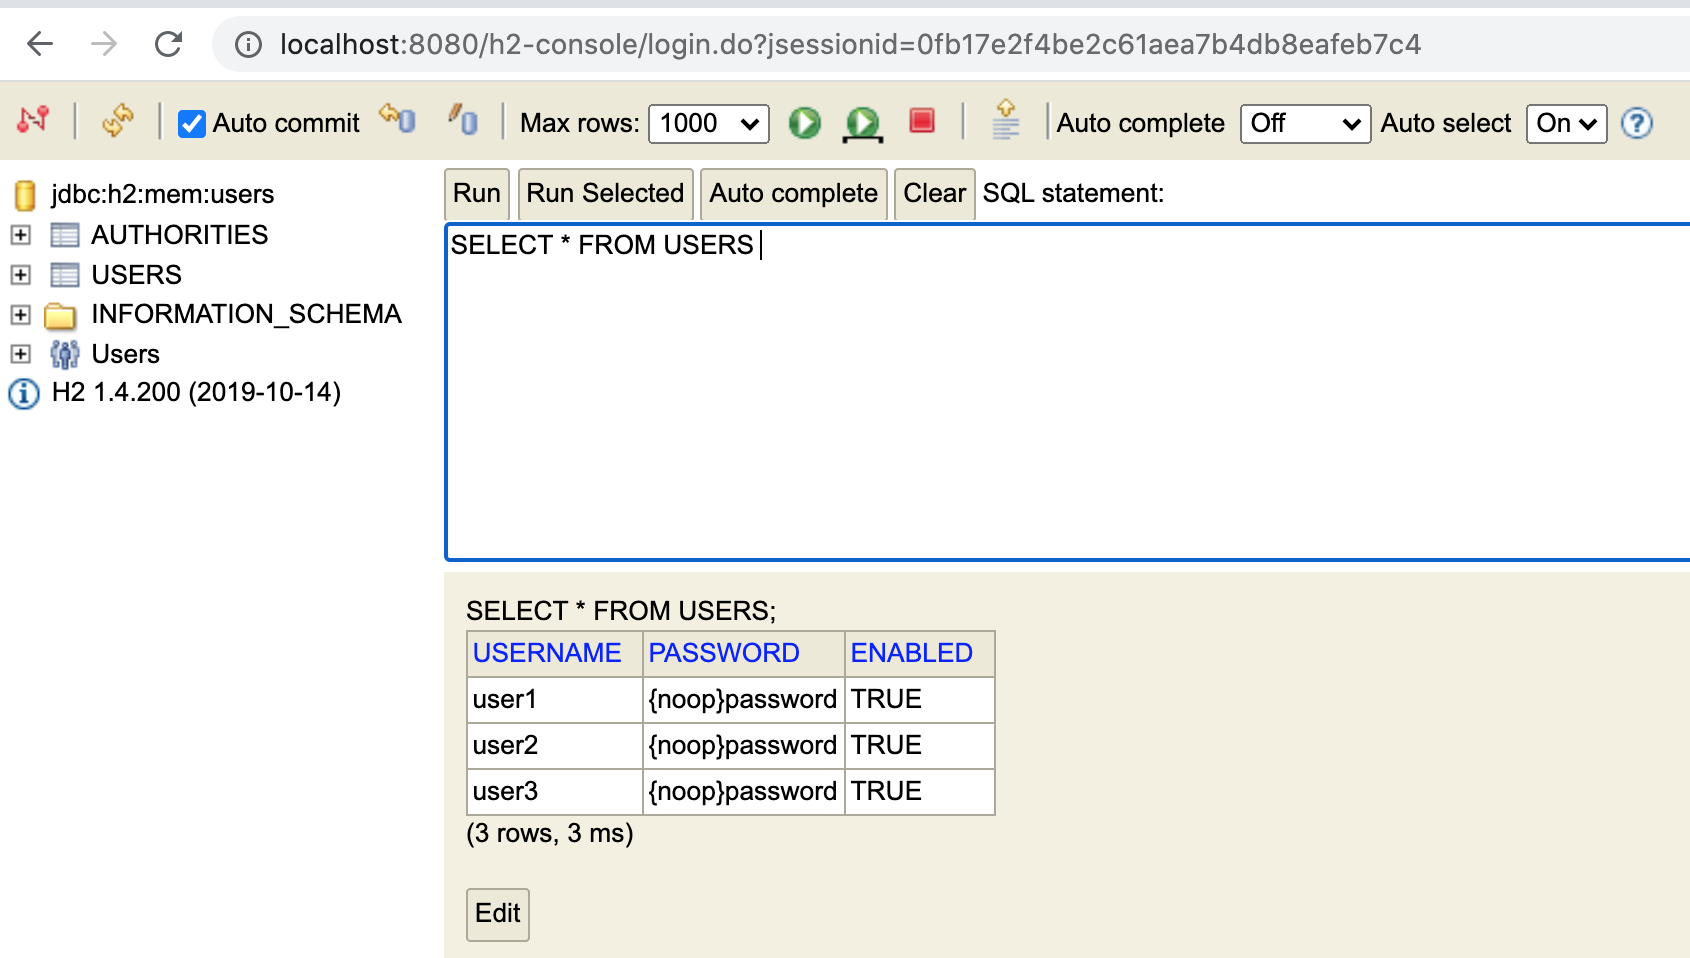
6.14. H2 User Access
With the schema created and users populated, we can view the results using the H2 console. |
|
6.15. Authenticate Access using JDBC UserDetailsService
We can now authenticate to access to the API using the credentials in this database.
$ curl http://localhost:8080/api/anonymous/hello?name=jim -u user1:password
hello, jim :caller=user1 (1)

$ curl http://localhost:8080/api/anonymous/hello?name=jim -u user1:password1
hello, jim :caller=user1 (2)

$ curl http://localhost:8080/api/anonymous/hello?name=jim -u user1:password2
hello, jim :caller=user1 (3)| 1 | authenticating using credentials from JDBC UserDetailsService |
| 2 | authenticating using credentials from directly configured in-memory UserDetailsService |
| 3 | authenticating using credentials from injected in-memory UserDetailsService |
However, we still have plaintext passwords in the database. Lets look to clean that up.
6.16. Encrypting Passwords
It would be bad practice to leave the user passwords in plaintext when we have the ability to store cryptographic hash values instead.
We can do that through Java and the BCryptPasswordEncoder.
The follow example shows using a shell script to obtain the encrypted password value.
$ htpasswd -bnBC 10 user1 password | cut -d\: -f2 (1) (2)
$2y$10$UvKwrln7xPp35c5sbj.9kuZ9jY9VYg/VylVTu88ZSCYy/YdcdP/Bq

$ htpasswd -bnBC 10 user2 password | cut -d\: -f2
$2y$10$9tYKBY7act5dN.2d7kumuOsHytIJW8i23Ua2Qogcm6OM638IXMmLS

$ htpasswd -bnBC 10 user3 password | cut -d\: -f2
$2y$10$AH6uepcNasVxlYeOhXX20.OX4cI3nXX.LsicoDE5G6bCP34URZZF2| 1 | script outputs in format username:encoded-password |
| 2 | cut command is breaking the line at the ":" character and returning second field with just the encoded value |
6.16.1. Updating Database with Encrypted Values
I have updated the populate SQL script to modify the {noop} plaintext
passwords with their {bcrypt} encrypted replacements.
update users
set password='{bcrypt}$2y$10$UvKwrln7xPp35c5sbj.9kuZ9jY9VYg/VylVTu88ZSCYy/YdcdP/Bq'
where username='user1';
update users
set password='{bcrypt}$2y$10$9tYKBY7act5dN.2d7kumuOsHytIJW8i23Ua2Qogcm6OM638IXMmLS'
where username='user2';
update users
set password='{bcrypt}$2y$10$AH6uepcNasVxlYeOhXX20.OX4cI3nXX.LsicoDE5G6bCP34URZZF2'
where username='user3';|
Don’t Store Plaintext or Decode-able Passwords
The choice of replacing the plaintext INSERTs versus using UPDATE is purely
a choice made for incremental demonstration. Passwords should always be stored in
their Cryptographic Hash form and never in plaintext in a real environment.
|
6.16.2. H2 View of Encrypted Passwords
Once we restart and run that portion of the SQL, the plaintext |
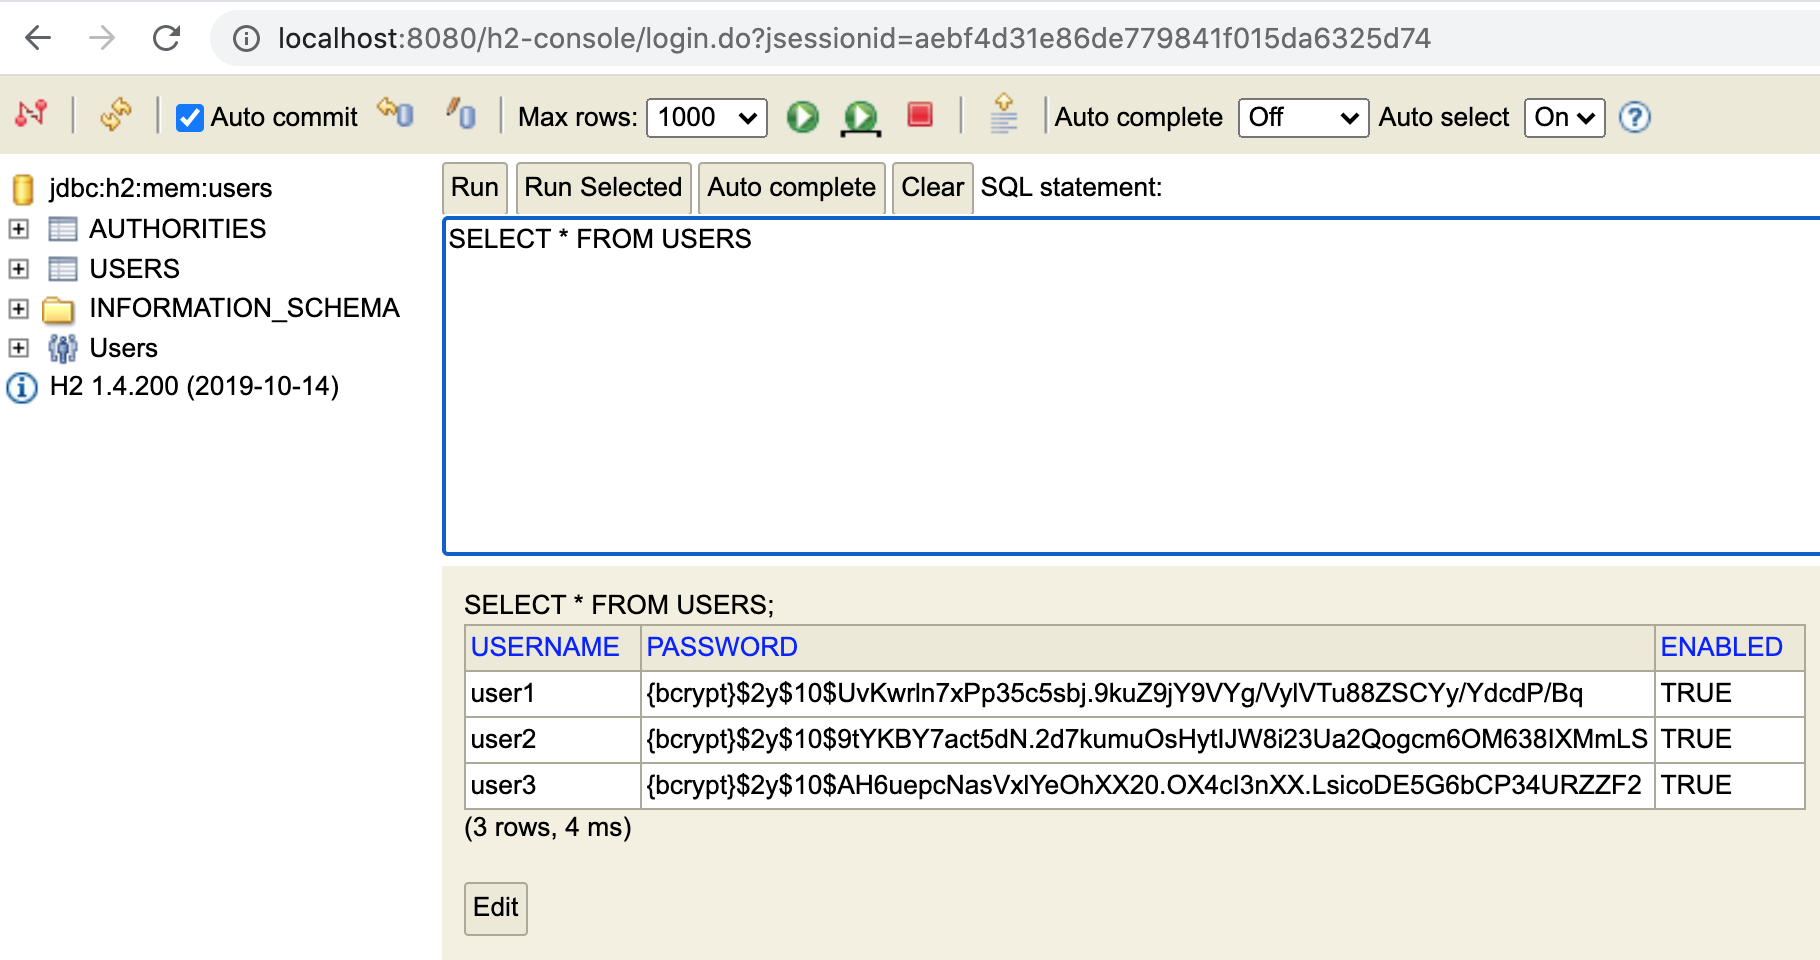
Figure 8. H2 User Access to Encrypted User Passwords
|
7. Final Examples
7.1. Authenticate to All Three UserDetailsServices
With all UserDetailsServices in place, we are able to login
as each user using one of the three sources.
$ curl http://localhost:8080/api/authn/hello?name=jim -u user1:password -v (2)
> Authorization: Basic dXNlcjE6cGFzc3dvcmQ= (1)
hello, jim :caller=user1

$ curl http://localhost:8080/api/authn/hello?name=jim -u user2:password1 (3)
hello, jim :caller=user2

$ curl http://localhost:8080/api/authn/hello?name=jim -u user3:password2 (4)
hello, jim :caller=user3| 1 | we are still sending a base64 encoding of the plaintext password. The cryptographic hash is created server-side. |
| 2 | password is from the H2 database |
| 3 | password1 is form the original in-memory user details |
| 4 | password2 is from the injected in-memory user details |
7.2. Authenticate to All Three Users
With the JDBC UserDetailsService in place with encoded passwords,
we are able to authenticate against all three users.
$ curl http://localhost:8080/api/authn/hello?name=jim -u user1:password (1)
hello, jim :caller=user1

$ curl http://localhost:8080/api/authn/hello?name=jim -u user2:password (1)
hello, jim :caller=user2

$ curl http://localhost:8080/api/authn/hello?name=jim -u user3:password (1)
hello, jim :caller=user3| 1 | three separate user credentials stored in H2 database |
8. Summary
In this module, we learned:
-
the various interfaces and object purpose that are part of the Spring authentication framework
-
how to wire up an
AuthenticationManagerwithAuthenticationProvidersto implement authentication for a configured security filter chain -
how to implement
AuthenticationProvidersusing onlyPasswordEncoderandUserDetailsSourceprimitives -
how to implement in-memory
UserDetailsService -
how to implement a database-backed
UserDetailsService -
how to encode and match encrypted password hashes
-
how to configure security to display the H2 UI and allow it to be functional