1. Abstract
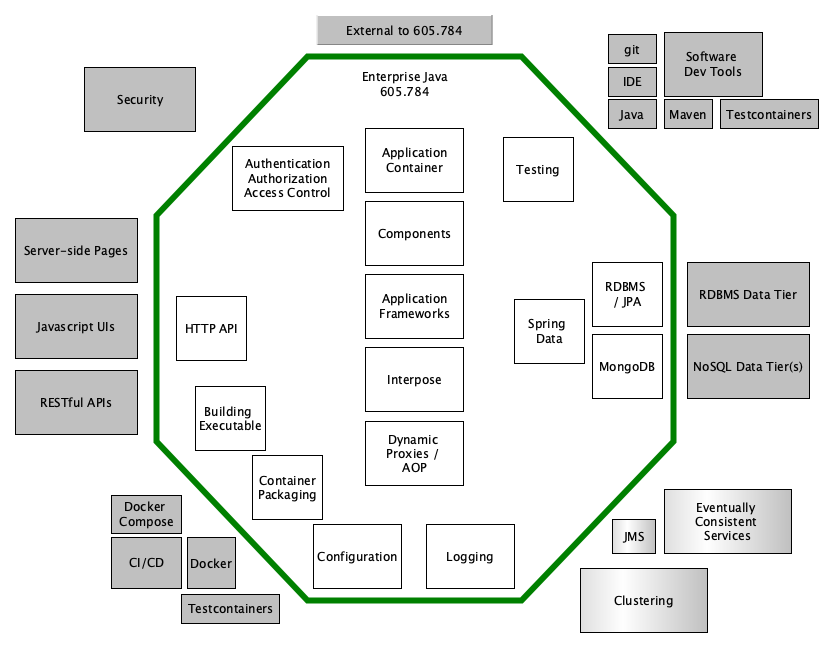
This book contains course notes covering Enterprise Computing with Java. This comprehensive course explores core application aspects for developing, configuring, securing, deploying, and testing a Java-based service using a layered set of modern frameworks and libraries that can be used to develop full services and microservices to be deployed within a container. The emphasis of this course is on the center of the application (e.g., Spring, Spring Boot, Spring Data, and Spring Security) and will lay the foundation for other aspects (e.g., API, SQL and NoSQL data tiers, distributed services) covered in related courses.
Students will learn thru lecture, examples, and hands-on experience in building multi-tier enterprise services using a configurable set of server-side technologies.
Students will learn to:
-
Implement flexibly configured components and integrate them into different applications using inversion of control, injection, and numerous configuration and auto-configuration techniques
-
Implement unit and integration tests to demonstrate and verify the capabilities of their applications using JUnit and Spock
-
Implement basic API access to service logic using using modern RESTful approaches that include JSON and XML
-
Implement basic data access tiers to relational and NoSQL databases using the Spring Data framework
-
Implement security mechanisms to control access to deployed applications using the Spring Security framework
Using modern development tools students will design and implement several significant programming projects using the above-mentioned technologies and deploy them to an environment that they will manage.
The course is continually updated and currently based on Java 11, Spring 5.x, and Spring Boot 2.x.
Enterprise Computing with Java (605.784.8VL) Course Syllabus
copyright © 2025 jim stafford (jim.stafford@jhu.edu)
2. Course Description
2.1. Meeting Times/Location
-
Wednesdays, 4:30-7:10pm EST
-
onsite: APL K219
-
via Zoom Meeting ID: 931 3887 6892
-
2.2. Course Goal
The goal of this course is to master the design and development challenges of a single application instance to be deployed in an enterprise-ready Java application framework. This course provides the bedrock for materializing broader architectural solutions within the body of a single instance.
2.3. Description
This comprehensive course explores core application aspects for developing, configuring, securing, deploying, and testing a Java-based service using a layered set of modern frameworks and libraries that can be used to develop full services and microservices to be deployed within a container. The emphasis of this course is on the center of the application (e.g., Spring, Spring Boot, Spring Data, and Spring Security) and will lay the foundation for other aspects (e.g., API, SQL and NoSQL data tiers, distributed services) covered in related courses.
Students will learn thru lecture, examples, and hands-on experience in building multi-tier enterprise services using a configurable set of server-side technologies.
Students will learn to:
-
Implement flexibly configured components and integrate them into different applications using inversion of control, injection, and numerous configuration and auto-configuration techniques
-
Implement unit and integration tests to demonstrate and verify the capabilities of their applications using JUnit
-
Implement API access to service logic using using modern RESTful approaches that include JSON and XML
-
Implement data access tiers to relational and NoSQL (MongoDB) databases using the Spring Data framework
-
Implement security mechanisms to control access to deployed applications using the Spring Security framework
-
Package, run, and test services within a Docker container
Using modern development tools students will design and implement several significant programming projects using the above-mentioned technologies in an environment that they will manage.
The course is continually updated and currently based on Java 21, Maven 3, Spring 6.x, and Spring Boot 3.x.
2.4. Student Background
-
Prerequisite: 605.481 Distributed Development on the World Wide Web or equivalent
-
Strong Java programming skills are assumed
-
Familiarity with Maven and IDEs is helpful
-
Familiarity with Docker (as a user) can be helpful in setting up a local development environment quickly
2.5. Student Commitment
-
Students should be prepared to spend between 6-10 hours a week outside of class. Time spent can be made efficient by proactively keeping up with class topics and actively collaborating with the instructor and other students in the course.
2.6. Course Text(s)
The course uses no mandatory text. The course comes with many examples, course notes for each topic, and references to other free Internet resources.
2.7. Required Software
Students are required to establish a local development environment.
-
Software you will need to load onto your local development environment:
-
Git Client
-
Java JDK 21
-
Maven 3 (>= 3.6.3)
-
IDE (IntelliJ IDEA Community Edition or Pro or Eclipse/STS)
-
The instructor will be using IntelliJ IDEA CE in class, but Eclipse/STS is also a good IDE option. It is best to use what you are already comfortable using.
-
-
JHU VPN (Open Pulse Secure) — workarounds are available
-
-
Software you will ideally load onto your local development environment:
-
Docker
-
Docker can be used to automate software installation and setup and implement deployment and integration testing techniques. Several pre-defined images, ready to launch, will be made available in class.
-
-
curl or something similar
-
Postman API Client or something similar
-
-
Software you will need to install if you do not have Docker
-
MongoDB
-
-
High visibility software you will use that will get downloaded and automatically used through Maven.
-
application framework (Spring Boot, Spring).
-
SLF/Logback
-
a relational database (H2 Database Engine) and JPA persistence provider (Hibernate)
-
JUnit
-
Testcontainers
-
2.8. Course Structure
Lectures are conducted live each week and reflect recent/ongoing student activity. Students may optionally attend the lecture live at JHU, online, and/or watch the recording based on their personal schedule and review. There is no required attendance for the live lecture. Emphasis will be made to make the recorded video a valuable asset in all cases.
The course materials consist of a large set of examples that you will download, build, and work with locally. The course also provides a set of detailed course notes for each lecture and an associated assignment active at all times during the semester. Topics and assignments have been grouped into application development, service/API tier, containers, and data tier. Each group consists of multiple topics that span one or more weeks.
The examples are available in a Gitlab public repository. The course notes are available in HTML and PDF format for download. All content or links to content is published on the course public website (https://jcs.ep.jhu.edu/ejava-springboot/). To help you locate and focus on current content and not be overwhelmed with the entire semester, examples and links to content are activated as the semester progresses. A list of "What is new" and "Student TODOs" is published weekly before class to help you keep up to date and locate relevant material. The complete set of content from the previous semester is always available from the legacy link (https://jcs.ep.jhu.edu/legacy-ejava-springboot/)
2.9. Grading
-
100 >= A >= 90 > B >= 80 > C >= 70 > F
Assessment |
% of Semester Grade |
Class/Newsgroup Participation |
10% (9pm EST, Wed weekly cut-off) |
Assignment 0: Application Build |
5% (##) |
Assignment 1: Application Config |
20% |
Assignment 2: Web API |
15% |
Assignment 3: Security |
15% |
Assignment 4: Integration Testing and Containers |
10% |
Assignment 5: Database |
25% |
Do not host your course assignments in a public Internet repository.
Course assignments should not be posted in a public Internet repository. If using an Internet repository, only the instructor should have access. |
-
Assignments will be done individually and most are graded 100 though 0, based on posted project grading criteria.
-
## Assignment 0 will be graded on a done (100)/not-done(0) basis and must be turned in on-time in order to qualify for a REDO. The intent of this requirement is to promote early activity with development and early exchange of questions/answers and artifacts between students and instructor.
-
-
Class/newsgroup participation will be based on instructor judgment whether the student has made a contribution to class to either the classroom or newsgroup on a consistent weekly basis. A newsgroup contribution may be a well-formed technical observation/lesson learned, a well formed question that leads to a well formed follow up from another student, or a well formed answer/follow-up to another student’s question. Well formed submissions are those that clearly summarize the topic in the subject, and clearly describe the objective, environment, and conditions in the body. The instructor will be the judge of whether a newsgroup contribution meets the minimum requirements for the week. The intent of this requirement is to promote active and open collaboration between class members.
-
Weekly cut-off for newsgroup contributions is each Wed @9pm EST
-
2.10. Grading Policy
-
Late assignments will be deducted 10pts/week late, starting after the due date/time, with a one-time exception. A student may submit a single project up to 4 days late without receiving approval and still receive complete credit. Students taking advantage of the "free first pass" should still submit an e-mail to the instructor and grader(s) notifying them of their intent.
-
Class attendance is strongly recommended, but not mandatory. The student is responsible for obtaining any written or oral information covered during their absence. Each session will be recorded. A link to the recording will be posted on Canvas.
2.11. Academic Integrity
Collaboration of ideas and approaches are strongly encouraged. You may use partial solutions provided by others as a part of your project submission. However, the bulk usage of another students implementation or project will result in a 0 for the project. There is a difference between sharing ideas/code snippets and turning in someone else’s work as your own. When in doubt, document your sources.
Do not host your course assignments in a public Internet repository.
2.12. Instructor Availability
I am available at least 20min before class, breaks, and most times after class for extra discussion. I monitor/respond to e-mails and the newsgroup discussions and hold ad-hoc office hours via Zoom in the evening and early morning hours (EST) plus weekends.
I provide detailed answers to assignment and technical questions through the course newsgroup. You can get individual, non-technical questions answered via the instructor email.
2.13. Communication Policy
I provide detailed answers to assignment and technical questions through the course newsgroup. You can get individual, non-technical questions answered via email but please direct all technical and assignment questions to the newsgroup. If you have a question or make a discovery — it is likely pertinent to most of the class and you are the first to identify.
-
Newsgroup: [Canvas Course Discussions]
-
Instructor Email: jim.stafford@jhu.edu
I typically respond to all e-mails and newsgroup posts in the evening and early morning hours (EST). Rarely will a response take longer than 24 hours. It is very common for me to ask for a copy of your broken project so that I can provide more analysis and precise feedback. This is commonly transmitted as an early submission in Canvas.
2.14. Office Hours
Students needing further assistance are welcome to schedule a web meeting using Zoom Conferencing. Most conference times will be between 8 and 10pm EST and 6am to 5pm EST weekends.
3. Course Assignments
3.1. General Requirements
-
Assignments must be submitted to Canvas with source code in a standard archive file. "target" directories with binaries are not needed and add unnecessary size.
-
All assignments must be submitted with a README that points out how the project meets the assignment requirements.
-
All assignments must be written to build and run in the grader’s environment in a portable manner using Maven 3. This will be clearly spelled out during the course and you may submit partial assignments early to get build portability feedback (not early content grading feedback).
-
Test Cases must be written using JUnit 5 and run within the Maven surefire and failsafe environments.
-
The course repository will have an assignment-support and assignment-starter set of modules.
-
The assignment-support modules are to be referenced as a dependency and not cloned into student submissions.
-
The assignment-starter modules are skeletal examples of work to be performed in the submitted assignment.
-
3.2. Submission Guidelines
You should test your application prior to submission by
-
Verify that your project does not require a pre-populated database. All setup must come through automated test setup.
This will make sure you are not depending on any residue schema or data in your database.
-
Run maven clean and archive your project from the root without pre-build target directory files.
This will help assure you are only submitting source files and are including all necessary source files within the scope of the assignment.
-
Move your localRepository (or set your settings.xml#localRepository value to a new location — do not delete your primary localRepository)
This will hide any old module SNAPSHOTs that are no longer built by the source (e.g., GAV was changed in source but not sibling dependency).
-
Explode the archive in a new location and run mvn clean install from the root of your project.
This will make sure you do not have dependencies on older versions of your modules or manually installed artifacts. This, of course, will download all project dependencies and help verify that the project will build in other environments. This will also simulate what the grader will see when they initially work with your project.
-
Make sure the README documents all information required to demonstrate or navigate your application and point out issues that would be important for the evaluator to know (e.g., "the instructor said…")
4. Syllabus
# | Date | Lectures | Assignments/Notes |
---|---|---|---|
Aug27 |
|
|
|
|
|||
Sep03 |
|
||
Sep10 |
|
||
Logging notes |
|
||
Sep17 |
|
# | Date | Lectures | Assignments/Notes |
---|---|---|---|
Sep24 |
|
||
Oct01 *Async |
|||
Oct08 |
|
||
Oct15 |
|
||
Oct22 |
|
# | Date | Lectures | Assignments/Notes |
---|---|---|---|
Oct29 |
|||
Nov05 |
|||
Nov12 |
|||
Nov19 |
|||
Nov26 |
Thanksgiving |
no class |
|
Dec03 |
|
Development Environment Setup
copyright © 2025 jim stafford (jim.stafford@jhu.edu)
5. Introduction
Participation in this course requires a local development environment. Since competence using Java is a prerequisite for taking the course, much of the content here is likely already installed in your environment.
Software versions do not have to be latest-and-greatest. For the most part, the firm requirement is that
-
your JDK must be at least Java 21
-
the code you submit must be compliant with Java 21 environments
You must manually download and install some of the software locally (e.g., IDE). Some software installations (e.g., MongoDB) have simple Docker options. The remaining set will download automatically and run within Maven. Some software is needed day 1. Others can wait.
Rather than repeat detailed software installation procedures for the various environments, I will list each one, describe its purpose in the class, and direct you to one or more options to obtain. Please make use of the course newsgroup if you run into trouble or have questions.
5.1. Goals
The student will:
-
setup required tooling in local development environment and be ready to work with the course examples
5.2. Objectives
At the conclusion of these instructions, the student will have:
-
installed Java JDK 21
-
installed Maven 3
-
installed a Git Client and checked out the course examples repository
-
installed a Java IDE (IntelliJ IDEA Community Edition, Eclipse Enterprise, or Eclipse/STS)
-
installed a Web API Client tool
-
optionally installed Docker
-
conditionally installed Mongo
6. Software Setup
6.1. Java JDK (immediately)
You will need a JDK 21 compiler and its accompanying JRE environment immediately in class. Everything we do will revolve around a JVM.
-
For Mac and Unix-like platforms, SDKMan is a good source for many of the modern JDK images.
$ sdk list java | grep 21 | grep ora
| >>> | 21.0.8 | oracle | installed | 21.0.8-oracle
| | 21.0.7 | oracle | | 21.0.7-oracle
| | 21.0.6 | oracle | | 21.0.6-oracle
...
$ sdk install java 21.0.8-oracle
After installing and placing the bin
directory in your PATH, you should be able to execute the following commands and output a version 21.x of the JRE and compiler.
$ java --version java 21.0.8 2025-07-15 LTS Java(TM) SE Runtime Environment (build 21.0.8+12-LTS-250) Java HotSpot(TM) 64-Bit Server VM (build 21.0.8+12-LTS-250, mixed mode, sharing) $ javac --version javac 21.0.8
6.2. Git Client (immediately)
You will need a Git client immediately in class. Note that most IDEs have a built-in/internal Git client capability, so the command line client shown here may not be absolutely necessary. If you chose to use your built-in IDE Git client, just translate any command-line instructions to GUI commands. If you have git already installed, it is highly unlikely you need to upgrade.
Download and install a Git Client.
-
All platforms - Git-SCM
I have git installed through brew on macOS and recently updated using the following $ brew upgrade git |
If you already have git installed and working — no need for upgrade to latest. |
$ git version git version 2.51.0
Checkout the course baseline.
$ git clone https://gitlab.com/ejava-javaee/ejava-springboot.git ... $ ls | sort ... assignment-starter assignment-support build common ... pom.xml
Each week you will want to update your copy of the examples as I updated and release changes.
$ git checkout main # switches to main branch $ git pull # merges in changes from origin
Updating Changes to Modified Directory
If you have modified the source tree, you can save your changes to a new branch using the following: $ git status #show me which files I changed $ git diff #show me what the changes were $ git checkout -b new-branch #create new branch $ git commit -am "saving my stuff" #commit my changes to new branch $ git checkout main #switch back to course baseline $ git pull #get latest course examples/corrections |
Saving Modifications to an Existing Branch
If you have made modifications to the source tree while in the wrong branch, you can save your changes in an existing branch using the following: $ git stash #save my changes in a temporary area $ git checkout existing-branch #go to existing branch $ git commit -am "saving my stuff" #commit my changes to existing branch $ git checkout main #switch back to course baseline $ git pull #get latest course examples/corrections |
6.3. Maven 3 (immediately)
You will need Maven immediately in class. We use Maven to create repeatable and portable builds in class. This software build system is rivaled by Gradle. However, everything presented in this course is based on Maven and there is no feasible way to make that optional.
Download and install Maven 3.
-
All platforms - Apache Maven Project
Place the $MAVEN_HOME/bin directory in your $PATH so that the mvn
command can be found.
$ mvn --version Apache Maven 3.9.11 (3e54c93a704957b63ee3494413a2b544fd3d825b) Maven home: /usr/local/Cellar/maven/3.9.11/libexec Java version: 21.0.8, vendor: Oracle Corporation, runtime: .../.sdkman/candidates/java/21.0.8-oracle Default locale: en_US, platform encoding: UTF-8 OS name: "mac os x", version: "15.6.1", arch: "aarch64", family: "mac"
Setup any custom settings in $HOME/.m2/settings.xml
.
This is an area where you and I can define environment-specific values referenced by the build.
<?xml version="1.0"?>
<settings xmlns="http://maven.apache.org/POM/4.0.0"
xmlns:xsi="http://www.w3.org/2001/XMLSchema-instance"
xsi:schemaLocation="http://maven.apache.org/POM/4.0.0 http://maven.apache.org/xsd/settings-1.0.0.xsd">
<!-- keep as default
<localRepository>somewhere_else</localRepository>
-->
<offline>false</offline>
<mirrors>
<!-- uncomment when JHU VPN unavailable
<mirror>
<id>ejava-nexus</id>
<mirrorOf>ejava-nexus,ejava-nexus-snapshots,ejava-nexus-releases</mirrorOf>
<url>file://${user.home}/.m2/repository/</url>
</mirror>
--> (1) (2)
</mirrors>
<profiles>
</profiles>
<activeProfiles>
<!-- activate Docker modules when published
<activeProfile>docker</activeProfile>
-->
</activeProfiles>
</settings>
1 | make sure your ejava-springboot repository:main branch is up to date and installed (i.e., mvn clean install -f ./build; mvn clean install ) prior to using local mirror |
2 | the URL in the mirror must be consistent with the localRepository value.
The value shown here assumes the default, $HOME/.m2/repository value. |
Attempt to build the source tree. Report any issues to the course newsgroup.
$ pwd .../ejava-springboot $ mvn install -f build ... [INFO] ---------------------------------------- [INFO] BUILD SUCCESS [INFO] ---------------------------------------- $ mvn clean install ... [INFO] ---------------------------------------- [INFO] BUILD SUCCESS [INFO] ----------------------------------------
6.4. Java IDE (immediately)
You will realistically need a Java IDE very early in class.
If you are a die-hard vi, emacs, or text editor user — you can do a lot with your current toolset and Maven.
However, when it comes to code refactoring, inspecting framework API classes, and debugging, there is no substitute for a good IDE.
I have used Eclipse/STS for many years and some students in previous semester have used Eclipse installations from a previous Java-development course or work experience.
They are free and work well.
I will actively be using IntelliJ IDEA Community Edition.
The community edition is free and contains most of the needed support.
The professional edition is available free for 1 year (plus renewals) to anyone supplying a .edu
e-mail.
It is up to you what IDE you use. Using something familiar is always the best first choice. |
Download and install an IDE for Java development.
-
IntelliJ IDEA Community Edition
-
All platforms - Jetbrains IntelliJ
-
-
Eclipse/STS
-
All platforms - Spring.io /tools
-
-
Eclipse/Enterprise Java and Web Developers (or whatever…)
-
All platforms - eclipse.org
-
Load an attempt to run the examples in
-
app/app-build/java-app-example
6.5. Web API Client tool (not immediately)
Within the first month of the course, it will be helpful for you to have a client that can issue POST, PUT, and DELETE commands in addition to GET commands over HTTP. This will not be necessary until a few weeks into the semester.
Some options include:
-
curl - command line tool popular in Unix environments and likely available for Windows. All of my Web API call examples are done using curl.
-
Postman API Client - a UI-based tool for issuing and viewing web requests/responses. I personally do not like how "enterprisey" Postman has become. It used to be a simple browser plugin tool. However, the free version works and seems to only require a sign-up login.
$ curl -v -X GET https://ep.jhu.edu/
<!DOCTYPE html>
<html class="no-js" lang="en">
<head>
...
<title>Johns Hopkins Engineering | Part-Time & Online Graduate Education</title>
...
6.6. Install Docker (not immediately)
We will cover and make use of Docker since it is highly likely that anything you develop professionally will be deployed with Docker or will leverage it in some way. Spring/Spring Boot has also embraced Docker and Testcontainers as their preferred integration environment. There will be time-savings setup of backend databases as well as options in assignments where Docker desired. Once the initial investment of installing Docker has been tackled — software deployments, installation, and executions become very portable and easy to achieve.
I have made Docker optional for the students who cannot install. Let me know where you stand on this installation. |
Docker can serve three purposes in class:
-
automates example database and JMS resource setup
-
provides a popular example deployment packaging
-
provides an integration test platform option with Maven plugins or with Testcontainers
Without Docker installation, you will
-
need to manually install MongoDB native to your environment
-
be limited to conceptual coverage of deployment and testing options in class
Download and install Docker (called "Docker Desktop" these days).
-
All platforms - Docker.com
-
Optionally install - docker-compose
$ docker -v
Docker version 28.3.2, build 578ccf6
$ docker-compose -v
Docker Compose version v2.39.1-desktop.1
The Docker Compose capability is now included with Docker via a Docker plugin and executed using docker compose versus requiring a separate docker-compose wrapper.
Functionally they are the same.
The docker-compose script is only required for some legacy cases.
|
$ docker compose --help
Usage: docker compose [OPTIONS] COMMAND
Define and run multi-container applications with Docker
...
$ docker-compose --help
Usage: docker compose [OPTIONS] COMMAND
Define and run multi-container applications with Docker
...
6.6.1. docker-compose Test Drive
With the course baseline checked out, you should be able to perform the following. Your results for the first execution will also include the download of images.
$ docker compose -p ejava up -d mongodb postgres (1)(2) Creating ejava_postgres_1 ... done Creating ejava_mongodb_1 ... done
1 | -p option sets the project name to a well-known value (directory name is default) |
2 | up starts services and -d runs them all in the background |
$ docker compose -p ejava stop mongodb postgres (1) Stopping ejava_mongodb_1 ... done Stopping ejava_postgres_1 ... done $ docker compose -p ejava rm -f mongodb postgres (2) Going to remove ejava_mongodb_1, ejava_postgres_1 Removing ejava_mongodb_1 ... done Removing ejava_postgres_1 ... done
1 | stop pauses the running container |
2 | rm removes state assigned to the stopped container. -f does not request confirmation. |
6.7. MongoDB (later)
You will need MongoDB in the later 1/3 of the course. It is somewhat easy to install locally, but a mindless snap — configured exactly the way we need it to be — if we use Docker. Feel free to activate a free Atlas account if you wish, but what gets turned in for grading should either use a standard local URL (using Flapdoodle (via Maven), Docker, or Testcontainers).
If you have not and will not be installing Docker, you will need to install and set up a local instance of Mongo.
-
All platforms - MongoDB
Introduction to Enterprise Java Frameworks
copyright © 2025 jim stafford (jim.stafford@jhu.edu)
7. Introduction
7.1. Goals
The student will learn:
-
constructs and styles for implementing code reuse
-
what is a framework
-
what has enabled frameworks
-
a historical look at Java frameworks
7.2. Objectives
At the conclusion of this lecture, the student will be able to:
-
identify the key difference between a library and framework
-
identify the purpose for a framework in solving an application solution
-
identify the key concepts that enable a framework
-
identify specific constructs that have enabled the advancement of frameworks
-
identify key Java frameworks that have evolved over the years
8. Code Reuse
Code reuse is the use of existing software to create new software. [1]
We leverage code reuse to help solve either repetitive or complex tasks so that we are not repeating ourselves, we reduce errors, and we achieve more complex goals.
8.1. Code Reuse Trade-offs
On the positive side, we do this because we have confidence that we can delegate a portion of our job to code that has been proven to work. We should not need to again test what we are using.
On the negative side, reuse can add dependencies bringing additional size, complexity, and risk to our solution. If all you need is a spoon — do you need to bring the entire kitchen?
8.2. Code Reuse Constructs
Code reuse can be performed using several structural techniques
- Method Call
-
We can wrap functional logic within a method within our own code base. We can make calls to this method from the places that require that same task performed.
- Classes
-
We can capture state and functional abstractions in a set of classes. This adds some modularity to related reusable method calls.
- Interfaces
-
Abstract interfaces can be defined as placeholders for things needed but supplied elsewhere. This could be because of different options provided or details being supplied elsewhere.
- Modules
-
Reusable constructs can be packaged into separate physical modules so that they can be flexibly used or not used by our application.
8.3. Code Reuse Styles
There are two basic styles of code reuse, and they primarily have to with control.
![]() Figure 1. Library/ Framework/Code Relationship [2]
|
|
It’s not always a one-or-the-other style. Libraries can have mini frameworks within them. Even the JSON/XML parser example can be a mini-framework of customizations and extensions.
9. Frameworks
9.1. Framework Informal Description
A successful software framework is a body code that has been developed from the skeletons of successful and unsuccessful solutions of the past and present within a common domain of challenge. A framework is a generalization of solutions that provides for key abstractions, opportunity for specialization, and supplies default behavior to make the on-ramp easier and also appropriate for simpler solutions.
-
"We have done this before. This is what we need and this is how we do it."
A framework is much bigger than a pattern instantiation. A pattern is commonly at the level of specific object interactions. We typically have created or commanded something at the completion of a pattern — but we have a long way to go in order to complete our overall solution goal.
-
Pattern Completion: "that is not enough — we are not done"
-
Framework Completion: "I would pay (or get paid) for that!"
A successful framework is more than many patterns grouped together. Many patterns together is just a sea of calls — like a large city street at rush hour. There is a pattern of when people stop and go, make turns, speed up, or yield to let someone into traffic. Individual tasks are accomplished, but even if you could step back a bit — there is little to be understood by all the interactions.
-
"Where is everyone going?"
A framework normally has a complex purpose. We have typically accomplished something of significance or difficulty once we have harnessed a framework to perform a specific goal. Users of frameworks are commonly not alone. Similar accomplishments are achieved by others with similar challenges but varying requirements.
-
"This has gotten many to their target. You just need to supply …"
Well-designed and popular frameworks can operate at different scale — not just a one-size-fits-all all-of-the-time. This could be for different sized environments or simply for developers to have a workbench to learn with, demonstrate, or develop components for specific areas.
-
"Why does the map have to be actual size?"
9.2. Framework Characteristics
The following distinguishing features for a framework are listed on Wikipedia. [3] I will use them to structure some further explanations.
- Inversion of Control (IoC)
-
Unlike a procedural algorithm where our concrete code makes library calls to external components, a framework calls our code to do detailed things at certain points. All the complex but reusable logic has been abstracted into the framework.
-
"Don’t call us. We’ll call you." is a very common phrase to describe inversion of control
-
- Default Behavior
-
Users of the framework do not have to supply everything. One or more selectable defaults try to do the common, right thing.
-
Remember — the framework developers have solved this before and have harvested the key abstractions and processing from the skeletal remains of previous solutions
-
- Extensibility
-
To solve the concrete case, users of the framework must be able to provide specializations that are specific to their problem domain.
-
Framework developers — understanding the problem domain — have pre-identified which abstractions will need to be specialized by users. If they get that wrong, it is a sign of a bad framework.
-
- Non-modifiable Framework code
-
A framework has a tangible structure; well-known abstractions that perform well-defined responsibilities. That tangible aspect is visible in each of the concrete solutions and is what makes the product of a framework immediately understandable to other users of the framework.
-
"This is very familiar"
-
10. Framework Enablers
10.1. Dependency Injection
A process to enable Inversion of Control (IoC), whereby objects define their dependencies [4] and the manager assembles and connects the objects according to definitions.
The "manager" can be your setup code ("POJO" setup) or in realistic cases a "container" (see later definition)
10.2. POJO
A Plain Old Java Object (POJO) is what the name says it is. It is nothing more than an instantiated Java class.
A POJO normally will address the main purpose of the object and can be missing details or dependencies that give it complete functionality. Those details or dependencies are normally for specialization and extensibility that is considered outside the main purpose of the object.
-
Example: POJO may assume inputs are valid but does not know validation rules.
10.3. Component
A component is a fully assembled set of code (one or more POJOs) that can perform its duties for its clients. A component will normally have a well-defined interface and a well-defined set of functions it can perform.
A component can have zero or more dependencies on other components, but there should be no further mandatory assembly once your client code gains access to it.
10.4. Bean
A generalized term that tends to refer to an object in the range of a POJO to a component that encapsulates something. A supplied "bean" takes care of aspects that we do not need to have knowledge of.
In Spring, the objects that form the backbone of your application and that are managed by the Spring IoC container are called beans. A bean is an object that is instantiated, assembled, and managed by a Spring IoC container. Otherwise, a bean is simply one of many objects in your application. Beans, and the dependencies among them, are reflected in the configuration metadata used by a container. [4]
Introduction to the Spring IoC Container and Beans
You will find that I commonly use the term "component" in the lecture notes — to be a bean that is fully assembled and managed by the container. |
10.5. Container
A container is the assembler and manager of components.
Both Docker and Spring are two popular containers that work at two different levels but share the same core responsibility.
10.5.1. Docker Container Definition
-
Docker supplies a container that assembles and packages software so that it can be generically executed on remote platforms.
A container is a standard unit of software that packages up code and all its dependencies, so the application runs quickly and reliably from one computing environment to another. [5]
Use containers to Build Share and Run your applications
10.5.2. Spring Container Definition
-
Spring supplies a container that assembles and packages software to run within a JVM.
(The container) is responsible for instantiating, configuring, and assembling the beans. The container gets its instructions on what objects to instantiate, configure, and assemble by reading configuration metadata. The configuration metadata is represented in XML, Java annotations, or Java code. It lets you express the objects that compose your application and the rich interdependencies between those objects. [6]
Container Overview
10.6. Interpose
(Framework/Spring) Containers do more than just configure and assemble simple POJOs. Containers can apply layers of functionality onto beans when wrapping them into components. Examples:
-
Perform validation
-
Enforce security constraints
-
Manage transaction for backend resource
-
Perform method in a separate thread
11. Language Impact on Frameworks
As stated earlier, frameworks provide a template of behavior — allowing for configuration and specialization. Over the years, the ability to configure and to specialize has gone through significant changes with language support.
11.1. XML Configurations
Prior to Java 5, the primary way to identify components was with an XML file. The XML file would identify a bean class provided by the framework user. The bean class would either implement an interface or comply with JavaBean getter/setter conventions.
11.1.1. Inheritance
Early JavaEE EJB defined a set of interfaces that represented things like stateless and stateful sessions and persistent entity classes. End-users would implement the interface to supply specializations for the framework. These interfaces had many callbacks that were commonly not needed but had to be tediously implemented with noop return statements — which produced some code bloat. Java interfaces did not support default implementations at that time.
11.1.2. Java Reflection
Early Spring bean definitions used some interface implementation, but more heavily leveraged compliance to JavaBean setter/getter behavior and Java reflection. Bean classes listed in the XML were scanned for methods that started with "set" or "get" (or anything else specially configured) and would form a call to them using Java reflection. This eliminated much of the need for strict interfaces and noop boilerplate return code.
11.2. Annotations
By the time Java 5 and annotations arrived in 2005 (late 2004), the Java framework worlds were drowning in XML. During that early time, everything was required to be defined. There were no defaults.
Although changes did not seem immediate, JavaEE frameworks like EJB 3.0/JPA 1.0 provided a substantial example for the framework communities in 2006. They introduced "sane" defaults and a primary (XML) and secondary (annotation) override system to give full choice and override of how to configure. Many things just worked right out of the box and only required a minor set of annotations to customize.
Spring went a step further and created a Java Configuration capability to be a 100% replacement for the old XML configurations. XML files were replaced by Java classes. XML bean definitions were replaced by annotated factory methods. Bean construction and injection was replaced by instantiation and setter calls within the factory methods.
Both JavaEE and Spring supported class level annotations for components that were very simple to instantiate and followed standard injection rules.
11.3. Lambdas
Java 8 brought in lambdas and functional processing, which from a strictly syntactical viewpoint is primarily a shorthand for writing an implementation to an interface (or abstract class) with only one abstract method.
You will find many instances in modern libraries where a call will accept a lambda function to implement core business functionality within the scope of the called method. Although — as stated — this is primarily syntactical sugar, it has made method definitions so simple that many more calls take optional lambdas to provide convenient extensions.
12. Key Frameworks
In this section, I am going to list a limited set of key Java framework highlights. In following the primarily Java path for enterprise frameworks, you will see a remarkable change over the years.
12.1. CGI Scripts
The Common Gateway Interface (CGI) was the cornerstone web framework when Java started coming onto the scene. [7] CGI was created in 1993 and, for the most part, was a framework for accepting HTTP calls, serving up static content and calling scripts to return dynamic content results. [8]
The important part to remember is that CGI was 100% stateless relative to backend resources. Each dynamic script called was a new, heavyweight operating system process and new connection to the database. Java programs were shoehorned into this framework as scripts.
12.2. Jakarta EE
Jakarta EE, formerly the Java Platform, Enterprise Edition (JavaEE) and Java 2 Platform, Enterprise Edition (J2EE) is a framework that extends the Java Platform, Standard Edition (Java SE) to be an end-to-end Web to database functionality and more. [9] Focusing only on the web and database portions here, JakartaEE provided a means to invoke dynamic scripts — written in Java — within a process thread and cached database connections.
The initial versions of Jakarta EE aimed big. Everything was a large problem and nothing could be done simply. It was viewed as being overly complex for most users. Spring was formed initially as a means to make J2EE simpler and ended up soon being an independent framework of its own.
J2EE first was released in 1999 and guided by Sun Microsystems. The Servlet portion was likely the most successful portion of the early release. The Enterprise Java Beans (EJB) portion was not realistically usable until JavaEE 5 / post 2006. By then, frameworks like Spring had taken hold of the target community.
In 2010, Sun Microsystems and control of both JavaSE and JavaEE was purchased by Oracle and seemed to progress but on a slow path. By JavaEE 8 in 2017, the framework had become very Spring-like with its POJO-based design. In 2017, Oracle transferred ownership of JavaEE to Jakarta. The JavaEE framework and libraries paused for a few years for naming changes and compatibility releases. [9]
12.3. Spring
Spring 1.0 was released in 2004 and was an offshoot of a book written by Rod Johnson "Expert One-on-One J2EE Design and Development" that was originally meant to explain how to be successful with J2EE. [10]
In a nutshell, Rod Johnson and the other designers of Spring thought that rather than starting with a large architecture like J2EE, one should start with a simple bean and scale up from there without boundaries. Small Spring applications were quickly achieved and gave birth to other frameworks like the Hibernate persistence framework (first released in 2003) which significantly influenced the EJB3/JPA standard. [11]
Spring and Spring Boot use many JavaEE(javax)/Jakarta libraries.
Spring 6 / Spring Boot 3 updated to Jakarta Maven artifact versions that renamed classes/properties to the jakarta
package naming.
12.4. Jakarta Persistence API (JPA)
The Jakarta Persistence API (JPA), formerly the Java Persistence API, was developed as a part of the JavaEE community and provided a framework definition for persisting objects in a relational database. JPA fully replaced the original EJB Entity Beans standards of earlier releases. It has an API, provider, and user extensions. [12] The main providers of JPA were EclipseLink (formerly TopLink from Oracle) and Hibernate.
Frameworks should be based on the skeletons of successful implementations
Early EJB Entity Bean standards (< 3) were not thought to have been based on successful implementations.
The persistence framework failed to deliver, was modified with each major release, and eventually replaced by something that formed from industry successes.
|
JPA has been a wildly productive API. It provides simple API access and many extension points for DB/SQL-aware developers to supply more efficient implementations. JPA’s primary downside is likely that it allows Java developers to develop persistent objects without thinking of database concerns first. One could hardly blame that on the framework.
12.5. Spring Data
Spring Data is a data access framework centered around a core data object and its primary key — which is very synergistic with Domain-Driven Design (DDD) Aggregate and Repository concepts. [13]
-
Persistence models like JPA allow relationships to be defined to infinity and beyond.
-
In DDD, the persisted object has a firm boundary and only IDs are allowed to be expressed when crossing those boundaries.
-
These DDD boundary concepts are very consistent with the development of microservices — where large transactional monoliths are broken down into eventually consistent smaller services.
By limiting the scope of the data object relationships, Spring has been able to automatically define an extensive CRUD (Create, Read, Update, and Delete), query, and extension framework for persisted objects on multiple storage mechanisms.
We will be working with Spring Data JPA and Spring Data Mongo in this class. With the bounding DDD concepts, the two frameworks have an amazing amount of API synergy between them.
12.6. Spring Boot
Spring Boot was first released in 2014. Rather than take the "build anything you want, any way you want" approach in Spring, Spring Boot provides a framework for providing an opinionated view of how to build applications. [14]
-
By adding a dependency, a default implementation is added with "sane" defaults.
-
By setting a few properties, defaults are customized to your desired settings.
-
By defining a few beans, you can override the default implementations with local choices.
There is no external container in Spring Boot. Everything gets boiled down to an executable JAR and launched by a simple Java main (and a lot of other intelligent code).
Our focus will be on Spring Boot, Spring, and lower-level Spring and external frameworks.
13. Summary
In this module we:
-
identified the key differences between a library and framework
-
identify the purpose for a framework in solving an application solution
-
identify the key concepts that enable a framework
-
identify specific constructs that have enabled the advance of frameworks
-
identify key Java frameworks that have evolved over the years
Pure Java Main Application
copyright © 2025 jim stafford (jim.stafford@jhu.edu)
14. Introduction
This material provides an introduction to building a bare bones Java application using a single, simple Java class, packaging that in a Java ARchive (JAR), and executing it two ways:
-
as a class in the classpath
-
as the Main-Class of a JAR
14.2. Objectives
At the conclusion of this lecture and related exercises, the student will be able to:
-
create source code for an executable Java class
-
add that Java class to a Maven module
-
build the module using a Maven pom.xml
-
execute the application using a classpath
-
configure the application as an executable JAR
-
execute an application packaged as an executable JAR
15. Simple Java Class with a Main
Our simple Java application starts with a public class with a static main() method that optionally accepts command-line arguments from the caller
package info.ejava.examples.app.build.javamain;
import java.util.List;
public class SimpleMainApp { (1)
public static void main(String...args) { (2) (3)
System.out.println("Hello " + List.of(args));
}
}
1 | public class |
2 | implements a static main() method |
3 | optionally accepts arguments |
16. Project Source Tree
This class is placed within a module source tree in the
src/main/java
directory below a set of additional directories (info/ejava/examples/app/build/javamain
)
that match the Java package name of the class (info.ejava.examples.app.build.javamain
)
|-- pom.xml (1)
`-- src
|-- main (2)
| |-- java
| | `-- info
| | `-- ejava
| | `-- examples
| | `-- app
| | `-- build
| | `-- javamain
| | `-- SimpleMainApp.java
| `-- resources (3)
`-- test (4)
|-- java
`-- resources
1 | pom.xml will define our project artifact and how to build it |
2 | src/main will contain the pre-built, source form of our artifacts that will be part of our primary JAR output for the module |
3 | src/main/resources is commonly used for property files or other resource files
read in during the program execution |
4 | src/test will contain the pre-built, source form of our test artifacts. These will not be part of the
primary JAR output for the module |
17. Building the Java Archive (JAR) with Maven
In setting up the build within Maven, I am going to limit the focus to just compiling our simple Java class and packaging that into a standard Java JAR.
17.1. Add Core pom.xml Document
Add the core document with required GAV
information (groupId
, artifactId
, version
) to the pom.xml
file at the root of the module tree. Packaging is also required but will have a default of jar
if not supplied.
<project xmlns="http://maven.apache.org/POM/4.0.0" xmlns:xsi="http://www.w3.org/2001/XMLSchema-instance"
xsi:schemaLocation="http://maven.apache.org/POM/4.0.0 http://maven.apache.org/maven-v4_0_0.xsd">
<modelVersion>4.0.0</modelVersion>
<groupId>info.ejava.examples.app</groupId> (1)
<artifactId>java-app-example</artifactId> (2)
<version>6.1.1-SNAPSHOT</version> (3)
<packaging>jar</packaging> (4)
<project>
1 | groupId |
2 | artifactId |
3 | version |
4 | packaging |
Module directory should be the same name/spelling as artifactId to align with default directory naming patterns used by plugins. |
Packaging specification is optional in this case. The default packaging is |
17.2. Add Optional Elements to pom.xml
-
name
<project xmlns="http://maven.apache.org/POM/4.0.0" xmlns:xsi="http://www.w3.org/2001/XMLSchema-instance"
xsi:schemaLocation="http://maven.apache.org/POM/4.0.0 http://maven.apache.org/maven-v4_0_0.xsd">
<modelVersion>4.0.0</modelVersion>
<groupId>info.ejava.examples.app</groupId>
<artifactId>java-app-example</artifactId>
<version>6.1.1-SNAPSHOT</version>
<packaging>jar</packaging>
<name>App::Build::Java Main Example</name> (1)
<project>
1 | name appears in Maven build output but not required |
17.3. Define Plugin Versions
Define plugin versions so the module can be deterministically built in multiple environments
-
Each version of Maven has a set of default plugins and plugin versions
-
Each plugin version may or may not have a set of defaults (e.g., not Java 21) that are compatible with our module
<properties>
<java.target.version>21</java.target.version>
<maven-compiler-plugin.version>3.14.0</maven-compiler-plugin.version>
<maven-jar-plugin.version>3.4.2</maven-jar-plugin.version>
</properties>
<pluginManagement>
<plugins>
<plugin>
<groupId>org.apache.maven.plugins</groupId>
<artifactId>maven-compiler-plugin</artifactId>
<version>${maven-compiler-plugin.version}</version>
<configuration>
<release>${java.target.version}</release>
</configuration>
</plugin>
</plugins>
</pluginManagement>
The jar
packaging will automatically activate the maven-compiler-plugin
and maven-jar-plugin
.
Our definition above identifies the version of the plugin to be used (if used) and any desired
configuration of the plugin(s).
17.4. pluginManagement vs. plugins
-
Use
pluginManagement
to define a plugin if it activated in the module build-
useful to promote consistency in multi-module builds
-
commonly seen in parent modules
-
-
Use
plugins
to declare that a plugin be active in the module build-
ideally only used by child modules
-
our child module indirectly activated several plugins by using the
jar
packaging type
-
18. Build the Module
Maven modules are commonly built with the following commands/ phases
-
clean
removes previously built artifacts -
package
creates primary artifact(s) (e.g., JAR)-
processes main and test resources
-
compiles main and test classes
-
runs unit tests
-
builds the archive
-
[INFO] Scanning for projects...
[INFO]
[INFO] --------------< info.ejava.examples.app:java-app-example >--------------
[INFO] Building App::Build::Java App Example 6.1.1-SNAPSHOT
[INFO] from pom.xml
[INFO] --------------------------------[ jar ]---------------------------------
[INFO]
[INFO] --- maven-clean-plugin:3.4.0:clean (default-clean) @ java-app-example ---
[INFO] Deleting .../java-app-example/target
[INFO]
[INFO] --- maven-resources-plugin:3.3.1:resources (default-resources) @ java-app-example ---
[INFO] Copying 0 resource from src/main/resources to target/classes
[INFO]
[INFO] --- maven-compiler-plugin:3.13.0:compile (default-compile) @ java-app-example ---
[INFO] Recompiling the module because of changed source code.
[INFO] Compiling 1 source file with javac [debug parameters release 17] to target/classes
[INFO]
[INFO] --- maven-resources-plugin:3.3.1:testResources (default-testResources) @ java-app-example ---
[INFO] Copying 0 resource from src/test/resources to target/test-classes
[INFO]
[INFO] --- maven-compiler-plugin:3.13.0:testCompile (default-testCompile) @ java-app-example ---
[INFO] Recompiling the module because of changed dependency.
[INFO]
[INFO] --- maven-surefire-plugin:3.3.1:test (default-test) @ java-app-example ---
[INFO]
[INFO] --- maven-jar-plugin:3.4.2:jar (default-jar) @ java-app-example ---
[INFO] Building jar: .../java-app-example/target/java-app-example-6.1.1-SNAPSHOT.jar
[INFO]
[INFO] ------------------------------------------------------------------------
[INFO] BUILD SUCCESS
[INFO] ------------------------------------------------------------------------
[INFO] Total time: 1.783 s
19. Project Build Tree
The produced build tree from mvn clean package
contains the following key artifacts (and more)
|-- pom.xml
|-- src
`-- target
|-- classes (1)
| `-- info
| `-- ejava
| `-- examples
| `-- app
| `-- build
| `-- javamain
| `-- SimpleMainApp.class
...
|-- java-app-example-6.1.1-SNAPSHOT.jar (2)
...
`-- test-classes (3)
1 | target/classes for built artifacts from src/main |
2 | primary artifact(s) (e.g., Java Archive (JAR)) |
3 | target/test-classes for built artifacts from src/test |
20. Resulting Java Archive (JAR)
Maven adds a few extra files to the META-INF directory that we can ignore. The key files we want to focus on are:
-
SimpleMainApp.class
is the compiled version of our application -
META-INF/MANIFEST.MF contains properties relevant to the archive
$ jar tf target/java-app-example-*-SNAPSHOT.jar | egrep -v "/$" | sort
META-INF/MANIFEST.MF
META-INF/maven/info.ejava.examples.app/java-app-example/pom.properties
META-INF/maven/info.ejava.examples.app/java-app-example/pom.xml
info/ejava/examples/app/build/javamain/SimpleMainApp.class
|
21. Execute the Application
The application is executed by
-
invoking the
java
command -
adding the JAR file (and any other dependencies) to the classpath
-
specifying the fully qualified class name of the class that contains our main() method
$ java -cp target/java-app-example-*-SNAPSHOT.jar info.ejava.examples.app.build.javamain.SimpleMainApp
Output:
Hello []
$ java -cp target/java-app-example-*-SNAPSHOT.jar info.ejava.examples.app.build.javamain.SimpleMainApp arg1 arg2 "arg3 and 4"
Output:
Hello [arg1, arg2, arg3 and 4]
-
example passed three (3) arguments separated by spaces
-
third argument (
arg3 and arg4
) used quotes around the entire string to escape spaces and have them included in the single parameter
-
22. Configure Application as an Executable JAR
To execute a specific Java class within a classpath is conceptually simple. However, there is a lot more to know than we need to when there may be only a single entry point. In the following sections we will assign a default Main-Class by using the MANIFEST.MF properties
22.1. Add Main-Class property to MANIFEST.MF
$ unzip -qc target/java-app-example-*-SNAPSHOT.jar META-INF/MANIFEST.MF
Manifest-Version: 1.0
Created-By: Maven JAR Plugin 3.4.2
Build-Jdk-Spec: 21
Main-Class: info.ejava.examples.app.build.javamain.SimpleMainApp
22.2. Automate Additions to MANIFEST.MF using Maven
One way to surgically add that property is through the maven-jar-plugin
<plugin>
<groupId>org.apache.maven.plugins</groupId>
<artifactId>maven-jar-plugin</artifactId>
<version>${maven-jar-plugin.version}</version>
<configuration>
<archive>
<manifest>
<mainClass>info.ejava.examples.app.build.javamain.SimpleMainApp</mainClass>
</manifest>
</archive>
</configuration>
</plugin>
This is a very specific plugin configuration that would only apply to a specific child module.
Therefore, we would place this in a |
23. Execute the JAR versus just adding to classpath
The executable JAR is executed by
-
invoking the
java
command -
adding the -jar option
-
adding the JAR file (and any other dependencies) to the classpath
$ java -jar target/java-app-example-*-SNAPSHOT.jar
Output:
Hello []
$ java -jar target/java-app-example-*-SNAPSHOT.jar one two "three and four"
Output:
Hello [one, two, three and four]
-
example passed three (3) arguments separated by spaces
-
third argument (
three and four
) used quotes around the entire string to escape spaces and have them included in the single parameter
-
24. Configure pom.xml to Test
At this point, we are ready to create an automated execution of our JAR as a part of the build.
We have to do that after the packaging
phase and will leverage the integration-test
Maven phase
<build>
...
<plugin>
<groupId>org.apache.maven.plugins</groupId>
<artifactId>maven-antrun-plugin</artifactId> (1)
<executions>
<execution>
<id>execute-jar</id>
<phase>integration-test</phase> (4)
<goals>
<goal>run</goal>
</goals>
<configuration>
<tasks>
<java fork="true" failonerror="true" classname="info.ejava.examples.app.build.javamain.SimpleMainApp"> (2)
<classpath>
<pathelement path="${project.build.directory}/${project.build.finalName}.jar"/>
</classpath>
<arg value="Ant-supplied java -cp"/>
<arg value="Command Line"/>
<arg value="args"/>
</java>
<java fork="true" failonerror="true"
jar="${project.build.directory}/${project.build.finalName}.jar"> (3)
<arg value="Ant-supplied java -jar"/>
<arg value="Command Line"/>
<arg value="args"/>
</java>
</tasks>
</configuration>
</execution>
</executions>
</plugin>
</plugins>
</build>
1 | Using the maven-ant-run plugin to execute Ant task |
2 | Using the java Ant task to execute shell java -cp command line |
3 | Using the java Ant task to execute shell java -jar command line |
4 | Running the plugin during the integration-phase
|
24.1. Execute JAR as part of the build
$ mvn clean verify
[INFO] Scanning for projects...
[INFO]
[INFO] -------------< info.ejava.examples.app:java-app-example >--------------
...
[INFO] --- maven-jar-plugin:3.4.2:jar (default-jar) @ java-app-example -(1)
[INFO] Building jar: .../java-app-example/target/java-app-example-6.1.1-SNAPSHOT.jar
[INFO]
...
[INFO] --- maven-antrun-plugin:3.1.0:run (execute-jar) @ java-app-example ---
[INFO] Executing tasks (2)
[INFO] [java] Hello [Ant-supplied java -cp, Command Line, args]
[INFO] [java] Hello [Ant-supplied java -jar, Command Line, args]
[INFO] Executed tasks
[INFO] ------------------------------------------------------------------------
[INFO] BUILD SUCCESS
1 | Our plugin is executing |
2 | Our application was executed and the results displayed |
25. Summary
-
The JVM will execute the static
main()
method of the class specified in the java command -
The class must be in the JVM classpath
-
Maven can be used to build a JAR with classes
-
A JAR can be the subject of a java execution
-
The Java
META-INF/MANIFEST.MF
Main-Class
property within the target JAR can express the class with themain()
method to execute -
The maven-jar-plugin can be used to add properties to the
META-INF/MANIFEST.MF
file -
A Maven build can be configured to execute a JAR
Simple Spring Boot Application
copyright © 2025 jim stafford (jim.stafford@jhu.edu)
26. Introduction
This material makes the transition from creating and executing a simple Java main application to a Spring Boot application.
26.2. Objectives
At the conclusion of this lecture and related exercises, the student will be able to:
-
extend the standard Maven
jar
module packaging type to include core Spring Boot dependencies -
construct a basic Spring Boot application
-
build and execute an executable Spring Boot JAR
-
define a simple Spring component and inject that into the Spring Boot application
27. Spring Boot Maven Dependencies
Spring Boot provides a spring-boot-starter-parent
(gradle source,
pom.xml) pom that can be used as a parent pom for our Spring Boot modules.
[15]
This defines version information for dependencies and plugins for building Spring Boot artifacts — along with an opinionated view of how the module should be built.
spring-boot-starter-parent
inherits from a spring-boot-dependencies
(gradle source,
pom.xml)
pom that provides a definition of artifact versions without an opinionated view of how the module is built.
This pom can be imported by modules that already inherit from a local Maven parent — which would be common.
This is the demonstrated approach we will take here. We will also include demonstration of how the build constructs are commonly spread across parent and local poms.
Spring Boot has converted over to gradle and posts a pom version of the gradle artifact to Maven central repository as a part of their build process. |
28. Parent POM
We are likely to create multiple Spring Boot modules and would be well-advised to begin by creating a local parent pom construct to house the common passive definitions. By passive definitions (versus active declarations), I mean definitions for the child poms to use if needed versus mandated declarations for each child module. For example, a parent pom may define the JDBC driver to use when needed, but not all child modules will need a JDBC driver nor a database for that matter. In that case, we do not want the parent pom to actively declare a dependency. We just want the parent to passively define the dependency that the child can optionally choose to actively declare. This construct promotes consistency among all the modules.

"Root"/parent poms should define dependencies and plugins for consistent re-use among child poms and use dependencyManagement and pluginManagement elements to do so. |
"Child"/concrete/leaf poms declare dependencies and plugins to be used when building that module and try to keep dependencies to a minimum. |
"Prototype" poms are a blend of root and child pom concepts. They are a nearly-concrete, parent pom that can be extended by child poms but actively declare a select set of dependencies and plugins to allow child poms to be as terse as possible. |
28.1. Define Version for Spring Boot artifacts
I am using a technique below of defining the value in a property so that it is easy to locate and change as well as re-use elsewhere if necessary.
# Place this declaration in an inherited parent pom
<properties>
<springboot.version>3.5.5</springboot.version> (1)
</properties>
1 | default value has been declared in imported ejava-build-bom |
Property values can be overruled at build time by supplying a system property on the command line "-D(name)=(value)" |
28.2. Import springboot-dependencies-plugin
Import springboot-dependencies-plugin
. This will define dependencyManagement
for us for many artifacts that are relevant to our Spring Boot development.
# Place this declaration in an inherited parent pom
<dependencyManagement> (1)
<dependencies>
<dependency>
<groupId>org.springframework.boot</groupId>
<artifactId>spring-boot-dependencies</artifactId>
<version>${springboot.version}</version>
<type>pom</type>
<scope>import</scope>
</dependency>
</dependencies>
</dependencyManagement>
1 | import is within examples-root for class examples, which is a grandparent of this example |
29. Local Child/Leaf Module POM
The local child module pom.xml is where the module is physically built. Although Maven modules can have multiple levels of inheritance — where each level is a child of their parent — the child module I am referring to here is the leaf module where the artifacts are meant to be really built. Everything defined above it is primarily used as a common definition (through dependencyManagement and pluginManagement) to simplify the child pom.xml and to promote consistency among sibling modules. It is the job of the leaf module to activate these definitions that are appropriate for the type of module being built.
29.2. Declare dependency on artifacts used
Realize the parent definition of the spring-boot-starter
dependency by declaring
it within the child dependencies section.
For where we are in this introduction, only the above dependency will be necessary.
The imported spring-boot-dependencies
will take care of declaring the version#
# Place this declaration in the child/leaf pom building the JAR archive
<dependencies>
<dependency>
<groupId>org.springframework.boot</groupId>
<artifactId>spring-boot-starter</artifactId>
<!--version --> (1)
</dependency>
</dependencies>
1 | parent has defined (using import in this case) the version for all children to consistently use |
The figure below shows the parent poms being the source of the passive dependency definitions and the child being the source of the active dependency declarations.
-
the parent is responsible for defining the version# for dependencies used
-
the child is responsible for declaring what dependencies are needed and adopts the parent version definition
An upgrade to a future dependency version should not require a change of a child module declaration if this pattern is followed.

30. Simple Spring Boot Application Java Class
With the necessary dependencies added to our build classpath, we now have enough to begin defining a simple Spring Boot Application.
package info.ejava.springboot.examples.app.build.springboot;
import org.springframework.boot.SpringApplication;
import org.springframework.boot.autoconfigure.SpringBootApplication;
@SpringBootApplication (3)
public class SpringBootApp {
public static void main(String... args) { (1)
System.out.println("Running SpringApplication");
SpringApplication.run(SpringBootApp.class, args); (2)
System.out.println("Done SpringApplication");
}
}
1 | Define a class with a static main() method |
2 | Initiate Spring application bootstrap by invoking SpringApplication.run() and passing a) application class and b) args passed into main() |
3 | Annotate the class with @SpringBootApplication |
Startup can, of course, be customized (e.g., change the printed banner, registering event listeners) |
30.1. Module Source Tree
The source tree will look similar to our previous Java main example.
|-- pom.xml
`-- src
|-- main
| |-- java
| | `-- info
| | `-- ejava
| | `-- examples
| | `-- app
| | `-- build
| | `-- springboot
| | `-- SpringBootApp.java
| `-- resources
`-- test
|-- java
`-- resources
31. Spring Boot Executable JAR
At this point, we can likely execute the Spring Boot Application within the IDE but instead, lets go back to the pom and construct a JAR file to be able to execute the application from the command line.
31.1. Building the Spring Boot Executable JAR
We saw earlier how we could build a standard executable JAR using the maven-jar-plugin
.
However, there were some limitations to that approach — especially the fact that a standard Java JAR cannot house dependencies to form a self-contained classpath and Spring Boot will need additional JARs to complete the application bootstrap.
Spring Boot uses a custom executable JAR format that can be built with the aid of the
spring-boot-maven-plugin.
Let’s extend our pom.xml file to enhance the standard JAR to be a Spring Boot executable JAR.
31.1.1. Declare spring-boot-maven-plugin
The following snippet shows the configuration for a spring-boot-maven-plugin
that defines a default execution to build the Spring Boot executable JAR for all child modules that declare using it.
In addition to building the Spring Boot executable JAR, we are setting up a standard in the parent for all children to have their follow-on JAR classified separately as a bootexec
.
classifier
is a core Maven construct and is meant to label sibling artifacts to the original Java JAR for the module.
Other types of classifiers
are source
, schema
, javadoc
, etc.
bootexec
is a value we made up.
bootexec is a value we made up.
|
By default, the repackage
goal would have replaced the Java JAR with the Spring Boot executable JAR.
That would have left an ambiguous JAR artifact in the repository — we would not easily know its JAR type.
This will help eliminate dependency errors during the semester when we layer N+1
assignments on top of layer N
.
Only standard Java JARs can be used in classpath dependencies.
<properties>
<spring-boot.classifier>bootexec</spring-boot.classifier>
</properties>
...
<build>
<pluginManagement>
<plugins>
<plugin>
<groupId>org.springframework.boot</groupId>
<artifactId>spring-boot-maven-plugin</artifactId>
<configuration>
<classifier>${spring-boot.classifier}</classifier> (4)
</configuration>
<executions>
<execution>
<id>build-app</id> (1)
<phase>package</phase> (2)
<goals>
<goal>repackage</goal> (3)
</goals>
</execution>
</executions>
</plugin>
...
</plugins>
</pluginManagement>
</build>
1 | id used to describe execution and required when having more than one |
2 | phase identifies the maven goal in which this plugin runs |
3 | repackage identifies the goal to execute within the spring-boot-maven-plugin |
4 | adds a -bootexec to the executable JAR’s name |
We can do much more with the spring-boot-maven-plugin
on a per-module basis (e.g., run the application from within Maven).
We are just starting at construction at this point.
31.1.2. Build the JAR
$ mvn clean package
[INFO] Scanning for projects...
...
[INFO] --- maven-jar-plugin:3.4.2:jar (default-jar) @ springboot-app-example ---
[INFO] Building jar: .../target/springboot-app-example-6.1.1-SNAPSHOT.jar (1)
[INFO]
[INFO] --- spring-boot-maven-plugin:3.5.5:repackage (build-app) @ springboot-app-example ---
[INFO] Attaching repackaged archive .../target/springboot-app-example-6.1.1-SNAPSHOT-bootexec.jar with classifier bootexec (2)
1 | standard Java JAR is built by the maven-jar-plugin |
2 | standard Java JAR is augmented by the spring-boot-maven-plugin |
31.2. Java MANIFEST.MF properties
The spring-boot-maven-plugin
augmented the standard JAR by adding a few properties to the MANIFEST.MF file
$ unzip -qc target/springboot-app-example-6.1.1-SNAPSHOT-bootexec.jar META-INF/MANIFEST.MF
Manifest-Version: 1.0
Created-By: Maven JAR Plugin 3.2.2
Build-Jdk-Spec: 21
Main-Class: org.springframework.boot.loader.launch.JarLauncher (1)
Start-Class: info.ejava.examples.app.build.springboot.SpringBootApp (2)
Spring-Boot-Version: 3.5.5
Spring-Boot-Classes: BOOT-INF/classes/
Spring-Boot-Lib: BOOT-INF/lib/
Spring-Boot-Classpath-Index: BOOT-INF/classpath.idx
Spring-Boot-Layers-Index: BOOT-INF/layers.idx
1 | Main-Class was set to a Spring Boot launcher |
2 | Start-Class was set to the class we defined with @SpringBootApplication |
31.3. JAR size
Notice that the size of the Spring Boot executable JAR is significantly larger than the original standard JAR.
$ ls -lh target/*jar* | grep -v sources | cut -d\ -f9-99
10M Aug 28 15:19 target/springboot-app-example-6.1.1-SNAPSHOT-bootexec.jar (2)
4.3K Aug 28 15:19 target/springboot-app-example-6.1.1-SNAPSHOT.jar (1)
1 | The original Java JAR with Spring Boot annotations was 4.3KB |
2 | The Spring Boot JAR is 10MB |
31.4. JAR Contents
Unlike WARs, a standard Java JAR does not provide a way to embed dependency JARs. Common approaches to embed dependencies within a single JAR include a "shaded" JAR where all dependency JAR are unwound and packaged as a single "uber" JAR
-
positives
-
works
-
follows standard Java JAR constructs
-
-
negatives
-
obscures contents of the application
-
problem if multiple source JARs use files with same path/name
-
Spring Boot creates a custom WAR-like structure
BOOT-INF/classes/info/ejava/examples/app/build/springboot/AppCommand.class
BOOT-INF/classes/info/ejava/examples/app/build/springboot/SpringBootApp.class (3)
BOOT-INF/lib/javax.annotation-api-2.1.1.jar (2)
...
BOOT-INF/lib/spring-boot-3.5.5.jar
BOOT-INF/lib/spring-context-6.2.10.jar
BOOT-INF/lib/spring-beans-6.2.10.jar
BOOT-INF/lib/spring-core-6.2.10.jar
...
META-INF/MANIFEST.MF
META-INF/maven/info.ejava.examples.app/springboot-app-example/pom.properties
META-INF/maven/info.ejava.examples.app/springboot-app-example/pom.xml
org/springframework/boot/loader/launch/ExecutableArchiveLauncher.class
org/springframework/boot/loader/launch/JarLauncher.class (1)
...
org/springframework/boot/loader/util/SystemPropertyUtils.class
1 | Spring Boot loader classes hosted at the root / |
2 | Local application classes hosted in /BOOT-INF/classes |
3 | Dependency JARs hosted in /BOOT-INF/lib |
Spring Boot can also use a standard WAR structure — to be deployed to a web server.
|
31.5. Execute Command Line
springboot-app-example$ java -jar target/springboot-app-example-6.1.1-SNAPSHOT-bootexec.jar (1)
Running SpringApplication (2)
. ____ _ __ _ _ (3)
/\\ / ___'_ __ _ _(_)_ __ __ _ \ \ \ \
( ( )\___ | '_ | '_| | '_ \/ _` | \ \ \ \
\\/ ___)| |_)| | | | | || (_| | ) ) ) )
' |____| .__|_| |_|_| |_\__, | / / / /
=========|_|==============|___/=/_/_/_/
:: Spring Boot :: (v3.5.5)
2019-12-04 09:01:03.014 INFO 1287 --- [main] i.e.e.a.build.springboot.SpringBootApp: \
Starting SpringBootApp on Jamess-MBP with PID 1287 (.../springboot-app-example/target/springboot-app-example-6.1.1-SNAPSHOT.jar \
started by jim in .../springboot-app-example)
2019-12-04 09:01:03.017 INFO 1287 --- [main] i.e.e.a.build.springboot.SpringBootApp: \
No active profile set, falling back to default profiles: default
2019-12-04 09:01:03.416 INFO 1287 --- [main] i.e.e.a.build.springboot.SpringBootApp: \
Started SpringBootApp in 0.745 seconds (JVM running for 1.13)
Done SpringApplication (4)
1 | Execute the JAR using the java -jar command |
2 | Main executes and passes control to SpringApplication |
3 | Spring Boot bootstrap is started |
4 | SpringApplication terminates and returns control to our main() |
32. Add a Component to Output Message and Args
We have a lot of capability embedded into our current Spring Boot executable JAR that is there to bootstrap the application by looking around for components to activate. Let’s explore this capability with a simple class that will take over the responsibility for the output of a message with the arguments to the program.
We want this class found by Spring’s application startup processing, so we will:
// AppCommand.java
package info.ejava.examples.app.build.springboot; (2)
import org.springframework.boot.CommandLineRunner;
import org.springframework.stereotype.Component;
import java.util.List;
@Component (1)
public class AppCommand implements CommandLineRunner {
public void run(String... args) throws Exception {
System.out.println("Component code says Hello " + List.of(args));
}
}
1 | Add a @Component annotation on the class |
2 | Place the class in a Java package configured to be scanned |
32.1. @Component Annotation
import org.springframework.boot.CommandLineRunner;
import org.springframework.stereotype.Component;
@Component
public class AppCommand implements CommandLineRunner {
Classes can be configured to have their instances managed by Spring. Class annotations
can be used to express the purpose of a class and to trigger Spring into managing them
in specific ways. The most generic form of component annotation is @Component
.
Others will include @Controller
, @Service
, @Repository
, etc. Classes directly annotated with
a @Component
(or other annotation) indicates that Spring can instantiate instances
of this class with no additional assistance from a @Bean
factory.
32.2. Interface: CommandLineRunner
import org.springframework.boot.CommandLineRunner;
import org.springframework.stereotype.Component;
@Component
public class AppCommand implements CommandLineRunner {
public void run(String... args) throws Exception {
}
}
-
Components implementing CommandLineRunner interface get called after application initialization
-
Program arguments are passed to the
run()
method -
Can be used to perform one-time initialization at start-up
-
Alternative Interface: ApplicationRunner
-
Components implementing ApplicationRunner are also called after application initialization
-
Program arguments are passed to its
run()
method have been wrapped in ApplicationArguments convenience class
-
Component startup can be ordered with the @Ordered Annotation. |
32.3. @ComponentScan Tree
By default, the @SpringBootApplication
annotation configured Spring to look at
and below the Java package for our SpringBootApp class. I chose to place this
component class in the same Java package as the application class
@SpringBootApplication
// @ComponentScan
// @SpringBootConfiguration
// @EnableAutoConfiguration
public class SpringBootApp {
}
src/main/java
`-- info
`-- ejava
`-- springboot
`-- examples
`-- app
|-- AppCommand.java
`-- SpringBootApp.java
33. Running the Spring Boot Application
$ java -jar target/springboot-app-example-6.1.1-SNAPSHOT-bootexec.jar
Running SpringApplication (1)
. ____ _ __ _ _ (2)
/\\ / ___'_ __ _ _(_)_ __ __ _ \ \ \ \
( ( )\___ | '_ | '_| | '_ \/ _` | \ \ \ \
\\/ ___)| |_)| | | | | || (_| | ) ) ) )
' |____| .__|_| |_|_| |_\__, | / / / /
=========|_|==============|___/=/_/_/_/
:: Spring Boot :: (v3.5.5)
2019-09-06 15:56:45.666 INFO 11480 --- [ main] i.e.s.examples.app.SpringBootApp
: Starting SpringBootApp on Jamess-MacBook-Pro.local with PID 11480 (.../target/springboot-app-example-6.1.1-SNAPSHOT.jar ...)
2019-09-06 15:56:45.668 INFO 11480 --- [ main] i.e.s.examples.app.SpringBootApp
: No active profile set, falling back to default profiles: default
2019-09-06 15:56:46.146 INFO 11480 --- [ main] i.e.s.examples.app.SpringBootApp
: Started SpringBootApp in 5.791 seconds (JVM running for 6.161) (3)
Hello [] (4) (5)
Done SpringApplication (6)
1 | Our SpringBootApp.main() is called and logs Running SpringApplication |
2 | SpringApplication.run() is called to execute the Spring Boot application |
3 | Our AppCommand component is found within the classpath at or under the package declaring @SpringBootApplication |
4 | The AppCommand component run() method is called, and it prints out a message |
5 | The Spring Boot application terminates |
6 | Our SpringBootApp.main() logs Done SpringApplication an exits |
33.1. Implementation Note
I added print statements directly in the Spring Boot Application’s main() method
to help illustrate when calls were made. This output could have been packaged into listener
callbacks to leave the main() method implementation free — except to register the callbacks.
If you happen to need more complex behavior to fire before the Spring context begins initialization,
then look to add
listeners
of the SpringApplication instead.
|
34. Configure pom.xml to Test
At this point, we are again ready to set up an automated execution of our JAR as a part of the build.
We can do that by adding a separate goal execution of the spring-boot-maven-plugin
.
<build>
...
<plugins>
<plugin>
<groupId>org.springframework.boot</groupId>
<artifactId>spring-boot-maven-plugin</artifactId>
<executions>
<execution>
<id>run-application</id> (1)
<phase>integration-test</phase>
<goals>
<goal>run</goal>
</goals>
<configuration> (2)
<arguments>Maven,plugin-supplied,args</arguments>
</configuration>
</execution>
</executions>
</plugin>
</plugins>
</build>
1 | new execution of the run goal to be performed during the Maven integration-test phase |
2 | command line arguments passed to main
|
34.1. Execute JAR as part of the build
$ mvn clean verify
[INFO] Scanning for projects...
...
[INFO] --- spring-boot-maven-plugin:3.5.5:run (run-application) @ springboot-app-example ---
[INFO] Attaching agents: [] (1)
Running SpringApplication
. ____ _ __ _ _
/\\ / ___'_ __ _ _(_)_ __ __ _ \ \ \ \
( ( )\___ | '_ | '_| | '_ \/ _` | \ \ \ \
\\/ ___)| |_)| | | | | || (_| | ) ) ) )
' |____| .__|_| |_|_| |_\__, | / / / /
=========|_|==============|___/=/_/_/_/
:: Spring Boot :: (v3.5.5)
2022-07-02 14:11:46.110 INFO 48432 --- [ main] i.e.e.a.build.springboot.SpringBootApp : Starting SpringBootApp using Java 21 on Jamess-MacBook-Pro.local with PID 48432 (.../springboot-app-example/target/classes started by jim in .../springboot-app-example)
2022-07-02 14:11:46.112 INFO 48432 --- [ main] i.e.e.a.build.springboot.SpringBootApp : No active profile set, falling back to 1 default profile: "default"
2022-07-02 14:11:46.463 INFO 48432 --- [ main] i.e.e.a.build.springboot.SpringBootApp : Started SpringBootApp in 0.611 seconds (JVM running for 0.87)
Component code says Hello [Maven, plugin-supplied, args] (2)
Done SpringApplication
1 | Our plugin is executing |
2 | Our application was executed and the results displayed |
35. Summary
As a part of this material, the student has learned how to:
-
Add Spring Boot constructs and artifact dependencies to the Maven POM
-
Define Application class with a main() method
-
Annotate the application class with @SpringBootApplication (and optionally use lower-level annotations)
-
Place the application class in a Java package that is at or above the Java packages with beans that will make up the core of your application
-
Add component classes that are core to your application to your Maven module
-
Typically, define components in a Java package that is at or below the Java package for the
SpringBootApplication
-
Annotate components with
@Component
(or other special-purpose annotations used by Spring) -
Execute application like a normal executable JAR
Assignment 0: Application Build
copyright © 2025 jim stafford (jim.stafford@jhu.edu)
The following makes up "Assignment 0". It is intended to get you started developing right away, communicating questions/answers, and turning something in with some of the basics.
As with most assignments, a set of starter projects is available in assignment-starter/houserentals-starter
.
It is expected that you can implement the complete assignment on your own.
However, the Maven poms and the portions unrelated to the assignment focus are commonly provided for reference to keep the focus on each assignment part.
Your submission should not be a direct edit/hand-in of the starters.
Your submission should — at a minimum:
-
be in a separate source tree — not within the class examples
-
have a local parent pom.xml that extends either
spring-boot-starter-parent
orejava-build-parent
-
use your own Maven groupIds
-
change the "starter" portion of the provided groupId to a name unique to you
Change: <groupId>info.ejava-student.starter.assignments.houserentals</groupId> To: <groupId>info.ejava-student.[your-value].assignments.houserentals</groupId>
-
-
use your own Maven descriptive name
-
change the "Starter" portion of the provided name to a name unique to you
Change: <name>Starter::Assignments::HouseRentals</name> To: <name>[Your Value]::Assignments::HouseRentals</name>
-
-
use your own Java package names
-
change the "starter" portion of the provided package name to a name unique to you
Change: package info.ejava_student.starter.assignment0.app.houserentals; To: package info.ejava_student.[your_value].assignment0.app.houserentals;
-
The following diagram depicts the 3 modules (parent, javaapp, and bootapp) you will turn in. You will inherit or depend on external artifacts that will be supplied via Maven.

36. Part A: Build Pure Java Application JAR
36.1. Purpose
In this portion of the assignment, you will demonstrate your knowledge of building a module containing a pure Java application. You will:
-
create source code for an executable Java class
-
add that Java class to a Maven module
-
build the module using a Maven pom.xml
-
execute the application using a classpath
-
configure the application as an executable JAR
-
execute an application packaged as an executable JAR
36.2. Overview
In this portion of the assignment you are going to implement a JAR with a Java main class and execute it.

In this part of the assignment, the name of the main class is shown specialized to "HouseRentalsMain" since it contains (or directly calls) code having specifically to do with "HouseRentals". |
36.3. Requirements
-
Create a Maven project that will host a Java program
-
Supply a single Java class with a main() method that will print a single "HouseRentals has started" message to stdout
-
Compile the Java class
-
Archive the Java class into a JAR
-
Execute the Java class using the JAR as a classpath
-
Register the Java class as the
Main-Class
in theMETA-INF/MANIFEST.MF
file of the JAR -
Execute the JAR to launch the Java class
-
Turn in a source tree with a complete Maven module that will build and execute a demonstration of the pure Java main application.
36.4. Grading
Your solution will be evaluated on:
-
create source code for an executable Java class
-
whether the Java class includes a non-root Java package
-
the assignment of a unique Java package for your work
-
whether you have successfully provided a main method that prints a startup message
-
-
add that Java class to a Maven module
-
the assignment of a unique groupId relative to your work
-
whether the module follows standard, basic Maven src/main directory structure
-
-
build the module using a Maven pom.xml
-
whether the module builds from the command line
-
-
execute the application using a classpath
-
if the Java main class executes using a
java -cp
approach -
if the demonstration of execution is performed as part of the Maven build
-
-
execute an application packaged as an executable JAR
-
if the java main class executes using a
java -jar
approach -
if the demonstration of execution is performed as part of the Maven build
-
36.5. Additional Details
-
The root maven pom can extend either
spring-boot-starter-parent
orejava-build-parent
. Add<relativeParent/>
tag to parent reference to indicate an orphan project since neither of these will be in the parent directory or within your project tree. -
When inheriting or depending on
ejava
class modules, include a JHU repository reference in your root pom.xml.<repositories> <repository> <id>ejava-nexus-snapshots</id> <url>https://pika.cs.ep.jhu.edu/nexus/repository/ejava-snapshots</url> </repository> </repositories>
-
The maven build shall automate the demonstration of the two execution styles. You can use the
maven-antrun-plugin
or any other Maven plugin to implement this. -
A quick start project is available in
assignment-starter/houserentals-starter/assignment0-houserentals-javaapp
Modify Maven groupId and Java package if used.
37. Part B: Build Spring Boot Executable JAR
37.1. Purpose
In this portion of the assignment you will demonstrate your knowledge of building a simple Spring Boot Application. You will:
-
construct a basic Spring Boot application
-
define a simple Spring component and inject that into the Spring Boot application
-
build and execute an executable Spring Boot JAR
37.2. Overview
In this portion of the assignment, you are going to implement a Spring Boot executable JAR with a Spring Boot application and execute it.

In this part of the assignment, the name of the main class can be generalized to "RentalApp" since nothing about that class specifically has or calls anything to do with "HouseRentals". All details of the specialization are within the "HouseRentalCommand" component. |
37.3. Requirements
-
Create a Maven project to host a Spring Boot Application
-
Supply a single Java class with a main() method that bootstraps the Spring Boot Application
-
Supply a
@Component
that will be loaded and invoked when the application starts-
have that
@Component
print a single "HouseRentals has started" message to stdout
-
-
Compile the Java class
-
Archive the Java class
-
Convert the JAR into an executable Spring Boot Application JAR
-
Execute the JAR and Spring Boot Application
-
Turn in a source tree with a complete Maven module that will build and execute a demonstration of the Spring Boot application
37.4. Grading
Your solution will be evaluated on:
-
extend the standard Maven jar module packaging type to include core Spring Boot dependencies
-
whether you have added a dependency on
spring-boot-starter
(directly or indirectly) to bring in required dependencies
-
-
construct a basic Spring Boot application
-
whether you have defined a proper
@SpringBootApplication
-
-
define a simple Spring component and inject that into the Spring Boot application
-
whether you have successfully injected a
@Component
that prints a startup message
-
-
build and execute an executable Spring Boot JAR
-
whether you have configured the Spring Boot plugin to build an executable JAR
-
if the demonstration of execution is performed as part of the Maven build
-
37.5. Additional Details
-
The root maven pom can extend either
spring-boot-starter-parent
orejava-build-parent
. Add<relativeParent/>
tag to parent reference to indicate an orphan project since neither of these will be in the parent directory or within your project tree. -
When inheriting or depending on
ejava
class modules, include a JHU repository reference in your root pom.xml.<repositories> <repository> <id>ejava-nexus-snaphots</id> <url>https://pika.cs.ep.jhu.edu/nexus/repository/ejava-snapshots</url> </repository> </repositories>
-
The maven build shall automate the demonstration of the application using the
spring-boot-maven-plugin
. There is no need for themaven-antrun-plugin
in this portion of the assignment. -
A quick start project is available in
assignment-starter/houserentals-starter/assignment0-houserentals-bootapp
for Maven details. Modify Maven groupId and Java package if used.
Bean Factory and Dependency Injection
copyright © 2025 jim stafford (jim.stafford@jhu.edu)
38. Introduction
This material provides an introduction to configuring an application using a factory method. This is the most basic use of separation between the interface used by the application and the decision of what the implementation will be.
The configuration choice shown will be part of the application, but as you will see later, configurations can be deeply nested — far away from the details known to the application writer.
38.1. Goals
The student will learn:
-
to decouple an application through the separation of interface and implementation
-
to configure an application using dependency injection and factory methods of a configuration class
38.2. Objectives
At the conclusion of this lecture and related exercises, the student will be able to:
-
implement a service interface and implementation component
-
package a service within a Maven module separate from the application module
-
implement a Maven module dependency to make the component class available to the application module
-
use a
@Bean
factory method of a@Configuration
class to instantiate a Spring-managed component
39. Hello Service
To get started, we are going to create a simple Hello
service. We are going to implement an interface and a single implementation right off the bat.
They will be housed in two separate modules:
-
hello-service-api
-
hello-service-stdout

We will start out by creating two separate module directories.
39.1. Hello Service API
The Hello Service API module will contain a single interface and pom.xml.
hello-service-api/
|-- pom.xml
`-- src
`-- main
`-- java
`-- info
`-- ejava
`-- examples
`-- app
`-- hello
`-- Hello.java (1)
1 | Service interface |
39.2. Hello Service StdOut
The Hello Service StdOut module will contain a single implementation class and pom.xml.
hello-service-stdout/
|-- pom.xml
`-- src
`-- main
`-- java
`-- info
`-- ejava
`-- examples
`-- app
`-- hello
`-- stdout
`-- StdOutHello.java (1)
1 | Service implementation |
39.3. Hello Service API pom.xml
We will be building a normal Java JAR with no direct dependencies on Spring Boot or Spring.
#pom.xml
...
<groupId>info.ejava.examples.app</groupId>
<version>6.1.1-SNAPSHOT</version>
<artifactId>hello-service-api</artifactId>
<packaging>jar</packaging>
...
39.4. Hello Service StdOut pom.xml
The implementation will be similar to the interface’s pom.xml except it requires a dependency on the interface module.
#pom.xml
...
<groupId>info.ejava.examples.app</groupId>
<version>6.1.1-SNAPSHOT</version>
<artifactId>hello-service-stdout</artifactId>
<packaging>jar</packaging>
<dependencies>
<dependency>
<groupId>${project.groupId}</groupId> (1)
<artifactId>hello-service-api</artifactId>
<version>${project.version}</version> (1)
</dependency>
</dependencies>
...
1 | Dependency references leveraging ${project} variables module shares with dependency |
Since we are using the same source tree, we can leverage ${project} variables.
This will not be the case when declaring dependencies on external modules.
|
39.5. Hello Service Interface
The interface is quite simple, just pass in the String name for what you want the service to say hello to.
package info.ejava.examples.app.hello;
public interface Hello {
void sayHello(String name);
}
The service instance will be responsible for
-
the greeting
-
the implementation — how we say hello

39.7. Hello Service Modules Complete
We are now done implementing our sample service interface and implementation. We just need to build and install it into the repository to make available to the application.
39.8. Hello Service API Maven Build
$ mvn clean install -f hello-service-api
[INFO] Scanning for projects...
[INFO]
[INFO] -------------< info.ejava.examples.app:hello-service-api >--------------
[INFO] Building App::Config::Hello Service API 6.1.1-SNAPSHOT
[INFO] --------------------------------[ jar ]---------------------------------
[INFO]
[INFO] --- maven-clean-plugin:3.1.0:clean (default-clean) @ hello-service-api ---
[INFO]
[INFO] --- maven-resources-plugin:3.1.0:resources (default-resources) @ hello-service-api ---
[INFO] Using 'UTF-8' encoding to copy filtered resources.
[INFO] skip non existing resourceDirectory .../app-config/hello-service-api/src/main/resources
[INFO]
[INFO] --- maven-compiler-plugin:3.8.1:compile (default-compile) @ hello-service-api ---
[INFO] Changes detected - recompiling the module!
[INFO] Compiling 1 source file to .../app-config/hello-service-api/target/classes
[INFO]
[INFO] --- maven-resources-plugin:3.1.0:testResources (default-testResources) @ hello-service-api ---
[INFO] Using 'UTF-8' encoding to copy filtered resources.
[INFO] skip non existing resourceDirectory .../app-config/hello-service-api/src/test/resources
[INFO]
[INFO] --- maven-compiler-plugin:3.8.1:testCompile (default-testCompile) @ hello-service-api ---
[INFO] No sources to compile
[INFO]
[INFO] --- maven-surefire-plugin:2.12.4:test (default-test) @ hello-service-api ---
[INFO] No tests to run.
[INFO]
[INFO] --- maven-jar-plugin:3.1.2:jar (default-jar) @ hello-service-api ---
[INFO] Building jar: .../app-config/hello-service-api/target/hello-service-api-6.1.1-SNAPSHOT.jar
[INFO]
[INFO] --- maven-install-plugin:3.0.0-M1:install (default-install) @ hello-service-api ---
[INFO] Installing .../app-config/hello-service-api/target/hello-service-api-6.1.1-SNAPSHOT.jar to .../.m2/repository/info/ejava/examples/app/hello-service-api/6.1.1-SNAPSHOT/hello-service-api-6.1.1-SNAPSHOT.jar
[INFO] Installing .../app-config/hello-service-api/pom.xml to .../.m2/repository/info/ejava/examples/app/hello-service-api/6.1.1-SNAPSHOT/hello-service-api-6.1.1-SNAPSHOT.pom
[INFO] ------------------------------------------------------------------------
[INFO] BUILD SUCCESS
[INFO] ------------------------------------------------------------------------
[INFO] Total time: 2.070 s
39.9. Hello Service StdOut Maven Build
$ mvn clean install -f hello-service-stdout
[INFO] Scanning for projects...
[INFO]
[INFO] ------------< info.ejava.examples.app:hello-service-stdout >------------
[INFO] Building App::Config::Hello Service StdOut 6.1.1-SNAPSHOT
[INFO] --------------------------------[ jar ]---------------------------------
[INFO]
[INFO] --- maven-clean-plugin:3.1.0:clean (default-clean) @ hello-service-stdout ---
[INFO]
[INFO] --- maven-resources-plugin:3.1.0:resources (default-resources) @ hello-service-stdout ---
[INFO] Using 'UTF-8' encoding to copy filtered resources.
[INFO] skip non existing resourceDirectory .../app-config/hello-service-stdout/src/main/resources
[INFO]
[INFO] --- maven-compiler-plugin:3.8.1:compile (default-compile) @ hello-service-stdout ---
[INFO] Changes detected - recompiling the module!
[INFO] Compiling 1 source file to .../app-config/hello-service-stdout/target/classes
[INFO]
[INFO] --- maven-resources-plugin:3.1.0:testResources (default-testResources) @ hello-service-stdout ---
[INFO] Using 'UTF-8' encoding to copy filtered resources.
[INFO] skip non existing resourceDirectory .../app-config/hello-service-stdout/src/test/resources
[INFO]
[INFO] --- maven-compiler-plugin:3.8.1:testCompile (default-testCompile) @ hello-service-stdout ---
[INFO] No sources to compile
[INFO]
[INFO] --- maven-surefire-plugin:2.12.4:test (default-test) @ hello-service-stdout ---
[INFO] No tests to run.
[INFO]
[INFO] --- maven-jar-plugin:3.1.2:jar (default-jar) @ hello-service-stdout ---
[INFO] Building jar: .../app-config/hello-service-stdout/target/hello-service-stdout-6.1.1-SNAPSHOT.jar
[INFO]
[INFO] --- maven-install-plugin:3.0.0-M1:install (default-install) @ hello-service-stdout ---
[INFO] Installing .../app-config/hello-service-stdout/target/hello-service-stdout-6.1.1-SNAPSHOT.jar to .../.m2/repository/info/ejava/examples/app/hello-service-stdout/6.1.1-SNAPSHOT/hello-service-stdout-6.1.1-SNAPSHOT.jar
[INFO] Installing .../app-config/hello-service-stdout/pom.xml to .../.m2/repository/info/ejava/examples/app/hello-service-stdout/6.1.1-SNAPSHOT/hello-service-stdout-6.1.1-SNAPSHOT.pom
[INFO] ------------------------------------------------------------------------
[INFO] BUILD SUCCESS
[INFO] ------------------------------------------------------------------------
[INFO] Total time: 2.658 s
40. Application Module
We now move on to developing our application within its own module containing two (2) classes similar to earlier examples.
|-- pom.xml
`-- src
``-- main
`-- java
`-- info
`-- ejava
`-- examples
`-- app
`-- config
`-- beanfactory
|-- AppCommand.java (2)
`-- SelfConfiguredApp.java (1)
1 | Class with Java main() that starts Spring |
2 | Class containing our first component that will be the focus of our injection |
40.1. Application Maven Dependency
We make the Hello Service visible to our application by adding a dependency
on the hello-service-api
and hello-service-stdout
artifacts. Since the
implementation already declares a compile dependency on the interface, we
can get away with only declaring a direct dependency just on the implementation.
<groupId>info.ejava.examples.app</groupId>
<artifactId>appconfig-beanfactory-example</artifactId>
<name>App::Config::Bean Factory Example</name>
<dependencies>
<dependency>
<groupId>org.springframework.boot</groupId>
<artifactId>spring-boot-starter</artifactId>
</dependency>
<dependency>
<groupId>${project.groupId}</groupId>
<artifactId>hello-service-stdout</artifactId> (1)
<version>${project.version}</version>
</dependency>
</dependencies>
1 | Dependency on implementation creates dependency on both implementation and interface |
In this case, the module we depend on is in the same groupId and shares the same version .
For simplicity of reference and versioning, I used the ${project} variables to reference it.
That will not always be the case.
|

40.2. Viewing Dependencies
You can verify the dependencies exist using the tree
goal of the dependency
plugin.
$ mvn dependency:tree -f hello-service-stdout
...
[INFO] --- maven-dependency-plugin:3.1.1:tree (default-cli) @ hello-service-stdout ---
[INFO] info.ejava.examples.app:hello-service-stdout:jar:6.1.1-SNAPSHOT
[INFO] \- info.ejava.examples.app:hello-service-api:jar:6.1.1-SNAPSHOT:compile
40.3. Application Java Dependency
Next, we add a reference to the Hello interface and define how we can get it injected. In this case, we are using contructor injection where the instance is supplied to the class through a parameter to the constructor.
The component class now has a non-default
constructor to allow the Hello implementation to be injected and the
Java attribute is defined as final to help assure that the value
is assigned during the constructor.
|
package info.ejava.examples.app.config.beanfactory;
import org.springframework.boot.CommandLineRunner;
import org.springframework.stereotype.Component;
import info.ejava.examples.app.hello.Hello;
@Component
public class AppCommand implements CommandLineRunner {
private final Hello greeter; (1)
public AppCommand(Hello greeter) { (2)
this.greeter = greeter;
}
public void run(String... args) {
greeter.sayHello("World");
}
}
1 | Add a reference to the Hello interface. Java attribute defined as final
to help assure that the value is assigned during the constructor. |
2 | Using contructor injection where the instance is supplied to the class through a parameter to the constructor |
41. Dependency Injection
Our AppCommand
class has been defined only with the interface to Hello
and not a
specific implementation.
This Separation of Concerns helps improve modularity, testability, reuse, and many other desirable features of an application. The interaction between the two classes is defined by an interface.
But how do does our client class (AppCommand
) get an instance of the implementation (StdOutHello
)?
-
If the client class directly instantiates the implementation — it is coupled to that specific implementation.
public AppCommand() {
this.greeter = new StdOutHello("World");
}
-
If the client class procedurally delegates to a factory — it runs the risk of violating Separation of Concerns by adding complex initialization code to its primary business purpose
public AppCommand() {
this.greeter = BeanFactory.makeGreeter();
}
Traditional procedural code normally makes calls to libraries in order to perform a specific purpose. If we instead remove the instantiation logic and decisions from the client and place that elsewhere, we can keep the client more focused on its intended purpose. With this inversion of control (IoC), the application code is part of a framework that calls the application code when it is time to do something versus the other way around. In this case, the framework is for application assembly.
Most frameworks, including Spring, implement dependency injection through a form of IoC.
42. Spring Dependency Injection
We defined the dependency using the Hello
interface and have three primary ways
to have dependencies injected into an instance.
import org.springframework.beans.factory.annotation.Autowired;
public class AppCommand implements CommandLineRunner {
//@Autowired -- FIELD injection (3)
private Hello greeter;
@Autowired //-- Constructor injection (1)
public AppCommand(Hello greeter) {
this.greeter = greeter;
}
//@Autowired -- PROPERTY injection (2)
public void setGreeter(Hello hello) {
this.greeter = hello;
}
1 | constructor injection - injected values required prior to instance being created |
2 | field injection - value injected directly into attribute |
3 | setter or property injection - setter() called with value |
42.1. @Autowired Annotation
The @Autowired(required=…)
annotation
-
may be applied to fields, methods, constructors
-
@Autowired(required=true)
- default value forrequired
attribute-
successful injection is mandatory when applied to a property
-
specific constructor use required when applied to a constructor
-
only a single constructor per class may have this annotation
-
-
-
@Autowired(required=false)
-
injected is not required to exist when applied to a property
-
specific constructor an option for container to use
-
multiple constructors may have this annotation applied
-
container will determine best based on number of matches
-
-
single constructor has an implied
@Autowired(required=false)
-
There are more details to learn about injection and the lifecycle of a bean. However, we know that we are using constructor injection at this point in time since the dependency is required for the instance to be valid.
42.2. Dependency Injection Flow
In our example:
-
Spring will detect the AppCommand component and look for ways to instantiate it
-
The only constructor requires a Hello instance
-
Spring will then look for a way to instantiate an instance of Hello
43. Bean Missing
When we go to run the application, we get the following error
$ mvn clean package
...
***************************
APPLICATION FAILED TO START
***************************
Description:
Parameter 0 of constructor in AppCommand required a bean of type 'Hello' that could not be found.
Action:
Consider defining a bean of type 'Hello' in your configuration.
The problem is that the container has no knowledge of any beans that can satisfy the
only available constructor. The StdOutHello
class is not defined in a way that
allows Spring to use it.
43.1. Bean Missing Error Solution(s)
We can solve this in at least two (2) ways.
-
Add @Component to the StdOutHello class. This will trigger Spring to directly instantiate the class.
@Component public class StdOutHello implements Hello {
-
problem: It may be one of many implementations of Hello
-
-
Define what is needed using a
@Bean
factory method of a@Configuration
class. This will trigger Spring to call a method that is in charge of instantiating an object of the type identified in the method return signature.@Configuration public class AConfigurationClass { @Bean public Hello hello() { return new StdOutHello("..."); } }
44. @Configuration classes
@Configuration
classes are classes that Spring expects to have one or more @Bean
factory
methods. If you remember back, our Spring Boot application class was annotated with
@SpringBootApplication
@SpringBootApplication (1)
//==> wraps @SpringBootConfiguration (2)
// ==> wraps @Configuration
public class SelfConfiguredApp {
public static void main(String...args) {
SpringApplication.run(SelfConfiguredApp.class, args);
}
//...
}
1 | @SpringBootApplication is a wrapper around a few annotations including
@SpringBootConfiguration |
2 | @SpringBootConfiguration is an alternative annotation to using @Configuration
with the caveat that there be only one @SpringBootConfiguration per application |
Therefore, we have the option to use our Spring Boot application class to host the configuration and
the @Bean
factory.
45. @Bean Factory Method
There is more to @Bean
factory methods than we will cover here, but at its
simplest and most functional level — this is a series of factory methods the container will call to instantiate components for the application.
By default, they are all eagerly instantiated and the dependencies between them are resolved (if resolvable) by the container.
Adding a @Bean
factory method to our Spring Boot application class will
result in the following in our Java class.
@SpringBootApplication (4) (5)
public class SelfConfiguredApp {
public static void main(String...args) {
SpringApplication.run(SelfConfiguredApp.class, args);
}
@Bean (1)
public Hello hello() { (2)
return new StdOutHello("Application @Bean says Hey"); (3)
}
}
1 | method annotated with @Bean implementation |
2 | method returns Hello type required by container |
3 | method returns a fully instantiated instance. |
4 | method hosted within class with @Configuration annotation |
5 | @SpringBootConfiguration annotation included the capability defined for
@Configuration |
Anything missing to create instance gets declared as an input to the method, and it will get created in the same manner and passed as a parameter. |
46. @Bean Factory Used
With the @Bean
factory method in place, all comes together at runtime to produce the following:
$ java -jar target/appconfig-beanfactory-example-*-SNAPSHOT-bootexec.jar
...
Application @Bean says Hey World
-
the container
-
obtained an instance of a
Hello
bean -
passed that bean to the
AppCommand
class' constructor to instantiate that@Component
-
-
the
@Bean
factory method-
chose the implementation of the
Hello
service (StdOutHello
) -
chose the greeting to be used ("Application @Bean says Hey")
return new StdOutHello("Application @Bean says Hey");
-
-
the AppCommand CommandLineRunner determined who to say hello to ("World")
greeter.sayHello("World");
48. @Configuration Alternatives
With the basics of @Configuration
classes understood, I want to introduce two other common options for a @Bean
factory:
-
scope
-
proxyBeanMethods
By default,
-
Spring will instantiate a single component to represent the bean (singleton)
-
Spring will create a (CGLIB) proxy for each
@Configuration
class to assure the result is processed by Spring and that each bean client for singleton-scoped beans get the same copy. This proxy can add needless complexity depending on how sibling methods are designed.
The following concepts and issues will be discussed:
-
shared (singleton) or unique (prototype) component instances
-
(unnecessary) role of the Spring proxy (
proxyBeanMethods
) -
potential consequences of calling sibling @Bean methods over injection
48.1. Example Lifecycle POJO
To demonstrate, I created an example POJO that identifies its instance and tracks its component lifecycle.
-
the Java constructor is called for each POJO instance created
-
@PostConstruct
methods are called by Spring after dependencies have been injected. If and when you see debug from theinit()
, you know the POJO has been made into a component, with the potential for Spring container interpose.
public class Example {
private final int exampleValue;
public Example(int value) { this.exampleValue = value; } (1)
@PostConstruct (2)
void init() {
System.out.println("@PostConstruct called for: " + exampleValue);
}
public String toString() { return Integer.toString(exampleValue); }
}
1 | Constructor will be called for every instance created |
2 | @PostConstruct will only get called by when POJO becomes a component |
48.2. Example Lifecycle @Configuration Class
To further demonstrate, I have added a @Configuration
class with some options that will be changed during the example.
@Configuration //default proxyBeanMethods=true
//@Configuration(proxyBeanMethods = true)
//@Configuration(proxyBeanMethods = false)
public class BeanFactoryProxyBeansConfiguration {
private int value = 0;
@Bean //default is singleton
//@Scope(ConfigurableBeanFactory.SCOPE_SINGLETON) //"singleton"
Example bean() {
return new Example(value++);
}
48.3. Consuming @Bean Factories within Same Class
There are two pairs of Example
-consuming @Bean
factories: calling and injected.
-
Calling
@Bean
factories make a direct call to the supporting@Bean
factory method. -
Injected
@Bean
factories simply declare their requirement in method input parameters.
@Bean (1)
String calling1() { return "calling1=" + bean(); }
@Bean (1)
String calling2() { return "calling2=" + bean(); }
@Bean (2)
String injected1(Example bean) { return "injected1=" + bean; }
@Bean (2)
String injected2(Example bean) { return "injected2=" + bean; }
1 | calling consumers call the sibling @Bean factory method directly |
2 | injected consumers are passed an instance of requirements when called |
48.4. Using Defaults (Singleton, Proxy)
By default:
-
@Bean
factories use singleton scope -
@Configuration
classes useproxyBeanMethods=true
That means that:
-
@Bean factory method will be called only once by Spring
-
@Configuration
class instance will be proxied and direct calls (calling1
andcalling2
) will receive the same singleton result
@PostConstruct called for: 0 (2)
calling1=0 (1)
calling2=0 (1)
injected1=0 (1)
injected2=0 (1)
1 | only one POJO instance was created |
2 | only one component was initialized |
48.5. Prototype Scope, Proxy True
If we change component scope created by the bean()
method to "prototype"…
@Bean
@Scope(ConfigurableBeanFactory.SCOPE_PROTOTYPE) //"prototype"
Example bean() {
return new Example(value++);
}
…we get a unique POJO instance/component for each consumer (calling and injected) while proxyBeanMethods
is still true
.
@PostConstruct called for: 0 (2)
@PostConstruct called for: 1 (2)
@PostConstruct called for: 2 (2)
@PostConstruct called for: 3 (2)
calling1=0 (1)
calling2=1 (1)
injected1=2 (1)
injected2=3 (1)
1 | unique POJO instances were created |
2 | each instance was a component |
48.6. Prototype Scope, Proxy False
If we drop the CGLIB proxy, our configuration instance gets lighter, but …
@Configuration(proxyBeanMethods = false)
public class BeanFactoryProxyBeansConfiguration {
@Bean @Scope(ConfigurableBeanFactory.SCOPE_PROTOTYPE) //"prototype"
Example bean() {
…only injected consumers are given "component" beans. The "calling" consumers are given "POJO" beans that lack the potential for interpose.
@PostConstruct called for: 2 (2) @PostConstruct called for: 3 (2) calling1=0 (1) calling2=1 (1) injected1=2 (1) injected2=3 (1)
1 | each consumer is given a unique instance |
2 | only the injected callers are given components (with interpose potential) |
48.7. Singleton Scope, Proxy False
Keeping the proxy eliminated and reverting back to the default singleton scope for the bean …
@Configuration(proxyBeanMethods = false)
public class BeanFactoryProxyBeansConfiguration {
@Bean @Scope(ConfigurableBeanFactory.SCOPE_SINGLETON) //"singleton" - default
Example bean() {
…shows that only the injected consumers are receiving a singleton instance — initialized as a component, with the potential for interpose.
@PostConstruct called for: 0 (3) calling1=1 (2) calling2=2 (2) injected1=0 (1) injected2=0 (1)
1 | injected consumers get the same instance |
2 | calling consumers get unique instances independent of @Scope |
3 | only the injected consumers are getting a component (with interpose potential) |
48.8. @Configuration Takeaways
-
Spring instantiates all components, by default, as singletons — with the option to instantiate unique instances on demand when
@Scope
is set to "prototype". -
Spring, by default, constructs a CGLIB proxy to enforce those semantics for both calling and injected consumers.
-
Since
@Configuration
classes are only called once at start-up, it can be a waste of resources to construct a CGLIB proxy.-
Using injection-only consumers, with no direct calls to
@Configuration
class methods, eliminates the need for the proxy. -
adding
proxyFactoryBeans=false
eliminates the CGLIB proxy. Spring will enforce semantics for injected consumers
-
-
48.9. @Configuration and Interpose
Spring uses Interpose to intercept requests to the @Bean
method and enforce the scope requirements — even for buddy methods from the same @Configuration
class.
@Configuration
is a special @Component
.
Spring does not offer Interpose between buddy methods of non-@Configuration
@Components
.
The @Configuration
case is a special case where this is done.
This shows you that proxies can be built to intercept calls between buddy methods of the same class but Spring has chosen not to do so for normal @Components
.

49. Summary
In this module we
-
decoupled part of our application into three Maven modules (app, iface, and impl1)
-
decoupled the implementation details (
StdOutHello
) of a service from the caller (AppCommand
) of that service -
injected the implementation of the service into a component using constructor injection
-
defined a
@Bean
factory method to make the determination of what to inject -
showed an alternative using XML-based configuration and
@ImportResource
-
explored the differences between calling and injected sibling component consumers
In future modules, we will look at more detailed aspects of Bean lifecycle and @Bean factory methods. Right now we are focused on following a path to explore decoupling our application even further.
Value Injection
copyright © 2025 jim stafford (jim.stafford@jhu.edu)
50. Introduction
One of the things you may have noticed was the hard-coded string in the AppCommand class in the previous example.
public void run(String... args) throws Exception {
greeter.sayHello("World");
}
Let’s say we don’t want the value hard-coded or passed in as a command-line argument. Let’s go down a path that uses standard Spring value injection to inject a value from a property file.
50.1. Goals
The student will learn:
-
how to configure an application using properties
-
how to use different forms of injection
50.2. Objectives
At the conclusion of this lecture and related exercises, the student will be able to:
-
implement value injection into a Spring Bean attribute using
-
field injection
-
constructor injection
-
-
inject a specific value at runtime using a command line parameter
-
define a default value for the attribute
-
define property values for attributes of different type
51. @Value Annotation
To inject a value from a property source, we can add the Spring
@Value
annotation to the component property.
package info.ejava.examples.app.config.valueinject;
import org.springframework.beans.factory.annotation.Value;
...
@Component
public class AppCommand implements CommandLineRunner {
private final Hello greeter;
@Value("${app.audience}") (2)
private String audience; (1)
public AppCommand(Hello greeter) {
this.greeter = greeter;
}
public void run(String... args) throws Exception {
greeter.sayHello(audience);
}
}
1 | defining target of value as a FIELD |
2 | using FIELD injection to directly inject into the field |
There are no specific requirements for property names but there
are some common conventions followed using (prefix).(property)
to scope the property within a context.
-
app.audience
-
logging.file.name
-
spring.application.name
51.1. Value Not Found
However, if the property is not defined anywhere the following ugly error will appear.
org.springframework.beans.factory.BeanCreationException: Error creating bean with name 'appCommand' defined in file [.../app/app-config/appconfig-valueinject-example/target/classes/info/ejava/examples/app/config/valueinject/AppCommand.class]:
Unexpected exception during bean creation
...
Caused by: java.lang.IllegalArgumentException: Could not resolve placeholder
'app.audience' in value "${app.audience}"
51.2. Value Property Provided by Command Line
We can try to fix the problem by defining the property value on the command line
$ java -jar target/appconfig-valueinject-example-*-SNAPSHOT-bootexec.jar \
--app.audience="Command line World" (1)
...
Application @Bean says Hey Command line World
1 | use double dash (-- ) and property name to supply property value |
51.3. Default Value
We can defend against the value not being provided by assigning a default value where we declared the injection
@Value("${app.audience:Default World}") (1)
private String audience;
1 | use :value to express a default value for injection |
That results in the following output
$ java -jar target/appconfig-valueinject-example-*-SNAPSHOT-bootexec.jar
...
Application @Bean says Hey Default World
$ java -jar target/appconfig-valueinject-example-*-SNAPSHOT-bootexec.jar \
--app.audience="Command line World"
...
Application @Bean says Hey Command line World
52. Constructor Injection
In the above version of the example, we injected the Hello
bean through the constructor
and the audience
property using FIELD injection. This means
-
the value for
audience
attribute will not be known during the constructor -
the value for
audience
attribute cannot be made final
@Component
public class AppCommand implements CommandLineRunner {
private final Hello greeter;
@Value("${app.audience}")
private String audience; //<== injection is after ctor
public AppCommand(Hello greeter) {
this.greeter = greeter;
greeter.sayHello(audience); //X-no (1)
}
1 | audience value will be null when used in the constructor — when using FIELD injection |
52.1. Constructor Injection Solution
An alternative to using field
injection is to change it to constructor
injection.
This has the benefit of having all properties injected in time to have them declared final.
@Component
public class AppCommand implements CommandLineRunner {
private final Hello greeter;
private final String audience; (2)
public AppCommand(Hello greeter,
@Value("${app.audience:Default World}") String audience) {
this.greeter = greeter;
this.audience = audience; (1)
}
1 | audience value will be known when used in the constructor |
2 | audience value can be optionally made final |
53. @PostConstruct
If field-injection is our choice, we can account for the late-arriving injections by leveraging @PostConstruct
.
The Spring container will call a method annotated with @PostConstruct
after instantiation (ctor called) and properties fully injected.
import jakarta.annotation.PostConstruct;
...
@Component
public class AppCommand implements CommandLineRunner {
private final Hello greeter; (1)
@Value("${app.audience}")
private String audience; (2)
@PostConstruct
void init() { (3)
greeter.sayHello(audience); //yes-greeter and audience initialized
}
public AppCommand(Hello greeter) {
this.greeter = greeter;
}
1 | constructor injection occurs first and in-time to declare attribute as final |
2 | field and property-injection occurs next and can involve many properties |
3 | Container calls @PostConstruct when all injection complete |
54. Property Types
54.1. non-String Property Types
Properties can also express non-String types as the following example shows.
@Component
public class PropertyExample implements CommandLineRunner {
private final String strVal;
private final int intVal;
private final boolean booleanVal;
private final float floatVal;
public PropertyExample(
@Value("${val.str:}") String strVal,
@Value("${val.int:0}") int intVal,
@Value("${val.boolean:false}") boolean booleanVal,
@Value("${val.float:0.0}") float floatVal) {
...
The property values are expressed using string values that can be syntactically converted to the type of the target variable.
$ java -jar target/appconfig-valueinject-example-*-SNAPSHOT-bootexec.jar \
--app.audience="Command line option" \
--val.str=aString \
--val.int=123 \
--val.boolean=true \
--val.float=123.45
...
Application @Bean says Hey Command line option
strVal=aString
intVal=123
booleanVal=true
floatVal=123.45
54.2. Collection Property Types
We can also express properties as a sequence of values and inject the parsed string into Arrays and Collections.
...
private final List<Integer> intList;
private final int[] intArray;
private final Set<Integer> intSet;
public PropertyExample(...
@Value("${val.intList:}") List<Integer> intList,
@Value("${val.intList:}") Set<Integer> intSet,
@Value("${val.intList:}") int[] intArray) {
...
--val.intList=1,2,3,3,3
...
intList=[1, 2, 3, 3, 3] (1)
intSet=[1, 2, 3] (2)
intArray=[1, 2, 3, 3, 3] (3)
1 | parsed sequence with duplicates injected into List maintained duplicates |
2 | parsed sequence with duplicates injected into Set retained only unique values |
3 | parsed sequence with duplicates injected into Array maintained duplicates |
54.3. Custom Delimiters (using Spring SpEL)
We can get a bit more elaborate and define a custom delimiter for the values.
However, it requires the use of Spring Expression Language (EL; SpEL) #{}
operator.
(Ref: A Quick Guide to Spring @Value)
private final List<Integer> intList;
private final List<Integer> intListDelimiter;
public PropertyExample(
...
@Value("${val.intList:}") List<Integer> intList,
@Value("#{'${val.intListDelimiter:}'.split('!')}") List<Integer> intListDelimiter, (2)
...
--val.intList=1,2,3,3,3 --val.intListDelimiter='1!2!3!3!3' (1)
...
intList=[1, 2, 3, 3, 3]
intListDelimeter=[1, 2, 3, 3, 3]
...
1 | sequence is expressed on command line using two different delimiters |
2 | val.intListDelimiter String is read in from raw property value and segmented at the custom ! character |
54.4. Map Property Types
We can also leverage Spring EL to inject property values directly into a Map.
private final Map<Integer,String> map;
public PropertyExample( ...
@Value("#{${val.map:{}}}") Map<Integer,String> map) { (1)
...
--val.map="{0:'a', 1:'b,c,d', 2:'x'}"
...
map={0=a, 1=b,c,d, 2=x}
1 | parsed map injected into Map of specific type using Spring Expression Language (`#{}') operator |
54.5. Map Element
We can also use Spring EL to obtain a specific element from a Map.
private final Map<String, String> systemProperties;
public PropertyExample(
...
@Value("#{${val.map:{0:'',3:''}}[3]}") String mapValue, (1)
...
(no args)
...
mapValue= (2)
--val.map={0:'foo', 2:'bar, baz', 3:'buz'}
...
mapValue=buz (3)
...
1 | Spring EL declared to use Map element with key 3 and default to a Map of 2 elements with key 0 and 3 |
2 | With no arguments provided, the default 3:'' value was injected |
3 | With a map provided, the value 3:'buz' was injected |
54.6. System Properties
We can also simply inject Java System Properties into a Map using Spring EL.
private final Map<String, String> systemProperties;
public PropertyExample(
...
@Value("#{systemProperties}") Map<String, String> systemProperties) { (1)
...
System.out.println("systemProperties[user.timezone]=" + systemProperties.get("user.timezone")); (2)
...
systemProperties[user.timezone]=America/New_York
1 | Complete Map of system properties is injected |
2 | Single element is accessed and printed |
54.7. Property Conversion Errors
An error will be reported and the program will not start if the value provided cannot be syntactically converted to the target variable type.
$ java -jar target/appconfig-valueinject-example-*-SNAPSHOT-bootexec.jar \ --val.int=abc ... TypeMismatchException: Failed to convert value of type 'java.lang.String' to required type 'int'; nested exception is java.lang.NumberFormatException: For input string: "abc"
55. Summary
In this section we
-
defined a value injection for an attribute within a Spring Bean using
-
field injection
-
constructor injection
-
-
defined a default value to use in the event a value is not provided
-
defined a specific value to inject at runtime using a command line parameter
-
implemented property injection for attributes of different types
-
Built-in types (String, int, boolean, etc)
-
Collection types
-
Maps
-
-
Defined custom parsing techniques using Spring Expression Language (EL)
In future sections we will look to specify properties using aggregate property sources like file(s) rather than specifying each property individually.
Property Source
copyright © 2025 jim stafford (jim.stafford@jhu.edu)
56. Introduction
In the previous section we defined a value injection into an attribute of a Spring Bean class and defined a few ways to inject a value on an individual basis. Next, we will set up ways to specify entire collection of property values through files.
56.1. Goals
The student will learn:
-
to supply groups of properties using files
-
to configure a Spring Boot application using property files
-
to flexibly configure and control configurations applied
56.2. Objectives
At the conclusion of this lecture and related exercises, the student will be able to:
-
configure a Spring Boot application using a property file
-
specify a property file for a basename
-
specify a property file packaged within a JAR file
-
specify a property file located on the file system
-
specify a both
properties
andYAML
property file sources -
specify multiple files to derive an injected property from
-
specify properties based on an active profile
-
specify properties based on placeholder values
-
specify property overrides using different external source options
57. Property File Source(s)
Spring Boot uses three key properties when looking for configuration files (Ref: docs.spring.io):
-
spring.config.name
— one or more base names separated by commas. The default isapplication
and the suffixes searched for are.properties
and.yml
(or.yaml
) -
spring.profiles.active
— one or more profile names separated by commas used in this context to identify which form of the base name to use. The default isdefault
and this value is located at the end of the base filename separated by a dash (-
; e.g.,application-default
) -
spring.config.location
— one or more directories/packages to search for configuration files or explicit references to specific files. The default is:-
file:config/
- within aconfig
directory in the current directory -
file:./
- within the current directory -
classpath:/config/
- within aconfig
package in the classpath -
classpath:/
— within the root package of the classpath
-
Names are primarily used to identify the base name of the application (e.g., application
or myapp
) or
of distinct areas (e.g., database
, security
). Profiles are primarily used to supply
variants of property values. Location is primarily used to identify the search paths to look for
configuration files but can be used to override names and profiles when a complete file path is supplied.
57.1. Property File Source Example
In this initial example I will demonstrate spring.config.name
and spring.config.location
and
use a single value injection similar to previous examples.
//AppCommand.java
...
@Value("${app.audience}")
private String audience;
...
However, the source of the property value will not come from the command line. It will come from one of the following property and/or YAML files in our module.
src
`-- main
|-- java
| `-- ...
`-- resources
|-- alternate_source.properties
|-- alternate_source.yml
|-- application.properties
`-- property_source.properties
$ jar tf target/appconfig-propertysource-example-*-SNAPSHOT-bootexec.jar | \
egrep 'classes.*(properties|yml)'
BOOT-INF/classes/alternate_source.properties
BOOT-INF/classes/alternate_source.yml
BOOT-INF/classes/property_source.properties
BOOT-INF/classes/application.properties
57.2. Example Property File Contents
The four files each declare the same property app.audience
but with a different
value.
Spring Boot primarily supports the two file types shown (properties
and YAML
).
There is
some support for JSON
and XML
is primarily used to define configurations.
The first three below are in
properties
format.
#property_source.properties
app.audience=Property Source value
#alternate_source.properties
app.audience=alternate source property file
#application.properties
app.audience=application.properties value
This last file is in
YAML
format.
#alternate_source.yml
app:
audience: alternate source YAML file
That means the following — which will load the application.(properties|yml)
file
from one of the four locations …
$ java -jar target/appconfig-propertysource-example-*-SNAPSHOT-bootexec.jar
...
Application @Bean says Hey application.properties value
can also be completed with
$ java -jar target/appconfig-propertysource-example-*-SNAPSHOT-bootexec.jar \
--spring.config.location="classpath:/"
...
Application @Bean says Hey application.properties value
$ java -jar target/appconfig-propertysource-example-*-SNAPSHOT-bootexec.jar \
--spring.config.location="file:src/main/resources/"
...
Application @Bean says Hey application.properties value
$ java -jar target/appconfig-propertysource-example-*-SNAPSHOT-bootexec.jar \
--spring.config.location="file:src/main/resources/application.properties"
...
Application @Bean says Hey application.properties value
$ cp src/main/resources/application.properties /tmp/xyz.properties
$ java -jar target/appconfig-propertysource-example-*-SNAPSHOT-bootexec.jar \
--spring.config.name=xyz --spring.config.location="file:/tmp/"
...
Application @Bean says Hey application.properties value
57.3. Non-existent Path
If you supply a non-existent path, Spring will report that as an error.
java -jar target/appconfig-propertysource-example-*-SNAPSHOT-bootexec.jar \
--spring.config.location="file:src/main/resources/,file:src/main/resources/does_not_exit/"
[main] ERROR org.springframework.boot.diagnostics.LoggingFailureAnalysisReporter --
***************************
APPLICATION FAILED TO START
***************************
Description:
Config data location 'file:src/main/resources/does_not_exit/' does not exist
Action:
Check that the value 'file:src/main/resources/does_not_exit/' is correct, or prefix it with 'optional:'
You can mark the location with optional:
for cases where it is legitimate for the location not to exist.
java -jar target/appconfig-propertysource-example-*-SNAPSHOT-bootexec.jar \
--spring.config.location="file:src/main/resources/,optional:file:src/main/resources/does_not_exit/"
57.4. Path not Ending with Slash ("/")
If you supply a path not ending with a slash ("/"), Spring will also report an error.
java -jar target/appconfig-propertysource-example-*-SNAPSHOT-bootexec.jar \
--spring.config.location="file:src/main/resources"
...
14:28:23.544 [main] ERROR org.springframework.boot.SpringApplication - Application run failed
java.lang.IllegalStateException: Unable to load config data from 'file:src/main/resources'
...
Caused by: java.lang.IllegalStateException: File extension is not known to any PropertySourceLoader. If the location is meant to reference a directory, it must end in '/' or File.separator
57.5. Alternate File Examples
We can switch to a different set of configuration files by changing the
spring.config.name
or spring.config.location
so that …
#property_source.properties
app.audience=Property Source value
#alternate_source.properties
app.audience=alternate source property file
#alternate_source.yml
app:
audience: alternate source YAML file
can be used to produce
$ java -jar target/appconfig-propertysource-example-*-SNAPSHOT-bootexec.jar \
--spring.config.name=property_source
...
Application @Bean says Hey Property Source value
$ java -jar target/appconfig-propertysource-example-*-SNAPSHOT-bootexec.jar \
--spring.config.name=alternate_source
...
Application @Bean says Hey alternate source property file
$ java -jar target/appconfig-propertysource-example-*-SNAPSHOT-bootexec.jar \
--spring.config.location="classpath:alternate_source.properties,classpath:alternate_source.yml"
...
Application @Bean says Hey alternate source YAML file
57.6. Series of files
#property_source.properties
app.audience=Property Source value
#alternate_source.properties
app.audience=alternate source property file
The default priority is last specified.
$ java -jar target/appconfig-propertysource-example-*-SNAPSHOT-bootexec.jar \
--spring.config.name="property_source,alternate_source"
...
Application @Bean says Hey alternate source property file
$ java -jar target/appconfig-propertysource-example-*-SNAPSHOT-bootexec.jar \
--spring.config.name="alternate_source,property_source"
...
Application @Bean says Hey Property Source value
58. @PropertySource Annotation
We can define a property to explicitly be loaded using a Spring-provided
@PropertySource
annotation. This annotation can be used on any class that
is used as a @Configuration
, so I will add that to the main application.
However, because we are still working with a very simplistic, single property example — I have started a sibling example that only has a
single property file so that no priority/overrides from application.properties
will occur.
|-- pom.xml
`-- src
`-- main
|-- java
| `-- info
| `-- ejava
| `-- examples
| `-- app
| `-- config
| `-- propertysource
| `-- annotation
| |-- AppCommand.java
| `-- PropertySourceApp.java
`-- resources
`-- property_source.properties
#property_source.properties
app.audience=Property Source value
...
import org.springframework.boot.autoconfigure.SpringBootApplication;
import org.springframework.context.annotation.PropertySource;
@SpringBootApplication
@PropertySource("classpath:property_source.properties") (1)
public class PropertySourceApp {
...
1 | An explicit reference to the properties file is placed within the
annotation on the @Configuration class |
When we now execute our JAR, we get the contents of the property file.
java -jar target/appconfig-propertysource-annotation-example-*-SNAPSHOT-bootexec.jar
...
Application @Bean says Hey Property Source value
We will cover alternate property sources and their priority later within this lecture, @PropertySource
ends up being one or the lowest priority sources.
This permits the application to package a set of factory defaults and optionally allows many of the other sources to override.
Place Factory-Default Properties in @PropertySource
@PropertySource references make for a convenient location for components to package factory-supplied, low-priority defaults that can be easily overridden.
|
59. YAML Property Source
The @PropertySource
annotation does not directly support YAML files.
There are a couple of options to make that work.
59.1. spring.config.import
We can import YAML properties from local sources (e.g., application.properties or application.yaml). The following snippet shows an example import as well as a property that will be overridden by the imported YAML.
app.audience: Properties Property (1)
spring.config.import=classpath:/imported_yaml.yml (2)
1 | supplied property will get overridden by contents of import |
2 | imports configuration source that can be YAML or properties |
app:
audience: Imported YAML Property
59.2. Example Imported Properties
The "imported" property can be injected into components.
The following snippet shows a basic CommandLineRunner being returned as an anonymnous class from a @Bean
factory method.
The property is injected into the @Bean
method and visible to the run()
method.
@Bean
CommandLineRunner importedYamlProperties(@Value("${app.audience}") String text) {
return new CommandLineRunner() {
@Override
public void run(String... args) {
System.out.printf("-1) %s", text);
}
};
}
This produces the following output
-1) Imported YAML Property
59.3. PropertySourceFactory
Okay, but why do we have to use that indirect method?
It is surprising that Spring does not provide a built-in way to immediately do this, but they do supply the hooks and tools to make this work direct using PropertySourceFactory
.
The following snippet shows a class implementing a custom property source using YAML-ready classes.
import org.springframework.beans.factory.config.YamlPropertiesFactoryBean;
import org.springframework.core.env.PropertiesPropertySource;
import org.springframework.core.env.PropertySource;
import org.springframework.core.io.support.EncodedResource;
import org.springframework.core.io.support.PropertySourceFactory;
...
//source: https://www.baeldung.com/spring-yaml-propertysource
public class YamlPropertySourceFactory implements PropertySourceFactory {
@Override
public PropertySource<?> createPropertySource(String name,
EncodedResource encodedResource) {
YamlPropertiesFactoryBean factory = new YamlPropertiesFactoryBean();
factory.setResources(encodedResource.getResource());
Properties properties = factory.getObject();
return new PropertiesPropertySource(encodedResource.getResource().getFilename(),
properties);
}
}
59.3.1. Using Custom PropertySourceFactory
The resulting factory class is registered as a factory for the YAML property source.
@SpringBootApplication
@PropertySource(value="classpath:yaml_property_source.yml",
factory = YamlPropertySourceFactory.class)
public class YamlPropertySourceApp {
The following snippet shows an alternate form of Bean
factory (having nothing to do with YAML).
This variant returns a lamda function that implements the run()
method of the CommandLineRunner
.
The property is injected into the @Bean
method and visible to the lambda function.
@Bean
CommandLineRunner yamlFromFactory(@Value("${app.audience.multiline.collapsed}") String text) {
return args-> System.out.printf("\n-2) %s", text);
}
This produces the following output.
-2) YAML Multi-line Collapsed Property
59.4. Multi-line YAML
One reason for liking a YAML property source is the great support for line breaks.
The properties format requires the insertion of explicit line-continuations (\
) and line-terminations(\n
) that can be annoying when working with lengthy text like SQL queries.
app.audience.multiline:Properties\
Multi-line\n
Property
If we left off the escape sequences, Spring would have interpreted the follow-on lines as new property definitions. |
59.4.1. Multi-line YAML Example
We can instead use the YAML >
character to express that line breaks should be ignored in the resulting text.
The line termination at the end can be eliminated by using >-
.
app:
audience:
multiline:
#use >- to remove trailing \n
collapsed: >
YAML
Multi-line
Collapsed
Property
Each line of the YAML property is collapsed into a single string. This produces the following output.
-2) YAML Multi-line Collapsed Property
59.4.2. Retaining YAML Line Breaks
For things like database queries, you are going to want to provide literal text.
The following snippet shows text that will be exactly as shown using the |
character prefix.
The trailing line termination at the end can be eliminated by using |-
.
app:
audience:
multiline:
#use |- to remove trailing \n
preserved: |
YAML
Multi-line
Preserved
Property
This produces the following output.
-3) YAML
Multi-line
Preserved
Property
60. Profiles
In addition to spring.config.name
and spring.config.location
, there is a third
configuration property — spring.profiles.active
— that Spring uses when configuring
an application. Profiles are identified by
-(profileName)
at the end of the base filename
(e.g., application-site1.properties
, myapp-site1.properties
)
I am going to create a new example to help explain this.
|-- pom.xml
`-- src
`-- main
|-- java
| `-- info
| `-- ejava
| `-- examples
| `-- app
| `-- config
| `-- propertysource
| `-- profiles
| |-- AppCommand.java
| `-- PropertySourceApp.java
`-- resources
|-- application-default.properties
|-- application-site1.properties
|-- application-site2.properties
`-- application.properties
The example uses the default spring.config.name
of application
and supplies four
property files.
-
each of the property files supplies a common property of
app.commonProperty
to help demonstrate priority -
each of the property files supplies a unique property to help identify whether the file was used
#application.properties
app.commonProperty=commonProperty from application.properties
app.appProperty=appProperty from application.properties
#application-default.properties
app.commonProperty=commonProperty from application-default.properties
app.defaultProperty=defaultProperty from application-default.properties
#application-site1.properties
app.commonProperty=commonProperty from application-site1.properties
app.site1Property=site1Property from application-site1.properties
#application-site2.properties
app.commonProperty=commonProperty from application-site2.properties
app.site2Property=site2Property from application-site2.properties
The component class defines an attribute for each of the available properties and defines a default value to identify when they have not been supplied.
@Component
public class AppCommand implements CommandLineRunner {
@Value("${app.commonProperty:not supplied}")
private String commonProperty;
@Value("${app.appProperty:not supplied}")
private String appProperty;
@Value("${app.defaultProperty:not supplied}")
private String defaultProperty;
@Value("${app.site1Property:not supplied}")
private String site1Property;
@Value("${app.site2Property:not supplied}")
private String site2Property;
In all cases (except when using an alternate spring.config.name ), we will get
the application.properties loaded. However, it is used at a lower priority
than all other sources.
|
60.1. Default Profile
If we run the program with no profiles active, we enact the default
profile.
site1
and site2
profiles are not loaded.
$ java -jar target/appconfig-propertysource-profile-example-*-SNAPSHOT-bootexec.jar
...
commonProperty=commonProperty from application-default.properties (1)
appProperty=appProperty from application.properties (2)
defaultProperty=defaultProperty from application-default.properties (3)
site1Property=not supplied (4)
site2Property=not supplied
1 | commonProperty was set to the value from default profile |
2 | application.properties was loaded |
3 | the default profile was loaded |
4 | site1 and site2 profiles where not loaded |
60.2. Specific Active Profile
If we activate a specific profile (site1
) the associated file is loaded
and the alternate profiles — including default
— are not loaded.
$ java -jar target/appconfig-propertysource-profile-example-*-SNAPSHOT-bootexec.jar \
--spring.profiles.active=site1
...
commonProperty=commonProperty from application-site1.properties (1)
appProperty=appProperty from application.properties (2)
defaultProperty=not supplied (3)
site1Property=site1Property from application-site1.properties (4)
site2Property=not supplied (3)
1 | commonProperty was set to the value from site1 profile |
2 | application.properties was loaded |
3 | default and site2 profiles were not loaded |
4 | the site1 profile was loaded |
60.3. Multiple Active Profiles
We can activate multiple profiles at the same time. If they define overlapping properties, the later one specified takes priority.
$ java -jar target/appconfig-propertysource-profile-example-*-SNAPSHOT-bootexec.jar \
--spring.profiles.active=site1,site2 (1)
...
commonProperty=commonProperty from application-site2.properties (1)
appProperty=appProperty from application.properties (2)
defaultProperty=not supplied (3)
site1Property=site1Property from application-site1.properties (4)
site2Property=site2Property from application-site2.properties (4)
$ java -jar target/appconfig-propertysource-profile-example-*-SNAPSHOT-bootexec.jar \
--spring.profiles.active=site2,site1 (1)
...
commonProperty=commonProperty from application-site1.properties (1)
appProperty=appProperty from application.properties (2)
defaultProperty=not supplied (3)
site1Property=site1Property from application-site1.properties (4)
site2Property=site2Property from application-site2.properties (4)
1 | commonProperty was set to the value from last specified profile |
2 | application.properties was loaded |
3 | the default profile was not loaded |
4 | site1 and site2 profiles were loaded |
60.4. No Associated Profile
If there are no associated profiles with a given spring.config.name
, then
none will be loaded.
$ java -jar target/appconfig-propertysource-profile-example-*-SNAPSHOT-bootexec.jar \
--spring.config.name=BOGUS --spring.profiles.active=site1 (1)
...
commonProperty=not supplied (1)
appProperty=not supplied
defaultProperty=not supplied
site1Property=not supplied
site2Property=not supplied
1 | No profiles where loaded for spring.config.name BOGUS |
61. Property Placeholders
We have the ability to build property values using a placeholder that will come from elsewhere. Consider the following example where there is a common pattern to a specific set of URLs that change based on a base URL value.
-
(config_name).properties
would be the candidate to host the following definitionsecurity.authn=${security.service.url}/authentications?user=:user security.authz=${security.service.url}/authorizations/roles?user=:user
-
profiles would host the specific value for the placeholder
-
(config_name)-(profileA).properties
security.service.url=http://localhost:8080
-
(config_name)-(profileB).properties
security.service.url=https://acme.com
-
-
the default value for the placeholder can be declared in the same property file that uses it
security.service.url=https://acme.com security.authn=${security.service.url}/authentications?user=:user security.authz=${security.service.url}/authorizations/roles?user=:user
61.1. Placeholder Demonstration
To demonstrate this further, I am going to add three additional property files to the previous example.
`-- src
`-- main
...
`-- resources
|-- ...
|-- myapp-site1.properties
|-- myapp-site2.properties
`-- myapp.properties
61.2. Placeholder Property Files
# myapp.properties
app.commonProperty=commonProperty from myapp.properties (2)
app.appProperty="${app.commonProperty}" used by myapp.property (1)
1 | defines a placeholder for another property |
2 | defines a default value for the placeholder within this file |
Only the ${} characters and property name are specific to property placeholders. Quotes ("" ) within this property value are part of this example and not anything specific to property placeholders in general.
|
# myapp-site1.properties
app.commonProperty=commonProperty from myapp-site1.properties (1)
app.site1Property=site1Property from myapp-site1.properties
1 | defines a value for the placeholder |
# myapp-site2.properties
app.commonProperty=commonProperty from myapp-site2.properties (1)
app.site2Property=site2Property from myapp-site2.properties
1 | defines a value for the placeholder |
61.3. Placeholder Value Defined Internally
Without any profiles activated, we obtain a value for the placeholder
from within myapp.properties
.
$ java -jar target/appconfig-propertysource-profile-example-*-SNAPSHOT-bootexec.jar \
--spring.config.name=myapp
...
commonProperty=commonProperty from myapp.properties
appProperty="commonProperty from myapp.properties" used by myapp.property (1)
defaultProperty=not supplied
site1Property=not supplied
site2Property=not supplied
1 | placeholder value coming from default value defined in same myapp.properties |
61.4. Placeholder Value Defined in Profile
Activating the site1
profile causes the placeholder value to get defined by
myapp-site1.properties
.
$ java -jar target/appconfig-propertysource-profile-example-*-SNAPSHOT-bootexec.jar \
--spring.config.name=myapp --spring.profiles.active=site1
...
commonProperty=commonProperty from myapp-site1.properties
appProperty="commonProperty from myapp-site1.properties" used by myapp.property (1)
defaultProperty=not supplied
site1Property=site1Property from myapp-site1.properties
site2Property=not supplied
1 | placeholder value coming from value defined in myapp-site1.properties |
61.5. Multiple Active Profiles
Multiple profiles can be activated. By default — the last profile specified has the highest priority.
$ java -jar target/appconfig-propertysource-profile-example-*-SNAPSHOT-bootexec.jar \
--spring.config.name=myapp --spring.profiles.active=site1,site2
...
commonProperty=commonProperty from myapp-site2.properties
appProperty="commonProperty from myapp-site2.properties" used by myapp.property (1)
defaultProperty=not supplied
site1Property=site1Property from myapp-site1.properties
site2Property=site2Property from myapp-site2.properties
1 | placeholder value coming from value defined in last profile — myapp-site2.properties |
61.6. Mixing Names, Profiles, and Location
Name, profile, and location constructs can play well together as long as location only references a directory path and not a specific file. In the example below, we are defining a non-default name, a non-default profile, and a non-default location to search for the property files.
$ java -jar target/appconfig-propertysource-profile-example-*-SNAPSHOT-bootexec.jar \
--spring.config.name=myapp \
--spring.profiles.active=site1 \
--spring.config.location="file:src/main/resources/"
...
commonProperty=commonProperty from myapp-site1.properties
appProperty="commonProperty from myapp-site1.properties" used by myapp.property
defaultProperty=not supplied
site1Property=site1Property from myapp-site1.properties
site2Property=not supplied
The above example located the following property files in the filesystem (not classpath)
-
src/main/resources/myapp.properties
-
src/main/resources/myapp-site1.properties
62. Other Common Property Sources
Property files and profiles are, by far, the primary way to configure applications in bulk. However, it is helpful to know other ways to supply or override properties external to the application. One specific example is in deployment platforms where you do not control the command line and must provide some key configuration via environment variables or system properties.
Spring.io lists about a dozen sources of other property sources in priority order. Use their site for the full list. I won’t go through all of them, but will cover the ones that have been the most common and helpful for me in low-to-high Spring priority order.
Each example will inject value into a component property that will be printed.
@Value("${app.audience}")
private String audience;
62.1. Property Source
@PropertySource
is one of the lowest priority sources.
In the following example, I am supplying a custom property file and referencing it from a @Configuration
.
The reference will use a classpath:
reference to use the file from the module JAR.
@Configuration
@PropertySource(name="propertySource",
value = "classpath:info/ejava/examples/app/config/propertysource/packaged_propertySource.properties")
public class PropertySourceConfiguration { }
#packaged_propertySource.properties
app.audience=packaged_propertySource.properties value
Since the @PropertySource
is the lowest priority source of these examples, I will trigger it by supplying a fictitious spring.config.name
so that no default profiles override it.
$ java -jar target/appconfig-propertysource-example-6.1.1-SNAPSHOT-bootexec.jar \
--spring.config.name=none
Application @Bean says Hey packaged_propertySource.properties value
62.2. application.properties
If we allow the application to use the default "application" config name, the application.properties
file will take next precedence.
src
`-- main
|-- ...
`-- resources
|-- application.properties
#application.properties
app.audience=application.properties value
$ java -jar target/appconfig-propertysource-example-6.1.1-SNAPSHOT-bootexec.jar
Application @Bean says Hey application.properties value (1)
1 | "application.properties value" comes from a property file |
62.3. Profiles
The next level of override — as you know — is a profile.
#application-example.properties
app.audience=application-example.properties value
$ java -jar target/appconfig-propertysource-example-6.1.1-SNAPSHOT-bootexec.jar \
--spring.profiles.active=example
Application @Bean says Hey application-example.properties value
62.5. Java System Properties
The Next priority is the Java system property.
The example below shows the -Dapp.audience=…
Java system property overriding the environment variable.
$ (export APP_AUDIENCE=env &&
java -jar \
-Dapp.audience=sys \(1)
target/appconfig-propertysource-example-6.1.1-SNAPSHOT-bootexec.jar)
Application @Bean says Hey sys (2)
1 | "sys" comes from system property |
2 | system property overrides environment variable and file source |
62.6. spring.application.json
Next is priority are properties expressed within a JSON document supplied by the spring.application.json
property.
The spring.application.json
property can be expressed as an environment variable, Java system property, or command line.
The specific JSON will be used based on the priority of the source.
The properties within the JSON will override whatever we have demonstrated so far.
62.6.1. JSON Expressed as Environment Variable
$ (export APP_AUDIENCE=env && \
SPRING_APPLICATION_JSON='{"app.audience":"envjson"}' && \(1)
java -jar -Dapp.audience=sys \
target/appconfig-propertysource-example-6.1.1-SNAPSHOT-bootexec.jar)
Application @Bean says Hey envjson (2)
1 | "envjson" comes from spring.application.json property expressed using environment variable |
2 | spring.application.json overrides system property, environment variable and file |
62.6.2. JSON Expressed as System Property
(export APP_AUDIENCE=env && \
SPRING_APPLICATION_JSON='{"app.audience":"envjson"}' && \
java -jar \
-Dapp.audience=sys \
-Dspring.application.json='{"app.audience":"sysjson"}' \(1)
target/appconfig-propertysource-example-6.1.1-SNAPSHOT-bootexec.jar)
Application @Bean says Hey sysjson (2)
1 | "sysjson" comes from spring.application.json property expressed using system property |
2 | system property expression overrides environment variable expression |
62.7. Command Line Arguments
Next in priority are command line arguments.
The example below shows the --app.audience=…
command line argument overriding everything we have shown defined to date.
$ (export APP_AUDIENCE=env && \
SPRING_APPLICATION_JSON='{"app.audience":"envjson"}' && \
java -jar \
-Dapp.audience=sys \
-Dspring.application.json='{"app.audience":"sysjson"}' \
target/appconfig-propertysource-example-6.1.1-SNAPSHOT-bootexec.jar \
--app.audience=cmdarg) (1)
Application @Bean says Hey cmdarg (2)
1 | "cmdarg" comes from command line argument |
2 | command line argument overrides spring.application.json , system property, environment variable and file |
62.8. @SpringBootTest.properties
We will soon discuss testing, but know now that properties expressed as part of the @SpringBootTest
declaration overrides all other property sources.
@SpringBootTest(
properties={"app.audience=test"}
public class SampleNTest {
63. Summary
In this module we
-
supplied property value(s) through a set of property files
-
used both
properties
andYAML
formatted files to express property values -
specified base filename(s) to use using the
--spring.config.name
property -
specified profile(s) to use using the
--spring.profiles.active
property -
specified paths(s) to search using the
--spring.config.location
property -
specified a custom file to load using the
@PropertySource
annotation -
specified multiple names, profiles, and locations
-
specified property overrides through multiple types of external sources
In future modules, we will show how to leverage these property sources in a way that can make configuring the Java code easier.
Configuration Properties
copyright © 2025 jim stafford (jim.stafford@jhu.edu)
64. Introduction
In the previous chapter we mapped properties from different sources and then mapped them directly into individual component Java class attributes. That showed a lot of power but had at least one flaw — each component would define its own injection of a property. If we changed the structure of a property, we would have many places to update and some of that might not be within our code base.
In this chapter we are going to continue to leverage the same property source(s) as before but remove the direct @Value
injection from the component classes and encapsulate them within a configuration class that gets instantiated, populated, and injected into the component at runtime.
We will also explore adding validation of properties and leveraging tooling to automatically generate boilerplate JavaBean constructs.
64.1. Goals
The student will learn to:
-
map a Java
@ConfigurationProperties
class to properties -
define validation rules for property values
-
leverage tooling to generate boilerplate code for JavaBean classes
-
solve more complex property mapping scenarios
-
solve injection mapping or ambiguity
64.2. Objectives
At the conclusion of this lecture and related exercises, the student will be able to:
-
map a Java
@ConfigurationProperties
class to a group of properties-
generate property metadata — used by IDEs for property editors
-
-
create read-only
@ConfigurationProperties
class using constructor binding -
define Jakarta EE Java validation rule for property and have validated at runtime
-
generate boilerplate JavaBean methods using Lombok library
-
use relaxed binding to map between JavaBean and property syntax
-
map nested properties to a
@ConfigurationProperties
class -
map array properties to a
@ConfigurationProperties
class -
reuse
@ConfigurationProperties
class to map multiple property trees -
use
@Qualifier
annotation and other techniques to map or disambiguate an injection
65. Mapping properties to @ConfigurationProperties class
Starting off simple, we define a property (app.config.car.name
) in application.properties
to hold the name of a car.
# application.properties
app.config.car.name=Suburban
65.1. Mapped Java Class
At this point we now want to create a Java class to be instantiated and be assigned the
value(s) from the various property sources — application.properties
in this case, but as
we have seen from earlier lectures properties can come from many places. The class follows
standard JavaBean characteristics
-
default constructor to instantiate the class in a default state
-
"setter"/"getter" methods to set and get the state of the instance
A "toString()" method was also added to self-describe the state of the instance.
import org.springframework.boot.context.properties.ConfigurationProperties;
@ConfigurationProperties("app.config.car") (3)
public class CarProperties { (1)
private String name;
//default ctor (2)
public String getName() {
return name;
}
public void setName(String name) {
this.name = name; (2)
}
@Override
public String toString() {
return "CarProperties{name='" + name + "\'}";
}
}
1 | class is a standard Java bean with one property |
2 | class designed for us to use its default constructor and a setter() to assign value(s) |
3 | class annotated with @ConfigurationProperties to identify that is mapped to properties and
the property prefix that pertains to this class |
65.2. Injection Point
We can have Spring instantiate the bean, set the state, and inject that into a component at runtime and have the state of the bean accessible to the component.
...
@Component
public class AppCommand implements CommandLineRunner {
@Autowired
private CarProperties carProperties; (1)
public void run(String... args) throws Exception {
System.out.println("carProperties=" + carProperties); (2)
...
1 | Our @ConfigurationProperties instance is being injected into a @Component class
using FIELD injection |
2 | Simple print statement of bean’s toString() result |
65.3. Initial Error
However, if we build and run our application at this point, our injection will fail because Spring was not able to locate what it needed to complete the injection.
***************************
APPLICATION FAILED TO START
***************************
Description:
Field carProperties in info.ejava.examples.app.config.configproperties.AppCommand required a bean
of type 'info.ejava.examples.app.config.configproperties.properties.CarProperties' that could
not be found.
The injection point has the following annotations:
- @org.springframework.beans.factory.annotation.Autowired(required=true)
Action:
Consider defining a bean of type
'info.ejava.examples.app.config.configproperties.properties.CarProperties'
in your configuration. (1)
1 | Error message indicates that Spring is not seeing our @ConfigurationProperties class |
65.4. Registering the @ConfigurationProperties class
We currently have a similar problem that we had when we implemented our first @Configuration
and @Component
classes — the bean was not being scanned. Even though we have our
@ConfigurationProperties
class in the same basic classpath as the @Configuration
and @Component
classes — we need a little more to have it processed by Spring. There are several ways to do that:
|-- java
| `-- info
| `-- ejava
| `-- examples
| `-- app
| `-- config
| `-- configproperties
| |-- AppCommand.java
| |-- ConfigurationPropertiesApp.java (1)
| `-- properties
| `-- CarProperties.java (1)
`-- resources
`-- application.properties
1 | …properties.CarProperties Java package is under main class` Java package scope |
65.4.1. way 1 - Register Class as a @Component
Our package is being scanned by Spring for components, so if we add a @Component
annotation
the @ConfigurationProperties
class will be automatically picked up.
package info.ejava.examples.app.config.configproperties.properties;
...
@Component
@ConfigurationProperties("app.config.car") (1)
public class CarProperties {
1 | causes Spring to process the bean and annotation as part of component classpath scanning |
-
benefits: simple
-
drawbacks: harder to override when configuration class and component class are in the same Java class package tree
65.4.2. way 2 - Explicitly Register Class
Explicitly register the class using
@EnableConfigurationProperties
annotation on a @Configuration
class (such as the @SpringBootApplication
class)
import info.ejava.examples.app.config.configproperties.properties.CarProperties;
import org.springframework.boot.context.properties.ConfigurationPropertiesScan;
...
@SpringBootApplication
@EnableConfigurationProperties(CarProperties.class) (1)
public class ConfigurationPropertiesApp {
1 | targets a specific @ConfigurationProperties class to process |
-
benefits:
@Configuration
class has explicit control over which configuration properties classes to activate -
drawbacks: application could be coupled with the details if where configurations come from
65.4.3. way 3 - Enable Package Scanning
Enable package scanning for @ConfigurationProperties
classes with the
@ConfigurationPropertiesScan
annotation
@SpringBootApplication
@ConfigurationPropertiesScan (1)
public class ConfigurationPropertiesApp {
1 | allows a generalized scan to be defined that is separate for configurations |
We can control which root-level Java packages to scan. The default root is where annotation declared. |
-
benefits: easy to add more configuration classes without changing application
-
drawbacks: generalized scan may accidentally pick up an unwanted configuration
65.4.4. way 4 - Use @Bean factory
Create a @Bean
factory method in a @Configuration
class for the type .
@SpringBootApplication
public class ConfigurationPropertiesApp {
...
@Bean
@ConfigurationProperties("app.config.car") (1)
public CarProperties carProperties() {
return new CarProperties();
}
1 | gives more control over the runtime mapping of the bean to the @Configuration class |
-
benefits: decouples the
@ConfigurationProperties
class from the specific property prefix used to populate it. This allows for reuse of the same@ConfigurationProperties
class for multiple prefixes -
drawbacks: implementation spread out between the
@ConfigurationProperties
and@Configuration
classes. It also prohibits the use of read-only instances since the returned object is not yet populated
For our solution in this example, I am going to use @ConfigurationPropertiesScan
("way3") and drop multiple @ConfigurationProperties
classes into the same classpath and have them automatically scanned for.
65.5. Result
Having things properly in place, we get the instantiated and initialized
CarProperties
@ConfigurationProperties
class injected into our component(s).
Our example AppCommand
component simply prints the toString()
result of the instance and we see the property we set in the applications.property
file.
# application.properties
app.config.car.name=Suburban
...
@Component
public class AppCommand implements CommandLineRunner {
@Autowired
private CarProperties carProperties;
public void run(String... args) throws Exception {
System.out.println("carProperties=" + carProperties);
...
$ java -jar target/appconfig-configproperties-example-*-SNAPSHOT-bootexec.jar
...
carProperties=CarProperties{name='Suburban'}
66. Metadata
IDEs have support for linking Java properties to their @ConfigurationProperty
class
information.

This allows the property editor to know:
-
there is a property
app.config.carname
-
any provided Javadoc
Spring Configuration Metadata and IDE support is very helpful when faced with configuring dozens of components with hundreds of properties (or more!) |
66.1. Spring Configuration Metadata
IDEs rely on a JSON-formatted metadata file located in
META-INF/spring-configuration-metadata.json
to provide that information.
...
"properties": [
{
"name": "app.config.car.name",
"type": "java.lang.String",
"description": "Name of car with no set maximum size",
"sourceType": "info.ejava.examples.app.config.configproperties.properties.CarProperties"
}
...
We can author it manually. However, there are ways to automate this.
66.2. Spring Configuration Processor
To have Maven automatically generate the JSON metadata file, add the following dependency
to the project to have additional artifacts generated during Java compilation.
The Java compiler will inspect and recognize a type of class inside the dependency
and call it to perform additional processing.
Make it optional=true
since it is only needed during compilation and not at runtime.
<!-- pom.xml dependencies -->
<dependency>
<groupId>org.springframework.boot</groupId>
<artifactId>spring-boot-configuration-processor</artifactId> (1)
<optional>true</optional> (2)
</dependency>
1 | dependency will generate additional artifacts during compilation |
2 | dependency not required at runtime and can be eliminated from dependents |
Dependencies labelled optional=true or scope=provided are not included in the
Spring Boot executable JAR or transitive dependencies in downstream deployments without
further configuration by downstream dependents.
|
66.3. Javadoc Supported
As noted earlier, the metadata also supports documentation extracted from Javadoc comments. To demonstrate this, I will add some simple Javadoc to our example property.
@ConfigurationProperties("app.config.car")
public class CarProperties {
/**
* Name of car with no set maximum size (1)
*/
private String name;
1 | Javadoc information is extracted from the class and placed in the property metadata |
66.4. Rebuild Module
Rebuilding the module with Maven and reloading the module within the IDE should give the IDE additional information it needs to help fill out the properties file.
$ mvn clean compile
target/classes
Treetarget/classes/META-INF/
`-- spring-configuration-metadata.json
{
"groups": [
{
"name": "app.config.car",
"type": "info.ejava.examples.app.config.configproperties.properties.CarProperties",
"sourceType": "info.ejava.examples.app.config.configproperties.properties.CarProperties"
}
],
"properties": [
{
"name": "app.config.car.name",
"type": "java.lang.String",
"description": "Name of car with no set maximum size",
"sourceType": "info.ejava.examples.app.config.configproperties.properties.CarProperties"
}
],
"hints": []
}
66.5. IDE Property Help
If your IDE supports Spring Boot and property metadata, the property editor will offer help filling out properties.

IntelliJ free Community Edition does not support this feature. The following link provides a comparison with the for-cost Ultimate Edition. |
67. Constructor Binding
The previous example was a good start. However, I want to create a slight improvement at this point with a similar example and make the JavaBean read-only. This better depicts the contract we have with properties. They are read-only.
To accomplish a read-only JavaBean, we should remove the setter(s), create a custom constructor that will initialize the attributes at instantiation time, and ideally declare the attributes as final to enforce that they get initialized during construction and never changed.
Spring will automatically use the constructor in this case when there is only one.
Add the @ConstructorBinding
annotation to one of the constructors when there is more than one to choose.
...
import org.springframework.boot.context.properties.bind.ConstructorBinding;
@ConfigurationProperties("app.config.boat")
public class BoatProperties {
private final String name; (3)
@ConstructorBinding //only required for multiple constructors (2)
public BoatProperties(String name) {
this.name = name;
}
//not used for ConfigurationProperties initialization
public BoatProperties() { this.name = "default"; }
//no setter method(s) in read-only example (1)
public String getName() {
return name;
}
@Override
public String toString() {
return "BoatProperties{name='" + name + "\'}";
}
}
1 | remove setter methods to better advertise the read-only contract of the bean |
2 | add custom constructor and annotate with @ConstructorBinding when multiple ctors |
3 | make attributes final to better enforce the read-only nature of the bean |
@ConstructorBinding annotation required on the constructor method when more than
one constructor is supplied.
|
67.1. Property Names Bound to Constructor Parameter Names
When using constructor binding, we no longer have the name of the setter method(s) to help map the properties. The parameter name(s) of the constructor are used instead to resolve the property values.
In the following example, the property app.config.boat.name
matches the constructor
parameter name
. The result is that we get the output we expect.
# application.properties
app.config.boat.name=Maxum
$ java -jar target/appconfig-configproperties-example-*-SNAPSHOT-bootexec.jar
...
boatProperties=BoatProperties{name='Maxum'}
67.2. Constructor Parameter Name Mismatch
If we change the constructor parameter name to not match the property name, we will get a null for the property.
@ConfigurationProperties("app.config.boat")
public class BoatProperties {
private final String name;
@ConstructorBinding
public BoatProperties(String nameX) { (1)
this.name = nameX;
}
1 | constructor argument name has been changed to not match the property name from application.properties |
$ java -jar target/appconfig-configproperties-example-*-SNAPSHOT-bootexec.jar
...
boatProperties=BoatProperties{name='null'}
We will discuss relaxed binding soon and see that some syntactical
differences between the property name and JavaBean property name are accounted
for during @ConfigurationProperties binding. However, this was a clear case
of a name mis-match that will not be mapped.
|
68. Validation
The error in the last example would have occurred whether we used constructor or setter-based binding. We would have had a possibly vague problem if the property was needed by the application. We can help detect invalid property values for both the setter and constructor approaches by leveraging validation.
Java validation is a JavaEE/ Jakarta EE standard API for expressing validation for JavaBeans. It allows us to express constraints on JavaBeans to help further modularize objects within our application.
To add validation to our application, we start by adding the Spring Boot validation starter
(spring-boot-starter-validation
) to our pom.xml.
<dependency>
<groupId>org.springframework.boot</groupId>
<artifactId>spring-boot-starter-validation</artifactId>
</dependency>
This will bring in three (3) dependencies
-
jakarta.validation-api - this is the validation API and is required to compile the module
-
hibernate-validator - this is a validation implementation
-
tomcat-embed-el - this is required when expressing validations using regular expressions with
@Pattern
annotation
68.1. Validation Annotations
We trigger Spring to validate our JavaBean when instantiated by the container by adding the
Spring @Validated annotation to the class.
We further define the Java attribute with the Jakarta EE
@NotBlank
constraint to report an error if the property is ever null or lacks a non-whitespace character.
...
import org.springframework.validation.annotation.Validated;
import jakarta.validation.constraints.NotBlank;
@ConfigurationProperties("app.config.boat")
@Validated (1)
public class BoatProperties {
@NotBlank (2)
private final String name;
@ConstructorBinding
public BoatProperties(String nameX) {
this.name = nameX;
}
...
1 | The Spring @Validated annotation tells Spring to validate instances of this
class |
2 | The Jakarta EE @NotBlank annotation tells the validator this field is not
allowed to be null or lacking a non-whitespace character |
You can locate other validation constraints in the Validation API and also extend the API to provide more customized validations using the Validation Spec, Hibernate Validator Documentation, or various web searches. |
68.2. Validation Error
The error produced is caught by Spring Boot and turned into a helpful description of the problem clearly stating there is a problem with one of the properties specified (when actually it was a problem with the way the JavaBean class was implemented)
$ java -jar target/appconfig-configproperties-example-*-SNAPSHOT-bootexec.jar \
--app.config.boat.name=
***************************
APPLICATION FAILED TO START
***************************
Description:
Binding to target info.ejava.examples.app.config.configproperties.properties.BoatProperties failed:
Property: app.config.boat.name
Value: ""
Origin: "app.config.boat.name" from property source "commandLineArgs"
Reason: must not be blank
Action:
Update your application's configuration
Notice how the error message output by Spring Boot automatically knew what a validation error was and that the invalid property mapped to a specific property name. That is an example of Spring Boot’s FailureAnalyzer framework in action — which aims to make meaningful messages out of what would otherwise be a clunky stack trace. |
69. Boilerplate JavaBean Methods
Before our implementations get more complicated, we need to address a simplification we can make to our JavaBean source code, which will make all future JavaBean implementations incredibly easy.
Notice all the boilerplate constructor, getter/setter, toString(), etc. methods within our earlier JavaBean classes? These methods are primarily based on the attributes of the class. They are commonly implemented by IDEs during development but then become part of the overall code base that has to be maintained over the lifetime of the class. This will only get worse as we add additional attributes to the class when our code gets more complex.
...
@ConfigurationProperties("app.config.boat")
@Validated
public class BoatProperties {
@NotBlank
private final String name;
public BoatProperties(String name) { //boilerplate (1)
this.name = name;
}
public String getName() { //boilerplate (1)
return name;
}
@Override
public String toString() { //boilerplate (1)
return "BoatProperties{name='" + name + "\'}";
}
}
1 | Many boilerplate methods in source code — likely generated by IDE |
69.1. Generating Boilerplate Methods with Lombok
These boilerplate methods can be automatically provided for us at compilation using the Lombok library. Lombok is not unique to Spring Boot but has been adopted into Spring Boot’s overall opinionated approach to developing software and has been integrated into the popular Java IDEs.
I will introduce various Lombok features during later portions of the course
and start with a simple case here where all defaults for a JavaBean are desired.
The simple Lombok @Data
annotation intelligently inspects the JavaBean class
with just an attribute and supplies boilerplate constructs commonly supplied
by the IDE:
-
constructor to initialize attributes
-
getter
-
toString()
-
hashCode() and equals()
A setter was not defined by Lombok because the name
attribute is declared final.
...
import lombok.Data;
@ConfigurationProperties("app.config.company")
@Data (1)
@Validated
public class CompanyProperties {
@NotNull
private final String name;
//constructor (1)
//getter (1)
//toString (1)
//hashCode and equals (1)
}
1 | Lombok @Data annotation generated constructor, getter(/setter), toString, hashCode, and equals |
69.2. Visible Generated Constructs
The additional methods can be identified in a class structure view of an IDE or
using Java disassembler (javap
) command
You may need to locate a compiler option within your IDE properties to make the code generation within your IDE. |
$ javap -cp target/classes info.ejava.examples.app.config.configproperties.properties.CompanyProperties
Compiled from "CompanyProperties.java"
public class info.ejava.examples.app.config.configproperties.properties.CompanyProperties {
public info.ejava.examples.app.config.configproperties.properties.CompanyProperties(java.lang.String);
public java.lang.String getName();
public boolean equals(java.lang.Object);
protected boolean canEqual(java.lang.Object);
public int hashCode();
public java.lang.String toString();
}
69.3. Lombok Build Dependency
The Lombok annotations are defined with
RetentionPolicy.SOURCE
.
That means they are discarded by the compiler and not available at runtime.
@Target(ElementType.TYPE)
@Retention(RetentionPolicy.SOURCE)
public @interface Data {
That permits us to declare the dependency as scope=provided
to eliminate it from the application’s
executable JAR and transitive dependencies and have no extra bloat in the module
as well.
<dependency>
<groupId>org.projectlombok</groupId>
<artifactId>lombok</artifactId>
<scope>provided</scope>
</dependency>
69.4. Example Output
Running our example using the same, simple toString()
print statement and
property definitions produces near identical results from the caller’s perspective.
The only difference here is the specific text used in the returned string.
...
@Autowired
private BoatProperties boatProperties;
@Autowired
private CompanyProperties companyProperties;
public void run(String... args) throws Exception {
System.out.println("boatProperties=" + boatProperties); (1)
System.out.println("====");
System.out.println("companyProperties=" + companyProperties); (2)
...
1 | BoatProperties JavaBean methods were provided by hand |
2 | CompanyProperties JavaBean methods were provided by Lombok |
# application.properties
app.config.boat.name=Maxum
app.config.company.name=Acme
$ java -jar target/appconfig-configproperties-example-*-SNAPSHOT-bootexec.jar
boatProperties=BoatProperties{name='Maxum'}
====
companyProperties=CompanyProperties(name=Acme)
With very infrequent issues, adding Lombok to our development approach for JavaBeans is almost a 100% win situation. 80-90% of the JavaBean class is written for us and we can override the defaults at any time with further annotations or custom methods. The fact that Lombok will not replace methods we have manually provided for the class always gives us an escape route in the event something needs to be customized.
70. Relaxed Binding
One of the key differences between Spring’s @Value
injection and @ConfigurationProperties
is the support for relaxed binding by the later. With relaxed binding, property definitions do
not have to be an exact match. JavaBean properties are commonly defined with camelCase.
Property definitions can come in a number of
different case formats. Here is a few.
-
camelCase
-
UpperCamelCase
-
kebab-case
-
snake_case
-
UPPERCASE
70.1. Relaxed Binding Example JavaBean
In this example, I am going to add a class to express many different properties of a business. Each of the attributes is expressed using camelCase to be consistent with common Java coding conventions and further validated using Jakarta EE Validation.
@ConfigurationProperties("app.config.business")
@Data
@Validated
public class BusinessProperties {
@NotNull
private final String name;
@NotNull
private final String streetAddress;
@NotNull
private final String city;
@NotNull
private final String state;
@NotNull
private final String zipCode;
private final String notes;
}
70.2. Relaxed Binding Example Properties
The properties supplied provide an example of the relaxed binding Spring implements between property and JavaBean definitions.
# application.properties
app.config.business.name=Acme
app.config.business.street-address=100 Suburban Dr
app.config.business.CITY=Newark
app.config.business.State=DE
app.config.business.zip_code=19711
app.config.business.notess=This is a property name typo
-
kebab-case
street-address
matched Java camelCasestreetAddress
-
UPPERCASE
CITY
matched Java camelCasecity
-
UpperCamelCase
State
matched Java camelCasestate
-
snake_case
zip_code
matched Java camelCasezipCode
-
typo
notess
does not match Java camelCasenotes
70.3. Relaxed Binding Example Output
These relaxed bindings are shown in the following output. However, the
note
attribute is an example that there is no magic when it comes to
correcting typo errors. The extra character in notess
prevented a mapping
to the notes
attribute. The IDE/metadata can help avoid the error
and validation can identify when the error exists.
$ java -jar target/appconfig-configproperties-example-*-SNAPSHOT-bootexec.jar
...
businessProperties=BusinessProperties(name=Acme, streetAddress=100 Suburban Dr,
city=Newark, state=DE, zipCode=19711, notes=null)
71. Nested Properties
The previous examples used a flat property model. That may not always be the case. In this example we will look into mapping nested properties.
(1)
app.config.corp.name=Acme
(2)
app.config.corp.address.street=100 Suburban Dr
app.config.corp.address.city=Newark
app.config.corp.address.state=DE
app.config.corp.address.zip=19711
1 | name is part of a flat property model below corp |
2 | address is a container of nested properties |
71.1. Nested Properties JavaBean Mapping
The mapping of the nested class is no surprise. We supply a JavaBean to hold their nested properties and reference it from the host/outer-class.
...
@Data
public class AddressProperties {
private final String street;
@NotNull
private final String city;
@NotNull
private final String state;
@NotNull
private final String zip;
}
71.2. Nested Properties Host JavaBean Mapping
The host class (CorporateProperties
) declares the base property prefix
and a reference (address
) to the nested class.
...
import org.springframework.boot.context.properties.NestedConfigurationProperty;
@ConfigurationProperties("app.config.corp")
@Data
@Validated
public class CorporationProperties {
@NotNull
private final String name;
@NestedConfigurationProperty //needed for metadata
@NotNull
//@Valid
private final AddressProperties address;
The @NestedConfigurationProperty is only supplied to generate
correct metadata — otherwise only a single address
property will be identified to exist within the generated metadata.
|
The validation initiated by the @Validated annotation seems to
automatically propagate into the nested AddressProperties class without
the need to add @Valid annotation.
|
71.3. Nested Properties Output
The defined properties are populated within the host and nested bean and accessible to components within the application.
$ java -jar target/appconfig-configproperties-example-*-SNAPSHOT-bootexec.jar
...
corporationProperties=CorporationProperties(name=Acme,
address=AddressProperties(street=null, city=Newark, state=DE, zip=19711))
72. Property Arrays
As the previous example begins to show, property mapping can begin to get complex. I won’t demonstrate all of them. Please consult documentation available on the Internet for a complete view. However, I will demonstrate an initial collection mapping to arrays to get started going a level deeper.
In this example, RouteProperties
hosts a local name
property and a
list of stops
that are of type AddressProperties
that we used before.
...
@ConfigurationProperties("app.config.route")
@Data
@Validated
public class RouteProperties {
@NotNull
private String name;
@NestedConfigurationProperty
@NotNull
@Size(min = 1)
private List<AddressProperties> stops; (1)
...
1 | RouteProperties hosts list of stops as AddressProperties |
72.1. Property Arrays Definition
The above can be mapped using a properties format.
# application.properties
app.config.route.name: Superbowl
app.config.route.stops[0].street: 1101 Russell St
app.config.route.stops[0].city: Baltimore
app.config.route.stops[0].state: MD
app.config.route.stops[0].zip: 21230
app.config.route.stops[1].street: 347 Don Shula Drive
app.config.route.stops[1].city: Miami
app.config.route.stops[1].state: FLA
app.config.route.stops[1].zip: 33056
However, it may be easier to map using YAML.
# application.yml
app:
config:
route:
name: Superbowl
stops:
- street: 1101 Russell St
city: Baltimore
state: MD
zip: 21230
- street: 347 Don Shula Drive
city: Miami
state: FLA
zip: 33056
72.2. Property Arrays Output
Injecting that into our application and printing the state of the bean (with a
little formatting) produces the following output showing that each of the stops
were added to the route
using the AddressProperty
.
$ java -jar target/appconfig-configproperties-example-*-SNAPSHOT-bootexec.jar
...
routeProperties=RouteProperties(name=Superbowl, stops=[
AddressProperties(street=1101 Russell St, city=Baltimore, state=MD, zip=21230),
AddressProperties(street=347 Don Shula Drive, city=Miami, state=FLA, zip=33056)
])
73. System Properties
Note that Java properties can come from several sources and we are able to map them from standard Java system properties as well.
The following example shows mapping three (3) system properties: user.name
,
user.home
, and user.timezone
to a @ConfigurationProperties
class.
@ConfigurationProperties("user")
@Data
public class UserProperties {
@NotNull
private final String name; (1)
@NotNull
private final String home; (2)
@NotNull
private final String timezone; (3)
1 | mapped to SystemProperty user.name |
2 | mapped to SystemProperty user.home |
3 | mapped to SystemProperty user.timezone |
73.1. System Properties Usage
Injecting that into our components give us access to mapped properties and, of course,
access to them using standard getters and not just toString()
output.
@Component
public class AppCommand implements CommandLineRunner {
...
@Autowired
private UserProperties userProps;
public void run(String... args) throws Exception {
...
System.out.println(userProps); (1)
System.out.println("user.home=" + userProps.getHome()); (2)
1 | output UserProperties toString |
2 | get specific value mapped from user.home |
$ java -jar target/appconfig-configproperties-example-*-SNAPSHOT-bootexec.jar
...
UserProperties(name=jim, home=/Users/jim, timezone=America/New_York)
user.home=/Users/jim
74. @ConfigurationProperties Class Reuse
The examples to date have been singleton values mapped to one root source. However,
as we saw with AddressProperties
, we could have multiple groups of
properties with the same structure and different root prefix.
In the following example we have two instances of person. One has the prefix
of owner
and the other manager
, but they both follow the same structural schema.
# application.yml
owner: (1)
name: Steve Bushati
address:
city: Millersville
state: MD
zip: 21108
manager: (1)
name: Eric Decosta
address:
city: Owings Mills
state: MD
zip: 21117
1 | owner and manager root prefixes both follow the same structural schema |
74.1. @ConfigurationProperties Class Reuse Mapping
We would like two (2) bean instances that represent their respective person implemented as one
JavaBean class. We can structurally map both to the same class and create two instances of that
class. However when we do that — we can no longer apply the @ConfigurationProperties
annotation
and prefix to the bean class because the prefix will be instance-specific
//@ConfigurationProperties("???") multiple prefixes mapped (1)
@Data
@Validated
public class PersonProperties {
@NotNull
private String name;
@NestedConfigurationProperty
@NotNull
private AddressProperties address;
1 | unable to apply root prefix-specific @ConfigurationProperties to class |
74.2. @ConfigurationProperties @Bean Factory
We can solve the issue of having two (2) separate leading prefixes by adding a @Bean
factory method for each use and we can use our root-level application class to host those
factory methods.
@SpringBootApplication
@ConfigurationPropertiesScan
public class ConfigurationPropertiesApp {
...
@Bean
@ConfigurationProperties("owner") (2)
public PersonProperties ownerProps() {
return new PersonProperties(); (1)
}
@Bean
@ConfigurationProperties("manager") (2)
public PersonProperties managerProps() {
return new PersonProperties(); (1)
}
1 | @Bean factory method returns JavaBean instance to use |
2 | Spring populates the JavaBean according to the ConfigurationProperties annotation |
We are no longer able to use read-only JavaBeans when using the @Bean factory method
in this way. We are returning a default instance for Spring to populate based on the specified
@ConfigurationProperties prefix of the factory method.
|
74.3. Injecting ownerProps
Taking this one instance at a time, when we inject an instance of PersonProperties
into
the ownerProps
attribute of our component, the ownerProps
@Bean
factory is called
and we get the information for our owner.
@Component
public class AppCommand implements CommandLineRunner {
@Autowired
private PersonProperties ownerProps;
$ java -jar target/appconfig-configproperties-example-*-SNAPSHOT-bootexec.jar
...
PersonProperties(name=Steve Bushati, address=AddressProperties(street=null, city=Millersville, state=MD, zip=21108))
Great! However, there was something subtle there that allowed things to work.
74.4. Injection Matching
Spring had two @Bean
factory methods to chose from to produce an instance of PersonProperties
.
@Bean
@ConfigurationProperties("owner")
public PersonProperties ownerProps() {
...
@Bean
@ConfigurationProperties("manager")
public PersonProperties managerProps() {
...
The ownerProps
@Bean
factory method name happened to match the ownerProps
Java attribute name
and that resolved the ambiguity.
@Component
public class AppCommand implements CommandLineRunner {
@Autowired
private PersonProperties ownerProps; (1)
1 | Attribute name of injected bean matches @Bean factory method name |
74.5. Ambiguous Injection
If we were to add the manager
and specifically not make the two names match, there will
be ambiguity as to which @Bean
factory to use. The injected attribute name is manager
and the desired @Bean
factory method name is managerProps
.
@Component
public class AppCommand implements CommandLineRunner {
@Autowired
private PersonProperties manager; (1)
1 | Java attribute name does not match @Bean factory method name |
$ java -jar target/appconfig-configproperties-example-*-SNAPSHOT-bootexec.jar
***************************
APPLICATION FAILED TO START
***************************
Description:
Field manager in info.ejava.examples.app.config.configproperties.AppCommand
required a single bean, but 2 were found:
- ownerProps: defined by method 'ownerProps' in
info.ejava.examples.app.config.configproperties.ConfigurationPropertiesApp
- managerProps: defined by method 'managerProps' in
info.ejava.examples.app.config.configproperties.ConfigurationPropertiesApp
This may be due to missing parameter name information
Action:
Consider marking one of the beans as @Primary, updating the consumer to accept multiple beans,
or using @Qualifier to identify the bean that should be consumed
Ensure that your compiler is configured to use the '-parameters' flag.
You may need to update both your build tool settings as well as your IDE.
74.6. Injection @Qualifier
As the error message states, we can solve this one of several ways. The @Qualifier
route
is mostly what we want and can do that one of at least three ways.
74.7. way1: Create Custom @Qualifier Annotation
Create a custom @Qualifier
annotation and apply that to the @Bean
factory and injection
point.
-
benefits: eliminates string name matching between factory mechanism and attribute
-
drawbacks: new annotation must be created and applied to both factory and injection point
package info.ejava.examples.app.config.configproperties.properties;
import org.springframework.beans.factory.annotation.Qualifier;
import java.lang.annotation.ElementType;
import java.lang.annotation.Retention;
import java.lang.annotation.RetentionPolicy;
import java.lang.annotation.Target;
@Qualifier
@Target({ElementType.METHOD, ElementType.FIELD, ElementType.PARAMETER})
@Retention(RetentionPolicy.RUNTIME)
public @interface Manager {
}
@Bean
@ConfigurationProperties("manager")
@Manager (1)
public PersonProperties managerProps() {
return new PersonProperties();
}
1 | @Manager annotation used to add additional qualification beyond just type |
@Autowired
private PersonProperties ownerProps;
@Autowired
@Manager (1)
private PersonProperties manager;
1 | @Manager annotation is used to disambiguate the factory choices |
74.8. way2: @Bean Factory Method Name as Qualifier
Use the name of the @Bean
factory method as a qualifier.
-
benefits: no custom qualifier class required and factory signature does not need to be modified
-
drawbacks: text string must match factory method name
Example using String name of @Bean@Autowired private PersonProperties ownerProps; @Autowired @Qualifier("managerProps") (1) private PersonProperties manager;
1 @Bean
factory name is being applied as a qualifier versus defining a type
74.9. way3: Match @Bean Factory Method Name
Change the name of the injected attribute to match the @Bean
factory method name
-
benefits: simple and properly represents the semantics of the singleton property
-
drawbacks: injected attribute name must match factory method name
@Bean
@ConfigurationProperties("owner")
public PersonProperties ownerProps() {
...
@Bean
@ConfigurationProperties("manager")
public PersonProperties managerProps() {
...
@Autowired
private PersonProperties ownerProps;
@Autowired
private PersonProperties managerProps; (1)
1 | Attribute name of injected bean matches @Bean factory method name |
74.10. Ambiguous Injection Summary
Factory choices and qualifiers is a whole topic within itself. However, this set of
examples showed how @ConfigurationProperties
can leverage @Bean
factories to assist
in additional complex property mappings. We likely will be happy taking the simple way3
solution but it is good to know there is an easy way to use a @Qualifier
annotation
when we do not want to rely on a textual name match.
75. Summary
In this module we
-
mapped properties from property sources to JavaBean classes annotated with
@ConfigurationProperties
and injected them into component classes -
generated property metadata that can be used by IDEs to provide an aid to configuring properties
-
implemented a read-only JavaBean
-
defined property validation using Jakarta EE Java Validation framework
-
generated boilerplate JavaBean constructs with the Lombok library
-
demonstrated how relaxed binding can lead to more flexible property names
-
mapped flat/simple properties, nested properties, and collections of properties
-
leveraged custom
@Bean
factories to reuse common property structure for different root instances -
leveraged
@Qualifier
s in order to map or disambiguate injections
Auto Configuration
copyright © 2025 jim stafford (jim.stafford@jhu.edu)
76. Introduction
Thus far we have focused on how to configure an application within the primary application module, under fairly static conditions, and applied directly to a single application.
However, our application configuration will likely be required to be:
-
dynamically determined - Application configurations commonly need to be dynamic based on libraries present, properties defined, resources found, etc. at startup. For example, what database will be used when in development, integration, or production? What security should be enabled in development versus production areas?
-
modularized and not repeated - Breaking the application down into separate components and making these components reusable in multiple applications by physically breaking them into separate modules is a good practice. However, that leaves us with the repeated responsibility to configure the components reused. Many times there could be dozens of choices to make within a component configuration, and the application can be significantly simplified if an opinionated configuration can be supplied based on the runtime environment of the module.
If you find yourself needing configurations determined dynamically at runtime or find yourself solving a repeated problem and bundling that into a library shared by multiple applications — then you are going to want to master the concepts within Spring Boot’s Auto-configuration capability. Some of these Auto-configuration capabilities mentioned can be placed directly into the application while others are meant to be placed into separate Auto-configuration modules called "starter" modules. "Starter" modules can come with an opinionated, default way to configure the component for use with as little work as possible.
76.1. Goals
The student will learn to:
-
Enable/disable bean creation based on condition(s) at startup
-
Create Auto-configuration/Starter module(s) that establish necessary dependencies and conditionally supplies beans
-
Resolve conflicts between alternate configurations
-
Locate environment and condition details to debug Auto-configuration issues
76.2. Objectives
At the conclusion of this lecture and related exercises, the student will be able to:
-
Enable a
@Component
,@Configuration
class, or@Bean
factory method based on the result of a condition at startup -
Create Spring Boot Auto-configuration/Starter module(s)
-
Bootstrap Auto-configuration classes into applications using a Spring Boot 3
org.springframework.boot.autoconfigure.AutoConfiguration.imports
metadata file -
Create a conditional component based on the presence of a property value
-
Create a conditional component based on a missing component
-
Create a conditional component based on the presence of a class
-
Define a processing dependency order for Auto-configuration classes
-
Access textual debug information relative to conditions using the
debug
property -
Access web-based debug information relative to conditionals and properties using the Spring Boot Actuator
77. Injection/Inversion of Control
We define dependencies between components using interfaces.
public interface Hello {
void sayHello(String name);
}
The container injects the implementation.
@Component
@RequiredArgsConstructor
public class AppCommand implements CommandLineRunner {
private final Hello greeter;
public void run(String... args) throws Exception {
greeter.sayHello("World");
}
}
But how is the container configured with an implementation?
78. Review: Configuration Class
As we have seen earlier, @Configuration
classes are how we bootstrap an application
using Java classes. They are the modern alternative to the legacy XML definitions that
basically do the same thing — define and configure beans.
@Configuration
classes can be the @SpringBootApplication
class itself. This would be
appropriate for a small application.
@SpringBootApplication
//==> wraps @EnableAutoConfiguration
//==> wraps @SpringBootConfiguration
// ==> wraps @Configuration
public class SelfConfiguredApp {
public static void main(String...args) {
SpringApplication.run(SelfConfiguredApp.class, args);
}
@Bean
public Hello hello() {
return new StdOutHello("Application @Bean says Hey");
}
}
78.1. Review: Separate @Configuration Class
@Configuration
classes can be broken out into separate classes. This would be
appropriate for larger applications with distinct areas to be configured.
@Configuration(proxyBeanMethods = false) (2)
public class AConfigurationClass {
@Bean (1)
public Hello hello() {
return new StdOutHello("...");
}
}
1 | bean scope defaults to "singleton" |
2 | nothing directly calling the @Bean factory method; establishing a CGLIB proxy is unnecessary |
@Configuration classes are commonly annotated with the proxyMethods=false attribute that tells Spring not to create extra proxy code to enforce normal, singleton return of the created instance to be shared by all callers since @Configuration class instances are only called by Spring.
The javadoc for the annotation attribute describes the extra and unnecessary work saved.
|
79. Conditional Configuration
We can make @Bean
factory methods (or the @Component
annotated class) and entire @Configuration
classes dependent on conditions found at startup.
The following example uses the @ConditionalOnBooleanProperty annotation (added in 3.5.0) to define a Hello
bean based on the presence of the hello.quiet
property having the boolean value true
.
Prior to that, @ConditionalOnProperty annotation could have been used to judge whether hello.quiet
property had the String value "true".
...
import org.springframework.boot.autoconfigure.condition.ConditionalOnBooleanProperty;
import org.springframework.context.annotation.Bean;
@SpringBootApplication
public class StarterConfiguredApp {
public static void main(String...args) {
SpringApplication.run(StarterConfiguredApp.class, args);
}
@Bean
//@ConditionalOnProperty(prefix="hello", name="quiet", havingValue="true") (2)
//since 3.5.0
@ConditionalOnBooleanProperty(prefix="hello", name="quiet", havingValue=true) (1)
public Hello quietHello() {
return new StdOutHello("(hello.quiet property condition set, Application @Bean says hi)");
}
}
1 | @ConditionOnBooleanProperty (since 3.5.0) annotation used to define a Hello bean based on the presence of hello.quiet property having the boolean value of true |
2 | @ConditionalOnProperty annotation used to evaluate property having the String value "true" |
79.1. Property Value Condition Satisfied
The following is an example of the property being defined with the targeted value.
$ java -jar target/appconfig-autoconfig-*-SNAPSHOT-bootexec.jar --hello.quiet=true (1)
...
(hello.quiet property condition set, Application @Bean says hi) World (2)
1 | matching property supplied using command line |
2 | satisfies property condition in @SpringBootApplication |
The (parentheses) is trying to indicate a whisper.
hello.quiet=true property turns on this behavior.
|
79.2. Property Value Condition Not Satisfied
The following is an example of when the property is missing.
Since there is no Hello
bean factory, we encounter an error that we will look to solve using a separate Auto-configuration module.
$ java -jar target/appconfig-autoconfig-*-SNAPSHOT-bootexec.jar (1)
...
***************************
APPLICATION FAILED TO START
***************************
Description:
Parameter 0 of constructor in info.ejava.examples.app.config.auto.AppCommand required a bean of type 'info.ejava.examples.app.hello.Hello' that could not be found. (2)
Action:
Consider defining a bean of type 'info.ejava.examples.app.hello.Hello' in your configuration.
1 | property either not specified or not specified with targeted value |
2 | property condition within @SpringBootApplication not satisfied |
80. Two Primary Configuration Phases
Configuration processing within Spring Boot is separated into two primary phases:
-
User-defined configuration classes
-
processed first
-
part of the application module
-
located through the use of a
@ComponentScan
(wrapped by@SpringBootApplication
) -
establish the base configuration for the application
-
fill in any fine-tuning details.
-
-
Auto-configuration classes
-
parsed second
-
outside the scope of the
@ComponentScan
-
placed in separate modules, identified by metadata within those modules
-
enabled by application using
@EnableAutoConfiguration
(also wrapped by@SpringBootApplication
) -
provide defaults to fill in the reusable parts of the application
-
use User-defined configuration for details
-
81. Auto-Configuration
An Auto-configuration class is technically no different from any other @Configuration
class except that it is meant to be inspected after the user-defined @Configuration
class(es) and based on being named in a descriptor file within META-INF/spring
.
This alternate identification and second pass processing allows the core application to make key directional and detailed decisions and control conditions for the Auto-configuration class(es).
There are some tools provided to assist in defining Auto-configuration classes
-
@AutoConfiguration
annotation replaces the@Configuration
annotation to allow these classes to be filtered from the component scanpath -
META-INF/spring/org.springframework.boot.autoconfigure.AutoConfiguration.imports
descriptor file to identify Auto-configuration classes -
AutoConfigurationExcludeFilter
class actively filters classes annotated with@AutoConfiguration
out of the component scanpath that are not listed in theAutoConfiguration.imports
descriptor file
81.1. Example Auto-Configuration Class
The following Auto-configuration class example defines an unconditional Hello
bean
factory configured using a @ConfigurationProperties
class.
package info.ejava.examples.app.hello; (2)
...
@AutoConfiguration (3)
@EnableConfigurationProperties(HelloProperties.class)
public class HelloAutoConfiguration {
@Bean (1)
public Hello hello(HelloProperties helloProperties) {
return new StdOutHello(helloProperties.getGreeting());
}
}
1 | example Auto-configuration class provides unconditional @Bean factory for Hello |
2 | class is outside default component scanpath of @SpringBootApplication |
3 | armed with @AutoConfiguration annotation to exclude from component scanpath |
81.2. AutoConfigurationExcludeFilter
The @SpringBootApplication
includes a default @ComponentScan
that defines a set of filters to implement the Auto-configuration conventions.
AutoConfigurationExcludeFilter
is an exclude filter and will filter out any class annotated with @AutoConfiguration
that has not been included in the AutoConfiguration.imports
.
@ComponentScan(excludeFilters = { (1)
@Filter(type = FilterType.CUSTOM, classes=TypeExcludeFilter.class), (3)
@Filter(type = FilterType.CUSTOM, classes=AutoConfigurationExcludeFilter.class) }) (2)
1 | default filters supplied by @SpringBootApplication |
2 | excludes @AutoConfiguration classes not mentioned in AutoConfiguration.imports |
3 | framework that mostly allows test slices to customize class exclusions |
81.3. Supporting @ConfigurationProperties
This particular @Bean
factory defines the @ConfigurationProperties
class to
encapsulate the details of configuring Hello.
@AutoConfiguration
@EnableConfigurationProperties(HelloProperties.class)
public class HelloAutoConfiguration {
The @ConfigurationProperties
class supplies a default greeting making it optional for the User-defined configuration to do anything.
@ConfigurationProperties("hello")
@Data
@Validated
public class HelloProperties {
@NotBlank
private String greeting = "HelloProperties default greeting says Hola!"; (1)
}
1 | Value used if user-configuration does not specify a property value |
81.4. Locating Auto Configuration Classes
A dependency JAR makes the Auto-configuration class(es) known to the application by supplying a descriptor file (META-INF/spring/ org.springframework.boot.autoconfigure.AutoConfiguration.imports
) and listing the Auto-configuration classes within that file.
The example below shows the metadata file ("META-INF/…AutoConfiguration.imports") and an Auto-configuration class ("HelloAutoConfiguration") that will be named within that metadata file.
$ jar tf target/hello-starter-*-SNAPSHOT.jar | egrep -v '/$|maven|MANIFEST.MF'
META-INF/spring-configuration-metadata.json (2)
META-INF/spring/org.springframework.boot.autoconfigure.AutoConfiguration.imports (1)
info/ejava/examples/app/hello/HelloProperties.class
info/ejava/examples/app/hello/HelloAutoConfiguration.class
1 | "auto-configuration" dependency JAR supplies … AutoConfiguration.imports |
2 | @ConfigurationProperties class metadata generated by maven plugin for use by IDEs |
It is common best-practice to host Auto-configuration classes in a separate
module than the beans it configures. The Hello interface and Hello implementation(s)
comply with this convention and are housed in separate modules.
|
81.5. META-INF Auto-configuration Metadata File
Auto-configuration classes are registered in the … AutoConfiguration.imports
file by listing the class' fully qualified name, one per line.
# src/main/resources/META-INF/spring/org.springframework.boot.autoconfigure.AutoConfiguration.imports
info.ejava.examples.app.hello.HelloAutoConfiguration (1)
info.ejava.examples.app.hello.HelloResourceAutoConfiguration (2)
1 | Auto-configuration class registration |
2 | this class is part of a later example; multiple classes are listed one-per-line |
81.6. Spring Boot 2 META-INF/spring.factories
Prior to Spring Boot 2.7, the general purpose META-INF/spring.factories
file was used to bootstrap auto-configuration classes.
This approach was deprecated in 2.7 and eliminated in Spring Boot 3.
If you are ever working with a legacy version of Spring Boot, you will have to use this approach.
Auto-configuration classes were registered using the property name equaling the fully qualified classname of the @EnableAutoConfiguration
annotation and the value equaling the fully qualified classname of the Auto-configuration class(es).
Multiple classes can be specified separated by commas.
The last entry on a line cannot end with a comma.
# src/main/resources/META-INF/spring.factories
org.springframework.boot.autoconfigure.EnableAutoConfiguration=\
info.ejava.examples.app.hello.HelloAutoConfiguration, \ (1)
info.ejava.examples.app.hello.HelloResourceAutoConfiguration
1 | Auto-configuration class registration |
The last line of the property cannot end with a comma or Spring Boot 2 will interpret entry as an empty class name |
81.7. Example Auto-Configuration Module Source Tree
Our configuration and properties class — along with the org.springframework.boot.autoconfigure.AutoConfiguration.imports
file get placed in a separate module source tree.
pom.xml
src
`-- main
|-- java
| `-- info
| `-- ejava
| `-- examples
| `-- app
| `-- hello
| |-- HelloAutoConfiguration.java
| `-- HelloProperties.java
`-- resources
`-- META-INF
`-- spring
`-- org.springframework.boot.autoconfigure.AutoConfiguration.imports
81.10. Application Starter Dependency
The application module declares a dependency on the starter module containing or having a dependency on the Auto-configuration artifacts.
<!-- takes care of initializing Hello Service for us to inject -->
<dependency>
<groupId>${project.groupId}</groupId> (1)
<artifactId>hello-starter</artifactId>
<version>${project.version}</version> (1)
</dependency>
1 | For this example, the application and starter modules share the same groupId and version
and leverage a ${project} variable to simplify the expression.
That will likely not be the case with most starter module dependencies and will need to be spelled out. |
81.11. Starter Brings in Pertinent Dependencies
The starter dependency brings in the Hello Service interface, targeted implementation(s), and some implementation dependencies.
$ mvn dependency:tree
...
[INFO] +- info.ejava.examples.app:hello-starter:jar:6.1.1-SNAPSHOT:compile
[INFO] | +- info.ejava.examples.app:hello-service-api:jar:6.1.1-SNAPSHOT:compile
[INFO] | +- info.ejava.examples.app:hello-service-stdout:jar:6.1.1-SNAPSHOT:compile
[INFO] | +- org.projectlombok:lombok:jar:1.18.10:provided
[INFO] | \- org.springframework.boot:spring-boot-starter-validation:jar:3.5.5:compile
...
82. Configured Application
The example application contains a component that requests the greeter implementation to say hello to "World".
import lombok.RequiredArgsConstructor;
...
@Component
@RequiredArgsConstructor (1)
public class AppCommand implements CommandLineRunner {
private final Hello greeter; //<== component in App requires Hello injected
public void run(String... args) throws Exception {
greeter.sayHello("World");
}
}
1 | lombok is being used to provide the constructor injection |
82.1. Review: Unconditional Auto-Configuration Class
This starter dependency is bringing in a @Bean
factory to construct an implementation of Hello
, that can satisfy the injection dependency.
package info.ejava.examples.app.hello;
...
@AutoConfiguration
@EnableConfigurationProperties(HelloProperties.class)
public class HelloAutoConfiguration {
@Bean
public Hello hello(HelloProperties helloProperties) { (1)
return new StdOutHello(helloProperties.getGreeting());
}
}
1 | Example Auto-configuration configured by HelloProperties |
This bean will be unconditionally instantiated the way it is currently defined.
82.2. Review: Starter Module Default
The starter dependency brings in an Auto-configuration class that instantiates a StdOutHello
implementation configured by a HelloProperties
class.
@ConfigurationProperties("hello")
@Data
@Validated
public class HelloProperties {
@NotBlank
private String greeting = "HelloProperties default greeting says Hola!"; (1)
}
1 | hello.greeting default defined in @ConfigurationProperties class of starter/autoconfigure module |
82.3. Produced Default Starter Greeting
This produces the default greeting
$ java -jar target/appconfig-autoconfig-*-SNAPSHOT-bootexec.jar
...
HelloProperties default greeting says Hola! World
The HelloAutoConfiguration.hello
@Bean
was instantiated with the HelloProperties
greeting of "HelloProperties default greeting says Hola!".
This Hello
instance was injected into the AppCommand
, which added "World" to the result.
Example of Reasonable Default
This is an example of a component being Auto-configured with a reasonable default.
It did not simply crash, demanding a greeting be supplied.
|
82.4. User-Application Supplies Property Details
Since the Auto-configuration class is using a properties class, we can define properties (aka "the details") in the main application for the dependency module to use.
#appconfig-autoconfig-example application.properties
#uncomment to use this greeting
hello.greeting: application.properties Says - Hey
$ java -jar target/appconfig-autoconfig-*-SNAPSHOT-bootexec.jar
...
application.properties Says - Hey World (1)
1 | auto-configured implementation using user-defined property |
The same scenario as before is occurring except this time the instantiation of the HelloProperties
finds a hello.greeting
property to override the Java default.
Example of Configuring Details
This is an example of customizing the behavior of an Auto-configured component.
|
83. Auto-Configuration Conflict
83.1. Review: Conditional @Bean Factory
We saw how we could make a @Bean
factory in the User-defined application module conditional (on the value of a property).
@SpringBootApplication
public class StarterConfiguredApp {
...
@Bean
@ConditionalOnBooleanProperty(prefix = "hello", name = "quiet", havingValue = true)
public Hello quietHello() {
return new StdOutHello("(hello.quiet property condition set, Application @Bean says hi)");
}
}
83.2. Potential Conflict
We also saw how to define a @Bean
factory in an Auto-configuration class brought in by starter module.
We now have a condition where the two can cause an ambiguity error that we need to account for.
$ java -jar target/appconfig-autoconfig-*-SNAPSHOT-bootexec.jar --hello.quiet=true (1)
...
***************************
APPLICATION FAILED TO START
***************************
Description:
Parameter 0 of constructor in info.ejava.examples.app.config.auto.AppCommand
required a single bean, but 2 were found:
- quietHello: defined by method 'quietHello' in info.ejava.examples.app.config.auto.StarterConfiguredApp
- hello: defined by method 'hello' in class path resource [info/ejava/examples/app/hello/HelloAutoConfiguration.class]
This may be due to missing parameter name information
Action:
Consider marking one of the beans as @Primary, updating the consumer to accept multiple beans, or using @Qualifier to identify the bean that should be consumed
1 | Supplying the hello.quiet=true property value causes two @Bean factories to choose from |
83.3. @ConditionalOnMissingBean
One way to solve the ambiguity is by using the @ConditionalOnMissingBean annotation — which defines a condition based on the absence of a bean.
Most conditional annotations can be used in both the application and autoconfigure modules.
However, the @ConditionalOnMissingBean
and its sibling @ConditionalOnBean are special and meant to be used with Auto-configuration classes in the autoconfigure modules.
Since the Auto-configuration classes are processed after the User-defined classes — there is a clear point to determine whether a User-defined bean does or does not exist. Any other use of these two annotations requires careful ordering and is not recommended.
...
import org.springframework.boot.autoconfigure.condition.ConditionalOnMissingBean;
@AutoConfiguration
@EnableConfigurationProperties(HelloProperties.class)
public class HelloAutoConfiguration {
@Bean
@ConditionalOnMissingBean (1)
public Hello hello(HelloProperties helloProperties) {
return new StdOutHello(helloProperties.getGreeting());
}
}
1 | @ConditionOnMissingBean causes Auto-configured @Bean method to be inactive when Hello bean already exists |
83.4. Bean Conditional Example Output
With the @ConditionalOnMissingBean
defined on the Auto-configuration class and the property
condition satisfied, we get the bean injected from the User-defined @Bean
factory.
$ java -jar target/appconfig-autoconfig-*-SNAPSHOT-bootexec.jar --hello.quiet=true
...
(hello.quiet property condition set, Application @Bean says hi) World
With the property condition not satisfied, we get the bean injected from the
Auto-configuration @Bean
factory. Wahoo!
$ java -jar target/appconfig-autoconfig-*-SNAPSHOT-bootexec.jar
...
application.properties Says - Hey World
84. Resource Conditional and Ordering
We can also define a condition based on the presence of a resource on the filesystem
or classpath using the
@ConditionOnResource. The following example satisfies the condition if
the file hello.properties
exists in the current directory. We are also
going to order our Auto-configured classes with the help of the
@AutoConfigureBefore annotation. There is a sibling
@AutoConfigureAfter annotation as well as a
AutoConfigureOrder we could have used.
...
import org.springframework.boot.autoconfigure.AutoConfigureBefore;
import org.springframework.boot.autoconfigure.condition.ConditionalOnResource;
@AutoConfiguration(before = HelloAutoConfiguration.class) //since boot 2.7.0 (2)
@ConditionalOnResource(resources = "file:./hello.properties") (1)
//@AutoConfigureBefore(HelloAutoConfiguration.class) (2)
public class HelloResourceAutoConfiguration {
@Bean
public Hello resourceHello() {
return new StdOutHello("hello.properties exists says hello");
}
}
1 | Auto-configured class satisfied only when file hello.properties present |
2 | This Auto-configuration class is processed prior to HelloAutoConfiguration |
84.1. Registering Second Auto-Configuration Class
This second Auto-configuration class is being provided in the same, hello-starter
module, so we need to update the '… AutoConfiguration.imports` file.
We do this by listing the second class within the same file.
# src/main/resources/spring/org.springframework.boot.autoconfigure.AutoConfiguration.imports
info.ejava.examples.app.hello.HelloAutoConfiguration
info.ejava.examples.app.hello.HelloResourceAutoConfiguration
84.2. Resource Conditional Example Output
The following execution with hello.properties
present in the current directory
satisfies the condition, causes the @Bean
factory from HelloAutoConfiguration
to be skipped because the bean already exists.
$ touch hello.properties
$ java -jar target/appconfig-autoconfig-*-SNAPSHOT-bootexec.jar
...
hello.properties exists says hello World
-
when property file is not present:
-
@Bean
factory fromHelloAutoConfiguration
used since neither property nor resource-based conditions satisfied
-
$ rm hello.properties
$ java -jar target/appconfig-autoconfig-*-SNAPSHOT-bootexec.jar
...
application.properties Says - Hey World
86. Class Conditions
There are many conditions we can add to our @Configuration
class or methods. However,
there is an important difference between the two.
-
class conditional annotations prevent the entire class from loading when not satisfied
-
@Bean
factory conditional annotations allow the class to load but prevent the method from being called when not satisfied
This works for missing classes too! Spring Boot parses the conditional class using ASM to detect and then evaluate conditions before allowing the class to be loaded into the JVM.
Otherwise, we would get a ClassNotFoundException
for the import of a class we are trying to base our condition on.
86.1. Class Conditional Example
In the following example, I am adding @ConditionalOnClass annotation to prevent the class from being loaded if the implementation class does not exist on the classpath.
...
import info.ejava.examples.app.hello.stdout.StdOutHello; (2)
import org.springframework.boot.autoconfigure.condition.ConditionalOnClass;
@Configuration(proxyBeanMethods = false)
@ConditionalOnClass(StdOutHello.class) (2)
@EnableConfigurationProperties(HelloProperties.class)
public class HelloAutoConfiguration {
@Bean
@ConditionalOnMissingBean
public Hello hello(HelloProperties helloProperties) {
return new StdOutHello(helloProperties.getGreeting()); (1)
}
}
1 | StdOutHello is the implementation instantiated by the @Bean factory method |
2 | HelloAutoConfiguration.class will not get loaded if StdOutHello.class does not exist |
The @ConditionOnClass
accepts either a class or string expression of the fully qualified classname.
The sibling
@ConditionalOnMissingClass accepts only the string form of the classname.
87. Excluding Auto Configurations
We can turn off certain Auto-configured classes using the
-
exclude
attribute of the@EnableAutoConfiguration
annotation -
exclude
attribute of the@SpringBootApplication
annotation which wraps the@EnableAutoConfiguration
annotation
@SpringBootApplication(exclude = {})
// ==> wraps @EnableAutoConfiguration(exclude={})
public class StarterConfiguredApp {
...
}
88. Debugging Auto Configurations
With all these conditional User-defined and Auto-configurations going on, it is easy to get lost or make a mistake. There are two primary tools that can be used to expose the details of the conditional configuration decisions.
88.1. Conditions Evaluation Report
It is easy to get a simplistic textual report of positive and negative condition evaluation matches
by adding a debug
property to the configuration. This can be done by adding --debug
or -Ddebug
to the command line.
The following output shows only the positive and negative matching conditions relevant to our example. There is plenty more in the full output.
88.2. Conditions Evaluation Report Example
$ java -jar target/appconfig-autoconfig-*-SNAPSHOT-bootexec.jar --debug | less
...
============================
CONDITIONS EVALUATION REPORT
============================
Positive matches: (1)
-----------------
HelloAutoConfiguration matched:
- @ConditionalOnClass found required class 'info.ejava.examples.app.hello.stdout.StdOutHello' (OnClassCondition)
HelloAutoConfiguration#hello matched:
- @ConditionalOnMissingBean (types: info.ejava.examples.app.hello.Hello; SearchStrategy: all) did not find any beans (OnBeanCondition)
Negative matches: (2)
-----------------
HelloResourceAutoConfiguration:
Did not match:
- @ConditionalOnResource did not find resource 'file:./hello.properties' (OnResourceCondition)
Matched:
- @ConditionalOnClass found required class 'info.ejava.examples.app.hello.stdout.StdOutHello' (OnClassCondition)
StarterConfiguredApp#quietHello:
Did not match:
- @ConditionalOnProperty (hello.quiet=true) did not find property 'quiet' (OnPropertyCondition)
1 | Positive matches show which conditionals are activated and why |
2 | Negative matches show which conditionals are not activated and why |
88.3. Condition Evaluation Report Results
The report shows us that
-
HelloAutoConfiguration
class was enabled becauseStdOutHello
class was present -
hello
@Bean
factory method ofHelloAutoConfiguration
class was enabled because no other beans were located -
entire
HelloResourceAutoConfiguration
class was not loaded because filehello.properties
was not present -
quietHello
@Bean
factory method of application class was not activated becausehello.quiet
property was not found
88.4. Actuator Conditions
We can also get a look at the conditionals while the application is running for Web applications using the Spring Boot Actuator. However, doing so requires that we transition our application from a command to a Web application. Luckily, this can be done technically by simply changing our starter in the pom.xml file.
<dependency>
<groupId>org.springframework.boot</groupId>
<artifactId>spring-boot-starter-web</artifactId>
<!-- <artifactId>spring-boot-starter</artifactId>-->
</dependency>
We also need to add a dependency on the spring-boot-starter-actuator
module.
<!-- added to inspect env -->
<dependency>
<groupId>org.springframework.boot</groupId>
<artifactId>spring-boot-starter-actuator</artifactId>
</dependency>
88.5. Activating Actuator Conditions
The Actuator, by default, will not expose any information without being configured to do so.
We can show a JSON version of the Conditions Evaluation Report by adding the management.endpoints.web.exposure.include
equal to the value conditions
.
I will do that on the command line here. Normally it would be in a profile-specific properties file appropriate for exposing this information.
$ java -jar target/appconfig-autoconfig-*-SNAPSHOT-bootexec.jar \
--management.endpoints.web.exposure.include=conditions
The Conditions Evaluation Report is available at the following URL: http://localhost:8080/actuator/conditions.
{
"contexts": {
"application": {
"positiveMatches": {
"HelloAutoConfiguration": [{
"condition": "OnClassCondition",
"message": "@ConditionalOnClass found required class 'info.ejava.examples.app.hello.stdout.StdOutHello'"
}],
"HelloAutoConfiguration#hello": [{
"condition": "OnBeanCondition",
"message": "@ConditionalOnBean (types: info.ejava.examples.app.hello.Hello; SearchStrategy: all) did not find any beans"
}],
...
,
"negativeMatches": {
"StarterConfiguredApp#quietHello": {
"notMatched": [{
"condition": "OnPropertyCondition",
"message": "@ConditionalOnProperty (hello.quiet=true) did not find property 'quiet'"
}],
"matched": []
},
"HelloResourceAutoConfiguration": {
"notMatched": [{
"condition": "OnResourceCondition",
"message": "@ConditionalOnResource did not find resource 'file:./hello.properties'"
}],
"matched": []
},
...
88.6. Actuator Environment
It can also be helpful to inspect the environment to determine the value of properties and which source
of properties is being used. To see that information, we add env
to the exposure.include
property.
$ java -jar target/appconfig-autoconfig-*-SNAPSHOT-bootexec.jar \
--management.endpoints.web.exposure.include=conditions,env
88.7. Actuator Links
This adds a full /env
endpoint and a view specific /env/{property}
endpoint to see information
for a specific property name. The available Actuator links are available at http://localhost:8080/actuator.
{
_links: {
self: {
href: "http://localhost:8080/actuator",
templated: false
},
conditions: {
href: "http://localhost:8080/actuator/conditions",
templated: false
},
env: {
href: "http://localhost:8080/actuator/env",
templated: false
},
env-toMatch: {
href: "http://localhost:8080/actuator/env/{toMatch}",
templated: true
}
}
}
88.8. Actuator Environment Report
The Actuator Environment Report is available at http://localhost:8080/actuator/env.
{
activeProfiles: [ ],
propertySources: [{
name: "server.ports",
properties: {
local.server.port: {
value: 8080
}
}
},
{
name: "commandLineArgs",
properties: {
management.endpoints.web.exposure.include: {
value: "conditions,env"
}
}
},
...
88.9. Actuator Specific Property Source
The source of a specific property and its defined value is available below the /actuator/env
URI
such that the hello.greeting
property is located at
http://localhost:8080/actuator/env/hello.greeting.
{
property: {
source: "applicationConfig: [classpath:/application.properties]",
value: "application.properties Says - Hey"
},
...
88.10. More Actuator
We can explore some of the other Actuator endpoints by changing the include property to * and revisiting the main actuator endpoint. Actuator Documentation is available on the web.
$ java -jar target/appconfig-autoconfig-*-SNAPSHOT-bootexec.jar \
--management.endpoints.web.exposure.include="*" (1)
1 | double quotes ("") being used to escape * special character on command line |
89. Summary
In this module we:
-
Defined conditions for
@Configuration
/@AutoConfiguration
classes and@Bean
factory methods that are evaluated at runtime startup -
Placed User-defined
@Configuration
conditions, which are evaluated first, in with application module -
Placed
@AutoConfiguration
classes in separatestarter
module to automatically bootstrap applications with specific capabilities -
Added conflict resolution and ordering to conditions to avoid ambiguous matches
-
Discovered how class conditions can help prevent entire
@AutoConfiguration
classes from being loaded and disrupt the application because an optional class is missing -
Learned how to debug conditions and visualize the runtime environment through use of the
debug
property or by using the Actuator for web applications
Logging
copyright © 2025 jim stafford (jim.stafford@jhu.edu)
90. Introduction
90.1. Why log?
Logging has many uses within an application — spanning:
-
auditing actions
-
reporting errors
-
providing debug information to assist in locating a problem
With much of our code located in libraries — logging is not just for our application code. We will want to know audit, error, and debug information in our library calls as well:
-
did that timer fire?
-
which calls failed?
-
what HTTP headers were input or returned from a REST call?
90.2. Why use a Logger over System.out?
Use of Loggers allow statements to exist within the code that will either:
-
be disabled
-
log output uninhibited
-
log output with additional properties (e.g., timestamp, thread, caller, etc.)
Logs commonly are written to the console and/or files by default — but that is not always the case. Logs can also be exported into centralized servers or database(s) so they can form an integrated picture of a distributed system and provide search and alarm capabilities.
However simple or robust your end logs become, logging starts with the code and is a very important thing to include from the beginning (even if we waited a few modules to cover it). |
90.3. Goals
The student will learn:
-
the value in using logging over simple System.out.println calls
-
the interface and implementation separation of a modern logging framework
-
the relationship between the different logger interfaces and implementations
-
to use log levels and verbosity to properly monitor the application under different circumstances
-
to express valuable context information in logged messages
-
to manage logging verbosity
-
to configure the output of logs to provide useful information
90.4. Objectives
At the conclusion of this lecture and related exercises, the student will be able to:
-
obtain access to an SLF4J Logger
-
issue log events at different severity levels
-
filter log events based on source and severity thresholds
-
efficiently bypass log statements that do not meet criteria
-
format log events for regular and exception parameters
-
customize log patterns
-
customize appenders
-
add contextual information to log events using Mapped Diagnostic Context
-
trigger additional logging events using Markers
-
use Spring Profiles to conditionally configure logging
91. Starting References
There are many resources on the Internet that cover logging, the individual logging implementations, and the Spring Boot opinionated support for logging. You may want to keep a browser window open to one or more of the following starting links while we cover this material. You will not need to go thru all of them, but know there is a starting point to where detailed examples and explanations can be found if not covered in this lesson.
-
Spring Boot Logging Feature provides documentation from a top-down perspective of how it supplies a common logging abstraction over potentially different logging implementations.
-
SLF4J Web Site provides documentation, articles, and presentations on SLF4J — the chosen logging interface for Spring Boot and much of the Java community.
-
Logback Web Site provides a wealth of documentation, articles, and presentations on Logback — the default logging implementation for Spring Boot.
-
Log4J2 Web Site provides core documentation on Log4J2 — a directly supported Spring Boot alternative logging implementation.
-
Java Util Logging (JUL) Documentation Web Site provides an overview of JUL — a lesser supported Spring Boot alternative implementation for logging.
92. Logging Dependencies
Most of what we need to perform logging is supplied
through our dependency on the spring-boot-starter
and its dependency on
spring-boot-starter-logging
. The only time we need to supply additional dependencies
is when we want to change the default logging implementation or make use of optional,
specialized extensions provided by that logging implementation.
Take a look at the transitive dependencies brought in by a straight forward dependency on
spring-boot-starter
.
$ mvn dependency:tree
...
[INFO] info.ejava.examples.app:appconfig-logging-example:jar:6.1.1-SNAPSHOT
[INFO] \- org.springframework.boot:spring-boot-starter:jar:3.5.5:compile
...
[INFO] | +- org.springframework.boot:spring-boot-starter-logging:jar:3.5.5:compile (1)
[INFO] | | +- ch.qos.logback:logback-classic:jar:1.5.18:compile
[INFO] | | | +- ch.qos.logback:logback-core:jar:1.5.18:compile
[INFO] | | | \- org.slf4j:slf4j-api:jar:2.0.17:compile
[INFO] | | +- org.apache.logging.log4j:log4j-to-slf4j:jar:2.24.3:compile
[INFO] | | | \- org.apache.logging.log4j:log4j-api:jar:2.24.3:compile
[INFO] | | \- org.slf4j:jul-to-slf4j:jar:2.0.17:compile
...
[INFO] | +- org.springframework:spring-core:jar:6.2.10:compile
[INFO] | | \- org.springframework:spring-jcl:jar:6.2.10:compile
1 | dependency on spring-boot-starter brings in spring-boot-starter-logging |
92.1. Logging Libraries
Notice that:
-
spring-core
dependency brings in its own repackaging and optimizations of Commons Logging withinspring-jcl
-
spring-jcl
provides a thin wrapper that looks for logging APIs and self-bootstraps itself to use them — with a preference for the SLF4J interface, then Log4J2 directly, and then JUL as a fallback -
spring-jcl
looks to have replaced the need for jcl-over-slf4j
-
-
spring-boot-starter-logging
provides dependencies for the SLF4J API, adapters and three optional implementations-
implementations — these will perform the work behind the SLF4J interface calls
-
Logback (the default)
-
-
adapters — these will bridge the SLF4J calls to the implementations
-
Logback
implements SLF4J natively - no adapter necessary -
log4j-to-slf4j
bridges Log4j to SLF4J -
jul-to-slf4j
- bridges Java Util Logging (JUL) to SLF4J
-
-
If we use Spring Boot with spring-boot-starter right out of the box, we will
be using the SLF4J API and Logback implementation configured to work correctly for most cases.
|
92.2. Spring and Spring Boot Internal Logging
Spring and Spring Boot use an internal version of the
Apache Commons Logging API
(Git Repo)
(that was previously known as the Jakarta Commons Logging or JCL (
Ref: Wikipedia, Apache Commons Logging))
that is rehosted within the spring-jcl
module to serve as a bridge to different logging implementations (Ref: Spring Boot Logging).
93. Getting Started
OK. We get the libraries we need to implement logging right out of the box with the
basic spring-boot-starter
. How do we get started generating log messages?
Lets begin with a comparison with System.out
so we can see how they are similar
and different.
93.1. System.out
System.out was built into Java from day 1
-
no extra imports are required
-
no extra libraries are required
System.out writes to wherever System.out
references. The default is stdout. You have
seen many earlier examples just like the following.
@Component
@Profile("system-out") (1)
public class SystemOutCommand implements CommandLineRunner {
public void run(String... args) throws Exception {
System.out.println("System.out message");
}
}
1 | restricting component to profile to allow us to turn off unwanted output after this demo |
93.2. System.out Output
The example SystemOutCommand
component above outputs the following statement when called with the
system-out
profile active (using spring.profiles.active
property).
$ java -jar target/appconfig-logging-example-*-SNAPSHOT-bootexec.jar \
--spring.profiles.active=system-out (1)
System.out message (2)
1 | activating profile that turns on our component and turns off all logging |
2 | System.out is not impacted by logging configuration and printed to stdout |
93.3. Turning Off Spring Boot Logging
Where did all the built-in logging (e.g., Spring Boot banner, startup messages, etc.) go in the last example?
The system-out
profile specified a logging.level.root
property that
effectively turned off all logging.
spring.main.banner-mode=off (1)
logging.level.root=OFF (2)
1 | turns off printing of verbose Spring Boot startup banner |
2 | turns off all logging (inheriting from the root configuration) |
Technically the logging was only turned off for loggers inheriting the root configuration — but we will ignore that detail for right now and just say "all logging". |
93.4. Getting a Logger
Logging frameworks make use of the fundamental design idiom — separate interface from implementation. We want our calling code to have simple access to a simple interface to express information to be logged and the severity of that information. We want the implementation to have limitless capability to produce and manage the logs, but want to only pay for what we likely will use. Logging frameworks allow that to occur and provide primary access thru a logging interface and a means to create an instance of that logger. The following diagram shows the basic stereotype roles played by the factory and logger.

-
Factory creates Logger
Lets take a look at several ways to obtain a Logger using different APIs and techniques.
93.6. JUL Example Output
The following output shows that even code using the JUL interface will be integrated into our standard Spring Boot logs.
java -jar target/appconfig-logging-example-*-SNAPSHOT-bootexec.jar \
--spring.profiles.active=factory
...
20:40:54,136 INFO info.ejava.examples.app.config.logging.factory.JULLogger - Java Util logger message
...
However, JUL is not widely used as an API or implementation. I won’t detail it here, but it has been reported to be much slower and missing robust features of modern alternatives. That does not mean JUL cannot be used as an API for your code (and the libraries your code relies on) and an implementation for your packaged application. It just means using it as an implementation is uncommon and won’t be the default in Spring Boot and other frameworks. |
93.8. SLF4J Example Output
$ java -jar target/appconfig-logging-example-*-SNAPSHOT-bootexec.jar \
--spring.profiles.active=factory (1)
...
20:40:55,156 INFO info.ejava.examples.app.config.logging.factory.DeclaredLogger - declared SLF4J logger message
...
1 | supplying custom profile to filter output to include only the factory examples |
93.9. Lombok SLF4J Declaration Example
Naming loggers after the fully qualified class name is so common that the Lombok library was able to successfully take advantage of that fact to automate the tasks for adding the imports and declaring the Logger during Java compilation.
package info.ejava.examples.app.config.logging.factory;
import lombok.extern.slf4j.Slf4j;
...
@Component
@Slf4j (1)
public class LombokDeclaredLogger implements CommandLineRunner {
(2)
@Override
public void run(String... args) throws Exception {
log.info("lombok declared SLF4J logger"); (3)
}
}
1 | @Slf4j annotation automates the import statements and Logger declaration |
2 | Lombok will declare a static log property using LoggerFactory during compilation |
3 | normal log statement provided by calling class — no different from earlier example |
93.10. Lombok Example Output
Since Lombok primarily automates code generation at compile time, the produced output is identical to the previous manual declaration example.
$ java -jar target/appconfig-logging-example-*-SNAPSHOT-bootexec.jar \
--spring.profiles.active=factory
...
20:40:55,155 INFO info.ejava.examples.app.config.logging.factory.LombokDeclaredLogger - lombok declared SLF4J logger message
...
93.11. Lombok Dependency
Of course, we need to add the following dependency to the project pom.xml
to enable
Lombok annotation processing.
<!-- used to declare logger -->
<dependency>
<groupId>org.projectlombok</groupId>
<artifactId>lombok</artifactId>
<scope>provided</scope>
</dependency>
95. Discarded Message Expense
The designers of logger frameworks are well aware that excess logging — even statements that are disabled — can increase the execution time of a library call or overall application. We have already seen how severity level thresholds can turn off output and that gives us substantial savings within the logging framework itself. However, we must be aware that building a message to be logged can carry its own expense and be aware of the tools to mitigate the problem.
Assume we have a class that is relatively expensive to obtain a String representation.
class ExpensiveToLog {
public String toString() { (1)
try { Thread.sleep(1000); } catch (Exception ignored) {}
return "hello";
}
}
1 | calling toString() on instances of this class will incur noticeable delay |
95.1. Blind String Concatenation
Now lets say we create a message to log through straight, eager String concatenation. What is wong here?
ExpensiveToLog obj=new ExpensiveToLog();
//...
log.debug("debug for expensiveToLog: " + obj + "!");
-
The log message will get formed by eagerly concatenating several Strings together
-
One of those Strings is produced by a relatively expensive
toString()
method -
Problem: The work of eagerly forming the String is wasted if
DEBUG
is not enabled
95.2. Verbosity Check
Assuming the information from the toString()
call is valuable and needed when we
have DEBUG
enabled — a verbosity check is one common solution we can use to determine
if the end result is worth the work. There are two very similar ways we can do this.
The first way is to dynamically check the current threshold level of the logger
within the code and only execute if the requested severity level is enabled.
We are still going to build the relatively expensive String when DEBUG
is enabled
but we are going to save all that processing time when it is not enabled. This overall
approach of using a code block works best when creating the message requires multiple
lines of code. This specific technique of dynamically checking is suitable when there
are very few checks within a class.
95.2.1. Dynamic Verbosity Check
The first way is to dynamically check the current threshold level of the logger
within the code and only execute if the requested severity level is enabled.
We are still going to build the relatively expensive String when DEBUG
is enabled
but we are going to save all that processing time when it is not enabled. This overall
approach of using a code block works best when creating the message requires multiple
lines of code. This specific technique of dynamically checking is suitable when there
are very few checks within a class.
if (log.isDebugEnabled()) { (1)
log.debug("debug for expensiveToLog: " + obj +"!");
}
1 | code block with expensive toString() call is bypassed when DEBUG disabled |
95.2.2. Static Final Verbosity Check
A variant of the first approach is to define a static final boolean
variable
at the start of the class, equal to the result of the enabled test.
This variant allows the JVM to know that the value of the if
predicate will never change allowing the code block and further checks to be eliminated when disabled.
This alternative is better when there are multiple blocks of code that you want to make conditional on the threshold level of the logger.
This solution assumes the logger threshold will never be changed or that the JVM will be restarted to use the changed value.
I have seen this technique commonly used in
libraries
where they anticipate many calls and they are commonly judged on their method throughput performance.
private static final boolean DEBUG_ENABLED = log.isDebugEnabled(); (1)
...
if (DEBUG_ENABLED) { (2)
log.debug("debug for expensiveToLog: " + obj + "!");
}
...
1 | logger’s verbosity level tested when class loaded and stored in static final variable |
2 | code block with expensive toString() |
95.3. SLF4J Parameterized Logging
SLF4J API offers another solution that removes the need for the if
clause — thus
cleaning your code of those extra conditional blocks. The SLF4J Logger
interface has a
format
and args
variant for each verbosity level call that permits the threshold to
be consulted prior to converting any of the parameters to a String.
The format specification uses a set of curly braces ("{}") to express an insertion
point for an ordered set of arguments. There are no format options. It is strictly a
way to lazily call toString()
on each argument and insert the result.
log.debug("debug for expensiveToLog: {}!", obj); (1) (2)
1 | {} is a placeholder for the result of obj.toString() if called |
2 | obj.toString() only called and overall message concatenated if logger threshold set to >= DEBUG |
95.5. Simple Performance Results: Enabled
The second set of results are from logging threshold set to DEBUG
. You can see that causes the
relatively expensive toString()
to be called for each of the four techniques shown with somewhat
equal results. I would not put too much weight on a few milliseconds difference between the calls
here except to know that neither provide a noticeable processing delay over the other when the
logging threshold has been met.
$ java -jar target/appconfig-logging-example-*-SNAPSHOT-bootexec.jar \
--spring.profiles.active=expense \
--logging.level.info.ejava.examples.app.config.logging.expense=DEBUG
11:44:43.560 INFO info.ejava.examples.app.config.logging.expense.DisabledOptimization - warmup logger
11:44:43.561 DEBUG info.ejava.examples.app.config.logging.expense.DisabledOptimization - warmup logger
11:44:44.572 DEBUG info.ejava.examples.app.config.logging.expense.DisabledOptimization - debug for expensiveToLog: hello!
11:44:45.575 DEBUG info.ejava.examples.app.config.logging.expense.DisabledOptimization - debug for expensiveToLog: hello!
11:44:46.579 DEBUG info.ejava.examples.app.config.logging.expense.DisabledOptimization - debug for expensiveToLog: hello!
11:44:47.582 INFO info.ejava.examples.app.config.logging.expense.DisabledOptimization - \
concat: 1010, ifDebug=1003, DEBUG_ENABLED=1004, param=1003 (1)
1 | all four methods paying the cost of the relatively expensive obj.toString() call |
96. Exception Logging
SLF4J interface and parameterized logging goes one step further to also support Exceptions
.
If you pass an Exception
object as the last parameter in the list, with no placeholder for it — it is treated special and will not have its toString()
called with the rest of the parameters.
Depending on the configuration in place, the stack trace for the Exception
is logged instead. The following snippet shows an example of an Exception
being thrown, caught, and then logged.
public void run(String... args) throws Exception {
try {
log.info("calling iThrowException");
iThrowException();
} catch (Exception ex) {
log.warn("caught exception", ex); (1)
}
}
private void iThrowException() throws Exception {
throw new Exception("example exception");
}
1 | Exception passed to logger without a {} placeholder |
96.1. Exception Example Output
When we run the example, note that the message is printed in its normal location and a stack trace is
added for the supplied Exception
parameter.
$ java -jar target/appconfig-logging-example-*-SNAPSHOT-bootexec.jar \
--spring.profiles.active=exceptions
13:41:17.119 INFO info.ejava.examples.app.config.logging.exceptions.ExceptionExample - calling iThrowException
13:41:17.121 WARN info.ejava.examples.app.config.logging.exceptions.ExceptionExample - caught exception (1)
java.lang.Exception: example exception (2)
at info.ejava.examples.app.config.logging.exceptions.ExceptionExample.iThrowException(ExceptionExample.java:23)
at info.ejava.examples.app.config.logging.exceptions.ExceptionExample.run(ExceptionExample.java:15)
at org.springframework.boot.SpringApplication.callRunner(SpringApplication.java:784)
...
at org.springframework.boot.loader.Launcher.launch(Launcher.java:51)
at org.springframework.boot.loader.JarLauncher.main(JarLauncher.java:52)
1 | normal message logged |
2 | stack trace for last Exception parameter logged |
96.2. Exception Logging and Formatting
Note that you can continue to use parameterized logging with Exceptions. The message passed in
above was actually a format with no parameters. The snippet below shows a format with two parameters
and an Exception
.
log.warn("caught exception {} {}", "p1","p2", ex);
The first two parameters are used in the formatting of the core message. The last Exception parameters is printed as a regular exception.
13:41:17.119 INFO info.ejava.examples.app.config.logging.exceptions.ExceptionExample - calling iThrowException
13:41:17.122 WARN info.ejava.examples.app.config.logging.exceptions.ExceptionExample - caught exception p1 p2 (1)
java.lang.Exception: example exception (2)
at info.ejava.examples.app.config.logging.exceptions.ExceptionExample.iThrowException(ExceptionExample.java:23)
at info.ejava.examples.app.config.logging.exceptions.ExceptionExample.run(ExceptionExample.java:15)
at org.springframework.boot.SpringApplication.callRunner(SpringApplication.java:784)
...
at org.springframework.boot.loader.Launcher.launch(Launcher.java:51)
at org.springframework.boot.loader.JarLauncher.main(JarLauncher.java:52)
1 | two early parameters ("p1" and "p2") where used to complete the message template |
2 | Exception passed as the last parameter had its stack trace logged |
97. Logging Pattern
Each of the previous examples showed logging output using a particular pattern. The pattern
was expressed using a logging.pattern.console
property. The
Logback Conversion Documentation
provides details about how the logging pattern is defined.
logging.pattern.console=%date{HH:mm:ss.SSS} %-5level %logger - %msg%n
The pattern consisted of:
-
%date (or %d)- time of day down to millisecs
-
%level (or %p, %le)- severity level left justified and padded to 5 characters
-
%logger (or %c, %lo)- full name of logger
-
%msg (or %m, %message) - full logged message
-
%n - operating system-specific new line
If you remember, that produced the following output.
java -jar target/appconfig-logging-example-*-SNAPSHOT-bootexec.jar \
--spring.profiles.active=levels
06:00:38.891 INFO info.ejava.examples.app.config.logging.levels.LoggerLevels - info message
06:00:38.892 WARN info.ejava.examples.app.config.logging.levels.LoggerLevels - warn message
06:00:38.892 ERROR info.ejava.examples.app.config.logging.levels.LoggerLevels - error message
97.1. Default Console Pattern
Spring Boot comes out of the box with a slightly more verbose default pattern expressed with the CONSOLE_LOG_PATTERN property. The following snippet depicts the information found within the Logback property definition — with some new lines added in to help read it.
CONSOLE_LOG_PATTERN
from GitHub%clr(%d{${LOG_DATEFORMAT_PATTERN:-yyyy-MM-dd HH:mm:ss.SSS}}){faint}
%clr(${LOG_LEVEL_PATTERN:-%5p})
%clr(${PID:- }){magenta}
%clr(---){faint}
%clr([%15.15t]){faint}
%clr(%-40.40logger{39}){cyan}
%clr(:){faint}
%m%n${LOG_EXCEPTION_CONVERSION_WORD:-%wEx}}
You should see some familiar conversion words from my earlier pattern example. However, there are some additional conversion words used as well. Again, keep the Logback Conversion Documentation close by to lookup any additional details.
-
%d - timestamp defaulting to full format
-
%p - severity level right justified and padded to 5 characters
-
$PID - system property containing the process ID
-
%t (or %thread) - thread name right justified and padded to 15 characters and chopped at 15 characters
-
%logger - logger name optimized to fit within 39 characters , left justified and padded to 40 characters, chopped at 40 characters
-
%m - fully logged message
-
%n - operating system-specific new line
97.2. Default Console Pattern Output
We will take a look at conditional variable substitution in a moment. This next example reverts to the
default CONSOLE_LOG_PATTERN
.
java -jar target/appconfig-logging-example-*-SNAPSHOT-bootexec.jar \
--logging.level.root=OFF \
--logging.level.info.ejava.examples.app.config.logging.levels.LoggerLevels=TRACE
2020-03-27 06:31:21.475 TRACE 31203 --- [ main] i.e.e.a.c.logging.levels.LoggerLevels : trace message
2020-03-27 06:31:21.477 DEBUG 31203 --- [ main] i.e.e.a.c.logging.levels.LoggerLevels : debug message
2020-03-27 06:31:21.477 INFO 31203 --- [ main] i.e.e.a.c.logging.levels.LoggerLevels : info message
2020-03-27 06:31:21.477 WARN 31203 --- [ main] i.e.e.a.c.logging.levels.LoggerLevels : warn message
2020-03-27 06:31:21.477 ERROR 31203 --- [ main] i.e.e.a.c.logging.levels.LoggerLevels : error message
Spring Boot defines color coding for the console that is not visible in the text of this document.
The color for severity level is triggered by the level — red for ERROR
, yellow for WARN
, and
green for the other three levels.

97.3. Variable Substitution
Logging configurations within Spring Boot make use of variable substitution. The value of LOG_DATEFORMAT_PATTERN
will be applied wherever the expression ${LOG_DATEFORMAT_PATTERN}
appears. The "${}"
characters are part
of the variable expression and will not be part of the result.
97.4. Conditional Variable Substitution
Variables can be defined with default values in the event they are not defined. In the following
expression ${LOG_DATEFORMAT_PATTERN:-yyyy-MM-dd HH:mm:ss.SSS}
:
-
the value of LOG_DATEFORMAT_PATTERN will be used if defined
-
the value of "yyyy-MM-dd HH:mm:ss.SSS" will be used if not defined
The "${}" and embedded ":-" characters following the variable name are part of the expression
when appearing within an XML configuration file and will not be part of the result. The dash (- )
character should be removed if using within a property definition.
|
97.5. Date Format Pattern
As we saw from a peek at the Spring Boot CONSOLE_LOG_PATTERN
default definition, we can change the format of the timestamp using the LOG_DATEFORMAT_PATTERN
system property.
That system property can flexibly be set using the logging.pattern.dateformat
property.
See the Spring Boot Documentation for information on this and other properties.
The following example shows setting that property using a command line argument.
$ java -jar target/appconfig-logging-example-*-SNAPSHOT-bootexec.jar \
--logging.level.root=OFF \
--logging.level.info.ejava.examples.app.config.logging.levels.LoggerLevels=INFO \
--logging.pattern.dateformat="HH:mm:ss.SSS" (1)
08:20:42.939 INFO 39013 --- [ main] i.e.e.a.c.logging.levels.LoggerLevels : info message
08:20:42.942 WARN 39013 --- [ main] i.e.e.a.c.logging.levels.LoggerLevels : warn message
08:20:42.942 ERROR 39013 --- [ main] i.e.e.a.c.logging.levels.LoggerLevels : error message
1 | setting LOG_DATEFORMAT_PATTERN using logging.pattern.dateformat property |
97.6. Log Level Pattern
We also saw from the default definition of CONSOLE_LOG_PATTERN
that the severity level
of the output can be changed using the LOG_LEVEL_PATTERN
system property. That system
property can be flexibly set with the logging.pattern.level
property. The following
example shows setting the format to a single character, left justified. Therefore, we can map
INFO
⇒ I
, WARN
⇒ W
, and ERROR
⇒ E
.
$ java -jar target/appconfig-logging-example-*-SNAPSHOT-bootexec.jar \
--logging.level.root=OFF \
--logging.level.info.ejava.examples.app.config.logging.levels.LoggerLevels=INFO \
--logging.pattern.dateformat="HH:mm:ss.SSS" \
--logging.pattern.level="%.-1p" (1)
(2)
08:59:17.376 I 44756 --- [ main] i.e.e.a.c.logging.levels.LoggerLevels : info message
08:59:17.379 W 44756 --- [ main] i.e.e.a.c.logging.levels.LoggerLevels : warn message
08:59:17.379 E 44756 --- [ main] i.e.e.a.c.logging.levels.LoggerLevels : error message
1 | logging.level.pattern expressed to be 1 character, left justified |
2 | single character produced in console log output |
97.7. Conversion Pattern Specifiers
Spring Boot Features Web Page documents some formatting rules. However, more details on the parts within the conversion pattern are located on the Logback Pattern Layout Web Page. The overall end-to-end pattern definition I have shown you is called a "Conversion Pattern". Conversion Patterns are made up of:
-
Literal Text (e.g.,
---
, whitespace,:
) — hard-coded strings providing decoration and spacing for conversion specifiers -
Conversion Specifiers - (e.g.,
%-40.40logger{39}
) — an expression that will contribute a formatted property of the current logging context-
starts with
%
-
followed by format modifiers — (e.g.,
-40.40
) — addresses min/max spacing and right/left justification-
optionally provide minimum number of spaces
-
use a negative number (
-#
) to make it left justified and a positive number (#
) to make it right justified
-
-
optionally provide maximum number of spaces using a decimal place and number (
.#
). Extra characters will be cut off-
use a negative number (
.-#
) to start from the left and positive number (.#
) to start from the right
-
-
-
followed by a conversion word (e.g.,
logger
,msg
) — keyword name for the property -
optional parameters (e.g.,
{39}
) — see individual conversion words for details on each
-
97.8. Format Modifier
The format modifier is between the %
character and word (e.g., %5p
).
(ref)
-
Nothing - as is (e.g.,
%p
or%level
; "severity level") -
Left justification flag - minus (
-
) is left justified (e.g.,%-5p
; "left justified") -
Minimum width - first decimal value (e.g.,
%10p
; "10 characters, right justified"). The field expands beyond this minimum length as needed. -
Maximum width - decimal point followed by value (e.g.,
%.2
; "2 characters, right justified"). The field is truncated to first N or last N characters depending on the left/right justification.
97.9. Format Modifier Impact Example
The following example demonstrates how the different format modifier expressions can impact the level
property.
logging.pattern.loglevel | output | comment |
---|---|---|
[%level] |
[INFO] [WARN] [ERROR] |
value takes whatever space necessary |
[%6level] |
[ INFO] [ WARN] [ ERROR] |
value takes at least 6 characters, right justified |
[%-6level] |
[INFO ] [WARN ] [ERROR ] |
value takes at least 6 characters, left justified |
[%.-2level] |
[IN] [WA] [ER] |
value takes no more than 2 characters, starting from the left |
[%.2level] |
[FO] [RN] [OR] |
value takes no more than 2 characters, starting from the right |
97.11. Expensive Conversion Words
I added two new helpful properties that could be considered controversial because they require extra overhead to obtain that information from the JVM. The technique has commonly involved throwing and catching an exception internally to determine the calling location from the self-generated stack trace:
-
%method (or %M) - name of method calling logger
-
%line (or %L) - line number of the file where logger call was made
The additional "expensive" fields are being used for console output for demonstrations using a demonstration profile. Consider your log information needs on a case-by-case basis and learn from this lesson what and how you can modify the logs for your specific needs. For example — to debug an error, you can switch to a more detailed and verbose profile without changing code. |
97.12. Example Override Output
We can activate the profile and demonstrate the modified format using the following command.
$ java -jar target/appconfig-logging-example-*-SNAPSHOT-bootexec.jar \
--spring.profiles.active=layout
14:25:58.428 INFO - logging.levels.LoggerLevels#run:14 info message
14:25:58.430 WARN - logging.levels.LoggerLevels#run:15 warn message
14:25:58.430 ERROR - logging.levels.LoggerLevels#run:16 error message
The coloring does not show up above so the image below provides a perspective of what that looks like.

97.13. Layout Fields
Please see the Logback Layouts Documentation for a detailed list of conversion words and how to optionally format them.
98. Loggers
We have demonstrated a fair amount capability thus far without having to know much about the internals of the logger framework. However, we need to take a small dive into the logging framework in order to explain some further concepts.
-
Logger Ancestry
-
Logger Inheritance
-
Appenders
-
Logger Additivity
98.1. Logger Tree
Loggers are organized in a hierarchy starting with a root logger called "root". As you would expect, higher in the tree are considered ancestors and lower in the tree are called descendants.

Except for root, the ancestor/descendant structure of loggers depends on the hierarchical name of each logger. Based on the loggers in the diagram
-
X, Y.3, and security are descendants and direct children of root
-
Y.3 is example of logger lacking an explicitly defined parent in hierarchy before reaching root. We can skip many levels between child and root and still retain same hierarchical name
-
X.1, X.2, and X.3 are descendants of X and root and direct children of X
-
Y.3.p is descendant of Y.3 and root and direct child of Y.3
98.2. Logger Inheritance
Each logger has a set of allowed properties. Each logger may define its own value for those properties, inherit the value of its parent, or be assigned a default (as in the case for root).
98.3. Logger Threshold Level Inheritance
The first inheritance property we will look at is a familiar one to you — severity threshold level. As the diagram shows
-
root, loggerX, security, loggerY.3, loggerX.1 and loggerX.3 set an explicit value for their threshold
-
loggerX.2 and loggerY.3.p inherit the threshold from their parent

98.4. Logger Effective Threshold Level Inheritance
The following table shows the specified and effective values applied to each logger for their threshold.
logger name | specified threshold | effective threshold |
---|---|---|
root |
OFF |
OFF |
X |
INFO |
INFO |
X.1 |
ERROR |
ERROR |
X.2 |
INFO |
|
X.3 |
OFF |
OFF |
Y.3 |
WARN |
WARN |
Y.3.p |
WARN |
|
security |
TRACE |
TRACE |
98.5. Example Logger Threshold Level Properties
These thresholds can be expressed in a property file.
logging.level.X=info
logging.level.X.1=error
logging.level.X.3=OFF
logging.level.security=trace
logging.level.Y.3=warn
logging.level.root=OFF
98.6. Example Logger Threshold Level Output
The output below demonstrates the impact of logging level inheritance from ancestors to descendants.
$ java -jar target/appconfig-logging-example-*-SNAPSHOT-bootexec.jar \
--spring.profiles.active=tree
CONSOLE 05:58:14.956 INFO - X#run:25 X info
CONSOLE 05:58:14.959 WARN - X#run:26 X warn
CONSOLE 05:58:14.959 ERROR - X#run:27 X error
CONSOLE 05:58:14.960 ERROR - X.1#run:27 X.1 error (2)
CONSOLE 05:58:14.960 INFO - X.2#run:25 X.2 info (1)
CONSOLE 05:58:14.960 WARN - X.2#run:26 X.2 warn
CONSOLE 05:58:14.960 ERROR - X.2#run:27 X.2 error
CONSOLE 05:58:14.960 WARN - Y.3#run:26 Y.3 warn
CONSOLE 05:58:14.960 ERROR - Y.3#run:27 Y.3 error
CONSOLE 05:58:14.960 WARN - Y.3.p#run:26 Y.3.p warn (1)
CONSOLE 05:58:14.961 ERROR - Y.3.p#run:27 Y.3.p error
CONSOLE 05:58:14.961 TRACE - security#run:23 security trace (3)
CONSOLE 05:58:14.961 DEBUG - security#run:24 security debug
CONSOLE 05:58:14.962 INFO - security#run:25 security info
CONSOLE 05:58:14.962 WARN - security#run:26 security warn
CONSOLE 05:58:14.962 ERROR - security#run:27 security error
1 | X.2 and Y.3.p exhibit the same threshold level as their parents X (INFO ) and Y.3 (WARN ) |
2 | X.1 (ERROR ) and X.3 (OFF ) override their parent threshold levels |
3 | security is writing all levels >= TRACE |
99. Appenders
Loggers generate LoggerEvents
but do not directly log anything.
Appenders are responsible for taking a LoggerEvent
and producing a message to a log.
There are many types of appenders. We have been working exclusively with
a ConsoleAppender
thus far but will work with some others before we are done.
At this point — just know that a ConsoleLogger
uses:
-
an encoder to determine when to write messages to the log
-
a layout to determine how to transform an individual
LoggerEvent
to a String -
a pattern when using a
PatternLayout
to define the transformation
99.1. Logger has N Appenders
Each of the loggers in our tree has the chance to have 0..N appenders.

99.2. Logger Configuration Files
To date we have been able to work mostly with Spring Boot properties when using loggers. However, we will need to know a few things about the Logger Configuration File in order to define an appender and assign it to logger(s). We will start with how the logger configuration is found.
Logback and Log4J2 both use XML as their primary definition language. Spring Boot will automatically locate a well-known named configuration file in the root of the classpath:
-
logback.xml
orlogback-spring.xml
for Logback -
log4j2.xml
orlog4j2-spring.xml
for Log4J2
Spring Boot documentation recommends using the -spring.xml
suffixed files over the provider default named files in order for Spring Boot to assure that all documented features can be enabled.
Alternately, we can explicitly specify the location using the logging.config
property to reference anywhere in the classpath or file system.
...
logging.config=classpath:/logging-configs/tree/logback-spring.xml (1)
...
1 | an explicit property reference to the logging configuration file to use |
99.3. Logback Root Configuration Element
The XML file has a root configuration
element which contains details of the appender(s) and logger(s).
See the
Spring Boot Configuration Documentation and the Logback Configuration Documentation for details on how to configure.
<configuration debug="false"> (1)
...
</configuration>
1 | debug attribute triggers logback debug |
99.4. Retain Spring Boot Defaults
We will lose most/all of the default Spring Boot customizations for logging when we define our own custom logging configuration file.
We can restore them by adding an include.
This is that same file that we looked at earlier for the definition of CONSOLE_LOG_PATTERN
.
<configuration>
<!-- bring in Spring Boot defaults for Logback -->
<include resource="org/springframework/boot/logging/logback/defaults.xml"/>
...
</configuration>
99.5. Appender Configuration
Our example tree has three (3) appenders total. Each adds a literal string prefix so we know which appender is being called.
<!-- leverages what Spring Boot would have given us for console -->
<appender name="console" class="ch.qos.logback.core.ConsoleAppender">
<encoder class="ch.qos.logback.classic.encoder.PatternLayoutEncoder"> (1)
<pattern>CONSOLE ${CONSOLE_LOG_PATTERN}</pattern> (2)
<charset>utf8</charset>
</encoder>
</appender>
<appender name="X-appender" class="ch.qos.logback.core.ConsoleAppender">
<encoder>
<pattern>X ${CONSOLE_LOG_PATTERN}</pattern>
</encoder>
</appender>
<appender name="security-appender" class="ch.qos.logback.core.ConsoleAppender">
<encoder>
<pattern>SECURITY ${CONSOLE_LOG_PATTERN}</pattern>
</encoder>
</appender>
1 | PatternLayoutEncoder is the default encoder |
2 | CONSOLE_PATTERN_LAYOUT is defined in included
defaults.xml |
This example forms the basis for demonstrating logger/appender assignment
and appender additivity. ConsoleAppender is used in each case for ease of
demonstration and not meant to depict a realistic configuration.
|
99.6. Appenders Attached to Loggers
The appenders are each attached to a single logger using the appender-ref
element.
-
console is attached to the root logger
-
X-appender is attached to loggerX logger
-
security-appender is attached to security logger
I am latching the two child appender assignments within an appenders
profile to:
-
keep them separate from the earlier log level demo
-
demonstrate how to leverage Spring Boot extensions to build profile-based conditional logging configurations.
<springProfile name="appenders"> (1)
<logger name="X">
<appender-ref ref="X-appender"/> (2)
</logger>
<!-- this logger starts a new tree of appenders, nothing gets written to root logger -->
<logger name="security" additivity="false">
<appender-ref ref="security-appender"/>
</logger>
</springProfile>
<root>
<appender-ref ref="console"/>
</root>
1 | using Spring Boot Logback extension to only enable appenders when profile active |
2 | appenders associated with logger using appender-ref |
99.7. Appender Tree Inheritance
These appenders, in addition to level, are inherited from ancestor to descendant
unless there is an override defined by the property additivity=false
.

99.8. Appender Additivity Result
logger name | assigned threshold | assigned appender | effective threshold | effective appender |
---|---|---|---|---|
root |
OFF |
console |
OFF |
console |
X |
INFO |
X-appender |
INFO |
console, X-appender |
X.1 |
ERROR |
ERROR |
console, X-appender |
|
X.2 |
INFO |
console, X-appender |
||
X.3 |
OFF |
OFF |
console, X-appender |
|
Y.3 |
WARN |
WARN |
console |
|
Y.3.p |
WARN |
console |
||
security *additivity=false |
TRACE |
security-appender |
TRACE |
security-appender |
99.9. Logger Inheritance Tree Output
$ java -jar target/appconfig-logging-example-*-SNAPSHOT-bootexec.jar \
--spring.profiles.active=tree,appenders
X 19:12:07.220 INFO - X#run:25 X info (1)
CONSOLE 19:12:07.220 INFO - X#run:25 X info (1)
X 19:12:07.224 WARN - X#run:26 X warn
CONSOLE 19:12:07.224 WARN - X#run:26 X warn
X 19:12:07.225 ERROR - X#run:27 X error
CONSOLE 19:12:07.225 ERROR - X#run:27 X error
X 19:12:07.225 ERROR - X.1#run:27 X.1 error
CONSOLE 19:12:07.225 ERROR - X.1#run:27 X.1 error
X 19:12:07.225 INFO - X.2#run:25 X.2 info
CONSOLE 19:12:07.225 INFO - X.2#run:25 X.2 info
X 19:12:07.225 WARN - X.2#run:26 X.2 warn
CONSOLE 19:12:07.225 WARN - X.2#run:26 X.2 warn
X 19:12:07.226 ERROR - X.2#run:27 X.2 error
CONSOLE 19:12:07.226 ERROR - X.2#run:27 X.2 error
CONSOLE 19:12:07.226 WARN - Y.3#run:26 Y.3 warn (2)
CONSOLE 19:12:07.227 ERROR - Y.3#run:27 Y.3 error (2)
CONSOLE 19:12:07.227 WARN - Y.3.p#run:26 Y.3.p warn
CONSOLE 19:12:07.227 ERROR - Y.3.p#run:27 Y.3.p error
SECURITY 19:12:07.227 TRACE - security#run:23 security trace (3)
SECURITY 19:12:07.227 DEBUG - security#run:24 security debug (3)
SECURITY 19:12:07.227 INFO - security#run:25 security info (3)
SECURITY 19:12:07.228 WARN - security#run:26 security warn (3)
SECURITY 19:12:07.228 ERROR - security#run:27 security error (3)
1 | log messages written to logger X and descendants are written to console and X-appender appenders |
2 | log messages written to logger Y.3 and descendants are written only to console appender |
3 | log messages written to security logger are written only to security appender because of additivity=false |
100. Mapped Diagnostic Context
Thus far, we have been focusing on calls made within the code without much concern about the overall context in which they were made. In a multi-threaded, multi-user environment there is additional context information related to the code making the calls that we may want to keep track of — like userId and transactionId.
SLF4J and the logging implementations support the need for call context information
through the use of
Mapped Diagnostic Context (MDC).
The
MDC class is a essentially a
ThreadLocal
map of strings that are assigned for the
current thread. The values of the MDC are commonly set and cleared in container filters
that fire before and after client calls are executed.
100.1. MDC Example
The following is an example where the run()
method is playing the role of the container filter — setting and clearing the MDC. For this MDC map — I am setting a "user" and "requestId" key
with the current user identity and a value that represents the request. The doWork()
method
is oblivious of the MDC and simply logs the start and end of work.
import org.slf4j.MDC;
...
public class MDCLogger implements CommandLineRunner {
private static final String[] USERS = new String[]{"jim", "joe", "mary"};
private static final SecureRandom r = new SecureRandom();
@Override
public void run(String... args) throws Exception {
for (int i=0; i<3; i++) {
String user = USERS[r.nextInt(USERS.length)];
String requestId = Integer.toString(r.nextInt(99999));
MDC.put("user", user); (1)
MDC.put("requestId", requestId);
doWork();
MDC.clear(); (2)
doWork();
}
}
public void doWork() {
log.info("starting work");
log.info("finished work");
}
}
1 | run() method simulates container filter setting context properties before call executed |
2 | context properties removed after all calls for the context complete |
100.2. MDC Example Pattern
To make use of the new "user" and "requestId" properties of the thread,
we can add the %mdc
(or %X) conversion word to the appender pattern as follows.
#application-mdc.properties
logging.pattern.console=%date{HH:mm:ss.SSS} %-5level [%-9mdc{user:-anonymous}][%5mdc{requestId}] %logger{0} - %msg%n
-
%mdc{user:-anonymous} - the identity of the user making the call or "anonymous" if not supplied
-
%mdc{requestId} - the specific request made or blank if not supplied
100.3. MDC Example Output
The following is an example of running the MDC example. Users are randomly selected and work is performed for both identified and anonymous users. This allows us to track who made the work request and sort out the results of each work request.
$ java -jar target/appconfig-logging-example-*-SNAPSHOT-bootexec.jar --spring.profiles.active=mdc
17:11:59.100 INFO [jim ][61165] MDCLogger - starting work
17:11:59.101 INFO [jim ][61165] MDCLogger - finished work
17:11:59.101 INFO [anonymous][ ] MDCLogger - starting work
17:11:59.101 INFO [anonymous][ ] MDCLogger - finished work
17:11:59.101 INFO [mary ][ 8802] MDCLogger - starting work
17:11:59.101 INFO [mary ][ 8802] MDCLogger - finished work
17:11:59.101 INFO [anonymous][ ] MDCLogger - starting work
17:11:59.101 INFO [anonymous][ ] MDCLogger - finished work
17:11:59.101 INFO [mary ][86993] MDCLogger - starting work
17:11:59.101 INFO [mary ][86993] MDCLogger - finished work
17:11:59.101 INFO [anonymous][ ] MDCLogger - starting work
17:11:59.101 INFO [anonymous][ ] MDCLogger - finished work
Like standard ThreadLocal variables, child threads do not inherit values of parent thread.
Each thread will maintain its own MDC properties.
|
100.4. Clearing MDC Context
We are responsible for setting the MDC context variables as well as clearing them when the work is complete.
-
One way to do that is using a finally block and manually calling MDC.clear()
try { MDC.put("user", user); (1) MDC.put("requestId", requestId); doWork(); } finally { MDC.clear(); }
-
Another is by using a try-with-closable and have the properties automatically cleared when the try block finishes.
try (MDC.MDCCloseable userProp = MDC.putCloseable("user", user); MDC.MDCCloseable reqProp = MDC.putCloseable("requestId", requestId) { doWork(); }
101. Markers
SLF4J and the logging implementations support markers. Unlike MDC data — which quietly sit in the background — markers are optionally supplied on a per-call basis. Markers have two primary uses
-
trigger reporting events to appenders — e.g., flush log, send the e-mail
-
implement additional severity levels — e.g.,
log.warn(FLESH_WOUND,"come back here!")
versuslog.warn(FATAL,"ouch!!!")
[18]
The additional functionality commonly is implemented through the use of
filters assigned to appenders looking for these Markers .
|
To me having triggers initiated by the logging statements does not sound appropriate (but still could be useful). However, when the thought of filtering comes up — I think of cases where we may want to better classify the subject(s) of the statement so that we have more to filter on when configuring appenders. More than once I have been in a situation where adjusting the verbosity of a single logger was not granular enough to provide an ideal result. |
101.1. Marker Class
Markers
have a single property called name and an optional collection of child Markers
.
The name and collection properties allow the parent marker to represent one or more values.
Appender filters test Markers
using the contains()
method to determine if the parent or any
children are the targeted value.
Markers
are obtained through the MarkerFactory
— which caches the Markers
it creates
unless requested to make them detached so they can be uniquely added to separate parents.
101.2. Marker Example
The following simple example issues two log events. The first is without a Marker
and the second with a Marker
that represents the value ALARM
.
import org.slf4j.Marker;
import org.slf4j.MarkerFactory;
...
public class MarkerLogger implements CommandLineRunner {
private static final Marker ALARM = MarkerFactory.getMarker("ALARM"); (1)
@Override
public void run(String... args) throws Exception {
log.warn("non-alarming warning statement"); (2)
log.warn(ALARM,"alarming statement"); (3)
}
}
1 | created single managed marker |
2 | no marker added to logging call |
3 | marker added to logging call to trigger something special about this call |
101.3. Marker Appender Filter Example
The Logback configuration has two appenders. The first appender — alarms
— is meant to
log only log events with an ALARM marker. I have applied the Logback-supplied
EvaluatorFilter
and OnMarkerEvaluator
to eliminate any log events that do not meet
that criteria.
<appender name="alarms" class="ch.qos.logback.core.ConsoleAppender">
<filter class="ch.qos.logback.core.filter.EvaluatorFilter">
<evaluator name="ALARM" class="ch.qos.logback.classic.boolex.OnMarkerEvaluator">
<marker>ALARM</marker>
</evaluator>
<onMatch>ACCEPT</onMatch>
<onMismatch>DENY</onMismatch>
</filter>
<encoder>
<pattern>%red(ALARM>>> ${CONSOLE_LOG_PATTERN})</pattern>
</encoder>
</appender>
The second appender — console — accepts all log events.
<appender name="console" class="ch.qos.logback.core.ConsoleAppender">
<encoder>
<pattern>${CONSOLE_LOG_PATTERN}</pattern>
</encoder>
</appender>
Both appenders are attached to the same root logger — which means that anything logged to the alarm appender will also be logged to the console appender.
<configuration>
<include resource="org/springframework/boot/logging/logback/defaults.xml"/>
...
<root>
<appender-ref ref="console"/>
<appender-ref ref="alarms"/>
</root>
</configuration>
101.4. Marker Example Result
The following shows the results of running the marker example — where both events
are written to the console appender and only the log event with the ALARM
Marker
is written to the alarm appender.
$ java -jar target/appconfig-logging-example-*-SNAPSHOT-bootexec.jar \
--spring.profiles.active=markers
18:06:52.135 WARN [] MarkerLogger - non-alarming warning statement (1)
18:06:52.136 WARN [ALARM] MarkerLogger - alarming statement (1)
ALARM>>> 18:06:52.136 WARN [ALARM] MarkerLogger - alarming statement (2)
1 | non-ALARM and ALARM events are written to the console appender |
2 | ALARM event is also written to alarm appender |
102. File Logging
Each topic and example so far has been demonstrated using the console because it is simple to demonstrate and to try out for yourself. However, once we get into more significant use of our application we are going to need to write this information somewhere to analyze later when necessary.
For that purpose, Spring Boot has a built-in appender ready to go for file logging. It is not active by default but all we have to do is specify the file name or path to trigger its activation.
$ java -jar target/appconfig-logging-example-*-SNAPSHOT-bootexec.jar \
--spring.profiles.active=levels \
--logging.file.name="mylog.log" (1)
$ ls ./mylog.log (2)
./mylog.log
1 | adding this property adds file logging to default configuration |
2 | this expressed logfile will be written to mylog.log in current directory |
102.1. root Logger Appenders
As we saw earlier with appender additivity, multiple appenders can be associated with the same logger (root logger in this case). With the trigger property supplied, a file-based appender is added to the root logger to produce a log file in addition to our console output.

102.2. FILE Appender Output
Under these simple conditions, a file is produced in the current directory with the specified
mylog.log
filename and the following contents.
$ cat mylog.log (1)
2020-03-29 07:14:33.533 INFO 90958 --- [main] i.e.e.a.c.logging.levels.LoggerLevels : info message
2020-03-29 07:14:33.542 WARN 90958 --- [main] i.e.e.a.c.logging.levels.LoggerLevels : warn message
2020-03-29 07:14:33.542 ERROR 90958 --- [main] i.e.e.a.c.logging.levels.LoggerLevels : error message
1 | written to file specified by logging.file property |
The file and parent directories will be created if they do not exist. The default definition of the appender will append to an existing file if it already exists. Therefore — if we run the example a second time we get a second set of messages in the file.
$ cat mylog.log
2020-03-29 07:14:33.533 INFO 90958 --- [main] i.e.e.a.c.logging.levels.LoggerLevels : info message
2020-03-29 07:14:33.542 WARN 90958 --- [main] i.e.e.a.c.logging.levels.LoggerLevels : warn message
2020-03-29 07:14:33.542 ERROR 90958 --- [main] i.e.e.a.c.logging.levels.LoggerLevels : error message
2020-03-29 07:15:00.338 INFO 91090 --- [main] i.e.e.a.c.logging.levels.LoggerLevels : info message (1)
2020-03-29 07:15:00.342 WARN 91090 --- [main] i.e.e.a.c.logging.levels.LoggerLevels : warn message
2020-03-29 07:15:00.342 ERROR 91090 --- [main] i.e.e.a.c.logging.levels.LoggerLevels : error message
1 | messages from second execution appended to same log |
102.3. Spring Boot FILE Appender Definition
If we take a look at the definition for
Spring Boot’s Logback FILE Appender, we can see that it is a
Logback RollingFileAppender
with a
Logback SizeAndTimeBasedRollingPolicy
.
<appender name="FILE"
class="ch.qos.logback.core.rolling.RollingFileAppender"> (1)
<filter class="ch.qos.logback.classic.filter.ThresholdFilter">
<level>${FILE_LOG_THRESHOLD}</level>
</filter>
<encoder>
<pattern>${FILE_LOG_PATTERN}</pattern>
<charset>${FILE_LOG_CHARSET}</charset>
</encoder>
<file>${LOG_FILE}</file>
<rollingPolicy class="ch.qos.logback.core.rolling.SizeAndTimeBasedRollingPolicy"> (2)
<fileNamePattern>${LOGBACK_ROLLINGPOLICY_FILE_NAME_PATTERN:-${LOG_FILE}.%d{yyyy-MM-dd}.%i.gz}</fileNamePattern>
<cleanHistoryOnStart>${LOGBACK_ROLLINGPOLICY_CLEAN_HISTORY_ON_START:-false}</cleanHistoryOnStart>
<maxFileSize>${LOGBACK_ROLLINGPOLICY_MAX_FILE_SIZE:-10MB}</maxFileSize>
<totalSizeCap>${LOGBACK_ROLLINGPOLICY_TOTAL_SIZE_CAP:-0}</totalSizeCap>
<maxHistory>${LOGBACK_ROLLINGPOLICY_MAX_HISTORY:-7}</maxHistory>
</rollingPolicy>
</appender>
1 | performs file rollover functionality based on configured policy |
2 | specifies policy and policy configuration to use |
102.4. RollingFileAppender
The Logback RollingFileAppender will:
-
write log messages to a specified file — and at some point, switch to writing to a different file
-
use a triggering policy to determine the point in which to switch files (i.e., "when it will occur")
-
use a rolling policy to determine how the file switchover will occur (i.e., "what will occur")
-
use a single policy for both if the rolling policy implements both policy interfaces
-
use file append mode by default
The rollover settings/state is evaluated no sooner than once a minute. If you set the maximum sizes to small amounts and log quickly for test/demonstration purposes, you will exceed your defined size limits until the recheck timeout has expired. |
102.5. SizeAndTimeBasedRollingPolicy
The Logback SizeAndTimeBasedRollingPolicy will:
-
trigger a file switch when the current file reaches a maximum size
-
trigger a file switch when the granularity of the primary date (%d) pattern in the file path/name would rollover to a new value
-
supply a name for the old/historical file using a mandatory date (%d) pattern and index (%i)
-
define a maximum number of historical files to retain
-
define a total size to allocate to current and historical files
102.7. logging.file.path
If we specify only the logging.file.path
, the filename will default to spring.log
and will be written to the directory path we supply.
$ java -jar target/appconfig-logging-example-*-SNAPSHOT-bootexec.jar \
--logging.file.path=target/logs (1)
...
$ ls target/logs (2)
spring.log
1 | specifying logging.file.path as target/logs |
2 | produces a spring.log in that directory |
102.8. logging.file.name
If we specify only the logging.file.name
, the file will be written to the filename
and directory we explicitly supply.
$ java -jar target/appconfig-logging-example-*-SNAPSHOT-bootexec.jar \
--logging.file.name=target/logs/mylog.log (1)
...
$ ls target/logs (2)
mylog.log
1 | specifying a logging.file.name |
2 | produces a logfile with that path and name |
102.9. logging.logback.rollingpolicy.max-file-size Trigger
One trigger for changing over to the next file is logging.logback.rollingpolicy.max-file-size
.
Note this property is Logback-specific.
The condition is satisfied when the current logfile reaches this value. The default is 10MB.
The following example changes that to 9400 Bytes. Once each instance of logging.file.name
reached the logging.logback.rollingpolicy.max-file-size
, it is compressed and moved to a filename with the pattern from logging.pattern.rolling-file-name
.
I picked 9400 Bytes based on the fact the application wrote 4800 Bytes each minute.
The file size would be evaluated each minute and exceed the limit every 2 minutes.
Notice the uncompressed, archived files are at least 9400 Bytes and 2 minutes apart.
Evaluation is no more often than 1 minute. |
java -jar target/appconfig-logging-example-*-SNAPSHOT-bootexec.jar \
--spring.profiles.active=rollover \
--logging.file.name=target/logs/mylog.log \
--logging.pattern.rolling-file-name='${logging.file.name}.%d{yyyy-MM-dd}.%i.log' \
--logging.logback.rollingpolicy.max-file-size=9400B (1)
...
ls -ltrh target/logs/
-rw-r--r-- 1 jim staff 9.4K Aug 9 11:29 mylog.log.2024-08-09.0.log (3)
-rw-r--r-- 1 jim staff 9.5K Aug 9 11:31 mylog.log.2024-08-09.1.log (2)
-rw-r--r-- 1 jim staff 1.6K Aug 9 11:31 mylog.log (1)
1 | logging.logback.rollingpolicy.max-file-size limits the size of the current logfile |
2 | historical logfiles renamed according to logging.pattern.rolling-file-name pattern |
3 | file size is evaluated each minute and archived when satisfied |
102.10. logging.pattern.rolling-file-name
There are several aspects of logging.pattern.rolling-file-name
to be aware of
-
%d
timestamp pattern and%i
index are required. The FILE appender will either be disabled (for%i
) or the application startup will fail (for%d
) if not specified -
the timestamp pattern directly impacts changeover when there is a value change in the result of applying the timestamp pattern. Many of my examples here use a pattern that includes
HH:mm:ss
just for demonstration purposes. A more common pattern would be by date only. -
the index is used when the
logging.logback.rollingpolicy.max-file-size
triggers the changeover and we already have a historical name with the same timestamp. -
the number of historical files is throttled using
logging.logback.rollingpolicy.max-history
only when index is used and not when file changeover is due tologging.logback.rollingpolicy.max-file-size
-
the historical file will be compressed if
gz
is specified as the suffix
102.11. Timestamp Rollover Example
The following example shows the file changeover occurring because the evaluation of
the %d
template expression within logging.pattern.rolling-file-name
changing.
The historical file is left uncompressed because the
logging.pattern.rolling-file-name
does not end in gz
.
$ java -jar target/appconfig-logging-example-*-SNAPSHOT-bootexec.jar \
--spring.profiles.active=rollover \
--logging.file.name=target/logs/mylog.log \
--logging.pattern.rolling-file-name='${logging.file.name}.%d{yyyy-MM-dd-HH:mm:ss}.%i'.log (1)
...
$ ls -ltrh target/logs
total 64
-rw-r--r-- 1 jim staff 79B Aug 9 12:04 mylog.log.2024-08-09-12:04:54.0.log
-rw-r--r-- 1 jim staff 79B Aug 9 12:04 mylog.log.2024-08-09-12:04:55.0.log
-rw-r--r-- 1 jim staff 79B Aug 9 12:04 mylog.log.2024-08-09-12:04:56.0.log
-rw-r--r-- 1 jim staff 79B Aug 9 12:04 mylog.log.2024-08-09-12:04:57.0.log
-rw-r--r-- 1 jim staff 79B Aug 9 12:04 mylog.log.2024-08-09-12:04:58.0.log
-rw-r--r-- 1 jim staff 79B Aug 9 12:04 mylog.log.2024-08-09-12:04:59.0.log
-rw-r--r-- 1 jim staff 79B Aug 9 12:05 mylog.log.2024-08-09-12:05:00.0.log
-rw-r--r-- 1 jim staff 79B Aug 9 12:05 mylog.log
$ file target/logs/mylog.log.2024-08-09-12\:04\:54.0.log (2)
target/logs/mylog.log.2024-08-09-12:04:54.0.log: ASCII text
1 | logging.pattern.rolling-file-name pattern triggers changeover at the seconds boundary |
2 | historical logfiles are left uncompressed because of .log name suffix specified |
Using a date pattern to include minutes and seconds is just for demonstration and learning purposes. Most patterns would be daily. |
102.12. History Compression Example
The following example is similar to the previous one with the exception that the
logging.pattern.rolling-file-name
ends in gz
— triggering the historical file
to be compressed.
$ java -jar target/appconfig-logging-example-*-SNAPSHOT-bootexec.jar \
--spring.profiles.active=rollover \
--logging.file.name=target/logs/mylog.log \
--logging.pattern.rolling-file-name='${logging.file.name}.%d{yyyy-MM-dd-HH:mm}.%i'.gz (1)
...
$ ls -ltrh target/logs
total 48
-rw-r--r-- 1 jim staff 193B Aug 9 13:39 mylog.log.2024-08-09-13:38.0.gz (1)
-rw-r--r-- 1 jim staff 534B Aug 9 13:40 mylog.log.2024-08-09-13:39.0.gz
-rw-r--r-- 1 jim staff 540B Aug 9 13:41 mylog.log.2024-08-09-13:40.0.gz
-rw-r--r-- 1 jim staff 528B Aug 9 13:42 mylog.log.2024-08-09-13:41.0.gz
-rw-r--r-- 1 jim staff 539B Aug 9 13:43 mylog.log.2024-08-09-13:42.0.gz
-rw-r--r-- 1 jim staff 1.7K Aug 9 13:43 mylog.log
$ file target/logs/mylog.log.2024-08-09-13\:38.0.gz
target/logs/mylog.log.2024-08-09-13:38.0.gz: gzip compressed data, original size modulo 2^32 1030
1 | historical logfiles are compressed when pattern uses a .gz suffix |
102.13. logging.logback.rollingpolicy.max-history Example
logging.logback.rollingpolicy.max-history
will constrain the number of files created for independent timestamps. In the example below, I constrained the limit to 2.
Note that the logging.logback.rollingpolicy.max-history
property does not seem to apply to files terminated because of size. For that, we can use logging.file.total-size-cap
.
$ java -jar target/appconfig-logging-example-*-SNAPSHOT-bootexec.jar \
--spring.profiles.active=rollover \
--logging.file.name=target/logs/mylog.log \
--logging.pattern.rolling-file-name='${logging.file.name}.%d{yyyy-MM-dd-HH:mm:ss}.%i'.log \ --logging.logback.rollingpolicy.max-history=2
...
$ ls -ltrh target/logs
total 24
-rw-r--r-- 1 jim staff 80B Aug 9 12:15 mylog.log.2024-08-09-12:15:31.0.log (1)
-rw-r--r-- 1 jim staff 80B Aug 9 12:15 mylog.log.2024-08-09-12:15:32.0.log (1)
-rw-r--r-- 1 jim staff 80B Aug 9 12:15 mylog.log
1 | specifying logging.logback.rollingpolicy.max-history limited number of historical logfiles.
Oldest files exceeding the criteria are deleted. |
102.14. logging.logback.rollingpolicy.total-size-cap Index Example
The following example triggers file changeover every 1000 Bytes and makes use of the index because we encounter multiple changes per timestamp pattern.
The files are aged-off at the point where total size for all logs reaches logging.logback.rollingpolicy.total-size-cap
.
Thus historical files with indexes 1 thru 9 have been deleted at this point in time in order to stay below the file size limit.
$ java -jar target/appconfig-logging-example-*-SNAPSHOT-bootexec.jar \
--spring.profiles.active=rollover \
--logging.file.name=target/logs/mylog.log \
--logging.logback.rollingpolicy.max-file-size=1000 \
--logging.pattern.rolling-file-name='${logging.file.name}.%d{yyyy-MM-dd}.%i'.log \
--logging.logback.rollingpolicy.total-size-cap=10000 (1)
...
$ ls -ltr target/logs
total 40 (2)
-rw-r--r-- 1 jim staff 4.7K Aug 9 12:37 mylog.log.2024-08-09.10.log (1)
-rw-r--r-- 1 jim staff 4.7K Aug 9 12:38 mylog.log.2024-08-09.11.log (1)
-rw-r--r-- 1 jim staff 2.7K Aug 9 12:39 mylog.log (1)
1 | logging.logback.rollingpolicy.total-size-cap constrains current plus historical files retained |
2 | historical files with indexes 1 thru 9 were deleted to stay below file size limit |
102.15. logging.logback.rollingpolicy.total-size-cap no Index Example
The following example triggers file changeover every second and makes no use of the index because the timestamp pattern is so granular that max-size
is not reached before the timestamp changes the base.
As with the previous example, the files are also aged-off when the total byte count reaches logging.logback.rollingpolicy.total-size-cap
.
$ java -jar target/appconfig-logging-example-*-SNAPSHOT-bootexec.jar \
--spring.profiles.active=rollover \
--logging.file.name=target/logs/mylog.log \
--logging.logback.rollingpolicy.max-file-size=100 \
--logging.pattern.rolling-file-name='${logging.file.name}.%d{yyyy-MM-dd-HH:mm:ss}.%i'.log \
--logging.logback.rollingpolicy.max-history=200 \
--logging.logback.rollingpolicy.total-size-cap=500 (1)
...
$ ls -ltrh target/logs
total 56
-rw-r--r-- 1 jim staff 79B Aug 9 12:44 mylog.log.2024-08-09-12:44:33.0.log (1)
-rw-r--r-- 1 jim staff 79B Aug 9 12:44 mylog.log.2024-08-09-12:44:34.0.log (1)
-rw-r--r-- 1 jim staff 79B Aug 9 12:44 mylog.log.2024-08-09-12:44:35.0.log (1)
-rw-r--r-- 1 jim staff 79B Aug 9 12:44 mylog.log.2024-08-09-12:44:36.0.log (1)
-rw-r--r-- 1 jim staff 79B Aug 9 12:44 mylog.log.2024-08-09-12:44:37.0.log (1)
-rw-r--r-- 1 jim staff 79B Aug 9 12:44 mylog.log.2024-08-09-12:44:38.0.log (1)
-rw-r--r-- 1 jim staff 80B Aug 9 12:44 mylog.log (1)
1 | logging.logback.rollingpolicy.total-size-cap constrains current plus historical files retained |
The logging.logback.rollingpolicy.total-size-cap value — if specified — must be larger than the logging.logback.rollingpolicy.max-file-size constraint.
Otherwise the file appender will not be activated.
|
103. Custom Configurations
At this point, you should have a good foundation in logging and how to get started with a decent logging capability and understand how the default configuration can be modified for your immediate and profile-based circumstances. For cases when this is not enough, know that:
-
detailed XML Logback and Log4J2 configurations can be specified — which allows the definition of loggers, appenders, filters, etc. of nearly unlimited power
-
Spring Boot provides include files that can be used as a starting point for defining the custom configurations without giving up most of what Spring Boot defines for the default configuration
103.2. Provided Logback Includes
-
defaults.xml - defines the logging configuration defaults we have been working with
-
base.xml - defines root logger with CONSOLE and FILE appenders we have discussed
-
puts you at the point of the out-of-the-box configuration
-
-
console-appender.xml - defines the
CONSOLE
appender we have been working with-
uses the
CONSOLE_LOG_PATTERN
-
-
file-appender.xml - defines the
FILE
appender we have been working with-
uses the
RollingFileAppender
withFILE_LOG_PATTERN
andSizeAndTimeBasedRollingPolicy
-
These files provide an XML representation of what Spring Boot configures with straight Java code. There are minor differences (e.g., enable/disable FILE Appender) between using the supplied XML files and using the out-of-the-box defaults. |
103.3. Customization Example: Turn off Console Logging
The following is an example custom configuration where we wish to turn off console logging and only rely on the logfiles. This result is essentially a copy/edit of the supplied base.xml.
<!-- logging-configs/no-console/logback-spring.xml (1)
Example Logback configuration file to turn off CONSOLE Appender and retain all other
FILE Appender default behavior.
-->
<configuration>
<include resource="org/springframework/boot/logging/logback/defaults.xml"/> (2)
<property name="LOG_FILE" value="${LOG_FILE:-${LOG_PATH:-${LOG_TEMP:-${java.io.tmpdir:-/tmp}}}/spring.log}"/> (3)
<include resource="org/springframework/boot/logging/logback/file-appender.xml"/> (4)
<root>
<appender-ref ref="FILE"/> (5)
</root>
</configuration>
1 | a logback-spring.xml file has been created to host the custom configuration |
2 | the standard Spring Boot defaults are included |
3 | LOG_FILE defined using the original expression from Spring Boot base.xml |
4 | the standard Spring Boot FILE appender is included |
5 | only the FILE appender is assigned to our logger(s) |
103.4. LOG_FILE Property Definition
The only complicated part is what I copy/pasted from base.xml to express the LOG_FILE
property used by the included FILE appender:
<property name="LOG_FILE"
value="${LOG_FILE:-${LOG_PATH:-${LOG_TEMP:-${java.io.tmpdir:-/tmp}}}/spring.log}"/>
-
use the value of
${LOG_FILE}
if that is defined -
otherwise use the filename
spring.log
and for the path-
use
${LOG_PATH}
if that is defined -
otherwise use
${LOG_TEMP}
if that is defined -
otherwise use
${java.io.tmpdir}
if that is defined -
otherwise use
/tmp
-
103.5. Customization Example: Leverage Restored Defaults
Our first execution uses all defaults and is written to ${java.io.tmpdir}/spring.log
java -jar target/appconfig-logging-example-*-SNAPSHOT-bootexec.jar \
--logging.config=src/main/resources/logging-configs/no-console/logback-spring.xml
(no console output)
$ ls -ltr $TMPDIR/spring.log (1)
-rw-r--r-- 1 jim staff 67238 Apr 2 06:42 /var/folders/zm/cskr47zn0yjd0zwkn870y5sc0000gn/T//spring.log
1 | logfile written to restored default ${java.io.tmpdir}/spring.log |
103.6. Customization Example: Provide Override
Our second execution specified an override for the logfile to use. This is expressed exactly as we did earlier with the default configuration.
java -jar target/appconfig-logging-example-*-SNAPSHOT-bootexec.jar \
--logging.config=src/main/resources/logging-configs/no-console/logback-spring.xml \
--logging.file.name="target/logs/mylog.log" (2)
(no console output)
$ ls -ltr target/logs (1)
total 136
-rw-r--r-- 1 jim staff 67236 Apr 2 06:46 mylog.log (1)
1 | logfile written to target/logs/mylog.log |
2 | defined using logging.file.name |
104. Spring Profiles
Spring Boot extends the logback.xml capabilities to allow us to easily
take advantage of profiles. Any of the elements within the configuration file
can be wrapped in a springProfile
element to make their activation depend
on the profile value.
<springProfile name="appenders"> (1)
<logger name="X">
<appender-ref ref="X-appender"/>
</logger>
<!-- this logger starts a new tree of appenders, nothing gets written to root logger -->
<logger name="security" additivity="false">
<appender-ref ref="security-appender"/>
</logger>
</springProfile>
1 | elements are activated when appenders profile is activated |
See Profile-Specific Configuration for more examples involving multiple profile names and boolean operations.
105. Summary
In this module we:
-
made a case for the value of logging
-
demonstrated how logging frameworks are much better than
System.out
logging techniques -
discussed the different interface, adapter, and implementation libraries involved with Spring Boot logging
-
learned how the interface of the logging framework is separate from the implementation
-
learned to log information at different severity levels using loggers
-
learned how to write logging statements that can be efficiently executed when disabled
-
learned how to establish a hierarchy of loggers
-
learned how to configure appenders and associate with loggers
-
learned how to configure pattern layouts
-
learned how to configure the FILE Appender
-
looked at additional topics like Mapped Data Context (MDC) and Markers that can augment standard logging events
We covered the basics in great detail so that you understood the logging framework, what kinds of things are available to you, how it was doing its job, and how it could be configured. However, we still did not cover everything. For example, we left topics like accessing and viewing logs within a distributed environment, structured appender formatters (e.g., JSON), etc.. It is important for you to know that this lesson placed you at a point where those logging extensions can be implemented by you in a straight forward manner.
Testing
copyright © 2025 jim stafford (jim.stafford@jhu.edu)
106. Introduction
106.1. Why Do We Test?
-
demonstrate capability?
-
verify/validate correctness?
-
find bugs?
-
aid design?
-
more …?
There are many great reasons to incorporate software testing into the application lifecycle. There is no time too early to start.
106.2. What are Test Levels?
-
Unit Testing - verifies a specific area of code
-
Integration Testing - any type of testing focusing on interface between components
-
System Testing — tests involving the complete system
-
Acceptance Testing — normally conducted as part of a contract sign-off
It would be easy to say that our focus in this lesson will be on unit and integration testing. However, there are some aspects of system and acceptance testing that are applicable as well.
106.3. What are some Approaches to Testing?
-
Static Analysis — code reviews, syntax checkers
-
Dynamic Analysis — takes place while code is running
-
White-box Testing — makes use of an internal perspective
-
Black-box Testing — makes use of only what the item is required to do
-
Many more …
In this lesson we will focus on dynamic analysis testing using both black-box interface contract testing and white-box implementation and collaboration testing.
106.4. Goals
The student will learn:
-
to understand the testing frameworks bundled within Spring Boot Test Starter
-
to leverage test cases and test methods to automate tests performed
-
to leverage assertions to verify correctness
-
to integrate mocks into test cases
-
to implement unit integration tests within Spring Boot
-
to express tests using Behavior-Driven Development (BDD) acceptance test keywords
-
to automate the execution of tests using Maven
-
to augment and/or replace components used in a unit integration test
106.5. Objectives
At the conclusion of this lecture and related exercises, the student will be able to:
-
write a test case and assertions using "Vintage" JUnit 4 constructs
-
write a test case and assertions using JUnit 5 "Jupiter" constructs
-
leverage alternate (JUnit, Hamcrest, AssertJ, etc.) assertion libraries
-
implement a mock (using Mockito) into a JUnit unit test
-
define custom behavior for a mock
-
capture and inspect calls made to mocks by subjects under test
-
-
implement BDD acceptance test keywords into Mockito & AssertJ-based tests
-
implement unit integration tests using a Spring context
-
implement (Mockito) mocks in Spring context for unit integration tests
-
augment and/or override Spring context components using
@TestConfiguration
-
execute tests using Maven Surefire plugin
-
group tests into Suites for grouping or setup/teardown efficiency
107. Test Constructs
At the heart of testing, we want to
|
![]() Figure 24. Basic Test Concepts
|
Subjects can vary in scope depending on the type of our test. Unit testing will have class and method-level subjects. Integration tests can span multiple classes/components — whether vertically (e.g., front-end request to database) or horizontally (e.g., peers).
107.1. Automated Test Terminology
Unfortunately, you will see the terms "unit" and "integration" used differently as we go through the testing topics and span tooling. There is a conceptual way of thinking of testing and a technical way of how to manage testing to be concerned with when seeing these terms used:
Conceptual - At a conceptual level, we simply think of unit tests dealing with one subject at a time and involve varying levels of simulation around them in order to test that subject. We conceptually think of integration tests at the point where multiple real components are brought together to form the overall set of subjects — whether that be vertical (e.g., to the database and back) or horizontal (e.g., peer interactions) in nature.
Test Management - At a test management level, we have to worry about what it takes to spin up and shutdown resources to conduct our testing. Build systems like Maven refer to unit tests as anything that can be performed within a single JVM and integration tests as tests that require managing external resources (e.g., start/stop web server). Maven runs these tests in different phases — executing unit tests first with the Surefire plugin and integration tests last with the Failsafe plugin.
107.2. Maven Test Types
Maven runs these tests in different phases — executing unit tests first with the Surefire plugin and integration tests last with the Failsafe plugin. By default, Surefire will locate unit tests starting with "Test" or ending with "Test", "Tests", or "TestCase". Failsafe will locate integration tests starting with "IT" or ending with "IT" or "ITCase".
107.3. Test Naming Conventions
Neither tools like JUnit or the IDEs care how are classes are named. However, since our goal is to eventually check these tests in with our source code and run them in an automated manner — we will have to pay early attention to Maven Surefire and Failsafe naming rules while we also address the conceptual aspects of testing.
107.4. Lecture Test Naming Conventions
I will try to use the following terms to mean the following:
-
Unit Test - conceptual unit test focused on a limited subject and will use the suffix "Test". These will generally be run without a Spring context and will be picked up by Maven Surefire.
-
Unit Integration Test - conceptual integration test (vertical or horizontal) runnable within a single JVM and will use the suffix "NTest". This will be picked up by Maven Surefire and will likely involve a Spring context.
-
External Integration Test - conceptual integration test (vertical or horizontal) requiring external resource management and will use the suffix "IT". This will be picked up by Maven Failsafe. These will always have Spring context(s) running in one or more JVMs. These will sometimes be termed as "Maven (Heavyweight) Integration Tests" or "(Heavyweight) Failsafe Integration Tests".
That means to not be surprised to see a conceptual integration test bringing multiple real components together to be executed during the Maven Surefire test phase if we can perform this testing without the resource management of external processes.
108. Spring Boot Starter Test Frameworks
We want to automate tests as much as possible and can do that with many of the
Spring Boot testing options made available using the spring-boot-starter-test
dependency. This single dependency defines transitive dependencies on several powerful,
state of the art as well as legacy, testing frameworks.
These dependencies are only used during builds and not
in production — so we assign a scope of test
to this dependency.
<dependency>
<groupId>org.springframework.boot</groupId>
<artifactId>spring-boot-starter-test</artifactId>
<scope>test</scope> (1)
</dependency>
1 | dependency scope is test since these dependencies are not required to run outside of build environment |
108.1. Spring Boot Starter Transitive Dependencies
If we take a look at the transitive dependencies brought in by spring-boot-test-starter
, we see
a wide array of choices pre-integrated.
[INFO] +- org.springframework.boot:spring-boot-starter-test:jar:3.5.5:test
[INFO] | +- org.springframework.boot:spring-boot-test:jar:3.5.5:test
[INFO] | +- org.springframework.boot:spring-boot-test-autoconfigure:jar:3.5.5:test
[INFO] | +- org.springframework:spring-test:jar:6.2.10:test
[INFO] | +- org.junit.jupiter:junit-jupiter:jar:5.12.2:test
[INFO] | | +- org.junit.jupiter:junit-jupiter-api:jar:5.12.2:test
[INFO] | | +- org.junit.jupiter:junit-jupiter-params:jar:5.12.2:test
[INFO] | | \- org.junit.jupiter:junit-jupiter-engine:jar:5.12.2:test
[INFO] | +- org.mockito:mockito-core:jar:5.17.0:test
[INFO] | | +- net.bytebuddy:byte-buddy-agent:jar:1.17.7:test
[INFO] | | \- org.objenesis:objenesis:jar:3.3:test
[INFO] | +- org.mockito:mockito-junit-jupiter:jar:5.17.0:test
[INFO] | +- org.assertj:assertj-core:jar:3.27.4:test
[INFO] | +- com.jayway.jsonpath:json-path:jar:2.9.0:test
[INFO] | +- org.skyscreamer:jsonassert:jar:1.5.3:test
[INFO] | \- org.xmlunit:xmlunit-core:jar:2.10.3:test
[INFO] | +- org.hamcrest:hamcrest:jar:3.0:test
[INFO] | +- org.hamcrest:hamcrest-core:jar:3.0:test
[INFO] \- org.junit.vintage:junit-vintage-engine:jar:5.12.2:test
[INFO] +- junit:junit:jar:4.13.2:test
[INFO] +- org.junit.platform:junit-platform-engine:jar:1.12.2:test
[INFO] | +- org.junit.platform:junit-platform-commons:jar:1.12.2:test
...
108.2. Transitive Dependency Test Tools
At a high level:
-
spring-boot-test-autoconfigure
- contains many auto-configuration classes that detect test conditions and configure common resources for use in a test mode -
junit
- required to run the JUnit tests -
hamcrest
- required to implement Hamcrest test assertions -
assertj
- required to implement AssertJ test assertions -
mockito
- required to implement Mockito mocks -
jsonassert
- required to write flexible assertions for JSON data -
jsonpath
- used to express paths within JSON structures -
xmlunit
- required to write flexible assertions for XML data
In the rest of this lesson, I will be describing how JUnit, the assertion libraries, Mockito and Spring Boot play a significant role in unit and integration testing.
109. JUnit Background
JUnit is a test framework that has been around for many years (I found first commit in git from Dec 3, 2000). The test framework was originated by Kent Beck and Erich Gamma during a plane ride they shared in 1997. Its basic structure is centered around:
|
![]() Figure 25. Basic JUnit Test Framework Constructs
|
These constructs have gone through evolutionary changes in Java — to include annotations in Java 5 and lamda functions in Java 8 — which have provided substantial API changes in Java frameworks.
-
annotations added in Java 5 permitted frameworks to move away from inheritance-based approaches — with specifically named methods (JUnit 3.8) and to leverage annotations added to classes and methods (JUnit 4)
|
|
-
lamda functions (JUnit 5/Jupiter) added in Java 8 permit the flexible expression of code blocks that can extend the behavior of provided functionality without requiring verbose subclassing
JUnit 4/Vintage Assertions
|
JUnit 5/Jupiter Lambda Assertions
|
109.1. JUnit 5 Evolution
The success and simplicity of JUnit 4 made it hard to incorporate new features. JUnit 4 was a single module/JAR and everything that used JUnit leveraged that single jar.

109.2. JUnit 5 Areas
The next iteration of JUnit involved a total rewrite — that separated the overall project into three (3) modules.
|
![]() Figure 27. JUnit 5 Modularization
|
The name Jupiter was selected because it is the 5th planet from the Sun |
109.3. JUnit 5 Module JARs
The JUnit 5 modules have several JARs within them that separate interface from implementation — ultimately decoupling the test code from the core engine.

110. Syntax Basics
Before getting too deep into testing, I think it is a good idea to make a very shallow pass at the technical stack we will be leveraging.
-
JUnit
-
Mockito
-
Spring Boot
Each of the example tests that follow can be run within the IDE at the method, class, and parent java package level. The specifics of each IDE will not be addressed here but I will cover some Maven details once we have a few tests defined.
111. JUnit Vintage Basics
It is highly likely that projects will have JUnit 4-based tests around for a significant
amount of time without good reason to update them — because we do not have to.
There is full backwards-compatibility support within JUnit 5 and the specific libraries
to enable that are automatically included by spring-boot-starter-test
.
The following example shows a basic JUnit example using the Vintage syntax.
111.2. JUnit Vintage Example Test Methods
@Test(expected = IllegalArgumentException.class)
public void two_plus_two() {
log.info("2+2=4");
assertEquals(4,2+2);
throw new IllegalArgumentException("just demonstrating expected exception");
}
@Test
public void one_and_one() {
log.info("1+1=2");
assertTrue("problem with 1+1", 1+1==2);
assertEquals(String.format("problem with %d+%d",1,1), 2, 1+1);
}
-
@Test - a public instance method where subjects are invoked and result assertions are made
-
exceptions can be asserted at overall method level — but not at a specific point in the method and exception itself cannot be inspected without switching to a manual try/catch technique
-
asserts can be augmented with a String message in the first position
-
the expense of building String message is always paid whether needed or not
assertEquals(String.format("problem with %d+%d",1,1), 2, 1+1);
-
Vintage requires the class and methods have public access. |
111.3. JUnit Vintage Basic Syntax Example Output
The following example output shows the lifecycle of the setup and teardown methods combined with two test methods. Note that:
-
the static @BeforeClass and @AfterClass methods are run once
-
the instance @Before and @After methods are run for each test
16:35:42.293 INFO ...testing.testbasics.vintage.ExampleJUnit4Test - setUpClass (1)
16:35:42.297 INFO ...testing.testbasics.vintage.ExampleJUnit4Test - setUp (2)
16:35:42.297 INFO ...testing.testbasics.vintage.ExampleJUnit4Test - 2+2=4
16:35:42.297 INFO ...testing.testbasics.vintage.ExampleJUnit4Test - tearDown (2)
16:35:42.299 INFO ...testing.testbasics.vintage.ExampleJUnit4Test - setUp (2)
16:35:42.300 INFO ...testing.testbasics.vintage.ExampleJUnit4Test - 1+1=2
16:35:42.300 INFO ...testing.testbasics.vintage.ExampleJUnit4Test - tearDown (2)
16:35:42.300 INFO ...testing.testbasics.vintage.ExampleJUnit4Test - tearDownClass (1)
1 | @BeforeClass and @AfterClass called once per test class |
2 | @Before and @After executed for each @Test |
Not demonstrated — a new instance of the test class is instantiated for each test. No object state is retained from test to test without the manual use of static variables. |
JUnit Vintage provides no construct to dictate repeatable ordering of test methods within a class — thus making it hard to use test cases to depict lengthy, deterministically ordered scenarios. |
112. JUnit Jupiter Basics
To simply change-over from Vintage to Jupiter syntax, there are a few minor changes.
-
annotations and assertions have changed packages from
org.junit
toorg.junit.jupiter.api
-
lifecycle annotations have changed names
-
assertions have changed the order of optional arguments
-
exceptions can now be explicitly tested and inspected within the test method body
Vintage no longer requires classes or methods to be public. Anything non-private should work. |
112.2. JUnit Jupiter Example Test Methods
@Test
void two_plus_two() {
log.info("2+2=4");
assertEquals(4,2+2);
Exception ex=assertThrows(IllegalArgumentException.class, () ->{
throw new IllegalArgumentException("just demonstrating expected exception");
});
assertTrue(ex.getMessage().startsWith("just demo"));
}
@Test
void one_and_one() {
log.info("1+1=2");
assertTrue(1+1==2, "problem with 1+1");
assertEquals(2, 1+1, ()->String.format("problem with %d+%d",1,1));
}
-
@Test - a instance method where assertions are made
-
exceptions can now be explicitly tested at a specific point in the test method — permitting details of the exception to also be inspected
-
asserts can be augmented with a String message in the last position
-
this is a breaking change from Vintage syntax
-
the expense of building complex String messages can be deferred to a lambda function
assertEquals(2, 1+1, ()→String.format("problem with %d+%d",1,1));
-
112.3. JUnit Jupiter Basic Syntax Example Output
The following example output shows the lifecycle of the setup/teardown methods combined with two test methods. The default logger formatting added the new lines in between tests.
16:53:44.852 INFO ...testing.testbasics.jupiter.ExampleJUnit5Test - setUpClass (1)
(3)
16:53:44.866 INFO ...testing.testbasics.jupiter.ExampleJUnit5Test - setUp (2)
16:53:44.869 INFO ...testing.testbasics.jupiter.ExampleJUnit5Test - 2+2=4
16:53:44.874 INFO ...testing.testbasics.jupiter.ExampleJUnit5Test - tearDown (2)
(3)
16:53:44.879 INFO ...testing.testbasics.jupiter.ExampleJUnit5Test - setUp (2)
16:53:44.880 INFO ...testing.testbasics.jupiter.ExampleJUnit5Test - 1+1=2
16:53:44.881 INFO ...testing.testbasics.jupiter.ExampleJUnit5Test - tearDown (2)
(3)
16:53:44.883 INFO ...testing.testbasics.jupiter.ExampleJUnit5Test - tearDownClass (1)
1 | @BeforeAll and @AfterAll called once per test class |
2 | @Before and @After executed for each @Test |
3 | The default IDE logger formatting added the new lines in between tests |
Not demonstrated — we have the default option to have a new instance per test like Vintage or same instance for all tests and a defined test method order — which allows for lengthy scenario tests to be broken into increments. See @TestInstance annotation and TestInstance.Lifecycle enum for details. |
113. JUnit Jupiter Test Case Adjustments
113.1. Test Instance
State used by tests can be expensive to create or outside the scope of individual tests.
JUnit allows this state to be initialized and shared between test methods using one of two test instance techniques using the @TestInstance
annotation.
113.1.1. Shared Static State - PER_METHOD
The default test instance is PER_METHOD
.
With this option, the instance of the class is torn down and re-instantiated between each test.
We must declare any shared state as static
to have it live during the lifecycle of all instance methods.
The @BeforeAll
and @AfterAll
methods that initialize and tear down this data must be declared static when using PER_METHOD
.
@TestInstance(TestInstance.Lifecycle.PER_METHOD) //the default (1)
class StaticShared {
private static int staticState; (2)
@BeforeAll
static void init() { (3)
log.info("state={}", staticState++);
}
@Test
void testA() { log.info("state={}", staticState); } (4)
@Test
void testB() { log.info("state={}", staticState); }
1 | test case class is instantiated per method |
2 | any shared state must be declared private |
3 | @BeforeAll and @AfterAll methods must be declared static |
4 | @Test methods are normal instance methods with access to the static state |
113.2. Shared Instance State - PER_CLASS
There are often times during an integration test where shared state (e.g., injected components) is only available once the test case is instantiated.
We can make instance state sharable by using the PER_CLASS
option.
This makes the test case injectable by the container.
@TestInstance(TestInstance.Lifecycle.PER_CLASS) (1)
class InstanceShared {
private int instanceState; (2)
@BeforeAll
void init() { (3)
log.info("state={}", instanceState++);
}
@Test
void testA() { log.info("state={}", instanceState); }
@Test
void testB() { log.info("state={}", instanceState); }
1 | one instance is created for all tests |
2 | any shared state must be declared private |
3 | @BeforeAll and @AfterAll methods must be declared non-static |
Use of @ParameterizedTest and @MethodSource (later topics), where the method source uses components injected into the test case instance is one example of when one needs to use PER_CLASS .
|
113.2.1. Test Ordering
Although it is a "best practice" to make tests independent and be executed in any order — there can be times when one wants a specified order. There are a few options: [19]
-
Random Order
-
Specified Order
-
by Method Name
-
by Display Name
-
(custom order)
...
import org.junit.jupiter.api.*;
@TestMethodOrder(
// MethodOrderer.OrderAnnotation.class
// MethodOrderer.MethodName.class
// MethodOrderer.DisplayName.class
MethodOrderer.Random.class
)
class ExampleJUnit5Test {
@Test
@Order(1)
void two_plus_two() {
...
@Test
@Order(2)
void one_and_one() {
Explicit Method Ordering is the Exception
It is best practice to make test cases and tests within test cases modular and independent of one another.
To require a specific order violates that practice — but sometimes there are reasons to do so.
One example violation is when the overall test case is broken down into test methods that addresses a multi-step scenario.
In older versions of JUnit — that would have been required to be a single @Test calling out to helper methods.
|
114. Assertion Basics
The setup methods (@BeforeAll
and @BeforeEach
) of the test case and early parts of the
test method (@Test
) allow for us to define a given test context and scenario for the
subject of the test. Assertions are added to the evaluation
portion of the test method to determine whether the subject performed correctly. The result
of the assertions determine the pass/fail of the test.

114.1. Assertion Libraries
There are three to four primary general purpose assertion libraries available for us
to use within the spring-boot-starter-test
suite before we start considering
data format assertions for XML and JSON or add custom libraries of our own:
-
JUnit - has built-in, basic assertions like True, False, Equals, NotEquals, etc.
-
Hamcrest - uses natural-language expressions for matches
-
AssertJ - an improvement to natural-language assertion expressions using type-based builders
The built-in JUnit assertions are functional enough to get any job done. The value in using the other libraries is their ability to express the assertion using natural-language terms without using a lot of extra, generic Java code.
114.1.1. JUnit Assertions
The assertions built into JUnit are basic and easy to understand — but limited in their expression. They have the basic form of taking subject argument(s) and the name of the static method is the assertion made about the arguments.
import static org.junit.jupiter.api.Assertions.*;
...
assertEquals(expected, lhs+rhs); (1)
1 | JUnit static method assertions express assertion of one to two arguments |
We are limited by the number of static assertion methods present and have to extend them by using code to manipulate the arguments (e.g., to be equal or true/false). However, once we get to that point — we can easily bring in robust assertion libraries. In fact, that is exactly what JUnit describes for us to do in the JUnit User Guide.
114.1.2. Hamcrest Assertions
Hamcrest has a common pattern of taking a subject argument and a Matcher
argument.
import static org.hamcrest.MatcherAssert.assertThat;
import static org.hamcrest.Matchers.equalTo;
...
assertThat(beaver.getFirstName(), equalTo("Jerry")); (1)
1 | LHS argument is value being tested, RHS equalTo returns an object implementing Matcher interface |
The Matcher
interface can be implemented by an unlimited
number of expressions to implement the details of the assertion.
114.1.3. AssertJ Assertions
AssertJ uses a builder pattern that starts with the subject and then offers a nested number of assertion builders that are based on the previous node type.
import static org.assertj.core.api.Assertions.assertThat;
...
assertThat(beaver.getFirstName()).isEqualTo("Jerry"); (1)
1 | assertThat is a builder of assertion factories and isEqual executes an assertion in chain |
Custom AssertJ Assertions
Custom extensions are accomplished by creating a new builder factory at the start of the call tree. See the following link for a small example.
AssertJ also provides an Assertion Generator that generates assertion source code based on specific POJO classes and templates we can override using a maven or gradle plugin.
This allows us to express assertions about a Person
class using the following syntax.
import static info.ejava.examples.app.testing.testbasics.Assertions.*;
...
assertThat(beaver).hasFirstName("Jerry");
IDEs have an easier time suggesting assertion builders with AssertJ because everything is a method call on the previous type. IDEs have a harder time suggesting Hamcrest matchers because there is very little to base the context on. |
AssertJ Generator and Jakarta
Even though the Assertj core library has kept up to date, the assertions generator plugin has not.
Current default execution of the plugin results in classes annotated with a javax.annotation.Generated
annotation that has since been changed to jakarta
.
I won’t go into the details here, but the class example in gitlab shows where I downloaded the source templates from the plugin source repository and edited for use with Spring Boot 3 and Jakarta-based libraries.
A reply to one of the Assertj support tickets indicates they are working on it as a part of a Java 17 upgrade. |
114.2. Example Library Assertions
The following example shows a small peek at the syntax for each of the four assertion
libraries used within a JUnit Jupiter test case. They are shown without an
import static
declaration to better see where each comes from.
package info.ejava.examples.app.testing.testbasics.jupiter;
import lombok.extern.slf4j.Slf4j;
import org.hamcrest.MatcherAssert;
import org.hamcrest.Matchers;
import org.junit.Assert;
import org.junit.jupiter.api.Assertions;
import org.junit.jupiter.api.Test;
@Slf4j
class AssertionsTest {
int lhs=1;
int rhs=1;
int expected=2;
@Test
void one_and_one() {
//junit 4/Vintage assertion
Assert.assertEquals(expected, lhs+rhs); (1)
//Jupiter assertion
Assertions.assertEquals(expected, lhs+rhs); (1)
//hamcrest assertion
MatcherAssert.assertThat(lhs+rhs, Matchers.is(expected)); (2)
//AssertJ assertion
org.assertj.core.api.Assertions.assertThat(lhs+rhs).isEqualTo(expected); (3)
}
}
1 | JUnit assertions are expressed using a static method and one or more subject arguments |
2 | Hamcrest asserts that the subject matches a Matcher that can be infinitely extended |
3 | AssertJ’s extensible subject assertion provides type-specific assertion builders |
114.3. Assertion Failures
Assertions will report a generic message when they fail. If we change the expected result of the example from 2 to 3, the following error message will be reported. It contains a generic message of the assertion failure (location not shown) without context other than the test case and test method it was generated from (not shown).
java.lang.AssertionError: expected:<3> but was:<2> (1)
1 | we are not told what 3 and 2 are within a test except that 3 was expected and they are not equal |
114.3.1. Adding Assertion Context
However, there are times when some additional text can help to provide more context
about the problem. The following example shows the previous test augmented with
an optional message. Note that JUnit Jupiter assertions permit the lazy instantiation
of complex message strings using a lamda. AssertJ provides for lazy instantiation
using String.format
built into the as()
method.
@Test
void one_and_one_description() {
//junit 4/Vintage assertion
Assert.assertEquals("math error", expected, lhs+rhs); (1)
//Jupiter assertions
Assertions.assertEquals(expected, lhs+rhs, "math error"); (2)
Assertions.assertEquals(expected, lhs+rhs,
()->String.format("math error %d+%d!=%d",lhs,rhs,expected)); (3)
//hamcrest assertion
MatcherAssert.assertThat("math error",lhs+rhs, Matchers.is(expected)); (4)
//AssertJ assertion
org.assertj.core.api.Assertions.assertThat(lhs+rhs)
.as("math error") (5)
.isEqualTo(expected);
org.assertj.core.api.Assertions.assertThat(lhs+rhs)
.as("math error %d+%d!=%d",lhs,rhs,expected) (6)
.isEqualTo(expected);
}
1 | JUnit Vintage syntax places optional message as first parameter |
2 | JUnit Jupiter moves the optional message to the last parameter |
3 | JUnit Jupiter also allows optional message to be expressed thru a lambda function |
4 | Hamcrest passes message in first position like JUnit Vintage syntax |
5 | AspectJ uses an as() builder method to supply a message |
6 | AspectJ also supports String.format and args when expressing message |
java.lang.AssertionError: math error expected:<3> but was:<2> (1)
1 | an extra "math error" was added to the reported error to help provide context |
Although AssertJ supports multiple asserts in a single call chain,
your description (as("description") ) must come before the first failing assertion.
|
Because AssertJ uses chaining
|
114.4. Testing Multiple Assertions
The above examples showed several ways to assert the same thing with different libraries. However, evaluation would have stopped at the first failure in each test method. There are many times when we want to know the results of several assertions. For example, take the case where we are testing different fields in a returned object (e.g., person.getFirstName(), person.getLastName()). We may want to see all the results to give us better insight for the entire problem.
JUnit Jupiter and AssertJ support testing multiple assertions prior to failing a specific test and then go on to report the results of each failed assertion.
114.4.1. JUnit Jupiter Multiple Assertion Support
JUnit Jupiter uses a variable argument list of Java 8 lambda functions in order to provide support for testing multiple assertions prior to failing a test. The following example will execute both assertions and report the result of both when they fail.
@Test
void junit_all() {
Assertions.assertAll("all assertions",
() -> Assertions.assertEquals(expected, lhs+rhs, "jupiter assertion"), (1)
() -> Assertions.assertEquals(expected, lhs+rhs,
()->String.format("jupiter format %d+%d!=%d",lhs,rhs,expected))
);
}
1 | JUnit Jupiter uses Java 8 lambda functions to execute and report results for multiple assertions |
114.4.2. AssertJ Multiple Assertion Support
AssertJ uses a special factory class (SoftAssertions
) to build assertions from to support that capability.
Notice also that we have the chance to inspect the state of the assertions before failing the test.
That can give us the chance to gather additional information to place into the log. We also
have the option of not technically failing the test under certain conditions.
import org.assertj.core.api.SoftAssertions;
...
@Test
public void all() {
Person p = beaver; //change to eddie to cause failures
SoftAssertions softly = new SoftAssertions(); (1)
softly.assertThat(p.getFirstName()).isEqualTo("Jerry");
softly.assertThat(p.getLastName()).isEqualTo("Mathers");
softly.assertThat(p.getDob()).isAfter(wally.getDob());
log.info("error count={}", softly.errorsCollected().size()); (2)
softly.assertAll(); (3)
}
1 | a special SoftAssertions builder is used to construct assertions |
2 | we are able to inspect the status of the assertions before failure thrown |
3 | assertion failure thrown during later assertAll() call |
114.5. Asserting Exceptions
JUnit Jupiter and AssertJ provide direct support for inspecting Exceptions within the body of the test method. Surprisingly, Hamcrest offers no built-in matchers to directly inspect Exceptions.
114.5.1. JUnit Jupiter Exception Handling Support
JUnit Jupiter allows for an explicit testing for Exceptions at specific points within the test method. The type of Exception is checked and made available to follow-on assertions to inspect. From that point forward JUnit assertions do not provide any direct support to inspect the Exception.
import org.junit.jupiter.api.Assertions;
...
@Test
public void exceptions() {
RuntimeException ex1 = Assertions.assertThrows(RuntimeException.class, (1)
() -> {
throw new IllegalArgumentException("example exception");
});
}
1 | JUnit Jupiter provides means to assert an Exception thrown and provide it for inspection |
114.5.2. AssertJ Exception Handling Support
AssertJ has an Exception testing capability that is similar to JUnit Jupiter — where an explicit check for the Exception to be thrown is performed and the thrown Exception is made available for inspection. The big difference here is that AssertJ provides Exception assertions that can directly inspect the properties of Exceptions using natural-language calls.
Throwable ex1 = catchThrowable( (1)
()->{ throw new IllegalArgumentException("example exception"); });
assertThat(ex1).hasMessage("example exception"); (2)
RuntimeException ex2 = catchThrowableOfType(RuntimeException.class, (1)
()->{ throw new IllegalArgumentException("example exception"); });
assertThat(ex1).hasMessage("example exception"); (2)
1 | AssertJ can assert an Exception thrown and provide it for inspection |
2 | AssertJ can directly inspect Exceptions |
AssertJ goes one step further by providing an assertion that not only is the exception thrown, but can also tack on assertion builders to make on-the-spot assertions about the exception thrown. This has the same end functionality as the previous example — except:
-
previous method returned the exception thrown that can be subject to independent inspection
-
this technique returns an assertion builder with the capability to build further assertions against the exception
assertThatThrownBy( (1)
() -> {
throw new IllegalArgumentException("example exception");
},"not thrown").hasMessage("example exception");
assertThatExceptionOfType(RuntimeException.class).as("not thrown").isThrownBy( (1)
() -> {
throw new IllegalArgumentException("example exception");
}).withMessage("example exception");
1 | AssertJ can use caught Exception as an assertion factory to directly inspect Exception in a single chained call |
114.6. Asserting Dates
AssertJ has built-in support for date assertions. We have to add a separate library to gain date matchers for Hamcrest.
114.6.1. AssertJ Date Handling Support
The following shows an example of AssertJ’s built-in, natural-language support for Dates.
import static org.assertj.core.api.Assertions.*;
...
@Test
public void dateTypes() {
assertThat(beaver.getDob()).isAfter(wally.getDob());
assertThat(beaver.getDob())
.as("beaver NOT younger than wally")
.isAfter(wally.getDob()); (1)
}
1 | AssertJ builds date assertions that directly inspect dates using natural-language |
114.6.2. Hamcrest Date Handling Support
Hamcrest can be extended to support date matches by adding an external hamcrest-date
library.
<!-- for hamcrest date comparisons -->
<dependency>
<groupId>org.exparity</groupId>
<artifactId>hamcrest-date</artifactId>
<version>2.0.8</version>
<scope>test</scope>
</dependency>
That dependency adds at least a DateMatchers
class with date matchers that can be used to
express date assertions using natural-language expression.
import org.exparity.hamcrest.date.DateMatchers;
import static org.hamcrest.MatcherAssert.assertThat;
...
@Test
public void dateTypes() {
//requires additional org.exparity:hamcrest-date library
assertThat(beaver.getDob(), DateMatchers.after(wally.getDob()));
assertThat("beaver NOT younger than wally", beaver.getDob(),
DateMatchers.after(wally.getDob())); (1)
}
1 | hamcrest-date adds matchers that can directly inspect dates |
115. Mockito Basics
Without much question — we will have more complex software to test than what we have briefly shown so far in this lesson. The software will inevitably be structured into layered dependencies where one layer cannot be tested without the lower layers it calls. To implement unit tests, we have a few choices:
-
use the real lower-level components (i.e., "all the way to the DB and back", remember — I am calling that choice "Unit Integration Tests" if it can be technically implemented/managed within a single JVM)
-
create a stand-in for the lower-level components (aka "test double")
We will likely take the first approach during integration testing but the lower-level components may bring in too many dependencies to realistically test during a separate unit’s own detailed testing.
115.1. Test Doubles
The second approach ("test double") has a few options:
-
fake - using a scaled down version of the real component (e.g., in-memory SQL database)
-
stub - simulation of the real component by using pre-cached test data
-
mock - defining responses to calls and the ability to inspect the actual incoming calls made
115.2. Mock Support
spring-boot-starter-test
brings in a pre-integrated, mature
open source mocking framework called Mockito.
See the example below for an example unit test augmented with mocks using Mockito.
The example uses a simple Java Map<String, String>
to demonstrate some simulation and inspection concepts.
In a real unit test, the Java Map interface would stand for:
-
an interface we are designing (i.e., testing the interface contract we are designing from the client-side)
-
a test double we want to inject into a component under test that will answer with pre-configured answers and be able to inspect how called (e.g., testing collaborations within a white box test)
115.3. Mockito Learning Example Declarations
package info.ejava.examples.app.testing.testbasics.mockito;
import org.junit.jupiter.api.*;
import org.junit.jupiter.api.extension.ExtendWith;
import org.mockito.ArgumentCaptor;
import org.mockito.Captor;
import org.mockito.Mock;
import org.mockito.junit.jupiter.MockitoExtension;
import java.util.Map;
import static org.assertj.core.api.Assertions.assertThat;
import static org.mockito.Mockito.*;
@ExtendWith(MockitoExtension.class)
public class ExampleMockitoTest {
@Mock //creating a mock to configure for use in each test
private Map<String, String> mapMock;
@Captor
private ArgumentCaptor<String> stringArgCaptor;
-
@ExtendWith
bootstraps Mockito behavior into test case -
@Mock
can be used to inject a mock of the defined type-
"nice mock" is immediately available - will react in potentially useful manner by default
-
-
@Captor
can be used to capture input parameters passed to the mock calls
@InjectMocks will be demonstrated in later white box testing — where the defined mocks get injected into component under test. |
116. BDD Acceptance Test Terminology
Behavior-Driven Development (BDD) can be part of an agile development process and adds the use of natural-language constructs to express behaviors and outcomes. The BDD behavior specifications are stories with a certain structure that contain an acceptance criteria that follows a "given", "when", "then" structure:
-
given - initial context
-
when - event triggering scenario under test
-
then - expected outcome
116.1. Alternate BDD Syntax Support
There is also a strong push to express acceptance criteria in code that can be executed versus a document. Although far from a perfect solution, JUnit, AssertJ, and Mockito do provide some syntax support for BDD-based testing:
-
JUnit Jupiter allows the assignment of meaningful natural-language phrases for test case and test method names. Nested classes can also be employed to provide additional expression.
-
Mockito defines alternate method names to better map to the given/when/then language of BDD
-
AssertJ defines alternate assertion factory names using
then()
andand.then()
wording
116.3. Example BDD Syntax Output
When we run our test — the following natural-language text is displayed.

116.4. JUnit Options Expressed in Properties
We can define a global setting for the display name generator using junit-platform.properties
junit.jupiter.displayname.generator.default = \
org.junit.jupiter.api.DisplayNameGenerator$ReplaceUnderscores
This can also be used to express:
-
method order
-
class order
-
test instance lifecycle
-
@Parameterized test naming
-
parallel execution
117. Tipping Example
To go much further describing testing — we need to assemble a small set of interfaces and classes to test. I am going to use a common problem when several people go out for a meal together and need to split the check after factoring in the tip.
-
TipCalculator - returns the amount of tip required when given a certain bill total and rating of service. We could have multiple implementations for tips and have defined an interface for clients to depend upon.
-
BillCalculator - provides the ability to calculate the share of an equally split bill given a total, service quality, and number of people.
The following class diagram shows the relationship between the interfaces/classes. They will be the subject of the following Unit Integration Tests involving the Spring context.

118. Review: Unit Test Basics
In previous chapters we have looked at pure unit test constructs with an eye on JUnit, assertion libraries, and a little of Mockito. In preparation for the unit integration topic and adding the Spring context in the following chapter — I want to review the simple test constructs in terms of the Tipping example.
118.1. Review: POJO Unit Test Setup
@DisplayNameGeneration(DisplayNameGenerator.ReplaceUnderscores.class) (1)
@DisplayName("Standard Tipping Calculator")
public class StandardTippingCalculatorImplTest {
//subject under test
private TipCalculator tipCalculator; (2)
@BeforeEach (3)
void setup() { //simulating a complex initialization
tipCalculator=new StandardTippingImpl();
}
1 | DisplayName is part of BDD naming and optional for all tests |
2 | there will be one or more objects under test. These will be POJOs. |
3 | @BeforeEach plays the role of a the container — wiring up objects under test |
118.2. Review: POJO Unit Test
The unit test is being expressed in terms of BDD conventions. It is broken up into "given", "when", and "then" blocks and highlighted with use of BDD syntax where provided (JUnit and AssertJ in this case).
@Test
public void given_fair_service() { (1)
//given - a $100 bill with FAIR service (2)
BigDecimal billTotal = new BigDecimal(100);
ServiceQuality serviceQuality = ServiceQuality.FAIR;
//when - calculating tip (2)
BigDecimal resultTip = tipCalculator.calcTip(billTotal, serviceQuality);
//then - expect a result that is 15% of the $100 total (2)
BigDecimal expectedTip = billTotal.multiply(BigDecimal.valueOf(0.15));
then(resultTip).isEqualTo(expectedTip); (3)
}
1 | using JUnit snake_case natural language expression for test name |
2 | BDD convention of given, when, then blocks. Helps to be short and focused |
3 | using AssertJ assertions with BDD syntax |
118.3. Review: Mocked Unit Test Setup
The following example moves up a level in the hierarchy and forces us to test a class that had a dependency.
A pure unit test would mock out all dependencies — which we are doing for TipCalculator
.
@ExtendWith(MockitoExtension.class) (1)
@DisplayNameGeneration(DisplayNameGenerator.ReplaceUnderscores.class)
@DisplayName("Bill CalculatorImpl Mocked Unit Test")
public class BillCalculatorMockedTest {
//subject under test
private BillCalculator billCalculator;
@Mock (2)
private TipCalculator tipCalculatorMock;
@BeforeEach
void init() { (3)
billCalculator = new BillCalculatorImpl(tipCalculatorMock);
}
1 | Add Mockito extension to JUnit |
2 | Identify which interfaces to Mock |
3 | In this example, we are manually wiring up the subject under test |
118.4. Review: Mocked Unit Test
The following shows the TipCalculator mock being instructed on what to return based on input criteria and making call activity available to the test.
@Test
public void calc_shares_for_people_including_tip() {
//given - we have a bill for 4 people and tip calculator that returns tip amount
BigDecimal billTotal = new BigDecimal(100.0);
ServiceQuality service = ServiceQuality.GOOD;
BigDecimal tip = billTotal.multiply(new BigDecimal(0.18));
int numPeople = 4;
//configure mock
given(tipCalculatorMock.calcTip(billTotal, service)).willReturn(tip); (1)
//when - call method under test
BigDecimal shareResult = billCalculator.calcShares(billTotal, service, numPeople);
//then - tip calculator should be called once to get result
then(tipCalculatorMock).should(times(1)).calcTip(billTotal,service); (2)
//verify correct result
BigDecimal expectedShare = billTotal.add(tip).divide(new BigDecimal(numPeople));
and.then(shareResult).isEqualTo(expectedShare);
}
1 | configuring response behavior of Mock |
2 | optionally inspecting subject calls made |
118.5. @InjectMocks
The final unit test example shows how we can leverage Mockito to instantiate our subject(s) under test and inject them with mocks.
That takes over at least one job the @BeforeEach
was performing.
@ExtendWith(MockitoExtension.class)
@DisplayNameGeneration(DisplayNameGenerator.ReplaceUnderscores.class)
@DisplayName("Bill CalculatorImpl")
public class BillCalculatorImplTest {
@Mock
TipCalculator tipCalculatorMock;
/*
Mockito is instantiating this implementation class for us an injecting Mocks
*/
@InjectMocks (1)
BillCalculatorImpl billCalculator;
1 | instantiates and injects out subject under test |
119. Spring Boot Unit Integration Test Basics
Pure unit testing can be efficiently executed without a Spring context, but there will eventually be a time to either:
-
integrate peer components with one another (horizontal integration)
-
integrate layered components to test the stack (vertical integration)
These goals are not easily accomplished without a Spring context and whatever is created outside of a Spring context will be different from production. Spring Boot and the Spring context can be brought into the test picture to more seamlessly integrate with other components and component infrastructure present in the end application. Although valuable, it will come at a performance cost and potentially add external resource dependencies — so don’t look for it to replace the lightweight pure unit testing alternatives covered earlier.
119.1. Adding Spring Boot to Testing
There are two primary things that will change with our Spring Boot integration test:
-
define a Spring context for our test to operate using
@SpringBootTest
-
inject components we wish to use/test from the Spring context into our tests using
@Autowire
I found the following article: Integration Tests with @SpringBootTest, by Tom Hombergs and his "Testing with Spring Boot" series to be quite helpful in clarifying my thoughts and originally preparing these lecture notes. The Spring Boot Testing reference web page provides detailed coverage of the test constructs that go well beyond what I am covering at this point in the course. We will pick up more of that material as we get into web and data tier topics. |
119.2. @SpringBootTest
To obtain a Spring context and leverage the auto-configuration capabilities of
Spring Boot, we can take the easy way out and annotate our test with @SpringBootTest
.
This will instantiate a default Spring context based on the configuration defined
or can be found.
package info.ejava.examples.app.testing.testbasics.tips;
...
import org.springframework.boot.test.context.SpringBootTest;
...
@SpringBootTest (1)
public class BillCalculatorNTest {
1 | using the default configuration search rules |
119.3. Default @SpringBootConfiguration Class
By default, Spring Boot will look for a class annotated with @SpringBootConfiguration
that is present at or above the Java package containing the test. Since we have a
class in a parent directory that represents our @SpringBootApplication
and that annotation
wraps @SpringBootConfiguration
, that class will be used to define the Spring context
for our test.
package info.ejava.examples.app.testing.testbasics;
...
@SpringBootApplication
// wraps => @SpringBootConfiguration
public class TestBasicsApp {
public static void main(String...args) {
SpringApplication.run(TestBasicsApp.class,args);
}
}
119.4. Conditional Components
When using the @SpringBootApplication, all components normally a part of the application will be part of the test. Be sure to define auto-configuration exclusions for any production components that would need to be turned off during testing.
|
119.5. Explicit Reference to @SpringBootConfiguration
Alternatively, we could have made an explicit reference as to which class to use if it was not in a standard relative directory or we wanted to use a custom version of the application for testing.
import info.ejava.examples.app.testing.testbasics.TestBasicsApp;
...
@SpringBootTest(classes = TestBasicsApp.class)
public class BillCalculatorNTest {
119.6. Explicit Reference to Components
Assuming the components required for test is known and a manageable number…
@Component
@RequiredArgsConstructor
public class BillCalculatorImpl implements BillCalculator {
private final TipCalculator tipCalculator;
...
@Component
public class StandardTippingImpl implements TipCalculator {
...
We can explicitly reference component classes needed to be in the Spring context.
@SpringBootTest(classes = {BillCalculatorImpl.class, StandardTippingImpl.class})
public class BillCalculatorNTest {
@Autowired
BillCalculator billCalculator;
119.7. Active Profiles
Prior to adding the Spring context, Spring Boot configuration and logging conventions were not being enacted. However, now that we are bringing in a Spring context — we can designate special profiles to be activated for our context. This can allow us to define properties that are more relevant to our tests (e.g., expressive log context, increased log verbosity).
package info.ejava.examples.app.testing.testbasics.tips;
import org.springframework.boot.test.context.SpringBootTest;
import org.springframework.test.context.ActiveProfiles;
@SpringBootTest
@ActiveProfiles("test") (1)
public class BillCalculatorNTest {
1 | activating the "test" profile for this test |
# application-test.properties (1)
logging.level.info.ejava.examples.app.testing.testbasics=DEBUG
1 | "test" profile setting loggers for package under test to DEBUG severity threshold |
119.9. Example @SpringBootTest NTest Output
When we run our test we get the following console information printed. Note that
-
the
DEBUG
messages are from theBillCalculatorImpl
-
DEBUG
is being printed because the "test" profile is active and the "test" profile set the severity threshold for that package to beDEBUG
-
method and line number information is also displayed because the test profile defines an expressive log event pattern
. ____ _ __ _ _
/\\ / ___'_ __ _ _(_)_ __ __ _ \ \ \ \
( ( )\___ | '_ | '_| | '_ \/ _` | \ \ \ \
\\/ ___)| |_)| | | | | || (_| | ) ) ) )
' |____| .__|_| |_|_| |_\__, | / / / /
=========|_|==============|___/=/_/_/_/
:: Spring Boot :: (v3.5.5)
14:17:15.427 INFO BillCalculatorNTest#logStarting:55 - Starting BillCalculatorNTest
14:17:15.429 DEBUG BillCalculatorNTest#logStarting:56 - Running with Spring Boot ..., Spring ...
14:17:15.430 INFO BillCalculatorNTest#logStartupProfileInfo:655 - The following profiles are active: test
14:17:16.135 INFO BillCalculatorNTest#logStarted:61 - Started BillCalculatorNTest in 6.155 seconds (JVM running for 8.085)
14:17:16.138 DEBUG BillCalculatorImpl#calcShares:24 - tip=$9.00, for $50.00 and GOOD service
14:17:16.142 DEBUG BillCalculatorImpl#calcShares:33 - share=$14.75 for $50.00, 4 people and GOOD service
14:17:16.143 INFO BillHandler#run:24 - bill total $50.00, share=$14.75 for 4 people, after adding tip for GOOD service
14:17:16.679 DEBUG BillCalculatorImpl#calcShares:24 - tip=$18.00, for $100.00 and GOOD service
14:17:16.679 DEBUG BillCalculatorImpl#calcShares:33 - share=$29.50 for $100.00, 4 people and GOOD service
119.10. Alternative Test Slices
The @SpringBootTest
annotation is a general purpose test annotation that likely will
work in many generic cases. However, there are other cases where we may need a specific
database or other technologies available.
Spring Boot pre-defines a set of Test Slices that can establish more specialized test environments.
The following are a few examples:
-
@DataJpaTest - JPA/RDBMS testing for the data tier
-
@DataMongoTest - MongoDB testing for the data tier
-
@JsonTest - JSON data validation for marshalled data
-
@RestClientTest - executing tests that perform actual HTTP calls for the web tier
We will revisit these topics as we move through the course and construct tests relative additional domains and technologies.
120. Mocking Spring Boot Unit Integration Tests
In the previous @SpringBootTest
example I showed you how to instantiate a complete Spring context
to inject and execute test(s) against an integrated set of real components. However,
in some cases we may need the Spring context — but do not need or want the
interfacing components. In this example I am going to mock out the TipCalculator
to produce whatever the test requires.
import org.springframework.boot.test.mock.mockito.MockBean;
import static org.assertj.core.api.BDDAssertions.and;
import static org.mockito.BDDMockito.given;
import static org.mockito.BDDMockito.then;
import static org.mockito.Mockito.times;
@SpringBootTest(classes={BillCalculatorImpl.class})//defines custom Spring context (1)
@ActiveProfiles("test")
@DisplayNameGeneration(DisplayNameGenerator.ReplaceUnderscores.class)
@DisplayName("Bill CalculatorImpl Mocked Integration")
public class BillCalculatorMockedNTest {
@Autowired //subject under test (2)
private BillCalculator billCalculator;
@MockBean //will satisfy Autowired injection point within BillCalculatorImpl (3)
private TipCalculator tipCalculatorMock;
1 | defining a custom context that excludes TipCalculator component(s) |
2 | injecting BillCalculator bean under test from Spring context |
3 | defining a mock to be injected into BillCalculatorImpl in Spring context |
120.1. Example @SpringBoot/Mockito Test
The actual test is similar to the earlier example when we injected a real TipCalculator
from the Spring context.
However, since we have a mock in this case we must define its behavior
and then optionally determine if it was called.
@Test
public void calc_shares_for_people_including_tip() {
//given - we have a bill for 4 people and tip calculator that returns tip amount
BigDecimal billTotal = BigDecimal.valueOf(100.0);
ServiceQuality service = ServiceQuality.GOOD;
BigDecimal tip = billTotal.multiply(BigDecimal.valueOf(0.18));
int numPeople = 4;
//configure mock
given(tipCalculatorMock.calcTip(billTotal, service)).willReturn(tip); (1)
//when - call method under test (2)
BigDecimal shareResult = billCalculator.calcShares(billTotal, service, numPeople);
//then - tip calculator should be called once to get result
then(tipCalculatorMock).should(times(1)).calcTip(billTotal,service); (3)
//verify correct result
BigDecimal expectedShare = billTotal.add(tip).divide(BigDecimal.valueOf(numPeople));
and.then(shareResult).isEqualTo(expectedShare); (4)
}
1 | instruct the Mockito mock to return a tip result |
2 | call method on subject under test |
3 | verify mock was invoked N times with the value of the bill and service |
4 | verify with AssertJ that the resulting share value was the expected share value |
121. Maven Unit Testing Basics
At this point we have some technical basics for how tests are syntactically expressed. Now lets take a look at how they fit into a module and how we can execute them as part of the Maven build.
You learned in earlier lessons that production artifacts that are part of our
deployed artifact are placed in src/main
(java
and resources
). Our test artifacts
are placed in src/test
(java
and resources
). The following example shows the
layout of the module we are currently working with.
|-- pom.xml
`-- src
`-- test
|-- java
| `-- info
| `-- ejava
| `-- examples
| `-- app
| `-- testing
| `-- testbasics
| |-- PeopleFactory.java
| |-- jupiter
| | |-- AspectJAssertionsTest.java
| | |-- AssertionsTest.java
| | |-- ExampleJUnit5Test.java
| | `-- HamcrestAssertionsTest.java
| |-- mockito
| | `-- ExampleMockitoTest.java
| |-- tips
| | |-- BillCalculatorContractTest.java
| | |-- BillCalculatorImplTest.java
| | |-- BillCalculatorMockedNTest.java
| | |-- BillCalculatorNTest.java
| | `-- StandardTippingCalculatorImplTest.java
| `-- vintage
| `-- ExampleJUnit4Test.java
`-- resources
|-- application-test.properties
121.1. Maven Surefire Plugin
The
Maven Surefire plugin looks for classes that have been compiled from the src/test/java
source tree that have a
prefix of "Test" or suffix of "Test", "Tests", or "TestCase" by default.
Surefire starts up the JUnit context(s) and provides test results to the console
and target/surefire-reports directory.
Surefire is part of the standard "jar" profile we use for normal Java projects and will run automatically. The following shows the final output after running all the unit tests for the module.
$ mvn clean test
...
[INFO] Results:
[INFO]
[INFO] Tests run: 24, Failures: 0, Errors: 0, Skipped: 0
[INFO]
[INFO] ------------------------------------------------------------------------
[INFO] BUILD SUCCESS
[INFO] ------------------------------------------------------------------------
[INFO] Total time: 14.280 s
Consult online documentation on how Maven Surefire can be configured. However, I will demonstrate at least one feature that allows us to filter tests executed.
121.2. Filtering Tests
One new JUnit Jupiter feature is the ability to categorize tests using @Tag
annotations.
The following example shows a unit integration
test annotated with two tags: "springboot" and "tips". The "springboot" tag was added to
all tests that launch the Spring context. The "tips" tag was added to all tests that
are part of the tips example set of components.
import org.junit.jupiter.api.*;
...
@SpringBootTest(classes = {BillCalculatorImpl.class}) //defining custom Spring context
@Tag("springboot") @Tag("tips") (1)
...
public class BillCalculatorMockedNTest {
1 | test case has been tagged with JUnit "springboot" and "tips" tag values |
121.3. Filtering Tests Executed
We can use the tag names as a "groups" property specification to Maven Surefire to only run matching tests. The following example requests all tests tagged with "tips" but not tagged with "springboot" are to be run. Notice we have fewer tests executed and a much faster completion time.
$ mvn clean test -Dgroups='tips & !springboot' -Pbdd (1) (2)
...
[INFO] -------------------------------------------------------
[INFO] T E S T S
[INFO] -------------------------------------------------------
[INFO] Running Bill Calculator Contract
[INFO] Tests run: 1, Failures: 0, Errors: 0, Skipped: 0, Time elapsed: 0.41 s - in Bill Calculator Contract
[INFO] Running Bill CalculatorImpl
15:43:47.605 [main] DEBUG info.ejava.examples.app.testing.testbasics.tips.BillCalculatorImpl - tip=$50.00, for $100.00 and GOOD service
15:43:47.608 [main] DEBUG info.ejava.examples.app.testing.testbasics.tips.BillCalculatorImpl - share=$37.50 for $100.00, 4 people and GOOD service
[INFO] Tests run: 1, Failures: 0, Errors: 0, Skipped: 0, Time elapsed: 0.165 s - in Bill CalculatorImpl
[INFO] Running Standard Tipping Calculator
[INFO] Tests run: 1, Failures: 0, Errors: 0, Skipped: 0, Time elapsed: 0.004 s - in Standard Tipping Calculator
[INFO]
[INFO] Results:
[INFO]
[INFO] Tests run: 3, Failures: 0, Errors: 0, Skipped: 0
[INFO]
[INFO] ------------------------------------------------------------------------
[INFO] BUILD SUCCESS
[INFO] ------------------------------------------------------------------------
[INFO] Total time: 4.537 s
1 | execute tests with tag "tips" and without tag "springboot" |
2 | activating "bdd" profile that configures Surefire reports within the example Maven environment setup to understand display names |
121.4. Maven Failsafe Plugin
The
Maven Failsafe plugin looks for classes compiled from the src/test/java
tree that have a
prefix of "IT" or suffix of "IT", or "ITCase" by default.
Like Surefire, Failsafe is part of the standard Maven "jar" profile and runs later in the
build process. However, unlike Surefire that runs within one
Maven phase (test
), Failsafe runs within the scope of four Maven phases:
pre-integration-test
,
integration-test
,
post-integration-test
, and
verify
-
pre-integration-test - when external resources get started (e.g., web server)
-
integration-test - when tests are executed
-
post-integration-test - when external resources are stopped/cleaned up (e.g., shutdown web server)
-
verify - when results of tests are evaluated and build potentially fails
121.5. Failsafe Overhead
Aside from the integration tests, all other processes are normally started and stopped through the use of Maven plugins. Multiple phases are required for IT tests so that:
-
all resources are ready to test once the tests begin
-
all resources can be shutdown prior to failing the build for a failed test
With the robust capability to stand up a Spring context within a single JVM, we really have limited use for Failsafe for testing Spring Boot applications. The exception for that is when we truly need to interface with something external — like stand up a real database or host endpoints in Docker images. I will wait until we get to topics like that before showing examples. Just know that when Maven references "integration tests", they come with extra hooks and overhead that may not be technically needed for integration tests — like the ones we have demonstrated in this lesson — that can be executed within a single JVM.
122. Test Application Contexts
Tests often require component configurations that are not part of the Spring context under test — or need to override one or more of those components. Spring supplies:
-
@ComponentScan
to automatically search for components -
@ContextConfiguration
to explicitly define a series of components. This supports Java and XML definitions. -
@Import
to identify a specific component -
@Configuration
/@Bean
to further define specific component(s) once they are added to the application context
They overlap in many ways, but can be used to define the application context for a specific test case. To help automate this for testing, Spring Boot supplies:
-
@SpringBootTest
to define the application context via convention with optional configuration -
@TestConfiguration
to define component(s) for specific use and to avoid being picked up by a standard component scan.
122.1. @SpringBootTest
@SpringBootTest
defines a default @ContextConfiguration
by searching for the @SpringBootConfiguration
and working from there.
@SpringBootApplication
(containing the @SpringBootConfiguration
) defines a default @ComponentScan
that equals the one used by the application at runtime.
...
@SpringBootConfiguration (1)
@EnableAutoConfiguration
@ComponentScan(excludeFilters = { (2)
@Filter(type = FilterType.CUSTOM, classes = TypeExcludeFilter.class), (3)
@Filter(type = FilterType.CUSTOM, classes = AutoConfigurationExcludeFilter.class) (4)
})
public @interface SpringBootApplication {
1 | is a @SpringBootConfiguration searched for by @SpringBootTest |
2 | declares a default @ComponentScan usable by application and tests |
3 | TypeExcludeFilter allows exclude filters to be supplied by things like test slices and @SpringBootTest |
4 | @AutoConfiguration classes will be subject to inspection (AutoConfiguration.imports ) before including |
122.1.1. @SpringBootTest by Convention
The snippet below shows an example of using @SpringBootTest
by convention.
The test will:
package info.ejava.examples.app.testing.testbasics.apackage;
...
@SpringBootTest
public class ConventionNTest {
@TestConfiguration
static class MyEmbeddedConfiguration {
@Bean
public MyBean myBean() { /*...*/ }
}
-
search for
@SpringBootConfiguration
at or above its Java package — which normally is the@SpringBootApplication
-
use the
@ComponentScan
defined by@SpringBootApplication
-
ignore any
@Configuration
components annotated using@TestConfiguration
except static classes embedded within test case
122.1.2. @SpringBootTest by Configuration
The snippet below shows an example of using @SpringBootTest
by configuration.
The test will:
@SpringBootTest(
classes={TestBasicsApp.class}
properties = { /* ... */ })
@Import(MyTestConfiguration.class)
public class ConfiguredNTest {
-
bootstrap using identified classes for initial components versus searching for
@SpringBootConfiguration
-
explicit bootstrapping turns off automatic inclusion of embedded static
@TestConfiguration
classes
-
-
explicitly adds component to application context and overrides any exclude filter
122.2. @TestConfiguration
@TestConfiguration
can be used to hide @Component
classes from the @ComponentScan
of sibling tests.
Use this annotation on @Configuration
classes that you want applied for only certain tests.
@Configuration (1)
@TestComponent (2)
public @interface TestConfiguration {
1 | is a @Configuration |
2 | designated and filtered out of conventional @ComponentScan |
@TestConfiguration
must typically be explicitly imported using @Import
into their test cases.
@SpringBootTest
@Import(MyTestConfiguration.class)
public class TestConfigurationNTest {
When using convention (@SpringBootTest() ), the default @ComponentScan is used and will only automatically find @TestConfiguration classes that are embdedded and static.
|
When using configuration (@SpringBootTest(classes={}) ), @TestConfiguration classes must be explicitly @Import -ed whether they are external or embedded.
It is always safe to @Import a @TestConfiguration — whether or not using convention, embedded, or external.
|
122.3. Example Spring Context
In our example Spring context, we will have a TipCalculator
component located using @ComponentScan
.
It will have the name "standardTippingImpl" if we do not supply an override in the @Component
annotation.
@Primary (1)
@Component
public class StandardTippingImpl implements TipCalculator {
1 | declaring type as primary to make example more significant |
That bean gets injected into BillCalculatorImpl.tipCalculator
because it implements the required type.
@Component
@RequiredArgsConstructor
public class BillCalculatorImpl implements BillCalculator {
private final TipCalculator tipCalculator;
122.4. Test TippingCalculator
Our intent here is to manually write a stub and have it replace the TipCalculator
from the application’s Spring context.
import org.springframework.boot.test.context.TestConfiguration;
...
@TestConfiguration(proxyBeanMethods = false) //skipped in @ComponentScan -- manually imported (1)
public class MyTestConfiguration {
@Bean
public TipCalculator standardTippingImpl() { (2)
return new TipCalculator() {
@Override
public BigDecimal calcTip(BigDecimal amount, ServiceQuality serviceQuality) {
return BigDecimal.ZERO; (3)
}
};
}
}
1 | @TestConfiguration annotation prevents class from being picked up in normal component scan |
2 | standardTippingImpl name matches existing component |
3 | test-specific custom response |
122.5. Enable Component Replacement
Since we are going to replace an existing component, we need to enable bean overrides using the following property definition.
@SpringBootTest(
properties = "spring.main.allow-bean-definition-overriding=true"
)
public class TestConfigurationNTest {
Otherwise, we end up with the following error when we make our follow-on changes.
***************************
APPLICATION FAILED TO START
***************************
Description:
The bean 'standardTippingImpl', defined in class path resource
[.../testconfiguration/MyTestConfiguration.class], could not be registered.
A bean with that name has already been defined in file
[.../tips/StandardTippingImpl.class] and overriding is disabled.
Action:
Consider renaming one of the beans or enabling overriding by setting
spring.main.allow-bean-definition-overriding=true
122.6. Embedded TestConfiguration
@TestConfiguration
class is automatically found using an embedded static class when using the conventional search for @SpringBootConfiguration
.
@SpringBootTest(properties={"..."}) (1)
public class TestConfigurationNTest {
@Autowired
BillCalculator billCalculator; (3)
@TestConfiguration(proxyBeanMethods = false)
static class MyEmbeddedTestConfiguration { (2)
@Bean
public TipCalculator standardTippingImpl() { ... }
}
1 | Explicit @SpringBootTest.classes was not specified |
2 | embedded static class with @TestConfiguration found automatically |
3 | injected billCalculator injected with @Bean from @TestConfiguration |
122.7. External TestConfiguration
Alternatively, we can place the configuration in a separate/stand-alone class if we want to share this with other test cases.
@TestConfiguration(proxyBeanMethods = false)
public class MyTestConfiguration {
@Bean
public TipCalculator tipCalculator() {
return new TipCalculator() {
@Override
public BigDecimal calcTip(BigDecimal amount, ServiceQuality serviceQuality) {
return BigDecimal.ZERO;
}
};
}
}
122.8. Using External Configuration
The external @TestConfiguration
will only be used if specifically named in either:
-
@Import.value
-
@SpringBootTest.classes
-
@ContextConfiguration.classes
Pick one way.
@SpringBootTest(
classes=MyTestConfiguration.class, //way2 (2)
properties = "spring.main.allow-bean-definition-overriding=true"
)
@ContextConfiguration(classes=MyTestConfiguration.class) //way3 (3)
@Import(MyTestConfiguration.class) //way1 (1)
public class TestConfigurationNTest {
1 | way1 is most standard way to add a component to Spring context without impacting "convention" rules
This is valid for tests and production @Configuration . |
2 | way2 leverages the @SpringBootTest but impacts "convention" rules |
3 | way3 pre-dates @SpringBootTest |
122.9. TestConfiguration Result
Running the following test results in:
-
a single
TipCalculator
registered in the list because each considered have the same name and overriding is enabled -
the
TipCalculator
used is one of the@TestConfiguration
-supplied components
@SpringBootTest(classes=TestBasicsApp.class, //disables embedded scan
properties = "spring.main.allow-bean-definition-overriding=true")
@Import(MyTestConfiguration.class)
public class TestConfigurationNTest {
@Autowired
BillCalculator billCalculator;
@Autowired
List<TipCalculator> tipCalculators;
@Test
void calc_has_been_replaced() {
//then
then(tipCalculators).as("too many topCalculators").hasSize(1);
then(tipCalculators.get(0).getClass().getName())
.as("unexpected tipCalc implementation class")
.matches(".*My.*TestConfiguration.*"); (1)
}
1 | @Primary TipCalculator bean replaced by our @TestConfiguration -supplied bean |
123. Test Suites
Sometimes you have a set of tests that have common expensive setup and/or teardown and you would like to execute that once (e.g., start dependencies, migrate test data). Test Suites provide a way to identify a set of classes/methods that should be executed under the umbrella of a single suite. The Test Suite supplies the initial setup and final teardown.
16:30:03.190 [main] INFO .ExampleSuiteTests -- Suite.setUpSuite() <=== common setup
16:30:06.218 [main] INFO .ExampleTestCaseOne -- One.setUpClass()
16:30:06.222 [main] INFO .ExampleTestCaseOne -- One.setUp()
16:30:06.223 [main] INFO .ExampleTestCaseOne -- One.testA()
16:30:06.224 [main] INFO .ExampleTestCaseOne -- One.tearDown()
16:30:06.228 [main] INFO .ExampleTestCaseOne -- One.setUp()
16:30:06.228 [main] INFO .ExampleTestCaseOne -- One.testB()
16:30:06.228 [main] INFO .ExampleTestCaseOne -- One.tearDown()
16:30:06.229 [main] INFO .ExampleTestCaseOne -- One.tearDownClass()
16:30:06.234 [main] INFO .ExampleTestCaseTwo -- Two.setUpClass()
16:30:06.234 [main] INFO .ExampleTestCaseTwo -- Two.setUp()
16:30:06.234 [main] INFO .ExampleTestCaseTwo -- Two.test()
16:30:06.234 [main] INFO .ExampleTestCaseTwo -- Two.tearDown()
16:30:06.235 [main] INFO .ExampleTestCaseTwo -- Two.tearDownClass()
16:30:06.236 [main] INFO .ExampleSuiteTests -- Suite.tearDownSuite() <=== common teardown
123.1. Junit 5 Suite Maven Dependencies
Suite support is provided in the Junit platform versus jupiter and requires additional dependencies.
<!-- for Suite support -->
<dependency>
<groupId>org.junit.platform</groupId>
<artifactId>junit-platform-suite</artifactId>
<scope>test</scope>
</dependency>
The junit-platform-suite
dependency brings in
-
junit-platform-suite-api
- needed to compile the code -
junit-platform-suite-engine
- needed to find and execute the suites at test time
123.2. JUnit 5 Suite Class
The Test Suite is annotated with @Suite
and populated with a set of @Select
annotations that identify packages or specific classes to include.
import org.junit.platform.suite.api.*;
@Suite
@SuiteDisplayName("Example Suite")
@SelectClasses({SuiteTestCaseOne.class, SuiteTestCaseTwo.class}) (1)
@Slf4j
public class ExampleSuiteTests {
@BeforeSuite (2)
public static void setUpSuite() throws InterruptedException {
log.info("Suite.setUpSuite()");
Thread.sleep(3_000); //make timestamp obvious this went first
}
@AfterSuite (3)
public static void tearDownSuite() {
log.info("Suite.tearDownSuite()");
}
}
1 | determine what test cases are part of the suite |
2 | optional setup that runs before all test cases |
3 | optional teardown that runs after all test cases |
123.3. Suite Test Classes
The test cases can be normal test classes.
However, if you only want them executed within the scope of the Suite, they must be in a separate package (to hide from the IDE) or named appropriately to not be picked up by Maven surefire.
The two examples below get bypassed by the default naming rules (e.g., by not starting/ending with Test
, Tests
, TestCase
)
|
|
123.4. Selection Options
There are several options for selecting tests to include in the Suite.
-
Explicit class and method name
@SelectMethod(type=SuiteTestCaseOne.class, name="testA") @SelectClasses(SuiteTestCaseTwo.class)
-
Package and Classname Patterns
@SelectPackages({"info.ejava.examples.app.testing.testbasics"}) @IncludeClassNamePatterns(".*SuiteTest.*") (1)
1 pattern must include the package name -
Tags
@SelectPackages({"info.ejava.examples.app.testing.testbasics"}) @IncludeClassNamePatterns(".*SuiteTest.*") (1) @IncludeTags("testme") (2)
1 must still locate classes 2 individual test(s) annotated with @Tags
124. Summary
In this module we:
-
learned the importance of testing
-
introduced some of the testing capabilities of libraries integrated into
spring-boot-starter-test
-
went thru an overview of JUnit Vintage and Jupiter test constructs
-
stressed the significance of using assertions in testing and the value in making them based on natural-language to make them easy to understand
-
introduced how to inject a mock into a subject under test
-
demonstrated how to define a mock for testing a particular scenario
-
demonstrated how to inspect calls made to the mock during testing of a subject
-
discovered how to switch default Mockito and AssertJ methods to match Business-Driven Development (BDD) acceptance test keywords
-
implemented unit integration tests with Spring context using
@SpringBootTest
-
implemented mocks into the Spring context of a unit integration test
-
ran tests using Maven Surefire
-
implemented a
@TestConfiguration
with component override -
grouped tests within Suite for grouping or startup/teardown efficiency
HouseRentals Assignment 1
copyright © 2025 jim stafford (jim.stafford@jhu.edu)
The following three areas (Config, Logging, and Testing) map out the different portions of "Assignment 1". It is broken up to provide focus.
-
Each of the areas (1a Config, 1b Logging, and 1c Testing) are separate but are to be turned in together, under a single root project tree (the same project tree used in assignment 0). There is no relationship between the classes used in the three areas — even if they have the same name. Treat them as separate.
-
Each of the areas are further broken down into parts. The parts of the Config area are separate. Treat them that way by working in separate module trees (under a common grandparent). The individual parts for Logging and Testing overlap. Once you have a set of classes in place — you build from that point. They should be worked/turned in as a single module each (one for Logging and one for Testing; under the same parent as Config).
A set of starter projects is available in assignment-starter/houserentals-starter
.
It is expected that you can implement the complete assignment on your own.
However, the Maven poms and the portions unrelated to the assignment focus are commonly provided for reference to keep the focus on each assignment part.
Your submission should not be a direct edit/hand-in of the starters.
Your submission should — at a minimum:
-
use you own Maven groupIds
-
use your own Java package names below a given base
-
extend either
spring-boot-starter-parent
orejava-build-parent
Your assignment submission should be a single-rooted source tree with sub-modules or sub-module trees for each independent area part. The assignment starters — again can be your guide for mapping these out.
|-- assignment1-houserentals-autoconfig
| |-- pom.xml
| |-- rentals-autoconfig-app
| |-- rentals-autoconfig-toolrentals
| `-- rentals-autoconfig-starter
|-- assignment1-houserentals-beanfactory # 1st
| |-- pom.xml
| |-- rentals-beanfactory-app
| |-- rentals-beanfactory-houserentals
| `-- rentals-beanfactory-iface
|-- assignment1-houserentals-configprops
| |-- pom.xml
| `-- src
|-- assignment1-houserentals-logging
| |-- pom.xml
| `-- src
|-- assignment1-houserentals-propertysource
| |-- pom.xml
| `-- src
|-- assignment1-houserentals-testing
| |-- pom.xml
| `-- src
`-- pom.xml <== your project root (separate from course examples tree)
Mockito Java Agent Warning
You may see the following warning in your test output.
For Java21, at least, it is just a warning.
The ejava-build-parent has a Mockito is currently self-attaching to enable the inline-mock-maker. This will no longer work in future releases of the JDK. Please add Mockito as an agent to your build what is described in Mockito's documentation: https://javadoc.io/doc/org.mockito/mockito-core/latest/org/mockito/Mockito.html#0.3 WARNING: A Java agent has been loaded dynamically (/Users/jim/.m2/repository/net/bytebuddy/byte-buddy-agent/1.15.11/byte-buddy-agent-1.15.11.jar) WARNING: If a serviceability tool is in use, please run with -XX:+EnableDynamicAgentLoading to hide this warning WARNING: If a serviceability tool is not in use, please run with -Djdk.instrument.traceUsage for more information WARNING: Dynamic loading of agents will be disallowed by default in a future release Java HotSpot(TM) 64-Bit Server VM warning: Sharing is only supported for boot loader classes because bootstrap classpath has been appended |
125. Assignment 1a: App Config
125.1. @Bean Factory Configuration
125.1.1. Purpose
In this portion of the assignment, you will demonstrate your knowledge of configuring a decoupled application integrated using Spring Boot. You will:
-
implement a service interface and implementation component
-
package a service within a Maven module separate from the application module
-
implement a Maven module dependency to make the component class available to the application module
-
use a @Bean factory method of a @Configuration class to instantiate a Spring-managed component
125.1.2. Overview
In this portion of the assignment you will be implementing a component class and defining that as a Spring bean using a @Bean
factory located within the core application JAR.

125.1.3. Requirements
-
Create an interface Maven module with
-
a
RentalDTO
class withname
property. This is a simple data class. -
a
RentalsService
interface with agetRandomRental()
method. This method returns a singleRentalDTO
instance.
-
-
Create a HouseRental implementation Maven module with
-
HouseRental implementation implementing the
RentalsService
interface that returns aRentalDTO
with a name (e.g., "houseRental0").
-
-
Create an application Maven module with
-
a class that
-
implements
CommandLineRunner
interface -
has the
RentalsService
component injected using constructor injection -
has a
run()
method that-
calls the
RentalsService
for a random HouseRentalDTO -
prints a startup message with the DTO name
ExampleRentals has started, rental:{houseRental0}
-
relies on a
@Bean
factory to register it with the container and not a@Component
mechanism
-
-
-
a
@Configuration
class with two@Bean
factory methods-
one
@Bean
factory method to instantiate aRentalsService
houseRental implementation -
one
@Bean
factory method to instantiate theAppCommand
injected with aRentalsService
bean (not a POJO)@Bean
factories that require external beans, can have the dependencies injected by declaring them in their method signature. Example:TypeA factoryA() {return new TypeA(); } TypeB factoryB(TypeA beanA) {return new TypeB(beanA); }
That way the you can be assured that the dependency is a fully initialized bean versus a partially initialized POJO.
-
-
a
@SpringBootApplication
class that initializes the Spring Context — which will process the@Configuration
class
-
-
Turn in a source tree with three or more complete Maven modules that will build and demonstrate a configured Spring Boot application.
125.1.4. Grading
Your solution will be evaluated on:
-
implement a service interface and implementation component
-
whether an interface module was created to contain interface and dependencies of that interface
-
whether an implementation module was created to contain a class implementation of the interface
-
-
package a service within a Maven module separate from the application module
-
whether an application module was created to house a
@SpringBootApplication
and@Configuration
set of classes
-
-
implement a Maven module dependency to make the component class available to the application module
-
whether at least three separate Maven modules were created with a one-way dependency between them
-
-
use a
@Bean
factory method of a@Configuration
class to instantiate Spring-managed components-
whether the
@Configuration
class successfully instantiates theRentalsService
component -
whether the
@Configuration
class successfully instantiates theAppCommand
component injected with aRentalsService
component.
-
125.1.5. Additional Details
-
The
spring-boot-maven-plugin
can be used to both build the Spring Boot executable JAR and execute the JAR to demonstrate the instantiations, injections, and desired application output. -
A quick start project is available in
assignment-starter/houserentals-starter/assignment1-houserentals-beanfactory
. Modify Maven groupId and Java package if used.
125.2. Property Source Configuration
125.2.1. Purpose
In this portion of the assignment, you will demonstrate your knowledge of how to flexibly supply application properties based on application, location, and profile options. You will:
-
implement value injection into a Spring Component
-
define a default value for the injection
-
specify property files from different locations
-
specify a property file for a basename
-
specify properties based on an active profile
-
specify a both straight properties and YAML property file sources
125.2.2. Overview
You are given a Java application that prints out information based on injected properties, defaults, a base property file, and executed using different named profiles. You are to supply several profile-specific property files that — when processed together — produce the required output.

This assignment involves no new Java coding (the "assignment starter" has all you need). It is designed as a puzzle where — given some constant surroundings — you need to determine what properties to supply and in which file to supply them, to satisfy all listed test scenarios.
The assignment is structured into two modules: app and support
-
app - is your assignment. The skeletal structure is provided in
houserentals-starter/assignment1-houserentals-propertysource
-
support - is provided in the
houserentals-starter/houserentals-support-propertysource
module and is to be used, unmodified through a Maven dependency. It contains a defaultapplication.properties
file with skeletal values, a component that gets injected with property values, and a unit integration test that verifies the program results.
The houserentals-support-propertysource
module provides the following resources.
- PropertyCheck Class
-
This class has property injections defined with default values when they are not supplied. This class will be in your classpath and automatically packaged within your JAR.
Supplied Component Classpublic class PropertyCheck implements CommandLineRunner { @Value("${spring.config.name:(default value)}") String configName; @Value("${spring.config.location:(default value)}") String configLocations; @Value("${spring.profiles.active:(default value)}") String profilesActive; @Value("${rentals.priority.source:not assigned}") String prioritySource; @Value("${rentals.db.url:not assigned}") String dbUrl;
- application.properties File
-
This file provides a template of a database URL with placeholders that will get populated from other property sources. This file will be in your classpath and automatically packaged within your JAR.
Supplied application.properties File#application.properties rentals.priority.source=application.properties rentals.db.user=user rentals.db.port=00000 (1) rentals.db.url=mongodb://${rentals.db.user}:${rentals.db.password}@${rentals.db.host}:${rentals.db.port}/test?authSource=admin
1 rentals.db.url
is built from several property placeholders.password
is not specified. - PropertySourceTest Class
-
a unit integration test is provided that can verify the results of your property file population. This test will run automatically during the Maven build.
Supplied Test Classpublic class PropertySourceTest { static final String CONFIG_LOCATION="classpath:/,optional:file:src/locations/"; class no_profile { @Test void has_expected_sources() throws Exception { @Test void has_generic_files_in_classpath() { @Test void has_no_credential_files_in_classpath() { @Test void sources_have_unique_properties() { class dev_dev1_profiles { @Test void has_expected_sources() throws Exception { @Test void sources_have_unique_properties() { class dev_dev2_profiles { @Test void has_expected_sources() throws Exception { @Test void sources_have_unique_properties() { class prd_site1_profiles { @Test void has_expected_sources() throws Exception { @Test void sources_have_unique_properties() { class prd_site2_profiles { @Test void has_expected_sources() throws Exception { @Test void sources_have_unique_properties() { class dev_dev1_dev2 { @Test void sources_have_unique_properties() { class prd_site1_site2 { @Test void sources_have_unique_properties() {
125.2.3. Requirements
The starter module has much of the setup already defined. |
-
Create a dependency on the support module. (provided in starter)
Your Maven Dependency on Provided Assignment Artifacts<dependency> <groupId>info.ejava.assignments.propertysource.houserentals</groupId> <artifactId>houserentals-support-propertysource</artifactId> <version>${ejava.version}</version> </dependency>
-
Add a @SpringBootApplication class with main() (provided in starter)
Your @SpringBootApplication Classpackage info.ejava_student.starter.assignment1.propertysource.rentals; import info.ejava.assignments.propertysource.rentals.PropertyCheck; @SpringBootApplication public class PropertySourceApp {
-
Provide the following property file sources. (provided in starter)
application.properties
will be provided through the dependency on the support module and will get included in the JAR.Your Property Classpath and File Path Filessrc/main/resources:/ (1) application-default.properties application-dev.yml (3) application-prd.properties src/locations/ (2) application-dev1.properties application-dev2.properties application-site1.properties application-site2.yml (3)
1 src/main/resources
files will get packaged into JAR and will automatically be in the classpath at runtime2 src/locations are not packaged into the JAR and will be referenced by a command-line parameter to add them to the config location path 3 example uses of YAML files yml files must be expressed as a YAML fileapplication-dev.yml and application-site2.yml must be expressed using YAML syntax -
Enable the unit integration test from the starter when you are ready to test — by removing
@Disabled
.package info.ejava_student.starter.assignment1.propertysource.rentals; import info.ejava.assignments.propertysource.rentals.PropertySourceTest; ... //we will cover testing in a future topic, very soon @Disabled //enable when ready to start assignment public class MyPropertySourceTest extends PropertySourceTest {
-
Use a constant base shell command. This part of the command remains constant.
$ mvn clean package -DskipTests=true (2) $ java -jar target/*-propertysource-1.0-SNAPSHOT-bootexec.jar --spring.config.location=classpath:/,optional:file:src/locations/ (1)
1 this is the base shell command for 5 specific commands that specify profiles active 2 need to skip tests to build JAR before complete The only modification to the command line will be the conditional addition of a profile activation.
--spring.profiles.active= (1)
1 the following 5 shell commands will supply a different value for this property -
Populate the property and YAML files so that the scenarios in the following paragraph are satisfied. The default starter with the "base command" and "no active profile" set, produces the following by default.
$ java -jar target/*-propertysource-1.0-SNAPSHOT-bootexec.jar --spring.config.location=classpath:/,optional:file:src/locations/ configName=(default value) configLocations=classpath:/,optional:file:src/locations/ profilesActive=(default value) prioritySource=application-default.properties Rentals has started dbUrl=mongodb://user:NOT_SUPPLIED@NOT_SUPPLIED:00000/test?authSource=admin
Any property value that does not contain a developer/site-specific value (e.g., defaultUser and defaultPass) must be provided by a property file packaged into the JAR (i.e., source src/main/resources
)Any property value that does contain a developer/site-specific value (e.g., dev1pass and site1Pass) must be provided by a property file in the file:
part of the location path and not in the JAR (i.e., sourcesrc/locations
).Complete the following 5 scenarios:
-
No Active Profile Command Expected Result
configName=(default value) configLocations=classpath:/,optional:file:src/locations/ profilesActive=(default value) prioritySource=application-default.properties Rentals has started dbUrl=mongodb://defaultUser:defaultPass@defaulthost:27027/test?authSource=admin
You must supply a populated set of configuration files so that, under this option, user:NOT_SUPPLIED@NOT_SUPPLIED:00000
becomesdefaultUser:defaultPass@defaulthost:27027
. -
dev,dev1 Active Profile Command Expected Result
--spring.profiles.active=dev,dev1
configName=(default value) configLocations=classpath:/,optional:file:src/locations/ profilesActive=dev,dev1 prioritySource=application-dev1.properties Rentals has started dbUrl=mongodb://devUser:dev1pass@127.0.0.1:11027/test?authSource=admin
-
dev,dev2 Active Profile Command Expected Result
--spring.profiles.active=dev,dev2
configName=(default value) configLocations=classpath:/,optional:file:src/locations/ profilesActive=dev,dev2 prioritySource=application-dev2.properties Rentals has started dbUrl=mongodb://devUser:dev2pass@127.0.0.1:22027/test?authSource=admin
The development profiles share the same user and host. -
prd,site1 Active Profile Command Expected Result
--spring.profiles.active=prd,site1
configName=(default value) configLocations=classpath:/,optional:file:src/locations/ profilesActive=prd,site1 prioritySource=application-site1.properties Rentals has started dbUrl=mongodb://prdUser:site1pass@db.site1.net:27017/test?authSource=admin
-
prd,site2 Active Profile Command Expected Result
--spring.profiles.active=prd,site2
configName=(default value) configLocations=classpath:/,optional:file:src/locations/ profilesActive=prd,site2 prioritySource=application-site2.properties Rentals has started dbUrl=mongodb://prdUser:site2pass@db.site2.net:27017/test?authSource=admin
The production/site profiles share the same user and port.
-
-
No property with the same value may be present in multiple property files. You must make use of property source inheritance when requiring a common value.
-
Turn in a source tree with a complete Maven module that will build and demonstrate the
@Value
injections for the different active profile settings.
125.2.4. Grading
Your solution will be evaluated on:
-
implement value injection into a Spring Component
-
whether component attributes were injected with values from property sources
-
-
define a default value for the injection
-
whether default values were correctly accepted or overridden
-
whether each unique property value was expressed in a single source file and property file inheritance was used when common values were needed
-
-
specify property files from different locations
-
whether your solution provides property values coming from multiple file locations
-
any property value that does not contain a developer/site-specific value (e.g.,
defaultUser
anddefaultPass
) must be provided by a property file within the JAR -
any property value that contains developer/site-specific values (e.g.,
dev1pass
andsite1pass
) must be provided by a property file outside of the JAR
-
-
the given
application.properties
file may not be modified -
named
.properties
files are supplied as properties files -
named
.yml
(i.e.,application-dev.yml
) files are supplied as YAML files
-
-
specify properties based on an active profile
-
whether your output reflects current values for
dev1
,dev2
,site1
, andsite2
profiles
-
-
specify both straight properties and YAML property file sources
-
whether your solution correctly supplies values for at least 1 properties file
-
whether your solution correctly supplies values for at least 1 YAML file
-
125.2.5. Additional Details
-
The
spring-boot-maven-plugin
can be used to both build the Spring Boot executable JAR and demonstrate the instantiations, injections, and desired application output. -
A quick start project is available in
assignment-starter/houserentals-starter/assignment1-houserentals-propertysource
that supplies much of the boilerplate file and Maven setup. Modify Maven groupId and Java package if used. -
An integration unit test (
PropertySourceTest
) is provided within the support module that can automate the verifications. -
Ungraded Question to Ponder: How could you at runtime, provide a parameter option to the application to make the following output appear?
Alternate OutputconfigName=houserentals configLocations=(default value) profilesActive=(default value) prioritySource=not assigned Rentals has started dbUrl=not assigned
125.3. Configuration Properties
125.3.1. Purpose
In this portion of the assignment, you will demonstrate your knowledge of injecting properties into a @ConfigurationProperties
class to be injected into components - to encapsulate the runtime configuration of the component(s).
You will:
-
map a Java @ConfigurationProperties class to a group of properties
-
create a read-only @ConfigurationProperties class using @ConstructorBinding
-
define a Jakarta EE Java validation rule for a property and have the property validated at runtime
-
generate boilerplate JavaBean methods using Lombok library
-
map nested properties to a @ConfigurationProperties class
-
reuse a @ConfigurationProperties class to map multiple property trees of the same structure
-
use @Qualifier annotation and other techniques to map or disambiguate an injection
125.3.2. Overview
In this assignment, you are going to finish mapping a YAML file of properties to a set of Java classes and have them injected as @ConfigurationProperty
beans.

BoatRentalProperties
is a straight-forward, single use bean that can have the class directly mapped to a specific property prefix.
RentalsProperties
will be mapped to two separate prefixes — so the mapping cannot be applied directly to that class.
Keep this in mind when wiring up your solution.
An integration unit test is supplied and can be activated when you are ready to test your progress.
125.3.3. Requirements
-
Given the following read-only property classes, application.yml file, and
@Component
…-
read-only property classes
@Value public class RentalProperties { private int id; private LocalDate rentalDate; private BigDecimal rentalAmount; private String renterName; private AddressProperties location; }
@Value public class BoatRentalProperties { private int id; private LocalDate rentalDate; private BigDecimal rentalAmount; private String renterName; private AddressProperties location; }
record AddressProperties(String city, String state){}
Lombok @Value
annotation defines the class to be read-only by only declaring getter()s and no setter()s. This will require use of constructor binding.Java 17 record can now be used to define a read-only class without using Lombok @Value
.Your IDE may warn you that Lombok @Value
augments the properties asprivate final
and need not be manually defined with those settings. Feel free to follow suggested corrections.The property classes are supplied in the starter module.
-
List<T> wrapper class to use as an annotated validation root for use with
@Bean
factories.@Data public class ListOf<T> { private @Valid List<T> data; }
-
application.yml
YAML filerentals: houses: data: - id: 1 rentalDate: 2010-07-01 rentalAmount: 100.00 (1) renterName: Joe Camper location: city: Jonestown state: PA #... tools: data: - id: 2 rental-date: 2000-01-01 rental-amount: 1000 (2) renter_name: Itis Clunker (3) location: city: Dundalk state: MD boatRental: id: 3 RENTAL_DATE: 2022-08-01 (4) RENTAL_AMOUNT: 200_000 RENTER-NAME: Alexus Blabidy (5) LOCATION: city: Annapolis state: MD
1 lower camelCase 2 lower kabob-case 3 lower snake_case 4 upper SNAKE-CASE 5 upper KABOB-CASE The full contents of the YAML file can be found in the
houserentals-support/houserentals-support-configprops
support project. YAML was used here because it is easier to express and read the nested properties.Notice that multiple text cases (upper, lower, snake, kabob) are used to map the the same Java properties. This demonstrates one of the benefits in using
@ConfigurationProperties
over@Value
injection — configuration files can be expressed in syntax that may be closer to the external domain. -
@Component
with constructor injection and getters to inspect what was injected//@Component @Getter @RequiredArgsConstructor public class PropertyPrinter implements CommandLineRunner { private final ListOf<RentalProperties> houses; (1) private final ListOf<RentalProperties> tools; (1) private final BoatRentalProperties boat; @Override public void run(String... args) { System.out.println("houses:" + format(houses.getData())); System.out.println("tools:" + format(tools.getData())); System.out.println("boat:" + format(null==boat ? null : List.of(boat))); } private String format(List<?> rentals) { return null==rentals ? "(null)" : String.format("%s", rentals.stream() .map(r->"*" + r.toString()) .collect(Collectors.joining(System.lineSeparator(), System.lineSeparator(), ""))); } }
1 houses and tools are wrapped in a custom class containing a validatable List
The source for the
PropertyPrinter
component is supplied in the starter module. Except for getting it registered as a component, there should be nothing needing change here. -
-
When running the application, a
@ConfigurationProperties
beans will be created to represent the contents of the YAML file as two separateListOf<RentalProperties>
objects and a BoatRentalProperties object. When properly configured, they will be injected into the@Component
, and and it will output the following.houses: *RentalsProperties(id=1, rentalDate=2010-07-01, rentalAmount=100.0, renterName=Joe Camper, location=AddressProperties(city=Jonestown, state=PA)) *RentalsProperties(id=4, rentalDate=2021-05-01, rentalAmount=500000, renterName=Jill Suburb, location=AddressProperties(city=, state=MD)) (1) *RentalPropertiesProperties(id=5, rentalDate=2021-07-01, rentalAmount=1000000, renterName=M.R. Bigshot, location=AddressProperties(city=Rockville, state=MD)) tools: *RentalProperties(id=2, rentalDate=2000-01-01, rentalAmount=1000, renterName=Itis Clunker, location=AddressProperties(city=Dundalk, state=MD)) boat: *BoatRentalProperties(id=3, rentalDate=2022-08-01, rentalAmount=200000, renterName=Alexus Blabidy, location=AddressProperties(city=Annapolis, state=MD))
1 one of the houseRentals addresses is missing a city The "assignment starter" supplies most of the Java code needed for the PropertyPrinter
. -
Configure your solution so that the
BoatRentalProperties
bean is injected into thePropertyPrinter
component along with the List of house and toolRentalProperties
. There is a skeletal configuration supplied in the application class. Most of your work will be within this class.@SpringBootApplication (3) public class ConfigPropertiesApp { public static void main(String[] args) (1) public ListOf<RentalsProperties> houses() { return new ListOf<>(); } (2) public ListOf<RentalsProperties> tools() { return new ListOf<>(); } }
1 three 2 edits 3 likely required -
Turn in a source tree with a complete Maven module that will build and demonstrate the configuration property processing and output of this application.
125.3.4. Grading
Your solution will be evaluated on:
-
map a Java @ConfigurationProperties class to a group of properties
-
whether Java classes were used to map values from the given YAML file
-
-
create a read-only @ConfigurationProperties class using @ConstructorBinding
-
whether read-only Java classes, using
@ConstructorBinding
were used to map values from the given YAML file
-
-
generate boilerplate JavaBean methods using Lombok library
-
whether lombok annotations were used to generate boilerplate Java bean code
-
-
map nested properties to a @ConfigurationProperties class
-
whether nested Java classes were used to map nested properties from a given YAML file
-
-
reuse a @ConfigurationProperties class to map multiple property trees of the same structure
-
whether multiple property trees were instantiated using the same Java classes
-
-
use @Qualifier annotation or other techniques to map or disambiguate an injection
-
whether multiple
@ConfigurationProperty
beans of the same type could be injected into a@Component
using a disambiguating technique.
-
125.3.5. Additional Details
-
A starter project is available in
houserentals-starter/assignment1-houserentals-configprops
. Modify Maven groupId and Java package if used.
-
The
spring-boot-maven-plugin
can be used to both build the Spring Boot executable JAR and demonstrate the instantiations, injections, and desired application output. -
The support project contains an integration unit test that verifies the
PropertyPrinter
component was defined and injected with the expected data. It is activated through a Java class in the starter module. Activate it when you are ready to test.//we will cover testing in a future topic, very soon @Disabled //remove to activate when ready to test public class MyConfigurationTest extends ConfigurationPropertyTest { }
-
Ungraded Question to Ponder: What change(s) could be made to the application to validate the properties and report the following error?
Alternate OutputBinding to target ...ListOf<...RentalProperties> failed: Property: rentals.houses.data[1].location.city: Value: "" Reason: must not be blank
125.4. Auto-Configuration
125.4.1. Purpose
In this portion of the assignment, you will demonstrate your knowledge of developing @Configuration
classes used for Auto-Configuration of an application.
You will:
-
Create a
@Configuration
class or@Bean
factory method to be registered based on the result of a condition at startup -
Create a Spring Boot Auto-configuration module to use as a "Starter"
-
Bootstrap Auto-configuration classes into applications using an
… AutoConfiguration.imports
metadata file -
Create a conditional component based on the presence of a property value
-
Create a conditional component based on a missing component
-
Create a conditional component based on the presence of a class
-
Define a processing dependency order for Auto-configuration classes
125.4.2. Overview
In this assignment, you will be building a starter module, with a prioritized list of Auto-Configuration classes that will bootstrap an application depending on runtime environment.
This application will have one (1) type of RentalsService
out of a choice of two (2; HouseRentalsService or ToolRentalsService) based on the environment at runtime.

Make the @SpringBootApplication class package independent of @Configuration class packages
The Java package for the @SpringBootApplication class must not be a parent or at the same Java package as the @Configuration classes.
Doing so, would place the @Configuration classes in the default component scan path and make them part of the core application — versus a conditional extension of the application.
|
125.4.3. Requirements
You have already implemented the RentalsService interface and HouseRentals implementation modules in your Bean Factory solution. You will reuse them through a Maven dependency. ToolRentals implementation is a copy of HouseRentals implementation with name changes. |
-
Create a RentalsService interface module (already completed for beanfactory)
-
Add an interface to return a random rental as a
RentalDTO
instance
-
-
Create a HouseRentals implementation implementation module (already completed for beanfactory)
-
Add an implementation of the interface to return a RentalDTO with "house" in the name property.
-
-
Create a ToolRentals implementation implementation module (new)
-
Add an implementation of the interface to return a RentalDTO with "tool" in the name property.
-
-
Create an Application Module with a
@SpringBootApplication
class-
Add a
CommandLineRunner
implementation class that gets injected with aRentalsService
bean and prints "Rentals has started" with the name of rental coming from the injected bean. (mostly provided)-
Account for a null implementation injected when there is no implementation such that it still quietly prints the state of the component.
-
Include an injection (by any means) for properties
rentals.active
andrentals.preference
to print their values. Account for when they are not supplied.
-
-
Add a
@Bean
factory for theCommandLineRunner
implementation class — registered as "appCommand".-
Make the injection of the RentalsService optional to account for when there is no implementation
Making an injection optional@Autowired(required=false)
-
-
Do not place any direct Java or Maven dependencies from the Application Module to the RentalService implementation modules.
At this point you are have mostly repeated the bean factory solution except that you have eliminated the @Bean
factory for theRentalsService
in the Application module, added a ToolRental implementation option, and removed a few Maven module dependencies.
-
-
Create a Rental starter Module. This module will contain a set of
@AutoConfiguration
classes with runtime declarative conditions to identify which Rental type will be used.-
Add a dependency on the RentalsService interface module
-
Add a dependency on the RentalsService implementation modules and make them "optional" (this is important) so that the application module will need to make an explicit Maven dependency on the implementation for them to be on the runtime classpath.
-
Add three conditional
@AutoConfiguration
classes-
one that provides a
@Bean
factory for the ToolRentalsService implementation class-
Make this conditional on the presence of the ToolRental class(es) being available on the classpath
-
-
one that provides a
@Bean
factory for the HouseRentalsService implementation class-
Make this conditional on the presence of the HouseRental class(es) being available on the classpath
-
-
A third that provides another
@Bean
factory for the ToolRental implementation class-
Make this conditional on the presence of the ToolRental class(es) being available on the classpath
-
Make this also conditional on the property
rentals.preference
having the value oftools
.
-
-
-
Set the following priorities for the
@AutoConfiguration
classes-
make the ToolRental/property (3rd from above) the highest priority
-
make the HouseRental factory the next highest priority
-
make the ToolRental factory the lowest priority
You can use org.springframework.boot.autoconfigure.AutoConfigureOrder
to set a relative order — with the lower value having a higher priority.
-
-
Disable all RentalsService implementation
@Bean
factories if the propertyrentals.active
is present and has the valuefalse
Treat false
as being not the valuetrue
. Spring Boot does not offer a disable condition, so you will be looking to enable when the property istrue
or missing. -
Perform necessary registration steps within the Starter module to make the Auto-configuration classes visible to the application bootstrapping.
If you don’t know how to register an @AutoConfiguration
class and bypass this step, your solution will not work.Spring Boot only prioritizes explicitly registered @AutoConfiguration
/@Configuration
classes and not nested@Configuration
classes within them.
-
-
Augment the Application module pom to address dependencies
-
Add a dependency on the Starter Module (provided)
-
Create a profile (
houses
) that adds a direct dependency on the HouseRentals implementation module. (provided) The "assignment starter" provides an example of this. -
Create a profile (
tools
) that adds a direct dependency on the ToolRentals implementation module. (provided)Easy Profile Activation within IDEYou can manually activate the provided profile activations within your IDE by negating the property name (e.g.,
!houses
). Instead of activating when the profile is named (-Phouses
) or property present (-Dhouses
), the profile will be activated when the property is missing — which is the default if you do nothing to define it.<activation> <property> <name>!houses</name> (1) </property> </activation>
1 (easily) triggering profile within IDE to include houses implementation in classpath
-
-
Verify your solution will determine its results based on the available classes and properties at runtime. Your solution must have the following behavior
-
no Maven profiles active and no properties provided
$ pwd .../assignment1-houserentals-autoconfig $ mvn dependency:list -f *-autoconfig-app | egrep 'ejava-student.*module' (starter module) (interface module) (1) $ mvn clean package $ java -jar *-autoconfig-app/target/*-autoconfig-app-*-bootexec.jar rentals.active=(not supplied) rentals.preference=(not supplied) Rentals is not active (2)
1 no RentalsService implementation jars in dependency classpath 2 no implementation was injected because none in the classpath
-
Silence Test Output
You can turn off tests to focus on the application output by adding -DskipTests to the mvn build command.
|
-
houses
only Maven profile active and no properties provided$ mvn dependency:list -f *-autoconfig-app -P houses | egrep 'ejava-student.*module' (starter module) (interface module) (HouseRentals implementation module) (1) $ mvn clean package -P houses $ java -jar *-autoconfig-app/target/*-autoconfig-app-*-bootexec.jar rentals.active=(not supplied) rentals.preference=(not supplied) Rentals has started, rental:{houseRental0} (2)
1 HouseRentals implementation JAR in dependency classpath 2 HouseRentalsService was injected because only implementation in classpath -
tools
only Maven profile active and no properties provided$ mvn dependency:list -f *-autoconfig-app -P tools | egrep 'ejava-student.*module' (starter module) (interface module) (ToolRentals implementation module) (1) $ mvn clean package -P tools $ java -jar *-autoconfig-app/target/*-autoconfig-app-*-bootexec.jar rentals.active=(not supplied) rentals.preference=(not supplied) Rentals has started, rental:{toolRental0} (2)
1 ToolRentals implementation JAR in dependency classpath 2 ToolRentalsService was injected because only implementation in classpath -
houses
andtools
Maven profiles active$ mvn dependency:list -f *-autoconfig-app -P tools,houses | egrep 'ejava-student.*module' (starter module) (interface module) (HouseRentals implementation module) (1) (ToolRentals implementation module) (2) $ mvn clean install -P tools,houses $ java -jar *-autoconfig-app/target/*-autoconfig-app-*-bootexec.jar rentals.active=(not supplied) rentals.preference=(not supplied) Rentals has started, rental:{houseRental0} (3)
1 HouseRentals implementation JAR in dependency classpath 2 ToolRentals implementation JAR in dependency classpath 3 HouseRentalsService was injected because of higher-priority -
houses
andtools
Maven profiles active and Spring propertyRental.preference=tools
$ mvn clean install -P tools,houses (1) java -jar rentals-autoconfig-app/target/rentals-autoconfig-app-1.0-SNAPSHOT-bootexec.jar --rentals.preference=tools (2) rentals.active=(not supplied) rentals.preference=tools Rentals has started, rental:{toolRental0} (3)
1 HouseRental and ToolRental implementation JARs in dependency classpath 2 rentals.preference
property supplied withtools
value3 ToolRentalsService implementation was injected because of preference specified -
houses
andtools
Maven profiles active and Spring propertyrentals.active=false
$ mvn clean install -P tools,houses (1) $ java -jar rentals-autoconfig-app/target/rentals-autoconfig-app-1.0-SNAPSHOT-bootexec.jar --rentals.active=false (2) rentals.active=false rentals.preference=(not supplied) Rentals is not active (3)
1 HouseRental and ToolRental implementation JARs in dependency classpath 2 rentals.active
property supplied withfalse
value3 no implementation was injected because feature deactivated with property value -
Turn in a source tree with a complete Maven module that will build and demonstrate the Auto-Configuration property processing and output of this application.
-
125.4.4. Grading
Your solution will be evaluated on:
-
Create a
@Configuration
class/@Bean
factory method to be registered based on the result of a condition at startup-
whether your solution provides the intended implementation class based on the runtime environment
-
-
Create a Spring Boot Auto-configuration module to use as a "Starter"
-
whether you have successfully packaged your
@Configuration
classes as Auto-Configuration classes outside the package scanning of the@SpringBootApplication
-
-
Bootstrap Auto-configuration classes into applications using a
AutoConfiguration.imports
metadata file-
whether you have bootstrapped your Auto-Configuration classes so they are processed by Spring Boot at application startup
-
-
Create a conditional component based on the presence of a property value
-
whether you activate or deactivate a
@Bean
factory based on the presence or absence of a specific the a specific property
-
-
Create a conditional component based on a missing component
-
whether you activate or deactivate a
@Bean
factory based on the presence or absence of a specific@Component
-
-
Create a conditional component based on the presence of a class
-
whether you activate or deactivate a
@Bean
factory based on the presence or absence of a class -
whether your starter causes unnecessary dependencies on the Application module
-
-
Define a processing dependency order for Auto-configuration classes
-
whether your solution is capable of implementing the stated priorities of which bean implementation to instantiate under which conditions
-
125.4.5. Additional Details
-
A starter project is available in
houserentals-starter/assignment1-houserentals-autoconfig
. Modify Maven groupId and Java package if used. -
A unit integration test is supplied to check the results. We will cover testing very soon. Activate the test when you are ready to get feedback results. The test requires:
-
All classes be below the
info.ejava_student
Java package -
The component class injected with the dependency have the bean identity of
appCommand
. -
The injected service made available via
getRentalsService()
method within appCommand.
-
126. Assignment 1b: Logging
126.1. Application Logging
126.1.1. Purpose
In this portion of the assignment, you will demonstrate your knowledge of injecting and calling a logging framework. You will:
-
obtain access to an SLF4J Logger
-
issue log events at different severity levels
-
format log events for regular parameters
-
filter log events based on source and severity thresholds
126.1.2. Overview
In this portion of the assignment, you are going to implement a call thread through a set of components that are in different Java packages that represent different levels of the architecture.
Each of these components will setup an SLF4J Logger
and issue logging statements relative to the thread.

126.1.3. Requirements
All data is fake and random here. The real emphasis should be placed on the logging events that occur on the different loggers and not on creating a realistic HouseRental result. |
-
Create several components in different Java sub-packages (app, svc, and repo). They can be instantiated using the component scanpath or @Bean factory (partially provided).
-
an
AppCommand
component class in theapp
Java sub-package -
a
HouseRentalsServiceImpl
component class in thesvc
Java sub-package -
a
HouseRentalsHelperImpl
component class in thesvc
Java sub-package -
a
HouseRentalsRepositoryImpl
component class in therepo
Java sub-package
-
-
Implement a chain of calls from the
AppCommand
@Component
run() method through the other components.Figure 35. Required Call Sequence-
AppCommand.run() calls ServiceImpl.calcDelta(houseId, renterId) with a
houseId
andrenterId
to determine a delta between the two instances -
ServiceImpl.calcDelta(houseId, renterId) calls RepositoryImpl (getLeaderByHouseId(houseId) and getByRenterId(renterId)) to get
HouseRentalDTOs
-
RepositoryImpl can create transient instances with provided Ids and fake remaining properties
-
-
ServiceImpl.calcDelta(houseId, renterId) also calls ResultsHelper.calcDelta() to get a delta between the two
HouseRentalDTOs
-
HelperImpl.calcDelta(leader, target) calls HouseRentalDTO.getAmount() on the two provided
HouseRentalDTO
instances to determine the deltaThe focus of logging and this assignment really starts at this point and forward. I have considered writing the interaction logic above for you to eliminate this distraction within a logging assignment. However, I found that at this early point in the semester and assignments — this is also a good time to practice essential skills of creating components with dependencies and simple interactions.
-
-
Implement a
toString()
method inHouseRentalDTO
that includes thehouseId
,renterId
, andamount
information. (provided) -
Instantiate an SLF4J
Logger
into each of the four components-
manually instantiate a static final
Logger
with the name "X.Y" inAppCommand
-
leverage the Lombok library to instantiate a
Logger
with a name based on the Java package and name of the hosting class for all other components
-
-
Implement logging statements in each of the methods
-
AppCommand.run() logs message with text "HouseRentals has started"
-
the severity of AppCommand logging events are all INFO (and no other levels)
-
-
RepositoryImpl logs the contents of each returned dto
-
the severity of RepositoryImpl logging events are all TRACE
-
-
HelperImpl logs the request/result information
-
the severity of HelperImpl.calcDelta() logging events are DEBUG and TRACE (there must be at least two — one of each and no other levels)
-
-
ServiceImpl logs the request/result information
-
the severity of ServiceImpl.calcDelta() logging events are all INFO and TRACE (there must be at least two — one of each and no other levels)
-
-
-
Output available results information in log statements
-
Leverage the SLF4J parameter formatting syntax when implementing the log
-
For each of the INFO and DEBUG statements, include only the
HouseRentalDTO
property values (e.g., houseId, renterId, timeDelta)Use direct calls on individual properties for INFO and DEBUG statementsi.e., houseRental.getHouseId(), houseRental.getRenterId(), etc. -
For each of the TRACE statements, use the inferred
HouseRentalDTO.toString()
method to log the HouseRentalDTO.Use inferred toString() on passed object on TRACE statementsi.e., log.debug("…", houseRental) — no direct calls totoString()
-
-
Supply two Spring profiles
-
the root logger must be turned off by default (e.g., in
application.properties
) -
an
app-debug
Spring profile that turns on DEBUG and above priority (e.g., DEBUG, INFO, WARN, ERROR) logging events for all loggers in the application, including "X.Y" -
a
repo-only
Spring profile that turns on only log statements from the repo class(es).
-
-
Wrap your solution in a Maven build that executes the JAR three times with: (provided)
-
(no Spring profile) - no logs should be produced
-
app-debug
Spring profile-
DEBUG and higher priority logging events from the application (including "X.Y") are output to console
-
no TRACE messages are output to the console
-
-
repo-only
Spring profile-
logging events from repository class(es) are output to the console
-
no other logging events are output to the console
-
-
126.1.4. Grading
Your solution will be evaluated on:
-
obtain access to an SLF4J Logger
-
whether you manually instantiated a Logger into the AppCommand
@Component
-
whether you leveraged Lombok to instantiate a Logger into the other
@Components
-
whether your App Command
@Component
logger was named "X.Y" -
whether your other
@Component
loggers were named after the package/class they were declared in
-
-
issue log events at different severity levels
-
where logging statements issued at the specified verbosity levels
-
-
format log events for regular parameters
-
whether SLF4J format statements were used when including variable information
-
-
filter log events based on source and severity thresholds
-
whether your profiles set the logging levels appropriately to only output the requested logging events
-
126.1.5. Other Details
-
You may use any means to instantiate/inject the components (i.e.,
@Bean
factories or@Component
annotations) -
You are encouraged to use Lombok to declare constructors, getter/setter methods, and anything else helpful except for the manual instantiation of the "X.Y" logger in
AppCommand
. -
A starter project is available in
houserentals-starter/assignment1-houserentals-logging
. It contains a Maven pom that is configured to build and run the application with the following Spring profiles for this assignment:-
no profile
-
app-debug
-
repo-only
-
appenders
(used later in this assignment) -
appenders
andtrace
Modify Maven groupId and Java package if used.
-
-
There is an integration unit test (
MyLoggingNTest
) provided in the starter module. We will discuss testing very soon. Enable this test when you are ready to have the results evaluated.
126.2. Logging Efficiency
126.2.1. Purpose
In this portion of the assignment, you will demonstrate your knowledge of making suppressed logging efficient. You will:
-
efficiently bypass log statements that do not meet criteria
126.2.2. Overview
In this portion of the assignment, you are going to increase the cost of calling toString()
on the logged object and work to only pay that penalty when needed.
Make your changes to the previous logging assignment solution. Do not create a separate module for this work. |

126.2.3. Requirements
-
Update the
toString()
method inHouseRentalDTO
to be expensive to call-
artificially insert a 750 milliseconds delay within the
toString()
call
-
-
Refactor your log statements, if required, to only have
toString()
called when TRACE is active-
leverage the SLF4J API calls to make that as simple as possible
-
126.2.4. Grading
Your solution will be evaluated on:
-
efficiently bypass log statements that do not meet criteria
-
whether your
toString()
method paused the calling thread for 750 milliseconds when TRACE threshold is activated -
whether the calls to
toString()
are bypassed when priority threshold is set higher than TRACE -
the simplicity of your solution
-
126.2.5. Other Details
-
Include these modifications with the previous work on this overall logging assignment. Meaning — there will not be a separate module turned in for this portion of the assignment.
-
The
app-debug
should not exhibit any additional delays. Therepo-only
should exhibit a 1.5 (2x750msec) second delay. -
There is an integration unit test (
MyLoggingEfficiencyNTest
) provided in the starter module. We will discuss testing very soon. Enable this test when you are ready to have the results evaluated.
126.3. Appenders and Custom Log Patterns
126.3.1. Purpose
In this portion of the assignment, you will demonstrate your knowledge of assigning appenders to loggers and customizing logged events. You will:
-
filter log events based on source and severity thresholds
-
customize log patterns
-
customize appenders
-
add contextual information to log events using Mapped Diagnostic Context
-
use Spring Profiles to conditionally configure logging
126.3.2. Overview
In this portion of the assignment you will be creating/configuring a few basic appenders and mapping loggers to them — to control what, where, and how information is logged. This will involve profiles, property files, and a logback configuration file.
Make your changes to the original logging assignment solution. Do not create a separate module for this work. |

Except for setting the MDC, you are writing no additional code in this portion of the assignment. Most of your work will be in filling out the logback configuration file and setting properties in profile-based property files to tune logged output. |
126.3.3. Requirements
-
Declare two Appenders as part of a custom Logback configuration
-
CONSOLE appender to output to stdout
-
FILE appender to output to a file
target/logs/appenders.log
-
-
Assign the Appenders to Loggers
-
root logger events must be assigned to the CONSOLE Appender
-
any log events issued to the "X.Y" Logger must be assigned to both the CONSOLE and FILE Appenders
-
any log events issued to the "…svc" Logger must also be assigned to both the CONSOLE and FILE Appenders
-
any log events issued to the "…repo" Logger must only be assigned to the FILE Appender
Remember "additivity" rules for inheritance and appending assignment These are the only settings you need to make within the Appender file. All other changes can be done through properties. However, there will be no penalty (just complexity) in implementing other mechanisms.
-
-
Add an
appenders
profile that-
automatically enacts the requirements above
-
sets a base of INFO severity and up for all loggers with your application
-
-
Add a
requestId
property to the Mapped Diagnostic Context (MDC)Figure 37. Initialize Mapped Diagnostic Context (MDC)-
generate a random/changing value using a 36 character UUID String
Example: UUID.randomUUID().toString()
⇒d587d04c-9047-4aa2-bfb3-82b25524ce12
-
insert the value prior to the first logging statement — in the
AppCommand
component -
remove the MDC property when processing is complete within the
AppCommand
component
-
-
Declare a custom logging pattern in the
appenders
profile that includes the MDCrequestId
value in each log statements written by the FILE Appender-
The MDC
requestId
is only output by the FILE Appender. Encase the UUID within square[]
brackets so that it can be found in a pattern search more easilyExample: [d587d04c-9047-4aa2-bfb3-82b25524ce12]
-
The MDC
requestId
is not output by the CONSOLE Appender
-
-
Add an additional
trace
profile that-
activates logging events at TRACE severity and up for all loggers with your application
-
adds method and line number information to all entries in the FILE Appender but not the CONSOLE Appender. Use a format of
method:lineNumber
in the output.Example: run:27
Optional: Try defining the logging pattern once with an optional property variable that can be used to add method and line number expression versus repeating the definition twice.
-
-
Apply the
appenders
profile to-
output logging events at INFO severity and up to both CONSOLE and FILE Appenders
-
include the MDC
requestId
in events logged by the FILE Appender -
not include method and line number information in events logged
-
-
Apply the
appenders
andtrace
profiles to-
output logging events at TRACE severity and up to both CONSOLE and FILE Appenders
-
continue to include the MDC
requestId
in events logged by the FILE Appender -
add method and line number information in events logged by the FILE Appender
-
126.3.4. Grading
Your solution will be evaluated on:
-
filter log events based on source and severity thresholds
-
whether your log events from the different Loggers were written to the required appenders
-
whether a log event instance appeared at most once per appender
-
-
customize log patterns
-
whether your FILE Appender output was augmented with the
requestId
whenappenders
profile was active -
whether your FILE Appender output was augmented with method and line number information when
trace
profile was active
-
-
customize appenders
-
whether a FILE and CONSOLE appender were defined
-
whether a custom logging pattern was successfully defined for the FILE Logger
-
-
add contextual information to log events using Mapped Diagnostic Context
-
whether a
requestId
was added to the Mapped Data Context (MDC) -
whether the
requestId
was included in the customized logging pattern for the FILE Appender when theappenders
profile was active
-
-
use Spring Profiles to conditionally configure logging
-
whether your required logging configurations where put in place when activating the
appenders
profile -
whether your required logging configurations where put in place when activating the
appenders
andtrace
profiles
-
126.3.5. Other Details
-
You may use the default Spring Boot LogBack definition for the FILE and CONSOLE Appenders (i.e., include them in your logback configuration definition).
Included Default Spring Boot LogBack definitions<configuration> <include resource="org/springframework/boot/logging/logback/defaults.xml"/> <include resource="org/springframework/boot/logging/logback/console-appender.xml"/> <include resource="org/springframework/boot/logging/logback/file-appender.xml"/> ...
-
Your
appenders
andtrace
profiles may re-define the logging pattern for the FILE logger or add/adjust parameterized definitions. However, try to implement an optional parameterization as your first choice to keep from repeating the same definition. -
The following snippet shows an example resulting logfile from when
appenders
and thenappenders,trace
profiles were activated. Yours may look similar to the following:Example target/logs/appenders.log - "appenders" profile active$ rm target/logs/appenders.log $ java -jar target/assignment1-*-logging-1.0-SNAPSHOT-bootexec.jar --spring.profiles.active=appenders $ head target/logs/appenders.log head target/logs/appenders.log (1) 21:46:01.335 INFO -- [c934e045-1294-43c9-8d22-891eec2b8b84] Y : HouseRentals has started (2)
1 requestId
is supplied in all FILE output whenappenders
profile active2 no method and line number info supplied Example target/logs/appenders.log - "appenders,trace" profiles active$ rm target/logs/appenders.log $ java -jar target/assignment1-*-logging-1.0-SNAPSHOT-bootexec.jar --spring.profiles.active=appenders,trace $ head target/logs/appenders.log $ head target/logs/appenders.log (1) 21:47:33.784 INFO -- [0289d00e-5b28-4b01-b1d5-1ef8cf203d5d] Y.run:27 : HouseRentals has started (2)
1 requestId
is supplied in all FILE output whenappenders
profile active2 method and line number info are supplied -
There is a set of unit integration tests provided in the support module. We will cover testing very soon. Enable them when you are ready to evaluate your results.
127. Assignment 1c: Testing
The following parts are broken into different styles of conducting a pure unit test and unit integration test. None of the approaches are deemed to be "the best" for all cases.
-
tests that run without a Spring context can run blazingly fast, but lack the target runtime container environment
-
tests that use Mocks keep the focus on the subject under test, but don’t verify end-to-end integration
-
tests that assemble real components provide verification of end-to-end capability but can introduce additional complexities and performance costs
It is important that you come away knowing how to implement the different styles of unit testing so that they can be leveraged based on specific needs.
127.1. Demo
The assignment1-houserentals-testing
assignment starter contains a @SpringBootApplication
main class and some demonstration code that will execute at startup when using the demo
profile.
$ mvn package -Pdemo
06:34:21.217 INFO -- RentersServiceImpl : renter added: RenterDTO(id=null, firstName=warren, lastName=buffet, dob=1930-08-30)
06:34:21.221 INFO -- RentersServiceImpl : invalid renter: RenterDTO(id=null, firstName=future, lastName=buffet, dob=2023-07-14), [renter.dob: must be greater than 12 years]
You can follow that thread of execution through the source code to get better familiarity with the code you will be testing.
Starter Contains 2 Example Ways to Implement CommandLineRunner
There are actually 2 sets of identical output generated during the provided demo execution.
The starter is supplied with two example ways to implement a Implementing CommandLineRunner as a Class that Implements Interface
Returning a Lambda Function that Implements Interface
|
127.2. Unit Testing
127.2.1. Purpose
In this portion of the assignment, you will demonstrate your knowledge of implementing a unit test for a Java class. You will:
-
write a test case and assertions using JUnit 5 "Jupiter" constructs
-
leverage the AssertJ assertion library
-
execute tests using Maven Surefire plugin
127.2.2. Overview
In this portion of the assignment, you are going to implement a test case with 2 unit tests for a completed Java class.

The code under test is 100% complete and provided to you in a separate houserentals-support-testing
module.
<dependency>
<groupId>info.ejava.assignments.testing.houserentals</groupId>
<artifactId>houserentals-support-testing</artifactId>
<version>${ejava.version}</version>
</dependency>
Your assignment will be implemented in a module you create and form a dependency on the implementation code.
127.2.3. Requirements
-
Start with a dependency on supplied and completed
RenterValidatorImpl
andRenterDTO
classes in thehouserentals-support-testing
module. You only need to understand and test them. You do not need to implement or modify anything being tested.-
RenterValidatorImpl implements a
validateNewRenter
method that returns aList<String>
with identified validation error messages (provided) -
RenterDTO must have the following to be considered valid for registration: (provided)
-
null
id
-
non-blank
firstName
andlastName
-
dob
older than minAge
-
-
-
Implement a plain unit test case class for
RenterValidatorImpl
-
the test must be implemented without the use of a Spring context
-
all instance variables for the test case must come from plain POJO calls
-
tests must be implemented with JUnit 5 (Jupiter) constructs.
-
tests must be implemented using AssertJ assertions. Either BDD or regular form of assertions is acceptable.
-
-
The unit test case must have an
init()
method configured to execute "before each" test-
this can be used to initialize variables prior to each test
-
-
The unit test case must have a test that verifies a valid RenterDTO will be reported as valid.
-
The unit test case must have a test method that verifies an invalid RenterDTO will be reported as invalid with a string message for each error.
-
Name the test so that it automatically gets executed by the Maven Surefire plugin.
127.2.4. Grading
Your solution will be evaluated on:
-
write a test case and assertions using JUnit 5 "Jupiter" constructs
-
whether you have implemented a pure unit test absent of any Spring context
-
whether you have used JUnit 5 versus JUnit 4 constructs
-
whether your
init()
method was configured to be automatically called "before each" test -
whether you have tested with a valid and invalid
RenterDTO
and verified results where appropriate
-
-
leverage AssertJ assertion libraries
-
whether you have used assertions to identify pass/fail
-
whether you have used the AssertJ assertions
-
whether your assertions that detect errors are expressive in reporting the error (e.g., not
false!=true
or1!=0
)
-
-
execute tests using Maven Surefire plugin
-
whether your unit test is executed by Maven surefire during a build
-
127.2.5. Additional Details
-
A quick start project is available in
houserentals-starter/assignment1-houserentals-testing
, but-
copy the module into your own area
-
modify at least the Maven groupId and Java package when used
-
-
You are expected to form a dependency on the
houserentals-support-testing
module. The only things present in yoursrc/main
would be demonstration code that is supplied to you in the starter — but not part of any requirement.
127.3. Mocks
127.3.1. Purpose
In this portion of the assignment, you will demonstrate your knowledge of instantiating a Mock as part of unit testing. You will:
-
implement a mock (using Mockito) into a JUnit unit test
-
define custom behavior for a mock
-
capture and inspect calls made to mocks by subjects under test
127.3.2. Overview
In this portion of the assignment, you are going to again implement a unit test case for a class and use a mock for one of its dependencies.

127.3.3. Requirements
-
Start with a dependency on supplied and completed
RentersServiceImpl
and other classes in thehouserentals-support-testing
module. You only need to understand and test them. You do not need to implement or modify anything being tested.-
RentersServiceImpl implements a
createRenter
method that (supplied)-
validates the renter using a
RenterValidator
instance -
assigns the
id
if valid -
throws an exception with the error messages from the validator if invalid
-
-
-
Implement a unit test case for the
RentersService
to verify validation for a valid and invalidRenterDTO
-
the test case must be implemented without the use of a Spring context
-
all instance variables for the test case, except for the mock, must come from plain POJO calls
-
tests must be implemented using AssertJ assertions. Either BDD or regular form of assertions is acceptable.
-
a Mockito Mock must be used for the
RenterValidator
instance. You may not use theRenterValidatorImpl
class as part of this test -
the same
Renter
must be used for both valid and invalid tests. The difference will be triggered by the behavior trained into the validator Mock.
-
-
The unit test case must have an
init()
method configured to run "before each" test and initialize theRentersServiceImpl
with the Mock instance forRenterValidator
. -
The unit test case must have a test that verifies a valid registration will be handled as valid.
-
configure the Mock to return an empty
List<String>
when asked to validate the renter.Understand how the default Mock behaves before going too far with this. -
programmatically verify the Mock was called to validate the
RenterDTO
as part of the test criteria
-
-
The unit test case must have a test method that verifies an invalid registration will be reported with an exception.
-
configure the Mock to return a
List<String>
with errors for the renter -
programmatically verify the Mock was called 1 time to validate the
RenterDTO
as part of the test criteria
-
-
Name the test so that it automatically gets executed by the Maven Surefire plugin.
This assignment is not to test the Mock. It is a test of the Subject using a Mock
You are not testing or demonstrating the Mock.
Assume the Mock works and use the capabilities of the Mock to test the subject(s) they are injected into.
Place any experiments with the Mock in a separate Test Case and keep this assignment focused on testing the subject (with the functioning Mock).
|
127.3.4. Grading
Your solution will be evaluated on:
-
implement a mock (using Mockito) into a JUnit unit test
-
whether you used a Mock to implement the
RenterValidator
as part of this unit test -
whether you used a Mockito Mock
-
whether your unit test is executed by Maven surefire during a build
-
whether you used the same
Renter
in both valid and invalid cases and relied on the configuration of the Mock to trigger the difference
-
-
define custom behavior for a mock
-
whether you successfully configured the Mock to return an empty collection for the valid renter
-
whether you successfully configured the Mock to return a collection of error messages for the invalid renter
-
-
capture and inspect calls made to mocks by subjects under test
-
whether you programmatically checked that the Mock validation method was called as a part of registration using Mockito library calls
-
127.3.5. Additional Details
-
This portion of the assignment is expected to primarily consist of one additional test case added to the
src/test
tree. -
You may use BDD or non-BDD syntax for this test case and tests.
127.4. Mocked Unit Integration Test
127.4.1. Purpose
In this portion of the assignment, you will demonstrate your knowledge of implementing a unit integration test using a Spring context and Mock beans. You will:
-
implement unit integration tests within Spring Boot
-
implement mocks (using Mockito) into a Spring context for use with unit integration tests
127.4.2. Overview
In this portion of the assignment, you are going to implement an injected Mock bean that will be injected by Spring into both the RentersServiceImpl
@Component
for operational functionality and the unit integration test for configuration and inspection commands.

127.4.3. Requirements
-
Start with a supplied, completed, and injectable 'RentersServiceImpl' versus instantiating one like you did in the pure unit tests.
-
Implement a unit integration test for the
RentersService
for a valid and invalidRenterDTO
-
the test must be implemented using a Spring context
-
all instance variables for the test case must come from injected components — even trivial ones.
-
the
RenterValidator
must be implemented as Mockito Mock/Spring bean and injected into both theRenterValidatorImpl
@Component
and accessible in the unit integration test. You may not use theRenterValidatorImpl
class as part of this test. -
define and inject a
RenterDTO
into the test. This can come from a@Bean
factory. This can be a singleton (same instance for each test) or a prototype (new instance for each test). In either case — like with the previous Mock test — you will not be judging validity based on the state of theRenterDTO
.
-
-
The unit integration test case must have a test that verifies a valid registration will be handled as valid.
-
The unit integration test case must have a test method that verifies an invalid registration will be reported with an exception.
-
Name the unit integration test so that it automatically gets executed by the Maven Surefire plugin.
127.4.4. Grading
Your solution will be evaluated on:
-
to implement unit integration tests within Spring Boot
-
whether you implemented a test case that instantiated a Spring context
-
whether the subject(s) and their dependencies were injected by the Spring context
-
whether the test case verified the requirements for a valid and invalid input
-
whether your unit test is executed by Maven surefire during a build
-
-
implement mocks (using Mockito) into a Spring context for use with unit integration tests
-
whether you successfully declared a Mock bean injected into the necessary components under test and the test case for configuration
-
whether the validity of the
RenterDTO
was based on the training of the Mock and not the state of the DTO.
-
127.4.5. Additional Details
-
This portion of the assignment is expected to primarily consist of
-
adding one additional test case added to the
src/test
tree -
adding any supporting
@TestConfiguration
or other artifacts required to define the Spring context for the test -
changing the Mock to work with the Spring context
-
-
Anything you may have been tempted to simply instantiate as
private X x = new X();
can be changed to an injection by adding a@(Test)Configuration
/@Bean
factory to support testing. The point of having the 100% injection requirement is to encourage encapsulation and reuse among Test Cases for all types of test support objects. -
You may add the
RentersTestConfiguration
to the Spring context using either of the two annotation properties-
@Import.value
-
-
You may want to experiment with applying @Scope(ConfigurableBeanFactory.SCOPE_PROTOTYPE) versus the default @Scope(ConfigurableBeanFactory.SCOPE_SINGLETON) to you injected Renter and generate a random name in the
@Bean
factory. Every injectedSCOPE_SINGLETON
(default) gets the same instance.SCOPE_PROTOTYPE
gets a separate instance. Useful to know, but not a graded part of the assignment.
127.5. Unmocked/BDD Unit Integration Testing
127.5.1. Purpose
In this portion of the assignment, you will demonstrate your knowledge of conducting an end-to-end unit integration test that is completely integrated with the Spring context and using Behavior Driven Design (BDD) syntax. You will:
-
make use of BDD acceptance test keywords
127.5.2. Overview
In this portion of the assignment, you are going to implement an end-to-end unit integration test case for two classes integrated/injected using the Spring context with the syntactic assistance of BDD-style naming.

127.5.3. Requirements
-
Start with a supplied, completed, and injectable
RentersServiceImpl
by creating a dependency on thehouserentals-support-testing
module. There are to be no POJO or Mock implementations of any classes under test. -
Implement a unit integration test for the
RentersService
for a valid and invalidRenterDTO
-
the test must be implemented using a Spring context
-
all instance variables for the test case must come from injected components
-
the
RenterValidator
must be injected into theRentersServiceImpl
using the Spring context. Your test case will not need access to that component. -
define and inject a
RenterDTO
for a valid renter as an example of a bean that is unique to the test. This can come from a@Bean
factory from a Test Configuration
-
-
The unit integration test case must have
-
a display name defined for this test case that includes spaces
-
a display name generation policy for contained test methods that includes spaces
-
-
The unit integration test case must have a test that verifies a valid registration will be handled as valid.
-
use BDD (
then()
) alternative syntax for AssertJ assertions
-
-
The unit integration test case must have a test method that verifies an invalid registration will be reported with an exception.
-
use BDD (
then()
) alternative syntax for AssertJ assertions
-
-
Name the unit integration test so that it automatically gets executed by the Maven Surefire plugin.
127.5.4. Grading
Your solution will be evaluated on:
-
make use of BDD acceptance test keywords
-
whether you provided a custom display name for the test case that included spaces
-
whether you provided a custom test method naming policy that included spaces
-
whether you used BDD syntax for AssertJ assertions
-
-
whether components are injected from Spring context into test
-
whether this test is absent of any Mocks
127.5.5. Additional Details
-
This portion of the assignment is expected to primarily consist of adding a test case that
-
is based on the Mocked Unit Integration Test solution, which relies primarily on the beans of the Spring context
-
removes any Mocks
-
defines a names and naming policies for JUnit
-
changes AssertJ syntax to BDD form
-
-
The "custom test method naming policy" can be set using either an @Annotation or property. The properties approach has the advantage of being global to all tests within the module.
HTTP API
copyright © 2025 jim stafford (jim.stafford@jhu.edu)
128. Introduction
128.1. Goals
The student will learn:
-
how the WWW defined an information system capable of implementing system APIs
-
identify key differences between a truly RESTful API and REST-like or HTTP-based APIs
-
how systems and some actions are broken down into resources
-
how web interactions are targeted at resources
-
standard HTTP methods and the importance to use them as intended against resources
-
individual method safety requirements
-
value in creating idempotent methods
-
standard HTTP response codes and response code families to respond in specific circumstances
128.2. Objectives
At the conclusion of this lecture and related exercises, the student will be able to:
-
identify API maturity according to the Richardson Maturity Model (RMM)
-
identify resources
-
define a URI for a resource
-
define the proper method for a call against a resource
-
identify safe and unsafe method behavior
-
identify appropriate response code family and value to use in certain circumstances
129. World Wide Web (WWW)
The World Wide Web (WWW) is an information system of web resources identified by Uniform Resource Locators (URLs) that can be interlinked via hypertext and transferred using Hypertext Transfer Protocol (HTTP). [20] Web resources started out being documents to be created, downloaded, replaced, and removed but has progressed to being any identifiable thing — whether it be the entity (e.g., person), something related to that entity (e.g., photo), or an action (e.g., change of address). [21]
129.1. Example WWW Information System
The example information system below is of a standard set of content types, accessed through a standard set of methods, and related through location-independent links using URLs.

130. REST
Representational State Transfer (REST) is an architectural style for creating web services, and web services that conform to this style are considered "Restful" web services [22]. REST was defined in 2000 by Roy Fielding in his doctoral dissertation that was also used to design HTTP 1.1. [23] REST relies heavily on the concepts and implementations used in the World Wide Web — which centers around addressable web resources using URIs.
130.1. HATEOAS
At the heart of REST is the notion of hyperlinks to represent state.
For example, the presence of a address_change
link may mean the address of a person can be changed and the client accessing that person representation is authorized to initiate the change.
The presence of current_address
and addresses
links identifies how the client can obtain the current and past addresses for the person.
This is a shallow description of what is defined as
"Hypermedia As The Engine Of Application State" (HATEOAS).

The interface contract allows clients to dynamically determine current capabilities of a resource and the resource to add capabilities over time.
130.2. Clients Dynamically Discover State
HATEOAS permits the capabilities of client and server to advance independently through the dynamic discovery of links. [24]

130.3. Static Interface Contracts
Dynamic discovery differs significantly from remote procedure call (RPC) techniques where static interface contracts are documented in detail to represent a certain level of capability offered by the server and understood by the client. A capability change rollout under the RPC approach may require coordination between all clients involved.

130.4. Internet Scale
As clients morph from a few, well known sources to millions of lightweight apps running on end-user devices — the need to decouple service capability deployments through dynamic discovery becomes more important. Many features of REST provide this trait.
Do you have control of when clients update?
Design interfaces, clients, and servers with forward and backward compatibility in mind to allow for flexible rollout with minimal downtime. |
130.5. How RESTful?
Many of the open and interfacing concepts of the WWW are attractive to today’s service interface designers. However, implementing dynamic discovery is difficult — potentially making systems more complex and costly to develop. The Official REST definition contains more than most interface designs use or possibly need to use. This causes developments to take only what they need — and triggers some common questions:
What is your definition of REST?
How RESTful are you?
130.6. Buzzword Association
For many developers and product advertisements eager to get their names associated with a modern and successful buzzword — REST to them is (incorrectly) anything using HTTP that is not SOAP. For others, their version of REST is (still incorrectly) anything that embraces much of the WWW but still lacks the rigor of making the interfaces dynamic through hyperlinks.
This places us in a state where most of the world refers to something as REST and RESTful when what they have is far from the official definition.
130.7. REST-like or HTTP-based
Giving a nod to this situation, we might use a few other terms:
-
REST-like
-
HTTP-based
Better yet and for more precise clarity of meaning, I like the definitions put forward in the Richardson Maturity Model (RMM).
130.8. Richardson MaturityModel (RMM)
The Richardson Maturity Model (RMM) was developed by Leonard Richardson and breaks down levels of RESTful maturity. [25] Some of the old CORBA and XML RPC qualify for Level 0 only for the fact they adopt HTTP. However, they tunnel through many WWW features in spite of using HTTP. Many modern APIs achieve some level of compliance with Levels 1 and 2, but rarely will achieve Level 3. However, that is okay because, as you will see in the following sections — there are many worthwhile features in Level 2 without adding the complexity of HATEOAS.
Level 3 |
|
Level 2 |
|
Level 1 |
|
Level 0 |
|
130.9. "REST-like"/"HTTP-based" APIs
Common "REST-like" or "HTTP-based" APIs are normally on a trajectory to strive for RMM Level 2 and are based on a few main principals included within the definition of REST.
-
HTTP Protocol
-
Resources
-
URIs
-
Standard HTTP Method and Status Code Vocabulary
-
Standard Content Types for Representations
130.10. Uncommon REST Features Adopted
Links are used somewhat. However, they are rarely used in an opaque manner, rarely used within payloads, and rarely used with dynamic discovery. Clients commonly know the resources they are communicating with ahead of time and build URIs to those resources based on exposed details of the API and IDs returned in earlier responses. That is technically not a RESTful way to do things.
131. RMM Level 2 APIs
Although I will commonly hear projects state that they implement a "REST" interface (and sometimes use it as "HTTP without SOAP"), I have rarely found a project that strives for dynamic discovery of resource capabilities as depicted by Roy Fielding and categorized by RMM Level 3.
These APIs try to make the most of HTTP and the WWW, thus at least making the term "HTTP-based" appropriate and RMM-level 2 a more accurate description. Acknowledging that there is technically one definition of REST and very few attempting to (or needing to) achieve it — I will be targeting RMM Level 2 for the web service interfaces developed in this course and will generically refer to them as "APIs".
At this point, lets cover some of the key points of a RMM Level 2 API that I will be covering as a part of the course.
132. HTTP Protocol Embraced
Various communications protocols have been transport agnostic. If you are old enough to remember SOAP , you will have seen references to it being mapped to protocols other than HTTP (e.g., SOAP over JMS) and its use of HTTP lacked any leverage of WWW HTTP capabilities.
For SOAP and many other RPC protocols operating over HTTP — communication was tunneled though HTTP POST messages, bypassing investments made in the existing and robust WWW infrastructure. For example, many requests for the same status of the same resource tunneled through POST messages would need to be answered again-and-again by the service. To fully leverage HTTP client-side and server-side caches, an alternative approach to exposing the status as a GET of a resource would save the responding service a lot of unnecessary work and speed up client.
REST communication technically does not exist outside the HTTP transport protocol. Everything is expressed within the context of HTTP, leveraging the investment into the world’s largest information system.
133. Resource
By the time APIs reach RMM Level 1 compliance, service domains have been broken down into key areas, known as resources. These are largely noun-based (e.g., Documents, People, Companies), lower-level properties, or relationships. However, they go on to include actions or a long-running activity to be able to initiate them, monitor their status, and possibly perform some type of control.
Nearly anything can be made into a resource. HTTP has a limited number of methods but can have an unlimited number of resources. Some examples could be:
-
products
-
categories
-
customers
-
todos
133.1. Nested Resources
Resources can be nested under parent or related resources.
-
categories/{id}
-
categories/{id}/products
-
todos/{name}
-
todos/{name}/items
134. Uniform Resource Identifiers (URIs)
Resources are identified using Uniform Resource Identifier (URIs).
A URI is a compact sequence of characters that identifies an abstract or physical resource. [26]
URIs have a generic syntax composed of several components and are specialized by individual schemes (e.g., http, mailto, urn). The precise generic URI and scheme-specific rules guarantee uniformity of addresses.
https://github.com/spring-projects/spring-boot/blob/master/LICENSE.txt#L6 (1) mailto:joe@example.com?cc=bob@example.com&body=hello (2) urn:isbn:0-395-36341-1 (3)
134.1. Related URI Terms
There are a few terms commonly associated with URI.
- Uniform Resource Locator (URL)
-
URLs are a subset of URIs that provide a means to locate a specific resource by specifying a primary address mechanism, (e.g., network location). [26]
- Uniform Resource Name (URN)
-
URNs are used to identify resources without location information. They are a particular URI scheme. One common use of a URN is to define an XML namespace. e.g.,
<core xmlns="urn:activemq:core">
. - URI reference
-
legal way to specify a full or relative URI
- Base URI
-
leading components of the URI that form a base for additional layers of the tree to be appended
134.2. URI Generic Syntax
URI components are listed in hierarchical significance — from left to right — allowing for scheme-independent references to be made between resources in the hierarchy. The generic URI syntax and components are as follows: [28]
URI = scheme:[//authority]path[?query][#fragment]
The authority component breaks down into subcomponents as follows:
authority = [userinfo@]host[:port]
Scheme |
sequence of characters, beginning with a letter followed by letters, digits, plus (+), period, or hyphen(-) |
Authority |
naming authority responsible for the remainder of the URI |
User |
how to gain access to the resource (e.g., username) - rare, authentication use deprecated |
Host |
case-insensitive DNS name or IP address |
Port |
port number to access authority/host |
Path |
identifies a resource within the scope of a naming authority. Terminated by the first question mark ("?"), pound sign ("#"), or end of URI. When the authority is present, the path must begin with a slash ("/") character |
Query |
indicated with first question mark ("?") and ends with pound sign ("#") or end of URI |
Fragment |
indicated with a pound("#") character and ends with end of URI |
134.3. URI Component Examples
The following shows the earlier URI examples broken down into components.
-- authority fragment -- / \ https://github.com/spring-projects/spring-boot/blob/master/LICENSE.txt#L6 \ \ -- scheme -- path
Path cannot begin with the two slash ("//") character string when the authority is not present.
-- path / mailto:joe@example.com?cc=bob@example.com&body=hello \ \ -- scheme -- query
-- scheme / urn:isbn:0-395-36341-1 \ -- path
134.4. URI Characters and Delimiters
URI characters are encoded using UTF-8. Component delimiters are slash ("/"), question mark ("?"), and pound sign ("#"). Many of the other special characters are reserved for use in delimiting the sub-components.
: / @ [ ] ? (1)
1 | square brackets("[]") are used to surround newer (e.g., IPv6) network addresses |
! $ & ' ( ) * + , ; =
alpha(A-Z,a-z), digit (0-9), dash(-), period(.), underscore(_), tilde(~)
134.5. URI Percent Encoding
(Case-insensitive) Percent encoding is used to represent characters reserved for delimiters or other purposes (e.g., %x2f and %x2F both represent slash ("/") character). Unreserved characters should not be encoded.
https://www.google.com/search?q=this+%2F+that (1)
1 | slash("/") character is Percent Encoded as %2F |
134.6. URI Case Sensitivity
Generic components like scheme and authority are case-insensitive but normalize to lowercase. Other components of the URI are assumed to be case-sensitive.
HTTPS://GITHUB.COM/SPRING-PROJECTS/SPRING-BOOT (1) https://github.com/SPRING-PROJECTS/SPRING-BOOT (2)
1 | value pasted into browser |
2 | value normalized by browser |
134.7. URI Reference
Many times we need to reference a target URI and do so without specifying the complete URI. A URI reference can be the full target URI or a relative reference. A relative reference allows for a set of resources to reference one another without specifying a scheme or upper parts of the path. This also allows entire resource trees to be relocated without having to change relative references between them.
134.8. URI Reference Terms
- target uri
-
the URI being referenced
Example Target URIhttps://github.com/spring-projects/spring-boot/blob/master/LICENSE.txt#L6
- network-path reference
-
relative reference starting with two slashes ("//"). My guess is that this would be useful in expressing a URI to forward to without wishing to express http versus https (i.e., "use the same scheme used to contact me")
Example Network Path Reference//github.com/spring-projects/spring-boot/blob/master/LICENSE.txt#L6
- absolute-path reference
-
relative reference that starts with a slash ("/"). This will be a portion of the URI that our API layer will be well aware of.
Example Absolute Path Reference/spring-projects/spring-boot/blob/master/LICENSE.txt#L6
- relative-path reference
-
relative reference that does not start with a slash ("/"). First segment cannot have a ":" — avoid confusion with scheme by prepending a "./" to the path. This allows us to express the branch of a tree from a point in the path.
Example Relative Path Referencespring-boot/blob/master/LICENSE.txt#L6 LICENSE.txt#L6 ../master/LICENSE.txt#L6
- same-document reference
-
relative reference that starts with a pound ("#") character, supplying a fragment identifier hosted in the current URI.
Example Same Document Reference#L6
- base URI
-
leading components of the URI that form a base for additional layers of the tree to be appended
Example Base URIhttps://github.com/spring-projects /spring-projects
134.9. URI Naming Conventions
Although URI specifications do not list path naming conventions and REST promotes opaque URIs — it is a common practice to name resource collections with a URI path that ends in a plural noun. The following are a few example absolute URI path references.
/api/products (1)
/api/categories
/api/customers
/api/todo_lists
1 | URI paths for resource collections end with a plural noun |
Individual resource URIs are identified by an external identifier below the parent resource collection.
/api/products/{productId} (1)
/api/categories/{categoryId}
/api/customers/{customerId}
/api/customers/{customerId}/sales
1 | URI paths for individual resources are scoped below parent resource collection URI |
Nested resource URIs are commonly expressed as resources below their individual parent.
/api/products/{productId}/instructions (1)
/api/categories/{categoryId}/products
/api/customers/{customerId}/purchases
/api/todo_lists/{listName}/todo_items
1 | URI paths for resources of parent are commonly nested below parent URI |
134.10. URI Variables
The query at the end of the URI path can be used to express optional and mandatory arguments. This is commonly used in queries.
http://127.0.0.1:8080/jaxrsInventoryWAR/api/categories?name=&offset=0&limit=0
name => (null) #has value null
offset => 0
limit => 0
Nested path parameters may express mandatory arguments.
http://127.0.0.1:8080/jaxrsInventoryWAR/api/products/{id}
http://127.0.0.1:8080/jaxrsInventoryWAR/api/products/1
id => 1
135. Methods
HTTP contains a bounded set of methods that represent the "verbs" of what we are communicating relative to the resource. The bounded set provides a uniform interface across all resources.
There are four primary methods that you will see in most tutorials, examples, and application code.
obtain a representation of resource using a non-destructive read |
|
create a new resource or tunnel a command to an existing resource |
|
create a new resource with having a well-known identity or replace existing |
|
delete target resource |
GET http://127.0.0.1:8080/jaxrsInventoryWAR/api/products/1
135.1. Additional HTTP Methods
There are two additional methods useful for certain edge conditions implemented by application code.
logically equivalent to a |
|||
partial replace. Similar to PUT, but indicates payload provided does not represent the entire resource and may be represented as instructions of modifications to make. Useful hint for intermediate caches
|
There are three more obscure methods used for debug and communication purposes.
generates a list of methods supported for resource |
|
echo received request back to caller to check for changes |
|
used to establish an HTTP tunnel — to proxy communications |
136. Method Safety
Proper execution of the internet protocols relies on proper outcomes for each method. With the potential of client-side proxies and server-side reverse proxies in the communications chain — one needs to pay attention to what can and should not change the state of a resource. "Method Safety" is a characteristic used to describe whether a method executed against a specific resource modifies that resource or has visible side effects.
136.1. Safe and Unsafe Methods
The following methods are considered "Safe" — thus calling them should not modify a resource and will not invalidate any intermediate cache.
-
GET
-
HEAD
-
OPTIONS
-
TRACE
The following methods are considered "Unsafe" — thus calling them is assumed to modify the resource and will invalidate any intermediate cache.
-
POST
-
PUT
-
PATCH
-
DELETE
-
CONNECT
136.2. Violating Method Safety
Do not violate default method safety expectations
Internet communications is based upon assigned method safety expectations. However, these are just definitions. Your application code has the power to implement resource methods any way you wish and to knowingly or unknowingly violate these expectations. Learn the expected characteristics of each method and abide by them or risk having your API not immediately understood and render built-in Internet capabilities (e.g., caches) useless. The following are examples of what not to do: Example Method Safety Violations
|
137. Idempotent
Idempotence describes a characteristic where a repeated event produces the same outcome every time executed. This is a very important concept in distributed systems that commonly have to implement eventual consistency — where failure recovery can cause unacknowledged commands to be executed multiple times.
The idempotent characteristic is independent of method safety. Idempotence only requires that the same result state be achieved each time called.
137.1. Idempotent and non-Idempotent Methods
The application code implementing the following HTTP methods should strive to be idempotent.
-
GET
-
PUT
-
DELETE
-
HEAD
-
OPTIONS
The following HTTP methods are defined to not be idempotent.
-
POST
-
PATCH
-
CONNECT
Relationship between Idempotent and browser page refresh warnings?
The standard convention of Internet protocol is that most methods except for POST are assumed to be idempotent. That means a page refresh for a page obtained from a GET gets immediately refreshed and a warning dialogue is displayed if it was the result of a POST. |
138. Response Status Codes
Each HTTP response is accompanied by a standard HTTP status code. This is a value that tells the caller whether the request succeeded or failed and a type of success or failure.
Status codes are separated into five (5) categories
-
1xx - informational responses
-
2xx - successful responses
-
3xx - redirected responses
-
4xx - client errors
-
5xx - server errors
138.1. Common Response Status Codes
The following are common response status codes
Code | Name | Meaning |
---|---|---|
200 |
OK |
"We achieved what you wanted - may have previously done this" |
201 |
CREATED |
"We did what you asked and a new resource was created" |
202 |
ACCEPTED |
"We received your request and will begin processing it later" |
204 |
NO_CONTENT |
"Just like a 200 with an empty payload, except the status makes this clear" |
400 |
BAD_REQUEST |
"I do not understand what you said and never will" |
401 |
UNAUTHORIZED |
"We need to know who you are before we do this" |
403 |
FORBIDDEN |
"We know who you are, and you cannot say what you just said" |
404 |
NOT_FOUND |
"We could not locate the target resource of your request" |
422 |
UNPROCESSABLE_ENTITY |
"I understood what you said, but you said something wrong" |
500 |
INTERNAL_ERROR |
"Ouch! Nothing wrong with what you asked for or supplied, but we currently have issues completing. Try again later and we may have this fixed." |
139. Representations
Resources may have multiple independent representations. There is no direct tie between the data format received from clients, returned to clients, or managed internally. Representations are exchanged using standard MIME or Media types. Common media types for information include
-
application/json
-
application/xml
-
text/plain
Common data types for raw images include
-
image/jpg
-
image/png
139.1. Content Type Headers
Clients and servers specify the type of content requested or supplied in header fields.
defines a list of media types the client understands, in priority order |
|
identifies the format for data supplied in the payload |
In the following example, the client supplies a representation in
text/plain
and requests a response in XML or JSON — in that priority order.
The client uses the Accept header to express which media types it can handle
and both use the Content-Type to identify the media type of what was provided.
> POST /greeting/hello > Accept: application/xml,application/json > Content-Type: text/plain hi < 200/OK < Content-Type: application/xml <greeting type="hello" value="hi"/>
The next exchange is similar to the previous example, with the exception that the client provides no payload and requests JSON or anything else (in that priority order) using the Accept header. The server returns a JSON response and identifies the media type using the Content-Type header.
> GET /greeting/hello?name=jim > Accept: application/json,*/* < 200/OK < Content-Type: application/json { "msg" : "hi, jim" }
140. Links
RESTful applications dynamically express their state through the use of hyperlinks. That is an RMM Level 3 characteristic use of links. As mentioned earlier, REST-like APIs do not include that level of complexity. If they do use links, these links will likely be constrained to standard response headers.
The following is an example partial POST response with links expressed in the header.
POST http://localhost:8080/ejavaTodos/api/todo_lists
{"name":"My First List"}
=> Created/201
Location: http://localhost:8080/ejavaTodos/api/todo_lists/My%20First%20List (1)
Content-Location: http://localhost:8080/ejavaTodos/api/todo_lists/My%20First%20List (2)
1 | Location expresses the URI to the resource just acted upon |
2 | Content-Location expresses the URI of the resource represented in the payload |
141. Summary
In this module, we learned that:
-
technically — terms "REST" and "RESTful" have a specific meaning defined by Roy Fielding
-
the Richardson Maturity Model (RMM) defines several levels of compliance to RESTFul concepts, with level 3 being RESTful
-
very few APIs achieve full RMM level 3 RESTful adoption
-
but that is OK!!! — there are many useful and powerful WWW constructs easily made available before reaching the RMM level 3
-
can be referred to as "REST-like", "HTTP-based", or "RMM level 2"
-
marketers of the world attempting to leverage a buzzword will still call them REST APIs
-
-
most serious REST-like APIs adopt
-
HTTP
-
multiple resources identified through URIs
-
HTTP-compliant use of methods and status codes
-
method implementations that abide by defined safety and idempotent characteristics
-
standard resource representation formats like JSON, XML, etc.
-
Spring MVC
copyright © 2025 jim stafford (jim.stafford@jhu.edu)
142. Introduction
You learned the meaning of web APIs and supporting concepts in the previous lecture. This module is an introductory lesson to get started implementing some of those concepts. Since this lecture is primarily implementation, I will use a set of simplistic remote procedure calls (RPC) that are far from REST-like and place the focus on making and mapping to HTTP calls from clients to services using Spring and Spring Boot.
142.1. Goals
The student will learn to:
-
identify two primary paradigms in today’s server logic: synchronous and reactive
-
develop a service accessed via HTTP
-
develop a client to an HTTP-based service
-
access HTTP response details returned to the client
-
explicitly supply HTTP response details in the service code
142.2. Objectives
At the conclusion of this lecture and related exercises, the student will be able to:
-
identify the difference between the Spring MVC and Spring WebFlux frameworks
-
identify the difference between synchronous and reactive approaches
-
identify reasons to choose synchronous or reactive
-
implement a service method with Spring MVC synchronous annotated controller
-
implement a synchronous client using RestTemplate API
-
implement a synchronous client using RestClient fluent API
-
implement a client using Spring Webflux fluent API in synchronous mode
-
implement a declarative client using Spring Http Interface
-
pass parameters between client and service over HTTP
-
return HTTP response details from service
-
access HTTP response details in client
-
implement exception handler outside of service method
143. Spring Web APIs
There are two primary, overlapping frameworks within Spring for developing HTTP-based APIs:
Spring MVC is the legacy framework that operates using synchronous, blocking request/reply constructs. Spring WebFlux is the follow-on framework that builds on Spring MVC by adding asynchronous, non-blocking constructs that are inline with the reactive streams paradigm.
Java’s new Lightweight Threads capability will likely lessen the need for using reactive programming in Spring. Initial capability was previewed in Java 19 and released in Java 21. Support for synchronized methods was released in Java 24. |
143.1. Lecture/Course Focus
The focus of this lecture, module, and most portions of the course will be on synchronous communications patterns. The synchronous paradigm is simpler, and there are a ton of API concepts to cover before worrying about managing the asynchronous streams of the reactive programming model. In addition to reactive concepts, Spring WebFlux brings in a heavy dose of Java 8 lambdas and functional programming that should only be applied once we master more of the API concepts.
However, we need to know the two approaches exist to make sense of the software and available documentation.
For example, the long-time legacy client-side of Spring MVC (i.e., RestTemplate) was put in "maintenance mode" (minor changes and bug fixes only) towards the end of Spring 5, with its duties fulfilled by Spring WebFlux (i.e., WebClient ).
Spring 6 introduced a middle ground with RestClient
that addresses the synchronous communication simplicity of RestTemplate
with the fluent API concepts of WebClient
.
It is certain that you will encounter use of RestTemplate
in legacy Spring applications and there is no strong reason to replace.
There is a good chance you may have the desire to work with a fluent or reactive API.
Therefore, I will be demonstrating synchronous client concepts using each library to help cover all bases.
WebClient examples demonstrated here are intentionally synchronous
Examples of Spring WebFlux’s WebClient will be demonstrated as a synchronous replacement for Spring MVC RestTemplate . Details of the reactive API will not be covered.
|
143.2. Spring MVC
Spring MVC was originally implemented for writing Servlet-based applications. The term "MVC" stands for "Model, View, and Controller" — which is a standard framework pattern that separates concerns between:
-
data and access to data ("the model"),
-
representation of the data ("the view"), and
-
decisions of what actions to perform when ("the controller").
The separation of concern provides a means to logically divide web application code along architecture boundaries. Built-in support for HTTP-based APIs has matured over time, and with the shift of UI web applications to JavaScript frameworks running in the browser, the focus has likely shifted towards the API development.
![]() Figure 46. Spring MVC Synchronous Model
|
As mentioned earlier, the programming model for Spring MVC is synchronous, blocking request/reply. Each active request is blocked in its own thread while waiting for the result of the current request to complete. This mode scales primarily by adding more threads — most of which are blocked performing some sort of I/O operation. |
143.3. Spring WebFlux
Spring WebFlux is built using a stream-based, reactive design as a part of Spring 5/Spring Boot 2.
The reactive programming model was adopted into the java.util.concurrent package in Java 9, to go along with other asynchronous programming constructs — like Future<T>
.
Some of the core concepts — like annotated @RestController
and method
associated annotations — still exist.
The most visible changes added include the optional functional controller and the new, mandatory data input and return publisher types:
![]() Figure 47. Spring WebFlux Reactive Model
|
For any single call, there is an immediate response and then a flow of events that start once the flow is activated by a subscriber. The flow of events is published to and consumed from the new mandatory Mono and Flux data input and return types. No overall request is completed using an end-to-end single thread. Work to process each event must occur in a non-blocking manner. This technique sacrifices raw throughput of a single request to achieve better performance when operating at a greater concurrent scale. |
143.4. Synchronous vs. Asynchronous
To go a little further in contrasting the two approaches, the diagram below depicts a contrast between a call to two separate services using the synchronous versus asynchronous processing paradigms.
![]() Figure 48. Synchronous
For synchronous, the call to service 2 cannot be initiated until the synchronous call/response from service 1 is completed For asynchronous, the calls to service 1 and 2 are initiated sequentially but are carried out concurrently, and completed independently |
![]() Figure 49. Asynchronous
|
There are different types of asynchronous processing.
Spring has long supported threads with @Async
methods.
However, that style simply launches one or more additional threads that potentially also contain synchronous logic that will likely block at some point.
The reactive model is strictly non-blocking — relying on the backpressure of available data and the resources being available to consume it.
With the reactive programming paradigm comes strict rules of the road.
143.5. Mixing Approaches
There is a certain amount of mixture of approaches allowed with Spring MVC and Spring WebFlux. A pure reactive design without a trace of Spring MVC can operate on the Reactor Netty engine — optimized for reactive processing. Any use of Web MVC will cause the application to be considered a Web MVC application, choose between Tomcat or Jetty for the web server, and operate any use of reactive endpoints in a compatibility mode. [29]
With that said — functionally, we can mix Spring Web MVC and Spring WebFlux together in an application using what is considered to be the Web MVC container.
-
Synchronous and reactive flows can operate side-by-side as independent paths through the code
-
Synchronous flows can make use of asynchronous flows. A primary example of that is using the
WebClient
reactive methods from a Spring MVC controller-initiated flow
However, we cannot have the callback of a reactive flow make synchronous requests that can indeterminately block — or it itself will become synchronous and tie up a critical reactor thread.
Spring MVC has non-optimized, reactive compatibility
Tomcat and Jetty are Spring MVC servlet engines. Reactor Netty
is a Spring WebFlux engine. Use of reactive streams within the Spring MVC
container is supported — but not optimized or recommended
beyond use of the WebClient in Spring MVC applications. Use of
synchronous flows is not supported by Spring WebFlux.
|
143.6. Choosing Approaches
Independent synchronous and reactive flows can be formed on a case-by-case basis and optimized if implemented on separate instances. [29] We can choose our ultimate solution(s) based on some of the recommendations below.
- Synchronous
-
-
existing synchronous API working fine — no need to change [30]
-
easier to learn - can use standard Java imperative programing constructs
-
easier to debug - everything in the same flow is commonly in the same thread
-
the number of concurrent users is a manageable (e.g., <100) number [31]
-
service is CPU-intensive [32]
-
codebase makes use of ThreadLocal
-
service makes use of synchronous data sources (e.g., JDBC, JPA)
-
- Reactive
-
-
need to serve a significant number (e.g., 100-300) of concurrent users [31]
-
requires knowledge of Java stream and functional programming APIs
-
does little to no good (i.e., badly) if the services called are synchronous (i.e., initial response returns when overall request complete) (e.g., JDBC, JPA)
-
desire to work with Kotlin or Java 8 lambdas [30]
-
service is IO-intensive (e.g., database or external service calls) [32]
-
For many of the above reasons, we will start out our HTTP-based API coverage in this course using the synchronous approach.
144. Maven Dependencies
Most dependencies for Spring MVC are satisfied by changing spring-boot-starter
to spring-boot-starter-web
. Among other things, this brings in dependencies on
spring-webmvc
and spring-boot-starter-tomcat
.
<dependency>
<groupId>org.springframework.boot</groupId>
<artifactId>spring-boot-starter-web</artifactId>
</dependency>
The dependencies for Spring MVC and Spring WebFlux’s WebClient
are satisfied by adding
spring-boot-starter-webflux
. It primarily brings in the spring-webflux
and the reactive libraries, and spring-boot-starter-reactor-netty
. We won’t
be using the netty engine, but WebClient
does make use of some netty client libraries
that are brought in when using the starter.
<dependency>
<groupId>org.springframework.boot</groupId>
<artifactId>spring-boot-starter-web</artifactId>
</dependency>
<dependency>
<groupId>org.springframework.boot</groupId>
<artifactId>spring-boot-starter-webflux</artifactId>
</dependency>
145. Sample Application
To get started covering the basics of Web MVC, I am going to use a basic, remote procedure call (RPC)-oriented, RMM level 1 example where the web client simply makes a call to the service to say "hi".
The example is located within the rpc-greeter-svc
module.
|-- pom.xml `-- src |-- main | |-- java | | `-- info | | `-- ejava | | `-- examples | | `-- svc | | `-- rpc | | |-- GreeterApplication.java | | `-- greeter | | `-- controllers (1) | | `-- RpcGreeterController.java | `-- resources | `-- ... `-- test |-- java | `-- info | `-- ejava | `-- examples | `-- svc | `-- rpc | `-- greeter (2) | |-- GreeterRestTemplateNTest.java | |-- GreeterRestClientNTest.java | |-- GreeterSyncWebClientNTest.java | |-- GreeterHttpIfaceNTest.java | |-- GreeterAPI.java | `-- ClientTestConfiguration.java `-- resources `-- ...
1 | example @RestController |
2 | example clients using RestTemplate, RestClient, WebClient, and Http Interface Proxy |
146. Annotated Controllers
Traditional Spring MVC APIs are primarily implemented around annotated
controller components. Spring has a hierarchy of annotations that
help identify the role of the component class. In this case the controller
class will commonly be annotated with @RestController
, which wraps
@Controller
, which wraps @Component
. This primarily means that the
class will get automatically picked up during the component scan if
it is in the application’s scope.
package info.ejava.examples.svc.httpapi.greeter.controllers;
import org.springframework.web.bind.annotation.RestController;
@RestController
// ==> wraps @Controller
// ==> wraps @Component
public class RpcGreeterController {
//...
}
146.1. Class Mappings
Class-level mappings can be used to establish a base definition to be applied
to all methods and extended by method-level annotation mappings. Knowing this,
we can
define the base URI path using a
@RequestMapping
annotation on the controller class and all methods of this
class will either inherit or extend that URI path.
In this particular case, our class-level annotation is defining a base URL path
of /rpc/greeting
.
...
import org.springframework.web.bind.annotation.RequestMapping;
@RestController
@RequestMapping("rpc/greeter") (1)
public class RpcGreeterController {
...
1 | @RequestMapping.path="rpc/greeting" at class level establishes base URI path for all hosted methods |
Annotations can have alias and defaults
We can use either |
Annotating class can help keep from repeating common definitions
Annotations like @RequestMapping , applied at the class level establish
a base path for all HTTP-accessible methods of the class.
|
146.2. Method Request Mappings
There are two initial aspects to map to our method in our first simple example: URI and HTTP method.
GET /rpc/greeter/sayHi
-
URI - we already defined a base URI path of
/rpc/greeter
at the class level — we now need to extend that to form the final URI of/rpc/greeter/sayHi
-
HTTP method - this is specific to each class method — so we need to explicitly declare GET (one of the standard RequestMethod enums) on the class method
...
/**
* This is an example of a method as simple as it gets
* @return hi
*/
@RequestMapping(path="sayHi", (1)
method=RequestMethod.GET) (2)
public String sayHi() {
return "hi";
}
1 | @RequestMapping.path at the method level appends sayHi to the base URI |
2 | @RequestMapping.method=GET registers this method to accept HTTP GET calls to
the URI /rpc/greeter/sayHi |
@GetMapping is an alias for @RequestMapping(method=GET)
Spring MVC also defines a
|
146.3. Default Method Response Mappings
A few of the prominent response mappings can be determined automatically by the container in simplistic cases:
- response body
-
The response body is automatically set to the marshalled value returned by the endpoint method. In this case, it is a literal String mapping.
- status code
-
The container will return the following default status codes
-
200/OK - if we return a non-null value
-
404/NOT_FOUND - if we return a null value
-
500/INTERNAL_SERVER_ERROR - if we throw an exception
-
- Content-Type header
-
The container sensibly mapped our returned String to the
text/plain
Content-Type.
< HTTP/1.1 200 (1) < Content-Type: text/plain;charset=UTF-8 (2) < Content-Length: 2 ... hi (3)
1 | non-null, no exception return mapped to HTTP status 200 |
2 | non-null java.lang.String mapped to text/plain content type |
3 | value returned by endpoint method |
146.4. Executing Sample Endpoint
Once we start our application and enter the following in the browser, we get the expected string "hi" returned.
http://localhost:8080/rpc/greeter/sayHi hi
If you have access to curl
or another HTTP test tool, you will likely see
the following additional detail.
$ curl -v http://localhost:8080/rpc/greeter/sayHi ... > GET /rpc/greeter/sayHi HTTP/1.1 > Host: localhost:8080 > User-Agent: curl/7.54.0 > Accept: */* > < HTTP/1.1 200 < Content-Type: text/plain;charset=UTF-8 < Content-Length: 2 ... hi
147. RestTemplate Client
The primary point of making a callable HTTP endpoint is the ability
to call that endpoint from another application. With a functional
endpoint ready to go, we are ready to create a Java client and will do so
within a JUnit test using Spring MVC’s
RestTemplate
class in the simplest way possible.
Please note that most of these steps are true for any Java HTTP client
we might use.
I will go through all the steps for RestTemplate
here but only cover the unique aspects to the alternate techniques later on.
147.1. JUnit Integration Test Setup
We start our example by creating an integration unit test. That means we will be using the Spring context and will do so using @SpringBootTest
annotation with two key properties:
-
classes - reference
@Component
and/or@Configuration
class(es) to define which components will be in our Spring context (default is to look for@SpringBootConfiguration
, which is wrapped by@SpringBootApplication
). -
webEnvironment - to define this as a web-oriented test and whether to have a fixed (e.g., 8080), random, or none for a port number. The random port number will be injected using the
@LocalServerPort
annotation. The default value is MOCK — for Mock test client libraries able to bypass networking.
package info.ejava.examples.svc.rpc.greeter;
import info.ejava.examples.svc.rpc.GreeterApplication;
import org.springframework.boot.test.context.SpringBootTest;
import org.springframework.boot.test.web.server.LocalServerPort;
@SpringBootTest(classes = GreeterApplication.class, (1)
webEnvironment = SpringBootTest.WebEnvironment.RANDOM_PORT) (3)
@Import(ClientTestConfiguration.class) (2)
public class GreeterRestTemplateNTest {
@LocalServerPort (4)
private int port;
1 | using the application to define the components for the Spring context |
2 | adding sharable configuration specific to this test |
3 | the application will be started with a random HTTP port# |
4 | the random server port# will be injected into port annotated with @LocalServerPort |
@LocalServerPort is alias for Property local.server.port
@LocalServerPort Annotation
One could use that property instead to express the injection.
|
LocalServerPort Injection Alternatives
As you saw earlier, we can have it injected as an attribute of the test case class.
This would be good if many of the Inject as Test Attribute
A close alternative would be to inject the value into the Inject into Test Lifecycle Methods
We could move the injection to the Create @Bean Factory using @LocalServerPort and @Lazy
Inject @Bean into Test Case
|
147.2. Form Endpoint URL
Next, we will form the full URL for the target endpoint. We can take the parts we know and merge that with the injected server port number to get a full URL.
@LocalServerPort
private int port;
@Test
public void say_hi() {
//given - a service available at a URL and client access
String url = String.format("http://localhost:%d/rpc/greeter/sayHi", port); (1)
...
1 | full URL to the example endpoint |
Starting Simple
Starting simple. We will be covering more type-safe, purpose-driven ways to perform related client actions in this and follow-on lectures.
|
147.3. Obtain RestTemplate
With a URL in hand, we are ready to make the call. We will do that first using the synchronous RestTemplate from the Spring MVC library.
Spring’s RestTemplate
is a thread safe class that can be constructed with a default
constructor for the simple case — or through a
builder in more complex cases and injected to take advantage of separation of concerns.
import org.springframework.web.client.RestTemplate;
...
RestTemplate restTemplate = new RestTemplate();
147.4. Invoke HTTP Call
There are dozens of potential calls we can make with RestTemplate
.
We will learn many more, but in this case we are
|
Example Invoke HTTP Call
|
147.4.1. Exceptions
Note that a successful return from getForObject()
will only occur if the response from the server is a 2xx/successful response.
Otherwise, an Exception of one of the following types will be thrown:
-
RestClientException - error occurred communicating with server
-
RestClientResponseException error response received from server
-
HttpStatusCodeException - HTTP response received and HTTP status known
-
HttpServerErrorException - HTTP server (5xx) errors
-
HttpClientErrorException - HTTP client (4xx) errors
-
BadRequest, NotFound, UnprocessableEntity, …
-
-
-
-
147.5. Evaluate Response
At this point, we have made our request and have received our reply and can evaluate the reply against what was expected.
//then - we get a greeting response
then(greeting).isEqualTo("hi");
148. Spring Rest Clients
The Spring 5 documentation stated RestTemplate
was going into "maintenance mode" and that we should switchover to using the Spring WebFlux WebClient
.
The current Spring 6 documentation dropped that guidance and made the choice driven by:
-
synchronous - RestTemplate
-
fluent and synchronous - RestClient, new in Spring 6.1
-
fluent and asynchronous/reactive - WebClient
Spring 6 also added features to all three for:
-
client-side API facade - HTTP Interface - provides a type-safe business interface to any of the clients
I will summarize these additions next.
149. RestClient Client
RestClient is a synchronous API like RestTemplate
, but works using fluent ("chaining"; client.m1().m2()) API calls like WebClient
.
The asynchronous WebClient
fluent API was introduced in Spring 5 and RestClient
followed in Spring 6.1.
When using WebClient
in synchronous mode — the primary difference with RestClient
is no need to explicitly block for exchanges to complete.
In demonstrating RestClient
, there are a few aspects of our RestTemplate
example
that do not change and I do not need to repeat.
-
JUnit test setup — i.e., establishing the Spring context and random port#
-
Obtaining a URL
-
Evaluating returned response
The new aspects include
-
obtaining the
RestClient
instance -
invoking the HTTP endpoint and obtaining result
149.1. Obtain RestClient
RestClient
is an interface and must be constructed through a builder.
A default builder can be obtained through a static method of the RestClient
interface. RestClient
is also thread safe, is capable of being configured in a number of ways, and its builder can be injected to create individualized instances.
import org.springframework.web.client.RestClient;
...
RestClient restClient = RestClient.builder().build();
If you are already invested in a detailed RestTemplate
setup of configured defaults and want the fluent API, RestClient
can be constructed from an existing RestTemplate
instance.
RestTemplate restTemplate = ...
RestClient restClient=RestClient.create(restTemplate);
149.2. Invoke HTTP Call
The methods for RestClient
are arranged in a builder type pattern where each layer of call returns a type with a constrained set of methods that are appropriate for where we are in the call tree.
The example below shows an example of:
|
Example Invoke HTTP Call
|
150. WebClient Client
WebClient
and RestClient
look and act very much the same, with the primary difference being the reactive/asynchronous API aspects for WebClient
.
150.1. Obtain WebClient
WebClient
is an interface and must be constructed through a builder.
A default builder can be obtained through a static method of the WebClient
interface.
WebClient
is also thread safe, is capable of being configured in a number of ways, and its builder can be injected to create individualized instances.
import org.springframework.web.reactive.function.client.WebClient;
...
WebClient webClient = WebClient.builder().build();
One cannot use a RestTemplate
or RestClient
instance to create a WebClient
.
They are totally different threading models under the hood.
150.2. Invoke HTTP Call
The fluent API methods for WebClient
are much the same as RestClient
except for when it comes to obtaining the payload body.
The example below shows an example of:
|
Example Invoke HTTP Call
|
The block()
call is the synchronous part that we would look to avoid in a
truly reactive thread. It is a type of subscriber that triggers the defined
flow to begin producing data. This block()
is blocking the current
(synchronous) thread — just like RestTemplate
. The portions of the call ahead
of block()
are performed in a reactive set of threads.
151. Spring HTTP Interface
This last feature (HTTP Interface) allows you to declaritively define a typed interface for your client API using a Java interface, annotations, and any of the Spring client APIs we have just discussed. Spring will implement the details using dynamic proxies (discussed in detail much later in the course).
We can define a simple example using our /sayHi
endpoint by defining a method with the information required to make the HTTP call.
This is very similar to what is defined on the server-side.
import org.springframework.web.service.annotation.GetExchange;
interface MyGreeter {
@GetExchange("/sayHi")
String sayHi();
};
We then build a RestTemplate
, RestClient
, or WebClient
by any means and assign it a baseUrl.
The baseUrl plus @GetExchange
value must equal the server-side URL.
String url = ...
RestClient restClient = RestClient.builder().baseUrl(url).build();
We then can create an instance of the interface using the lower-level API, RestClientAdapter
, and HttpServiceProxyFactory
.
import org.springframework.web.client.support.RestClientAdapter;
import org.springframework.web.service.invoker.HttpServiceProxyFactory;
...
RestClientAdapter adapter = RestClientAdapter.create(restClient);
HttpServiceProxyFactory factory = HttpServiceProxyFactory.builderFor(adapter).build();
MyGreeter greeterAPI = factory.createClient(MyGreeter.class);
At this point, we can call it like any Java instance/method.
//when - calling the service
String greeting = greeterAPI.sayHi();
The Spring HTTP Interface is extremely RPC-oriented, but we can make it REST-like enough to be useful. Later examples in this lecture will show some extensions.
152. Implementing Parameters
There are three primary ways to map an HTTP call to method input parameters:
-
request body — annotated with @RequestBody that we will see in a POST
-
path parameter — annotated with @PathVariable
-
query parameter - annotated with @RequestParam
The later two are part of the next example and expressed in the URI.
/ (1) GET /rpc/greeter/say/hello?name=jim \ (2)
1 | URI path segments can be mapped to input method parameters |
2 | individual query values can be mapped to input method parameters |
-
we can have 0 to N path or query parameters
-
path parameters are part of the resource URI path and are commonly required when defined — but that is not a firm rule
-
query parameters are commonly the technique for optional arguments against the resource expressed in the URI path
-
152.1. Controller Parameter Handling
Parameters derived from the URI path require that the path be expressed with {placeholder}
names within the string.
That placeholder name will be mapped to a specific method input parameter using the @PathVariable
annotation.
In the following example, we are mapping whatever is in the position held by the {greeting}
placeholder — to the greeting
input variable.
Specific query parameters are mapped by their name in the URL to a specific method input parameter using the @RequestParam
annotation.
In the following example, we are mapping whatever is in the value position of name=
to the name
input variable.
@RequestMapping(path="say/{greeting}", (1)
method=RequestMethod.GET)
public String sayGreeting(
@PathVariable("greeting") String greeting, (1)
@RequestParam(value = "name", defaultValue = "you") String name) { (2)
return greeting + ", " + name;
}
1 | URI path placeholder {greeting} is being mapped to method input parameter String greeting |
2 | URI query parameter name is being mapped to method input parameter String name |
No direct relationship between placeholder/query names and method input parameter names
There is no direct correlation between the path placeholder or query parameter
name and the name of the variable without the @PathVariable and @RequestParam
mappings.
Having them match makes the mental mapping easier, but the value for the internet client URI name may not be the best value for the internal Java controller variable name.
|
152.2. Client-side Parameter Handling
As mentioned above, the path and query parameters are expressed in the URL — which is
not impacted whether we use RestTemplate
, RestClient
, or WebClient
.
http://localhost:8080/rpc/greeter/say/hello?name=jim
A way to build a URL through type-safe convenience methods is with the
UriComponentsBuilder
class. In the following example:
|
Example Client Code Forming URL with Path and Query Params
|
152.3. Spring HTTP Interface Parameter Handling
We can address parameters in Spring HTTP Interface using the same @PathVariable
and RequestParam
declarations that were used on the server-side.
The following example shows making each of the parameters required.
Notice also that we can have the call return the ResponseEntity wrapper versus just the value.
@GetExchange("/say/{greeting}")
ResponseEntity<String> sayGreeting(
@PathVariable(value = "greeting", required = true) String greeting,
@RequestParam(value = "name", required=true) String name);
With the method defined, we can call it like a normal Java method and inspect the response.
//when - asking for that greeting with required parameters
... = greeterAPI.sayGreeting("hello","jim");
//response "hello, jim"
152.3.1. Optional Parameters
We can make parameters optional, allowing the client to null them out. The following example shows the client passing in a null for the name — to have it defaulted by either the client or server-side code.
//when - asking for that greeting using client-side or server-side defaults
... = greeterAPI.sayGreeting("hello", null);
The optional parameter can be resolved:
-
on the server-side. In this case, the client marks the parameter as not required.
Using Server-side Default Parameter Value@RequestParam(value = "name", required=false) String name); //response "hello, you"
-
on the client-side. In this case, the client identifies the default value to use.
Using Client-side default@RequestParam(value = "name", defaultValue="client") String name); //response "hello, client"
153. Accessing HTTP Responses
The target of an HTTP response may be a specific marshalled object or successful status. However, it is common to want to have access to more detailed information. For example:
-
Success — was it a 201/CREATED or a 200/OK?
-
Failure — was it a 400/BAD_REQUEST, 404/NOT_FOUND, 422/UNPROCESSABLE_ENTITY, or 500/INTERNAL_SERVER_ERROR?
Spring can supply that additional information in a
ResponseEntity<T>
, supplying us with:
-
status code
-
response headers
-
response body — which will be unmarshalled to the specified type of
T
To obtain that object — we need to adjust our call to the client.
153.1. Obtaining ResponseEntity
The client libraries offer additional calls to obtain the ResponseEntity
.
//when - asking for that greeting
ResponseEntity<String> response = restTemplate.getForEntity(url, String.class);
//when - asking for that greeting
ResponseEntity<String> response = restClient.get()
.uri(url)
.retrieve()
.toEntity(String.class);
//when - asking for that greeting
ResponseEntity<String> response = webClient.get()
.uri(url)
.retrieve()
.toEntity(String.class)
.block();
//when - asking for that greeting
ResponseEntity<String> response = greeterAPI.sayGreeting("hello","jim");
153.2. ResponseEntity<T>
The ResponseEntity<T>
can provide us with more detail than just the response
object from the body. As you can see from the following evaluation block, the
client also has access to the status code and headers.
//then - response be successful with expected greeting
then(response.getStatusCode()).isEqualTo(HttpStatus.OK);
then(response.getHeaders().getFirst(HttpHeaders.CONTENT_TYPE)).startsWith("text/plain");
then(response.getBody()).isEqualTo("hello, jim");
154. Client Error Handling
As indicated earlier, something could fail in the call to the service, and we do not get our expected response returned.
$ curl -v http://localhost:8080/rpc/greeter/boom ... < HTTP/1.1 400 < Content-Type: application/json < Transfer-Encoding: chunked < Date: Thu, 21 May 2020 19:37:42 GMT < Connection: close < {"timestamp":"2020-05-21T19:37:42.261+0000","status":400,"error":"Bad Request", "message":"Required String parameter 'value' is not present" (1) ...
1 | Spring MVC has default error handling that will, by default, return an application/json rendering of an error |
Although there are differences in their options — RestTemplate
, RestClient
, and WebClient
will throw an exception if the status code is not successful.
Although very similar — unfortunately, WebClient
exceptions are technically different from the others and would need separate exception handling logic if used together.
154.1. RestTemplate Response Exceptions
RestTemplate
and RestClient
will throw an exception, by default for error responses.
154.1.1. Default RestTemplate Exceptions
All non-WebClient
exceptions thrown extend
HttpClientErrorException
— which is a RuntimeException
, so handling the exception
is not mandated by the Java language.
The example below is catching a specific BadRequest
exception (if thrown) and then handling the exception in a generic way.
import org.springframework.web.client.HttpClientErrorException;
...
//when - calling the service
HttpClientErrorException ex = catchThrowableOfType( (1)
HttpClientErrorException.BadRequest.class,
()->restTemplate.getForEntity(url, String.class));
//when - calling the service
HttpClientErrorException ex = catchThrowableOfType(
HttpClientErrorException.BadRequest.class,
() -> restClient.get().uri(url).retrieve().toEntity(String.class));
1 | using assertj catchThrowableOfType() to catch the exception and test that it be of a specific type only if thrown |
catchThrowableOfType does not fail if no exception thrown
AssertJ catchThrowableOfType only fails if an Exception of the wrong type is thrown.
It will return a null if no exception is thrown.
That allows for a "BDD style" of testing where the "when" processing is separate from the "then" verifications.
|
154.1.2. Noop RestTemplate Exceptions
RestTemplate
is the only client option that allows one to bypass the exception rule and obtain an error ResponseEntity from the call without exception handling.
The following example shows a NoOpResponseErrorHandler
error handler being put in place and the caller is receiving the error ResponseEntity
without using exception handling.
import org.springframework.web.client.NoOpResponseErrorHandler;
...
//configure RestTemplate to return error responses, not exceptions
RestTemplate noExceptionRestTemplate = new RestTemplate();
noExceptionRestTemplate.setErrorHandler(new NoOpResponseErrorHandler());
//when - calling the service
Assertions.assertDoesNotThrow(()->{
ResponseEntity<String> response = noExceptionRestTemplate.getForEntity(url, String.class);
//then - we get a bad request
then(response.getStatusCode()).isEqualTo(HttpStatus.BAD_REQUEST);
then(response.getHeaders().getFirst(HttpHeaders.CONTENT_TYPE))
.isEqualTo(MediaType.APPLICATION_JSON_VALUE);
},"return response, not exception");
154.2. RestClient Response Exceptions
RestClient
has two primary paths to invoke a request: retrieve()
and exchange()
.
154.2.1. RestClient retrieve() and Exceptions
retrieve().toEntity(T)
works very similar to RestTemplate.<method>ForEntity()
— where it returns what you ask or throws an exception.
The following shows a case where the RestClient
call will be receiving an error and throwing a BadRequest
exception.
HttpClientErrorException ex = catchThrowableOfType(
HttpClientErrorException.BadRequest.class,
() -> restClient.get().uri(url).retrieve().toEntity(String.class));
154.2.2. RestClient exchange() method
exchange()
permits some analysis and handling of the response within the pipeline.
However, it ultimately places you in a position that you need to throw an exception if you cannot return the type requested or a ResponseEntity
.
The following example shows an error being handled without an exception.
One must be careful doing this since the error response likely will not be the data type requested in a realistic scenario.
ResponseEntity<?> response = restClient.get().uri(url)
.exchange((req, resp) -> {
return ResponseEntity.status(resp.getStatusCode())
.headers(resp.getHeaders())
.body(StreamUtils.copyToString(resp.getBody(), Charset.defaultCharset()));
});
then(ex.getStatusCode()).isEqualTo(HttpStatus.BAD_REQUEST);
All default RestClient
exceptions thrown are identical to RestTemplate
exceptions.
154.3. WebClient Response Exceptions
WebClient
has the same two primary paths to invoke a request: retrieve()
and exchange()
.
retrieve()
works very similar to RestTemplate.<method>ForEntity()
— where it returns what you ask or throws an exception.
exchange()
permits some analysis of the response — but ultimately places you in a position that you need to throw an exception if you cannot return the type requested.
Overriding the exception handling design of these clients is not something I would recommend, and overriding the async API of the WebClient can be daunting.
Therefore, I am just going to show the exception handling option.
The example below is catching a specific BadRequest
exception and then handling the exception in a generic way.
import org.springframework.web.reactive.function.client.WebClientResponseException;
...
//when - calling the service
WebClientResponseException.BadRequest ex = catchThrowableOfType(
WebClientResponseException.BadRequest.class,
() -> webClient.get().uri(url).retrieve().toEntity(String.class).block());
All default WebClient
exceptions extend WebClientResponseException — which is also a RuntimeException
, so it has that in common with the exception handling of RestTemplate
.
154.4. Spring HTTP Interface Exceptions
The Spring HTTP Interface API exceptions will be identical to RestTemplate
and RestClient
.
Any special handling of error responses can be done in the client error handling stack (e.g., RestClient.defaultStatusHandler).
That will provide a means to translate the HTTP error response into a business exception if desired.
//when - calling the service
RestClientResponseException ex = catchThrowableOfType(
() -> greeterAPI.boom(),
HttpClientErrorException.BadRequest.class);
154.5. Client Exceptions
Once the code calling one of the two clients has the client-specific exception object, they have access to three key response values:
-
HTTP status code
-
HTTP response headers
-
HTTP body as string or byte array
The following is an example of handling an exception thrown by RestTemplate
and RestClient
.
HttpClientErrorException ex = ...
//then - we get a bad request
then(ex.getStatusCode()).isEqualTo(HttpStatus.BAD_REQUEST);
then(ex.getResponseHeaders().getFirst(HttpHeaders.CONTENT_TYPE))
.isEqualTo(MediaType.APPLICATION_JSON_VALUE);
log.info("{}", ex.getResponseBodyAsString());
The following is an example of handling an exception thrown by WebClient
.
WebClientResponseException.BadRequest ex = ...
//then - we get a bad request
then(ex.getStatusCode()).isEqualTo(HttpStatus.BAD_REQUEST);
then(ex.getHeaders().getFirst(HttpHeaders.CONTENT_TYPE)) (1)
.isEqualTo(MediaType.APPLICATION_JSON_VALUE);
log.info("{}", ex.getResponseBodyAsString());
1 | WebClient 's exception method name to retrieve response headers
different from RestTemplate |
155. Controller Responses
In our earlier example, our only response option from the service was a limited set of status codes derived by the container based on what was returned. The specific error demonstrated was generated by the Spring MVC container based on our mapping definition. It will be common for the controller method itself to need explicit control over the HTTP response returned --primarily to express response-specific
-
HTTP status code
-
HTTP headers
155.1. Controller Return ResponseEntity
The following service example performs some trivial error checking and:
-
responds with an explicit error if there is a problem with the input
-
responds with an explicit status and Content-Location header if successful
The service provides control over the entire response by returning a
ResponseEntity
containing the complete HTTP result versus just returning
the result value for the body. The ResponseEntity can express status code,
headers, and the returned entity.
import org.springframework.web.servlet.support.ServletUriComponentsBuilder;
...
@RequestMapping(path="boys",
method=RequestMethod.POST)
public ResponseEntity<String> createBoy(@RequestParam("name") String name) { (1)
try {
someMethodThatMayThrowException(name);
URI url = ServletUriComponentsBuilder.fromCurrentRequest() (2)
.build().toUri();
return ResponseEntity.created(url) //created requires Location URI (3)
.header(HttpHeaders.CONTENT_LOCATION, url.toString()) //optional header
.body(String.format("hello %s, how do you do?", name));
} catch (IllegalArgumentException ex) {
return ResponseEntity.unprocessableEntity() (4)
.body(ex.toString());
}
}
private void someMethodThatMayThrowException(String name) {
if ("blue".equalsIgnoreCase(name)) {
throw new IllegalArgumentException("boy named blue?");
}
}
1 | ResponseEntity returned used to express full HTTP response |
2 | ServletUriComponentsBuilder is a URI builder that can provide context of current call |
3 | service is able to return an explicit HTTP response with appropriate success details |
4 | service is able to return an explicit HTTP response with appropriate error details |
155.2. Example ResponseEntity Responses
In response, we see the explicitly assigned status code and Content-Location header.
curl -v -X POST http://localhost:8080/rpc/greeter/boys?name=jim ... < HTTP/1.1 201 (1) < Location: http://localhost:8080/rpc/greeter/boys?name=jim < Content-Location: http://localhost:8080/rpc/greeter/boys?name=jim < Content-Type: text/plain;charset=UTF-8 < Content-Length: 25 ... hello jim, how do you do?
1 | status explicitly |
2 | Content-Location header explicitly supplied by service |
For the error condition, we see the explicit status code and error payload assigned.
$ curl -v -X POST http://localhost:8080/rpc/greeter/boys?name=blue < HTTP/1.1 422 (1) < Content-Type: text/plain;charset=UTF-8 < Content-Length: 15 ... boy named blue?
1 | HTTP status code explicitly supplied by service |
155.3. Controller Exception Handler
We can make a small but significant step at simplifying the controller method by making sure the exception thrown is fully descriptive and moving the exception handling to either:
-
a separate, annotated method of the controller or
-
globally to be used by all controllers (shown later).
The following example uses @ExceptionHandler
annotation to register a handler for when controller methods happen to throw the IllegalArgumentException.
The handler can return an explicit ResponseEntity with the error details.
import org.springframework.web.bind.annotation.ExceptionHandler;
...
@ExceptionHandler(IllegalArgumentException.class) (1)
public ResponseEntity<String> handle(IllegalArgumentException ex) {(2)
return ResponseEntity.unprocessableEntity() (3)
.body(ex.getMessage());
}
1 | handles all IllegalArgumentException -s thrown by controller method (or anything it calls) |
2 | input parameter is concrete type or parent type of handled exception |
3 | handler builds a ResponseEntity with the details of the error |
Create custom exceptions to address specific errors
Create custom exceptions to the point that the handler has the information
and context it needs to return a valuable response.
|
155.4. Simplified Controller Using ExceptionHandler
With all exceptions addressed by ExceptionHandlers
, we can free our controller
methods of tedious, repetitive conditional error reporting logic and still
return an explicit HTTP response.
@RequestMapping(path="boys/throws",
method=RequestMethod.POST)
public ResponseEntity<String> createBoyThrows(@RequestParam("name") String name) {
someMethodThatMayThrowException(name); (1)
URI url = ServletUriComponentsBuilder.fromCurrentRequest()
.replacePath("/rpc/greeter/boys") (2)
.build().toUri();
return ResponseEntity.created(url)
.header(HttpHeaders.CONTENT_LOCATION, url)
.body(String.format("hello %s, how do you do?", name));
}
1 | Controller method is free from dealing with exception logic |
2 | replacing a path to match sibling implementation response |
Note the new method endpoint with the exception handler returns the same, explicit HTTP response as the earlier example.
curl -v -X POST http://localhost:8080/rpc/greeter/boys/throws?name=blue ... < HTTP/1.1 422 < Content-Type: text/plain;charset=UTF-8 < Content-Length: 15 ... boy named blue?
156. Summary
In this module we:
-
identified two primary paradigms (synchronous and reactive) and web frameworks (Spring MVC and Spring WebFlux) for implementing web processing and communication
-
were informed that Java lightweight threads may reduce the need for reactive programming — thus simplify concurrent programming
-
implemented an HTTP endpoint for a URI and method using Spring MVC annotated controller in a fully synchronous mode
-
demonstrated how to pass parameters between client and service using path and query parameters
-
demonstrated how to pass return results from service to client using http status code, response headers, and response body
-
demonstrated how to explicitly set HTTP responses in the service
-
demonstrated how to clean up service logic by using exception handlers
-
demonstrated use of the synchronous Spring MVC
RestTemplate
andRestClient
and reactive Spring WebFluxWebClient
client APIs -
demonstrated use of Spring HTTP Interface to wrap low-level client APIs with a type-safe, business interface
Controller/Service Interface
copyright © 2025 jim stafford (jim.stafford@jhu.edu)
157. Introduction
Many times we may think of a service from the client’s perspective and term everything on the other side of the HTTP connection to be "the service". That is OK from the client’s perspective, but even a moderately-sized service — there are normally a few layers of classes playing a certain architectural role and that front-line controller we have been working with should primarily be a "web facade" interfacing the business logic to the outside world.

In this lecture we are going to look more closely at how the overall endpoint breaks down into a set of "facade" and "business logic" pattern players and lay the groundwork for the "Data Transfer Object" (DTO) covered in the next lecture.
157.1. Goals
The student will learn to:
-
identify the Controller class as having the role of a facade
-
encapsulate business logic within a separate service class
-
establish some interface patterns between the two layers so that the web facade is as clean as possible
157.2. Objectives
At the conclusion of this lecture and related exercises, the student will be able to:
-
implement a service class to encapsulate business logic
-
turn
@RestController
class into a facade and delegate business logic details to an injected service class -
identify error reporting strategy options
-
identify exception design options
-
implement a set of condition-specific exceptions
-
implement a Spring
@RestControllerAdvice
class to offload exception handling and error reporting from the@RestController
158. Roles
In an N-tier, distributed architecture there is commonly a set of patterns to apply to our class design.

-
Business Logic - primary entry point for doing work. The business logic knows the why and when to do things. Within the overall service — this is the class (or set of classes) that make up the core service.
-
Data Transfer Object (DTO) - used to describe requested work to the business logic or results from the business logic. In small systems, the DTO may be the same as the business objects (BO) stored in the database — but the specific role that will be addressed here is communicating outside of the overall service.
-
Facade - this provides an adapter around the business logic that translates commands from various protocols and libraries — into core language commands.
I will cover DTOs in more detail in the next lecture — but relative to the client, facade, and business logic — know that all three work on the same type of data. The DTO data types pass thru the controller without a need for translation — other than what is required for communications.
Our focus in this lecture is still the controller and will now look at some controller/service interface strategies that will help develop a clean web facade in our controller classes.
159. Error Reporting
When an error occurs — whether it be client or internal server errors — we want to have access to useful information that can be used to correct or avoid the error in the future. For example, if a client asks for information on a particular account that cannot be found, it would save minutes to hours of debugging to know whether the client requested a valid account# or the bank’s account repository was not currently available.
We have one of two techniques to report error details: complex object result and thrown exception.
Design a way to allow low-level code report context of failures
The place were the error is detected is normally the place with the
most amount of context details known. Design a way to have the information
from the detection spot propagated to the error handling.
|
159.1. Complex Object Result
For the complex object result approach, each service method returns a complex result object (similar in concept to ResponseEntity). If the business method is:
-
successful: the requested result is returned
-
unsuccessful: the returned result expresses the error
The returned method type is complex enough to carry both types of payloads.

Complex return objects require handling logic in caller
The complex result object requires the caller to have error handling logic
ready to triage and react to the various responses. Anything that is not immediately
handled may accidentally be forgotten.
|
159.2. Thrown Exception
For the thrown exception case, exceptions are declared to carry failure-specific error reporting. The business method only needs to declare the happy path response in the return of the method and optionally declare try/catch blocks for errors it can address.

Thrown exceptions give the caller the option to handle or delegate
The thrown exception technique gives the caller the option to construct a
try/catch block and immediately handle the error or to automatically let it
propagate to a caller that can address the issue.
|
Either technique will functionally work. However, returning the complex object versus exception will require manual triage logic on the receiving end. As long as we can create error-specific exceptions, we can create some cleaner handling options in the controller.
159.3. Exceptions
Going the exception route, we can start to consider:
-
what specific errors should our services report?
-
what information is reported?
-
timestamp
-
(descriptive? redacted?) error text
-
-
are there generalizations or specializations?
The HTTP organization of status codes is a good place to start thinking of error types and how to group them (i.e., it is used by the world’s largest information system — the WWW). HTTP defines two primary types of errors:
-
client-based
-
server-based
It could be convenient to group them into a single hierarchy — depending on how we defined the details of the exceptions.

From the start, we can easily guess that our service method(s) might fail because
-
NotFoundException: the target entity was not found
-
InvalidInputException: something wrong with the content of what was requested
-
BadRequestException: request was not understood or erroneously requested
-
InternalErrorException: infrastructure or something else internal went bad
We can also assume that we would need, at a minimum
-
a message - this would ideally include IDs that are specific to the context
-
cause exception - commonly something wrapped by a server error
159.4. Checked or Unchecked?
Going the exception route — the most significant impact to our codebase will be the choice of checked versus unchecked exceptions (i.e., RuntimeException).
-
Checked Exception - these exceptions inherit from java.lang.Exception and are required to be handled by a try/catch block or declared as rethrown by the calling method. It always starts off looking like a good practice, but can get quite tedious when building layers of methods.
-
RuntimeException - these exceptions inherit from java.lang.RuntimeException and not required to be handled by the calling method. This can be a convenient way to address exceptions "not dealt with here". However, it is always the caller’s option to catch any exception they can specifically address.

If we choose to make them different (i.e., ServerErrorException unchecked and ClientErrorException checked), we will have to create separate inheritance hierarchies (i.e., no common ServiceErrorException parent).
159.5. Candidate Client Exceptions
The following is a candidate implementation for client exceptions. I am going to go the seemingly easy route and make them unchecked/RuntimeExceptions — but keep them in a separate hierarchy from the server exceptions to allow an easy change. Complete examples can be located in the repository
public abstract class ClientErrorException extends RuntimeException {
protected ClientErrorException(Throwable cause) {
super(cause);
}
protected ClientErrorException(String message, Object...args) {
super(String.format(message, args)); (1)
}
protected ClientErrorException(Throwable cause, String message, Object...args) {
super(String.format(message, args), cause);
}
public static class NotFoundException extends ClientErrorException {
public NotFoundException(String message, Object...args)
{ super(message, args); }
public NotFoundException(Throwable cause, String message, Object...args)
{ super(cause, message, args); }
}
public static class InvalidInputException extends ClientErrorException {
public InvalidInputException(String message, Object...args)
{ super(message, args); }
public InvalidInputException(Throwable cause, String message, Object...args)
{ super(cause, message, args); }
}
}
1 | encourage callers to add instance details to exception by supplying built-in, optional formatter |
The following is an example of how the caller can instantiate and throw the exception based on conditions detected in the request.
if (null==gesture) {
throw new ClientErrorException
.NotFoundException("gesture type[%s] not found", gestureType);
}
159.6. Service Errors
The following is a candidate implementation for server exceptions. These types of errors are commonly unchecked.
public abstract class ServerErrorException extends RuntimeException {
protected ServerErrorException(Throwable cause) {
super(cause);
}
protected ServerErrorException(String message, Object...args) {
super(String.format(message, args));
}
protected ServerErrorException(Throwable cause, String message, Object...args) {
super(String.format(message, args), cause);
}
public static class InternalErrorException extends ServerErrorException {
public InternalErrorException(String message, Object...args)
{ super(message, args); }
public InternalErrorException(Throwable cause, String message, Object...args)
{ super(cause, message, args); }
}
}
The following is an example of instantiating and throwing a server exception based on a caught exception.
try {
//...
} catch (RuntimeException ex) {
throw new InternalErrorException(ex, (1)
"unexpected error getting gesture[%s]", gestureType); (2)
}
1 | reporting source exception forward |
2 | encourage callers to add instance details to exception by supplying built-in, optional formatter |
160. Controller Exception Advice
We saw earlier where we could register an exception handler within the controller class and how that could clean up our controller methods of noisy error handling code. I want to now build on that concept and our new concrete service exceptions to define an external controller advice that will handle all registered exceptions.
The following is an example of a controller method that is void of error handling logic because of the external controller advice we will put in place.
@RestController
public class GesturesController {
...
@RequestMapping(path=GESTURE_PATH,
method=RequestMethod.GET,
produces = {MediaType.TEXT_PLAIN_VALUE})
public ResponseEntity<String> getGesture(
@PathVariable(name="gestureType") String gestureType,
@RequestParam(name="target", required=false) String target) {
//business method
String result = gestures.getGesture(gestureType, target); (1)
String location = ServletUriComponentsBuilder.fromCurrentRequest()
.build().toUriString();
return ResponseEntity
.status(HttpStatus.OK)
.header(HttpHeaders.CONTENT_LOCATION, location)
.body(result);
}
1 | handles only successful result — exceptions left to controller advice |
160.1. Service Method with Exception Logic
The following is a more complete example of the business method within the service class. Based on the result of the interaction with the data access tier — the business method determines the gesture does not exist and reports that error using an exception.
@Service
public class GesturesServiceImpl implements GesturesService {
@Override
public String getGesture(String gestureType, String target) {
String gesture = gestures.get(gestureType); //data access method
if (null==gesture) {
throw new ClientErrorException (1)
.NotFoundException("gesture type[%s] not found", gestureType);
} else {
String response = gesture + (target==null ? "" : ", " + target);
return response;
}
}
...
1 | service reporting details of error |
160.2. Controller Advice Class
The following is a controller advice class.
We annotate this with @RestControllerAdvice
to better describe its role and give us the option to create fully annotated handler methods.
My candidate controller advice class contains an internal helper method that programmatically builds a ResponseEntity.
The type-specific exception handler must translate the specific exception into a HTTP status code and body.
A more complete example — designed to be a base class to concrete @RestControllerAdvice
classes — can be found in the repository.
package info.ejava.examples.svc.httpapi.gestures.controllers;
import org.springframework.http.HttpStatus;
import org.springframework.http.ResponseEntity;
import org.springframework.web.bind.annotation.RestControllerAdvice;
@RestControllerAdvice( (1)
// wraps ==> @ControllerAdvice
// wraps ==> @Component
basePackageClasses = GesturesController.class) (2)
public class ExceptionAdvice { /(3)
//internal helper method
protected ResponseEntity<String> buildResponse(HttpStatus status, (4)
String text) { (5)
return ResponseEntity
.status(status)
.body(text);
}
...
1 | @RestControllerAdvice denotes this class as a @Component that will handle thrown exceptions |
2 | optional annotations can be used to limit the scope of this advice to certain packages and controller classes |
3 | handled thrown exceptions will return the DTO type for this application — in this case just text/plain |
4 | type-specific exception handlers must map exception to an HTTP status code |
5 | type-specific exception handlers must produce error text |
Example assumes DTO type is
This example assumes the DTO type for errors is a plain/test stringtext/plain string. More robust
response type would be part of an example using complex DTO types.
|
160.3. Advice Exception Handlers
Below are the candidate type-specific exception handlers we can use to translate the context-specific information from the exception to a valuable HTTP response to the client.
import org.springframework.http.HttpStatus;
import org.springframework.http.ResponseEntity;
import org.springframework.web.bind.annotation.ExceptionHandler;
import static info.ejava.examples.svc.httpapi.gestures.svc.ClientErrorException.*;
import static info.ejava.examples.svc.httpapi.gestures.svc.ServerErrorException.*;
...
@ExceptionHandler(NotFoundException.class) (1)
public ResponseEntity<String> handle(NotFoundException ex) {
return buildResponse(HttpStatus.NOT_FOUND, ex.getMessage()); (2)
}
@ExceptionHandler(InvalidInputException.class)
public ResponseEntity<String> handle(InvalidInputException ex) {
return buildResponse(HttpStatus.UNPROCESSABLE_ENTITY, ex.getMessage());
}
@ExceptionHandler(InternalErrorException.class)
public ResponseEntity<String> handle(InternalErrorException ex) {
log.warn("{}", ex.getMessage(), ex); (3)
return buildResponse(HttpStatus.INTERNAL_SERVER_ERROR, ex.getMessage());
}
@ExceptionHandler(RuntimeException.class)
public ResponseEntity<String> handleRuntimeException(RuntimeException ex) {
log.warn("{}", ex.getMessage(), ex); (3)
String text = String.format(
"unexpected error executing request: %s", ex.toString());
return buildResponse(HttpStatus.INTERNAL_SERVER_ERROR, text);
}
1 | annotation maps the handler method to a thrown exception type |
2 | handler method receives exception and converts to a ResponseEntity to be returned |
3 | the unknown error exceptions are candidates for mandatory logging |
161. Summary
In this module we:
-
identified the
@RestController
class' role is a "facade" for a web interface -
encapsulated business logic in a
@Service
class -
identified data passing between clients, facades, and business logic is called a Data Transfer Object (DTO). The DTO was a string in this simple example, but will be expanded in the content lecture
-
identified how exceptions could help separate successful business logic results from error path handling
-
identified some design choices for our exceptions
-
identified how a controller advice class can be used to offload exception handling
API Data Formats
copyright © 2025 jim stafford (jim.stafford@jhu.edu)
162. Introduction
Web content is shared using many standardized MIME Types. We will be addressing two of them here
-
XML
-
JSON
I will show manual approaches to marshaling/unmarshalling first. However, content is automatically marshalled/unmarshalled by the web client container once everything is set up properly. Manual marshaling/unmarshalling approaches are mainly useful in determining provider settings and annotations — as well as to perform low-level development debug outside the server on the shape and content of the payloads.
162.1. Goals
The student will learn to:
-
identify common/standard information exchange content types for web API communications
-
manually marshal and unmarshal Java types to and from a data stream of bytes for multiple content types
-
negotiate content type when communicating using web API
-
pass complex Data Transfer Objects to/from a web API using different content types
-
resolve data mapping issues
162.2. Objectives
At the conclusion of this lecture and related exercises, the student will be able to:
-
design a set of Data Transfer Objects (DTOs) to render information from and to the service
-
define Java class content type mappings to customize marshalling/unmarshalling
-
specify content types consumed and produced by a controller
-
specify content types supplied and accepted by a client
163. Pattern Data Transfer Object
There can be multiple views of the same conceptual data managed by a service. They can be the same physical implementation — but they serve different purposes that must be addressed. We will be focusing on the external client view (Data Transfer Object (DTO)) during this and other web tier lectures. I will specifically contrast the DTO with the internal implementation view (Business Object (BO)) right now to help us see the difference in the two roles.
163.1. DTO Pattern Problem Space
|
![]() Figure 56. Clients and Service Sharing Implementation Data
|
- Problem
-
Issues can arise when service implementations are complex.
-
client may get data they do not need
-
client may get data they cannot handle
-
client may get data they are not authorized to use
-
client may get too much data to be useful (e.g., entire database serialized to client)
-
- Forces
-
The following issues are assumed to be true:
-
some clients are local and can share object references with business logic
-
handling specifics of remote clients is outside core scope of business logic
-
163.2. DTO Pattern Solution Space
|
![]() Figure 57. DTO Represents Client View of Data
|
DTO/BO Mapping Location is a Design Choice
The design decision of which layer translates between DTOs of the API and BOs of the service is not always fixed. Since the DTO is an interface pattern and the Web API is one of many possible interface facades and clients of the service — the job of DTO/BO mapping may be done in the service tier instead. |
163.3. DTO Pattern Players
- Data Transfer Object
-
-
represents a subset of the state of the application at a point in time
-
not dependent on Business Objects or server-side technologies
-
doing so would require sending Business Objects to client
-
-
XML and JSON provide the “ultimate isolation” in DTO implementation/isolation
-
- Remote (Web) Facade
-
-
uses Business Logic and DTOs to perform core business logic
-
manages interface details with client
-
- Business Logic
-
-
performs core implementation duties that may include interaction with backend services and databases
-
- Business Object (Entity)
-
-
representation of data required to implement service
-
may have more server-side-specific logic when DTOs are present in the design
-
DTOs and BOs can be same class(es) in simple or short-lived services
DTOs and BOs can be the same class in small services.
However, supporting multiple versions of clients over longer service lifetimes may cause even small services to split the two data models into separate implementations.
|
164. Sample DTO Class
The following is an example DTO class we will look to use to
represent client view of data in a simple "Quote Service". The QuoteDTO
class
can start off as a simple POJO and — depending on the binding (e.g., JSON
or XML) and binding library (e.g., Jackson, JSON-B, or JAXB) - we may have
to add external configuration and annotations to properly shape
our information exchange.
The class is a vanilla POJO with a default constructor, public getters and setters,
and other convenience methods — mostly implemented by Lombok. The quote contains
three different types of fields (int, String, and LocalDate). The date
field
is represented using java.time.LocalDate
.
package info.ejava.examples.svc.content.quotes.dto;
import lombok.*;
import java.time.LocalDate;
@NoArgsConstructor (1)
@AllArgsConstructor(access = AccessLevel.PACKAGE)
@Data (2)
@Builder
@With
public class QuoteDTO {
private int id;
private String author;
private String text;
private LocalDate date; (3)
private String ignored; (4)
}
1 | default constructor |
2 | public setters and getters |
3 | using Java 8, java.time.LocalDate to represent generic day of year without timezone |
4 | example attribute we will configure to be ignored |
Lombok @Builder and @With
@Builder will create a new instance of the class using incrementally defined properties.
@With creates a copy of the object with a new value for one of its properties.
@Builder can be configured to create a copy constructor (i.e., a copy builder with no property value change).
|
Lombok @Builder and Constructors
@Builder requires an all-args-ctor and will define a package-friendly one unless there is already a ctor defined.
Unmarshallers require a no-args-ctor and can be provided using @NoArgsConstructor .
The presence of the no-args-ctor turns off the required all-args-ctor for @Builder and can be re-enabled with @AllArgsConstructor .
Access tuning can be accomplished using the access property.
|
165. Time/Date Detour
While we are on the topic of exchanging data — we might as well address time-related data that can cause numerous mapping issues. Our issues are on multiple fronts.
-
what does our time-related property represent?
-
e.g., a point in time, a point in time in a specific timezone, a birthdate, a daily wake-up time
-
-
what type do we use to represent our expression of time?
-
do we use legacy Date-based types that have a lot of support despite ambiguity issues?
-
do we use the newer
java.time
types that are more explicit in meaning but have not fully caught on everywhere?
-
-
how should we express time within the marshalled DTO?
-
how can we properly unmarshal the time expression into what we need?
-
how can we handle the alternative time wire expressions with minimal pain?
165.1. Pre Java 8 Time
During pre-Java8, we primarily had the following time-related java.util
classes
represents a point in time without timezone or calendar information. The point is a Java long value that represents the number of milliseconds before or after 1970 UTC. This allows us to identify a millisecond between 292,269,055 BC and 292,278,994 AD when applied to the Gregorian calendar. |
|
interprets a Date according to an assigned calendar (e.g., Gregorian Calendar) into years, months, hours, etc. Calendar can be associated with a specific timezone offset from UTC and assumes the Date is relative to that value. |
During the pre-Java 8 time period, there was also a time-based library called Joda that became popular at providing time expressions that more precisely identified what was being conveyed.
165.2. java.time
The ambiguity issues with java.util.Date
and the expression and popularity of
Joda caused it to be adopted into Java 8 (
JSR 310).
The following are a few of the key java.time
constructs added in Java 8.
represents a point in time at 00:00 offset from UTC. The point is a nanosecond
and improves on |
|
adds |
|
adds timezone identity to OffsetDateTime — which can be used to determine the appropriate timezone offset (i.e., daylight savings time) ( |
|
a generic date, independent of timezone and time ( |
|
a generic time of day, independent of timezone or specific date.
This allows us to express "I set my alarm for 6am" - without specifying the actual dates that is performed ( |
|
a date and time but lacking a specific timezone offset from UTC ( |
|
a time-based amount of time (e.g., 30.5 seconds). Vocabulary supports from milliseconds to days. |
|
a date based amount of time (e.g., 2 years and 1 day). Vocabulary supports from days to years. |
165.3. Date/Time Formatting
There are two primary format frameworks for formatting and parsing time-related fields in text fields like XML or JSON:
This legacy |
|
This newer |
public static final DateTimeFormatter ISO_LOCAL_DATE_TIME;
static {
ISO_LOCAL_DATE_TIME = new DateTimeFormatterBuilder()
.parseCaseInsensitive()
.append(ISO_LOCAL_DATE)
.appendLiteral('T')
.append(ISO_LOCAL_TIME)
.toFormatter(ResolverStyle.STRICT, IsoChronology.INSTANCE);
}
This, wrapped with some optional and default value constructs to handle missing information makes for a pretty powerful time parsing and formatting tool.
165.4. Date/Time Exchange
There are a few time standards supported by Java date/time formatting frameworks:
ISO 8601 |
This standard is cited in many places but hard to track down an official example of each and every format — especially when it comes to 0 values and timezone offsets.
However, an example representing a ZonedDateTime and EST may look like the following: |
RFC 822/ RFC 1123 |
These are lesser followed standards for APIs and includes constructs like an English word
abbreviation for day of week and month. The DateTimeFormatter example for this group
is |
My examples will work exclusively with the ISO 8601 formats. The following example leverages the Java expression of time formatting to allow for multiple offset expressions (Z
, +00
, +0000
, and +00:00
) on top of a standard LOCAL_DATE_TIME expression.
public static final DateTimeFormatter UNMARSHALLER
= new DateTimeFormatterBuilder()
.parseCaseInsensitive()
.append(DateTimeFormatter.ISO_LOCAL_DATE)
.appendLiteral('T')
.append(DateTimeFormatter.ISO_LOCAL_TIME)
.parseLenient()
.optionalStart().appendOffset("+HH", "Z").optionalEnd()
.optionalStart().appendOffset("+HH:mm", "Z").optionalEnd()
.optionalStart().appendOffset("+HHmm", "Z").optionalEnd()
.optionalStart().appendLiteral('[').parseCaseSensitive()
.appendZoneRegionId()
.appendLiteral(']').optionalEnd()
.parseDefaulting(ChronoField.OFFSET_SECONDS,0)
.parseStrict()
.toFormatter();
Use ISO_LOCAL_DATE_TIME Formatter by Default
Going through the details of |
166. Java Marshallers
I will be using four different data marshalling providers during this lecture:
|
the default JSON provider included within Spring and Spring Boot. It implements its own proprietary interface for mapping Java POJOs to JSON text. |
|
a relatively new Jakarta EE standard for JSON marshalling. The reference implementation is Yasson from the open source Glassfish project. It will be used to verify and demonstrate portability between the built-in Jackson JSON and other providers. |
|
a tightly integrated sibling of Jackson JSON. This requires a few extra module dependencies but offers a very similar setup and annotation set as the JSON alternative. I will use Jackson XML as my primary XML provider during examples. |
|
a well-seasoned XML marshalling framework that was the foundational requirement for early JavaEE servlet containers. I will use JAXB to verify and demonstrate portability between Jackson XML and other providers. |
Spring Boot comes with a Jackson JSON pre-wired with the web dependencies. It seamlessly
gets called from RestTemplate, RestClient, WebClient and the RestController when application/json
or nothing has been selected. Jackson XML requires additional dependencies — but integrates just
as seamlessly with the client and server-side frameworks for application/xml
.
For those reasons — Jackson JSON and Jackson XML will be used as our core marshalling
frameworks. JSON-B and JAXB will just be used for portability testing.
167. JSON Content
JSON is the content type most preferred by Javascript UI frameworks and NoSQL databases. It has quickly overtaken XML as a preferred data exchange format.
{
"id" : 0,
"author" : "Hotblack Desiato",
"text" : "Parts of the inside of her head screamed at other parts of the inside of her head.",
"date" : "1981-05-15"
}
Much of the mapping can be accomplished using Java reflection. Provider-specific
annotations can be added to address individual issues. Let’s take a look at how
both Jackson JSON and JSON-B can be used to map our QuoteDTO
POJO to the above
JSON content. The following is a trimmed down copy of the DTO class I showed you earlier.
What kind of things do we need to make that mapping?
@Data
public class QuoteDTO {
private int id;
private String author;
private String text;
private LocalDate date; (1)
private String ignored; (2)
}
1 | may need some LocalDate formatting |
2 | may need to mark as excluded |
167.1. Jackson JSON
For the simple cases, our DTO classes can be mapped to JSON with minimal effort using Jackson JSON. However, we potentially need to shape our document and can use Jackson annotations to customize. The following example shows using an annotation to eliminate a property from the JSON document.
Example Pre-Tweaked JSON Payload
|
Example QuoteDTO with Jackson Annotation(s)
|
Date/Time Formatting Handled at ObjectMapper/Marshaller Level
The example annotation above only addressed the ignore property.
We will address date/time formatting at the ObjectMapper/marshaller level below.
|
167.1.1. Jackson JSON Initialization
Jackson JSON uses an ObjectMapper
class to go to/from POJO and JSON. We can configure
the mapper with options or configure a reusable builder to create mappers with
prototype options.
Choosing the latter approach will be useful once we move inside the server.
import com.fasterxml.jackson.databind.ObjectMapper;
import com.fasterxml.jackson.databind.SerializationFeature;
import org.springframework.http.converter.json.Jackson2ObjectMapperBuilder;
We have the ability to simply create a default ObjectMapper directly.
ObjectMapper mapper = new ObjectMapper();
However, when using Spring it is useful to use the Spring Jackson2ObjectMapperBuilder
class to set many of the data marshalling types for us.
import org.springframework.http.converter.json.Jackson2ObjectMapperBuilder;
...
ObjectMapper mapper = new Jackson2ObjectMapperBuilder()
.featuresToEnable(SerializationFeature.INDENT_OUTPUT) (1)
.featuresToDisable(SerializationFeature.WRITE_DATES_AS_TIMESTAMPS) (2)
//more later
.createXmlMapper(false) (3)
.build();
1 | optional pretty print indentation |
2 | option to use ISO-based strings versus binary values and arrays |
3 | same Spring builder creates both XML and JSON ObjectMappers |
Use Injection When Inside Container
When inside the container, have the Jackson2ObjectMapperBuilder injected (i.e., not locally-instantiated) in order to pick up external and property configurations/customizations.
|
By default, Jackson will marshal zone-based timestamps as a decimal number
(e.g., -6106031876.123456789
) and generic date/times as an array of values
(e.g., [ 1776, 7, 4, 8, 2, 4, 123456789 ]
and [ 1966, 1, 9 ]
). By disabling this serialization
feature, Jackson produces ISO-based strings for all types of timestamps and
generic date/times (e.g., 1776-07-04T08:02:04.123456789Z
and
2002-02-14
)
The following example from the class repository shows a builder customizer being registered as a @Bean
factory to be able to adjust Jackson defaults used by the server.
The returned lambda function is called with a builder each time someone injects a Jackson2ObjectMapper
— provided the Jackson AutoConfiguration has not been overridden.
/**
* Execute these customizations first (Highest Precedence) and then the
* properties second so that properties can override Java configuration.
*/
@Bean
@Order(Ordered.HIGHEST_PRECEDENCE)
public Jackson2ObjectMapperBuilderCustomizer jacksonMapper() {
return (builder) -> { builder
//spring.jackson.serialization.indent-output=true
.featuresToEnable(SerializationFeature.INDENT_OUTPUT)
//spring.jackson.serialization.write-dates-as-timestamps=false
.featuresToDisable(SerializationFeature.WRITE_DATES_AS_TIMESTAMPS)
//spring.jackson.date-format=info.ejava.examples.svc.content.quotes.dto.ISODateFormat
.dateFormat(new ISODateFormat());
};
}
167.1.2. Jackson JSON Marshalling/Unmarshalling
The mapper created from the builder can then be used to marshal the POJO to JSON.
private ObjectMapper mapper;
public <T> String marshal(T object) throws IOException {
StringWriter buffer = new StringWriter();
mapper.writeValue(buffer, object);
return buffer.toString();
}
The mapper can just as easy — unmarshal the JSON to a POJO instance.
public <T> T unmarshal(Class<T> type, String buffer) throws IOException {
T result = mapper.readValue(buffer, type);
return result;
}
A packaged set of marshal/unmarshal convenience routines have been packaged inside ejava-dto-util
.
167.1.3. Jackson JSON Maven Aspects
For modules with only DTOs with Jackson annotations, only a direct dependency on jackson-annotations is necessary.
<dependency>
<groupId>com.fasterxml.jackson.core</groupId>
<artifactId>jackson-annotations</artifactId>
</dependency>
Modules that will be marshalling/unmarshalling JSON will need the core libraries that can be conveniently brought in through a dependency on one of the following two starters.
-
spring-boot-starter-web
-
spring-boot-starter-json
org.springframework.boot:spring-boot-starter-web:jar
+- org.springframework.boot:spring-boot-starter-json:jar
| +- com.fasterxml.jackson.core:jackson-databind:jar
| | +- com.fasterxml.jackson.core:jackson-annotations:jar
| | \- com.fasterxml.jackson.core:jackson-core
| +- com.fasterxml.jackson.datatype:jackson-datatype-jdk8:jar (1)
| +- com.fasterxml.jackson.datatype:jackson-datatype-jsr310:jar (1)
| \- com.fasterxml.jackson.module:jackson-module-parameter-names:jar
1 | defines mapping for java.time types |
Jackson has built-in ISO mappings for Date and java.time
Jackson has built-in mappings to ISO for java.util.Date and java.time
data types.
|
167.2. JSON-B
JSON-B (the standard) and
Yasson (the reference implementation of JSON-B) can pretty much
render a JSON view of our simple DTO class right
out of the box. Customizations can be applied using
JSON-B annotations. In the following example, the ignore
Java property
is being excluded from the JSON output.
Example Pre-Tweaked JSON-B Payload
|
Example QuoteDTO with JSON-B Annotation(s)
|
167.2.1. JSON-B Initialization
JSON-B provides all mapping through a Jsonb
builder object
that can be configured up-front with various options.
import jakarta.json.bind.Jsonb;
import jakarta.json.bind.JsonbBuilder;
import jakarta.json.bind.JsonbConfig;
JsonbConfig config=new JsonbConfig()
.setProperty(JsonbConfig.FORMATTING, true); (1)
Jsonb builder = JsonbBuilder.create(config);
1 | adds pretty-printing features to payload |
Jsonb is no longer
javax The Jsonb package has changed from
|
167.2.2. JSON-B Marshalling/Unmarshalling
The following two examples show how JSON-B marshals and unmarshals the DTO POJO instances to/from JSON.
private Jsonb builder;
public <T> String marshal(T object) {
String buffer = builder.toJson(object);
return buffer;
}
public <T> T unmarshal(Class<T> type, String buffer) {
T result = (T) builder.fromJson(buffer, type);
return result;
}
167.2.3. JSON-B Maven Aspects
Modules defining only the DTO class require a dependency on the following API definition for the annotations.
<dependency>
<groupId>jakarta.json</groupId>
<artifactId>jakarta.json-api</artifactId>
</dependency>
Modules marshalling/unmarshalling JSON documents using JSON-B/Yasson implementation
require dependencies on binding-api
and a runtime dependency on yasson
implementation.
org.eclipse:yasson:jar
+- jakarta.json.bind:jakarta.json.bind-api:jar
+- jakarta.json:jakarta.json-api:jar
\- org.glassfish:jakarta.json:jar
168. XML Content
XML is preferred by many data exchange services that require rigor in their data definitions.
That does not mean that rigor is always required. The following two examples are
XML renderings of a QuoteDTO
.
The first example is a straight mapping of Java class/attribute to XML elements. The second example applies an XML namespace and attribute (for the id
property).
Namespaces become important when mixing similar data types from different sources. XML attributes are commonly used to host identity information. XML elements are commonly used for description information.
The sometimes arbitrary use of attributes over elements in XML leads to some confusion when trying to perform direct mappings between JSON and XML — since JSON has no concept of an attribute.
<QuoteDTO> (1)
<id>0</id> (2)
<author>Zaphod Beeblebrox</author>
<text>Nothing travels faster than the speed of light with the possible exception of bad news, which obeys its own special laws.</text>
<date>1927</date> (3)
<date>6</date>
<date>11</date>
<ignored>ignored</ignored> (4)
</QuoteDTO>
1 | root element name defaults to variant of class name |
2 | all properties default to @XmlElement mapping |
3 | java.time types are going to need some work |
4 | all properties are assumed to not be ignored |
Collections Marshall Unwrapped
The three (3) date elements above are elements of an ordered collection marshalled without a wrapping element.
If we wanted to keep the collection (versus marshalling in ISO format), it would be common to define a wrapping element to encapsulate the collection — much like parentheses in a sentence.
|
<quote xmlns="urn:ejava.svc-controllers.quotes" id="0"> (1) (2) (3)
<author>Zaphod Beeblebrox</author>
<text>Nothing travels faster than the speed of light with the possible exception of bad news, which obeys its own special laws.</text>
<date>1927-06-11</date>
</quote> (4)
1 | quote is our targeted root element name |
2 | urn:ejava.svc-controllers.quotes is our targeted namespace |
3 | we want the id mapped as an attribute — not an element |
4 | we want certain properties from the DTO not to show up in the XML |
168.1. Jackson XML
Like Jackson JSON, Jackson XML will attempt to map a Java class solely on Java reflection and default mappings. However, to leverage key XML features like namespaces and attributes, we need to add a few annotations. The partial example below shows our POJO with Lombok and other mappings excluded for simplicity.
import com.fasterxml.jackson.dataformat.xml.annotation.JacksonXmlProperty;
import com.fasterxml.jackson.dataformat.xml.annotation.JacksonXmlRootElement;
...
@JacksonXmlRootElement(localName = "quote", (1)
namespace = "urn:ejava.svc-controllers.quotes") (2)
public class QuoteDTO {
@JacksonXmlProperty(isAttribute = true) (3)
private int id;
private String author;
private String text;
private LocalDate date;
@JsonIgnore (4)
private String ignored;
}
1 | defines the element name when rendered as the root element |
2 | defines namespace for type |
3 | maps id property to an XML attribute — default is XML element |
4 | reuses Jackson JSON general purpose annotations |
168.1.1. Jackson XML Initialization
Jackson XML initialization is nearly identical to its JSON sibling as long as we want them to have the same options. In all of our examples I will be turning off array-based, numeric dates expression in favor of ISO-based strings.
import com.fasterxml.jackson.databind.SerializationFeature;
import com.fasterxml.jackson.dataformat.xml.XmlMapper;
import org.springframework.http.converter.json.Jackson2ObjectMapperBuilder;
XmlMapper mapper = new Jackson2ObjectMapperBuilder()
.featuresToEnable(SerializationFeature.INDENT_OUTPUT) (1)
.featuresToDisable(SerializationFeature.WRITE_DATES_AS_TIMESTAMPS) (2)
//more later
.createXmlMapper(true) (3)
.build();
1 | pretty print output |
2 | use ISO-based strings for time-based fields versus binary numbers and arrays |
3 | XmlMapper extends ObjectMapper |
168.1.2. Jackson XML Marshalling/Unmarshalling
public <T> String marshal(T object) throws IOException {
StringWriter buffer = new StringWriter();
mapper.writeValue(buffer, object);
return buffer.toString();
}
public <T> T unmarshal(Class<T> type, String buffer) throws IOException {
T result = mapper.readValue(buffer, type);
return result;
}
168.1.3. Jackson XML Maven Aspects
Jackson XML is not broken out into separate libraries as much as its JSON sibling. Jackson XML annotations are housed in the same library as the marshalling/unmarshalling code.
<dependency>
<groupId>com.fasterxml.jackson.dataformat</groupId>
<artifactId>jackson-dataformat-xml</artifactId>
</dependency>
168.2. JAXB
JAXB is more particular about the definition of the Java class to be mapped.
JAXB requires that the root element of a document be defined with
an @XmlRootElement
annotation with an optional name and namespace
defined.
com.sun.istack.SAXException2: unable to marshal type
"info.ejava.examples.svc.content.quotes.dto.QuoteDTO"
as an element because it is missing an @XmlRootElement annotation
...
import jakarta.xml.bind.annotation.XmlRootElement;
...
@XmlRootElement(name = "quote", namespace = "urn:ejava.svc-controllers.quotes")
public class QuoteDTO { (1) (2)
1 | default name is quoteDTO if not supplied |
2 | default to no namespace if not supplied |
JAXB 4.x is no longer
javax JAXB 4.x used in Spring Boot 3/Spring 6 is no longer
|
168.2.1. Custom Type Adapters
JAXB has no default definitions for java.time
classes and must be handled with custom adapter code.
INFO: No default constructor found on class java.time.LocalDate java.lang.NoSuchMethodException: java.time.LocalDate.<init>()
This has always been an issue for Date formatting even before java.time
and can easily be solved with a custom adapter class that converts between a String and the unsupported
type.
We can locate
packaged solutions on the web, but it is helpful to get comfortable with the process on our own.
We first create an adapter class that extends XmlAdapter<ValueType, BoundType>
— where ValueType is a type known to JAXB and BoundType is the type we are mapping.
We can use DateFormatter.ISO_LOCAL_DATE to marshal and unmarshal the LocalDate to/from text.
import jakarta.xml.bind.annotation.adapters.XmlAdapter;
...
public static class LocalDateJaxbAdapter extends extends XmlAdapter<String, LocalDate> {
@Override
public LocalDate unmarshal(String text) {
return text == null ? null : LocalDate.parse(text, DateTimeFormatter.ISO_LOCAL_DATE);
}
@Override
public String marshal(LocalDate timestamp) {
return timestamp==null ? null : DateTimeFormatter.ISO_LOCAL_DATE.format(timestamp);
}
}
We next annotate the Java property with @XmlJavaTypeAdapter
, naming our
adapter class.
import jakarta.xml.bind.annotation.adapters.XmlJavaTypeAdapter;
...
@XmlAccessorType(XmlAccessType.FIELD) (2)
public class QuoteDTO {
...
@XmlJavaTypeAdapter(LocalDateJaxbAdapter.class) (1)
private LocalDate date;
1 | custom adapter required for unsupported types |
2 | must manually set access to FIELD when annotating attributes |
168.2.2. JAXB Initialization
There is no sharable, up-front initialization for JAXB. All configuration
must be done on individual, non-sharable JAXBContext objects. However,
JAXB does have a package-wide annotation that the other frameworks
do not. The following example shows a package-info.java
file that
contains annotations to be applied to every class in the same Java package.
//package-info.java
@XmlSchema(namespace = "urn:ejava.svc-controllers.quotes")
package info.ejava.examples.svc.content.quotes.dto;
import jakarta.xml.bind.annotation.XmlSchema;
The same feature could be used to globally apply adapters package-wide.
//package-info.java
@XmlSchema(namespace = "urn:ejava.svc-controllers.quotes")
@XmlJavaTypeAdapter(type= LocalDate.class, value=JaxbTimeAdapters.LocalDateJaxbAdapter.class)
package info.ejava.examples.svc.content.quotes.dto;
import jakarta.xml.bind.annotation.XmlSchema;
import jakarta.xml.bind.annotation.adapters.XmlJavaTypeAdapter;
import java.time.LocalDate;
168.2.3. JAXB Marshalling/Unmarshalling
import jakarta.xml.bind.JAXBContext;
import jakarta.xml.bind.JAXBException;
import jakarta.xml.bind.Marshaller;
import jakarta.xml.bind.Unmarshaller;
Marshalling/Unmarshalling starts out by constructing a JAXBContext
scoped to handle the classes of interest.
This will include the classes explicitly named and the classes they reference.
Therefore, one would only need to create a JAXBContext
by explicitly naming the input and return types of a Web API method.
public <T> String marshal(T object) throws JAXBException {
JAXBContext jbx = JAXBContext.newInstance(object.getClass()); (1)
Marshaller marshaller = jbx.createMarshaller();
marshaller.setProperty(Marshaller.JAXB_FORMATTED_OUTPUT, true); (2)
StringWriter buffer = new StringWriter();
marshaller.marshal(object, buffer);
return buffer.toString();
}
1 | explicitly name primary classes of interest |
2 | adds newline and indentation formatting |
public <T> T unmarshal(Class<T> type, String buffer) throws JAXBException {
JAXBContext jbx = JAXBContext.newInstance(type);
Unmarshaller unmarshaller = jbx.createUnmarshaller();
ByteArrayInputStream bis = new ByteArrayInputStream(buffer.getBytes());
T result = (T) unmarshaller.unmarshal(bis);
return result;
}
168.2.4. JAXB Maven Aspects
Modules that define DTO classes only will require a direct dependency on the
jakarta.xml-bind-api
library for annotations and interfaces.
<dependency>
<groupId>jakarta.xml.bind</groupId>
<artifactId>jakarta.xml.bind-api</artifactId>
</dependency>
Modules marshalling/unmarshalling DTO classes using JAXB will require a dependency
on the jaxb-runtime
artifact.
<dependency>
<groupId>org.glassfish.jaxb</groupId>
<artifactId>jaxb-runtime</artifactId>
</dependency>
Deprecated javax.xml.bind Dependencies
The
The following two artifacts contain the deprecated
|
169. Configure Server-side Jackson
169.1. Dependencies
Jackson JSON will already be on the classpath when using spring-boot-web-starter
.
To also support XML, make sure the server has an additional jackson-dataformat-xml
dependency.
<dependency>
<groupId>com.fasterxml.jackson.dataformat</groupId>
<artifactId>jackson-dataformat-xml</artifactId>
</dependency>
169.2. Configure ObjectMapper
Both XML and JSON mappers are instances of ObjectMapper. To configure their use in our application — we can go one step higher and create a builder for jackson to use as its base. That is all we need to know as long as we can configure them identically.
Jackson’s AutoConfiguration provides a layered approach to customizing the marshaller. One can configure using:
-
spring.jackson properties (e.g.,
spring.jackson.serialization.*
) -
Jackson2ObjectMapperBuilderCustomizer — a functional interface that will be passed a builder pre-configured using properties
Assigning a high precedence order to the customizer will allow properties to flexibly override the Java code configuration.
...
import com.fasterxml.jackson.databind.SerializationFeature;
import org.springframework.boot.autoconfigure.jackson.Jackson2ObjectMapperBuilderCustomizer;
import org.springframework.core.Ordered;
import org.springframework.core.annotation.Order;
@SpringBootApplication
public class QuotesApplication {
public static void main(String...args) {
SpringApplication.run(QuotesApplication.class, args);
}
@Bean
@Order(Ordered.HIGHEST_PRECEDENCE) (2)
public Jackson2ObjectMapperBuilderCustomizer jacksonMapper() {
return (builder) -> { builder (1)
//spring.jackson.serialization.indent-output=true
.featuresToEnable(SerializationFeature.INDENT_OUTPUT)
//spring.jackson.serialization.write-dates-as-timestamps=false
.featuresToDisable(SerializationFeature.WRITE_DATES_AS_TIMESTAMPS)
//spring.jackson.date-format=info.ejava.examples.svc.content.quotes.dto.ISODateFormat
.dateFormat(new ISODateFormat());
};
}
}
1 | returns a lambda function that is called with a Jackson2ObjectMapperBuilder to customize.
Jackson uses this same definition for both XML and JSON mappers |
2 | highest order precedence applies this configuration first, then properties — allowing for overrides using properties |
169.3. Controller Properties
We can register what MediaTypes each method supports by adding a set of consumes
and produces properties to the @RequestMapping
annotation in the controller.
This is an array of MediaType values (e.g., ["application/json", "application/xml"]
)
that the endpoint should either accept or provide in a response.
@RequestMapping(path= QUOTES_PATH,
method= RequestMethod.POST,
consumes = {MediaType.APPLICATION_JSON_VALUE, MediaType.APPLICATION_XML_VALUE},
produces = {MediaType.APPLICATION_JSON_VALUE, MediaType.APPLICATION_XML_VALUE})
public ResponseEntity<QuoteDTO> createQuote(@RequestBody QuoteDTO quote) {
QuoteDTO result = quotesService.createQuote(quote);
URI uri = ServletUriComponentsBuilder.fromCurrentRequestUri()
.replacePath(QUOTE_PATH)
.build(result.getId());
ResponseEntity<QuoteDTO> response = ResponseEntity.created(uri)
.body(result);
return response;
}
The Content-Type
request header is matched with one of the types listed in consumes
.
This is a single value and the following example uses an application/json
Content-Type
and the server uses our Jackson JSON configuration and DTO mappings to turn the JSON string
into a POJO.
POST http://localhost:64702/api/quotes
sent: [Accept:"application/xml", Content-Type:"application/json", Content-Length:"108"]
{
"id" : 0,
"author" : "Tricia McMillan",
"text" : "Earth: Mostly Harmless",
"date" : "1991-05-11"
}
If there is a match between Content-Type and consumes, the provider will map the body contents to the input type using the mappings we reviewed earlier. If we need more insight into the request headers — we can expand the method mapping to accept request headers.
@RequestMapping(path= QUOTES_PATH,
method= RequestMethod.POST,
consumes={MediaType.APPLICATION_JSON_VALUE, MediaType.APPLICATION_XML_VALUE},
produces={MediaType.APPLICATION_JSON_VALUE, MediaType.APPLICATION_XML_VALUE})
public ResponseEntity<QuoteDTO> createQuote(
@RequestHeader(name=HttpHeaders.CONTENT_TYPE) String contentType, (1)
@RequestHeader(name=HttpHeaders.ACCEPT) List<String> accept, (2)
@RequestBody QuoteDTO quote) {
QuoteDTO quote = request.getBody();
log.info("CONTENT_TYPE={}", request.getHeaders().get(HttpHeaders.CONTENT_TYPE));
log.info("ACCEPT={}", request.getHeaders().get(HttpHeaders.ACCEPT));
QuoteDTO result = quotesService.createQuote(quote);
1 | injecting request header properties into controller method |
2 | headers are technically lists |
The log statements at the start of the methods output the following two lines with request header information.
QuotesController#createQuote:43 CONTENT_TYPE=application/json
QuotesController#createQuote:44 ACCEPT=[application/xml]
Whatever the service returns (success or error), the Accept
request header is
matched with one of the types listed in the produces
. This is a list of N
values listed in priority order. In the following example, the client used an
application/xml
Accept header and the server converted it to XML using our Jackson XML
configuration and mappings to turn the POJO into an XML response.
sent: [Accept:"application/xml", Content-Type:"application/json", Content-Length:"108"]
rcvd: [Location:"http://localhost:64702/api/quotes/1", Content-Type:"application/xml", Transfer-Encoding:"chunked", Date:"Fri, 05 Jun 2020 19:44:25 GMT", Keep-Alive:"timeout=60", Connection:"keep-alive"]
<quote xmlns="urn:ejava.svc-controllers.quotes" id="1">
<author xmlns="">Tricia McMillan</author>
<text xmlns="">Earth: Mostly Harmless</text>
<date xmlns="">1991-05-11</date>
</quote>
If there is no match between Content-Type and consumes, a 415
/Unsupported Media Type
error status is returned.
If there is no match between Accept and produces, a 406
/Not Acceptable
error status is returned. Most of this
content negotiation and data marshalling/unmarshalling is hidden from the controller.
170. Client Marshall Request Content
If we care about the exact format our POJO is marshalled to or the format the service returns,
we can no longer pass a naked POJO to the client library. We must wrap the POJO in a
RequestEntity
and supply a set of headers with format specifications. The following shows
an example using RestTemplate.
RequestEntity<QuoteDTO> request = RequestEntity.post(quotesUrl) (1)
.contentType(contentType) (2)
.accept(acceptType) (3)
.body(validQuote);
ResponseEntity<QuoteDTO> response = restTemplate.exchange(request, QuoteDTO.class);
1 | create a POST request with client headers |
2 | express desired Content-Type for the request |
3 | express Accept types for the response |
The following example shows the request and reply information exchange for an application/json
Content-Type and Accept header.
POST http://localhost:49252/api/quotes, returned CREATED/201
sent: [Accept:"application/json", Content-Type:"application/json", Content-Length:"146"]
{
"id" : 0,
"author" : "Zarquon",
"text" : "Whatever your tastes, Magrathea can cater for you. We are not proud.",
"date" : "1920-08-17"
}
rcvd: [Location:"http://localhost:49252/api/quotes/1", Content-Type:"application/json", Transfer-Encoding:"chunked", Date:"Fri, 05 Jun 2020 20:17:35 GMT", Keep-Alive:"timeout=60", Connection:"keep-alive"]
{
"id" : 1,
"author" : "Zarquon",
"text" : "Whatever your tastes, Magrathea can cater for you. We are not proud.",
"date" : "1920-08-17"
}
The following example shows the request and reply information exchange for an application/xml
Content-Type and Accept header.
POST http://localhost:49252/api/quotes, returned CREATED/201
sent: [Accept:"application/xml", Content-Type:"application/xml", Content-Length:"290"]
<quote xmlns="urn:ejava.svc-controllers.quotes" id="0">
<author xmlns="">Humma Kavula</author>
<text xmlns="">In the beginning, the Universe was created. This has made a lot of people very angry and been widely regarded as a bad move.</text>
<date xmlns="">1942-03-03</date>
</quote>
rcvd: [Location:"http://localhost:49252/api/quotes/4", Content-Type:"application/xml", Transfer-Encoding:"chunked", Date:"Fri, 05 Jun 2020 20:17:35 GMT", Keep-Alive:"timeout=60", Connection:"keep-alive"]
<quote xmlns="urn:ejava.svc-controllers.quotes" id="4">
<author xmlns="">Humma Kavula</author>
<text xmlns="">In the beginning, the Universe was created. This has made a lot of people very angry and been widely regarded as a bad move.</text>
<date xmlns="">1942-03-03</date>
</quote>
171. Client Filters
The runtime examples above showed HTTP traffic and marshalled payloads. That can be very convenient for debugging purposes. There are two primary ways of examining marshalled payloads.
- Switch accepted Java type to String
-
Both our client and controller declare they expect a
QuoteDTO.class
to be the response. That causes the provider to map the String into the desired type. If the client or controller declared they expected aString.class
, they would receive the raw payload to debug or later manually parse using direct access to the unmarshalling code. - Add a filter
-
Both RestTemplate and WebClient accept filters in the request and response flow. RestTemplate is easier and more capable to use because of its synchronous behavior. We can register a filter to get called with the full request and response in plain view — with access to the body — using RestTemplate. WebClient, with its asynchronous design has a separate request and response flow with no easy access to the payload.
171.1. RestTemplate and RestClient
The following code provides an example of a filter that will work for the synchronous RestTemplate and RestClient.
It shows the steps taken to access the request and response payload.
Note that reading the body of a request or response is commonly a read-once restriction.
The ability to read the body multiple times will be taken care of within the @Bean
factory method registering this filter.
import org.springframework.http.client.ClientHttpRequestExecution;
import org.springframework.http.client.ClientHttpRequestInterceptor;
import org.springframework.http.client.ClientHttpResponse;
...
public class RestTemplateLoggingFilter implements ClientHttpRequestInterceptor {
public ClientHttpResponse intercept(HttpRequest request, byte[] body,(1)
ClientHttpRequestExecution execution) throws IOException {
ClientHttpResponse response = execution.execute(request, body); (1)
HttpMethod method = request.getMethod();
URI uri = request.getURI();
HttpStatusCode status = response.getStatusCode();
String requestBody = new String(body);
String responseBody = this.readString(response.getBody());
//... log debug
return response;
}
private String readString(InputStream inputStream) { ... }
...
}
1 | interceptor has access to the client request and response |
RestTemplateLoggingFilter is for all Synchronous Requests
The example class is called RestTemplateLoggingFilter because RestTemplate was here first, the filter is used many times in many examples, and I did not want to make the generalized name change at this time.
It is specific to synchronous requests, which includes RestClient .
|
The following code shows an example of a @Bean
factory that creates RestTemplate
instances configured with the debug logging filter shown above.
@Bean
ClientHttpRequestFactory requestFactory() {
return new SimpleClientHttpRequestFactory(); (3)
}
@Bean
public RestTemplate restTemplate(RestTemplateBuilder builder,
ClientHttpRequestFactory requestFactory) { (3)
return builder.requestFactory(
//used to read the streams twice -- so we can use the logging filter
()->new BufferingClientHttpRequestFactory(requestFactory)) (2)
.interceptors(new RestTemplateLoggingFilter()) (1)
.build();
}
@Bean
public RestClient restClient(RestClient.Builder builder,
ClientHttpRequestFactory requestFactory) { (3)
return builder //requestFactory used to read stream twice
.requestFactory(new BufferingClientHttpRequestFactory(requestFactory)) (2)
.requestInterceptor(new RestTemplateLoggingFilter()) (1)
.build();
}
1 | the overall intent of this @Bean factory is to register the logging filter |
2 | must configure client with a buffer (BufferingClientHttpRequestFactory ) for body to enable multiple reads |
3 | providing a ClientRequestFactory to be forward-ready for SSL communications |
171.2. WebClient
The following code shows an example request and response filter. They are independent and are implemented using a Java 8 lambda function. You will notice that we have no easy access to the request or response body.
package info.ejava.examples.common.webflux;
import org.springframework.web.reactive.function.client.ExchangeFilterFunction;
...
public class WebClientLoggingFilter {
public static ExchangeFilterFunction requestFilter() {
return ExchangeFilterFunction.ofRequestProcessor((request) -> {
//access to
//request.method(),
//request.url(),
//request.headers()
return Mono.just(request);
});
}
public static ExchangeFilterFunction responseFilter() {
return ExchangeFilterFunction.ofResponseProcessor((response) -> {
//access to
//response.statusCode()
//response.headers().asHttpHeaders())
return Mono.just(response);
});
}
}
The code below demonstrates how to register custom filters for injected WebClient instances.
@Bean
public WebClient webClient(WebClient.Builder builder) {
return builder
.filter(WebClientLoggingFilter.requestFilter())
.filter(WebClientLoggingFilter.responseFilter())
.build();
}
172. Date/Time Lenient Parsing and Formatting
In our quote example, we had an easy LocalDate to format and parse, but that even required a custom adapter for JAXB. Integration of other time-based properties can get more involved as we get into complete timestamps with timezone offsets. So lets try to address the issues here before we complete the topic on content exchange.
The primary time-related issues we can encounter include:
Potential Issue | Description |
---|---|
type not supported |
We have already encountered that with JAXB and solved using a custom adapter. Each of the providers offer their own form of adapter (or serializer/deserializer), so we have a good headstart on how to solve the hard problems. |
non-UTC ISO offset style supported |
There are at least four or more expressions of a timezone offset (Z, +00, +0000, or +00:00) that could be used. Not all of them can be parsed by each provider out-of-the-box. |
offset versus extended offset zone formatting |
There are more verbose styles (Z[UTC]) of expressing timezone offsets that include the ZoneId |
fixed width or truncated |
Are all fields supplied at all times even when they are 0 (e.g., |
We should always strive for:
-
consistent (ISO) standard format to marshal time-related fields
-
leniently parsing as many formats as possible
Let’s take a look at establishing an internal standard, determining which providers violate that standard, how to adjust them to comply with our standard, and how to leniently parse many formats with the Jackson parser since that will be our standard provider for the course.
172.1. Out of the Box Time-related Formatting
Out of the box, I found the providers marshalled OffsetDateTime
and Date
with the following format.
I provided an OffsetDateTime
and Date
timestamp with varying number of nanoseconds (123456789, 1, and 0 ns) and timezone UTC and -05:00) and the following table shows what was marshalled for the DTO.
Provider | OffsetDateTime | Trunc | Date | Trunc |
---|---|---|---|---|
Jackson |
1776-07-04T00:00:00.123456789Z 1776-07-04T00:00:00.1Z 1776-07-04T00:00:00Z 1776-07-03T19:00:00.123456789-05:00 1776-07-03T19:00:00.1-05:00 1776-07-03T19:00:00-05:00 |
Yes |
1776-07-04T00:00:00.123+00:00 1776-07-04T00:00:00.100+00:00 1776-07-04T00:00:00.000+00:00 |
No |
JSON-B |
1776-07-04T00:00:00.123456789Z 1776-07-04T00:00:00.1Z 1776-07-04T00:00:00Z 1776-07-03T19:00:00.123456789-05:00 1776-07-03T19:00:00.1-05:00 1776-07-03T19:00:00-05:00 |
Yes |
1776-07-04T00:00:00.123Z[UTC] 1776-07-04T00:00:00.1Z[UTC] 1776-07-04T00:00:00Z[UTC] |
Yes |
JAXB |
(not supported/ custom adapter required) |
n/a |
1776-07-03T19:00:00.123-05:00 1776-07-03T19:00:00.100-05:00 1776-07-03T19:00:00-05:00 |
Yes/ No |
Jackson and JSON-B — out of the box — use an ISO format that truncates
nanoseconds and uses "Z" and "+00:00" offset styles for java.time
types.
JAXB does not support java.time
types. When a non-UTC time is supplied,
the time is expressed using the targeted offset. You will notice that
Date is always modified to be UTC.
Jackson Date format is a fixed length, no truncation, always expressed
at UTC with an +HH:MM
expressed offset. JSON-B and JAXB Date formats
truncate milliseconds/nanoseconds. JSON-B uses extended timezone offset (Z[UTC]
) and JAXB
uses "+00:00" format. JAXB also always expresses the Date in EST
in my case.
172.2. Out of the Box Time-related Parsing
To cut down on our choices, I took a look at which providers out-of-the-box could parse the different timezone offsets. To keep things sane, my detailed focus was limited to the Date field. The table shows that each of the providers can parse the "Z" and "+00:00" offset format. They were also able to process variable length formats when faced with less significant nanosecond cases.
Provider | ISO Z | ISO +00 | ISO +0000 | ISO +00:00 | ISO Z[UTC] |
---|---|---|---|---|---|
Jackson |
Yes |
Yes |
Yes |
Yes |
No |
JSON-B |
Yes |
No |
No |
Yes |
Yes |
JAXB |
Yes |
No |
No |
Yes |
No |
The testing results show that timezone expressions "Z" or "+00:00" format should be portable and something to target as our marshalling format.
-
Jackson - no output change
-
JSON-B - requires modification
-
JAXB - requires no change
172.3. JSON-B DATE_FORMAT Option
We can configure JSON-B time-related field output using a java.time
format string.
java.time
permits optional characters. java.text
does not. The following expression
is good enough for Date output but will create a parser that is intolerant of varying
length timestamps. For that reason, I will not choose the type of option that locks
formatting with parsing.
JsonbConfig config=new JsonbConfig()
.setProperty(JsonbConfig.DATE_FORMAT, "yyyy-MM-dd'T'HH:mm:ss[.SSS][XXX]") (1)
.setProperty(JsonbConfig.FORMATTING, true);
builder = JsonbBuilder.create(config);
1 | a fixed formatting and parsing candidate option rejected because of parsing intolerance |
172.4. JSON-B Custom Serializer Option
A better JSON-B solution would be to create a serializer — independent of deserializer — that takes care of the formatting.
public class DateJsonbSerializer implements JsonbSerializer<Date> {
@Override
public void serialize(Date date, JsonGenerator generator, SerializationContext serializationContext) {
generator.write(DateTimeFormatter.ISO_INSTANT.format(date.toInstant()));
}
}
We add @JsonbTypeSerializer
annotation to the field we need to customize
and supply the class for our custom serializer.
@JsonbTypeSerializer(JsonbTimeSerializers.DateJsonbSerializer.class)
private Date date;
With the above annotation in place and the JsonConfig unmodified, we get output format we want from JSON-B without impacting its built-in ability to parse various time formats.
-
1776-07-04T00:00:00.123Z
-
1776-07-04T00:00:00.100Z
-
1776-07-04T00:00:00Z
172.5. Jackson Lenient Parser
All those modifications shown so far are good, but we would also like to have lenient
input parsing — possibly more lenient than built into the providers. Jackson provides
the ability to pass in a SimpleDateFormat
format string or an instance of class
that extends DateFormat
. SimpleDateFormat
does not make a good lenient parser,
therefore I created a lenient parser that uses DateTimeFormatter framework and plugged
that into the DateFormat
framework.
public class ISODateFormat extends DateFormat implements Cloneable {
public static final DateTimeFormatter UNMARSHALLER = new DateTimeFormatterBuilder()
//...
.toFormatter();
public static final DateTimeFormatter MARSHALLER = DateTimeFormatter.ISO_OFFSET_DATE_TIME;
public static final String MARSHAL_ISO_DATE_FORMAT = "yyyy-MM-dd'T'HH:mm:ss[.SSS]XXX";
@Override
public Date parse(String source, ParsePosition pos) {
OffsetDateTime odt = OffsetDateTime.parse(source, UNMARSHALLER);
pos.setIndex(source.length()-1);
return Date.from(odt.toInstant());
}
@Override
public StringBuffer format(Date date, StringBuffer toAppendTo, FieldPosition pos) {
ZonedDateTime zdt = ZonedDateTime.ofInstant(date.toInstant(), ZoneOffset.UTC);
MARSHALLER.formatTo(zdt, toAppendTo);
return toAppendTo;
}
@Override
public Object clone() {
return new ISODateFormat(); //we have no state to clone
}
}
I have built the lenient parser using the Java interface to DateTimeFormatter. It is designed to
-
handle variable length time values
-
different timezone offsets
-
a few different timezone offset expressions
public static final DateTimeFormatter UNMARSHALLER = new DateTimeFormatterBuilder()
.parseCaseInsensitive()
.append(DateTimeFormatter.ISO_LOCAL_DATE)
.appendLiteral('T')
.append(DateTimeFormatter.ISO_LOCAL_TIME)
.parseLenient()
.optionalStart().appendOffset("+HH", "Z").optionalEnd()
.optionalStart().appendOffset("+HH:mm", "Z").optionalEnd()
.optionalStart().appendOffset("+HHmm", "Z").optionalEnd()
.optionalStart().appendLiteral('[').parseCaseSensitive()
.appendZoneRegionId()
.appendLiteral(']').optionalEnd()
.parseDefaulting(ChronoField.OFFSET_SECONDS,0)
.parseStrict()
.toFormatter();
An instance of my ISODateFormat
class is then registered with the provider
to use on all interfaces.
mapper = new Jackson2ObjectMapperBuilder()
.featuresToEnable(SerializationFeature.INDENT_OUTPUT)
.featuresToDisable(SerializationFeature.WRITE_DATES_AS_TIMESTAMPS)
.dateFormat(new ISODateFormat()) (1)
.createXmlMapper(false)
.build();
1 | registering a global time formatter for Dates |
In the server, we can add that same configuration option to our builder @Bean
factory.
@Bean
public Jackson2ObjectMapperBuilderCustomizer jacksonMapper() {
return (builder) -> { builder
.featuresToEnable(SerializationFeature.INDENT_OUTPUT)
.featuresToDisable(SerializationFeature.WRITE_DATES_AS_TIMESTAMPS)
.dateFormat(new ISODateFormat()); (1)
};
}
1 | registering a global time formatter for Dates for JSON and XML |
At this point we have the insights into time-related issues and knowledge of how we can correct.
173. Summary
In this module we:
-
introduces the DTO pattern and contrasted it with the role of the Business Object
-
implemented a DTO class with several different types of fields
-
mapped our DTOs to/from a JSON and XML document using multiple providers
-
configured data mapping providers within our server
-
identified integration issues with time-related fields and learned how to create custom adapters to help resolve issues
-
learned how to implement client filters
-
took a deeper dive into time-related formatting issues in content and ways to address
Swagger
copyright © 2025 jim stafford (jim.stafford@jhu.edu)
174. Introduction
The core charter of this course is to introduce you to framework solutions in Java and focus on core Spring and SpringBoot frameworks. Details of Web APIs, database design, and distributed application design are best covered in other courses. We have been covering a modest amount of Web API topics in these last set of modules to provide a functional front door to our application implementations. You know by now how to implement basic RMM level 2, CRUD Web APIs. I now want to wrap up the Web API coverage by introducing a functional way to call those Web APIs with minimal work using Swagger UI. Detailed aspects of configuring Swagger UI is considered out of scope for this course but many example implementation details are included in each API example and a detailed example in the Swagger Contest Example.
174.1. Goals
You will learn to:
-
identify the items in the Swagger landscape and its central point — OpenAPI
-
generate an Open API interface specification from Java code
-
deploy and automatically configure a Swagger UI based on your Open API interface specification
-
invoke Web API endpoint operations using Swagger UI
-
generate a client library
174.2. Objectives
At the conclusion of this lecture and related exercises, you will be able to:
-
generate a default Open API 3.0 interface specification using Springdoc
-
configure and deploy a Swagger UI that calls your Web API using the Open API specification generated by your API
-
make HTTP CRUD interface calls to your Web API using Swagger UI
-
identify the starting point to make configuration changes to Springdoc
-
generate a client API using the OpenAPI schema definition from a running application
175. Swagger Landscape
The core portion of the Swagger landscape is made up of a line of standards and products geared towards HTTP-based APIs and supported by the company SmartBear. There are two types of things directly related to Swagger: the OpenAPI standard and tools. Although heavily focused on Java implementations, Swagger is generic to all HTTP API providers and not specific to Spring.
175.1. Open API Standard
OpenAPI — is an implementation-agnostic interface specification for HTTP-based APIs. This was originally baked into the Swagger tooling but donated to open source community in 2015 as a way to define and document interfaces.
-
Open API 2.0 - released in 2014 as the last version prior to transitioning to open source. This is equivalent to the Swagger 2.0 Specification.
-
Open API 3.x - released in 2017 as the first version after transitioning to open source.
175.2. Swagger-based Tools
Within the close Swagger umbrella, there are a set of Tools, both free/open source and commercial that are largely provided by Smartbear.
-
Swagger Open Source Tools - these tools are primarily geared towards single API at a time uses.
-
Swagger UI — is a user interface that can be deployed remotely or within an application. This tool displays descriptive information and provides the ability to execute API methods based on a provided OpenAPI specification.
-
Swagger Editor - is a tool that can be used to create or augment an OpenAPI specification.
-
Swagger Codegen - is a tool that builds server stubs and client libraries for APIs defined using OpenAPI.
-
-
Swagger Commercial Tools - these tools are primarily geared towards enterprise usage.
-
Swagger Inspector - a tool to create OpenAPI specifications using external call examples
-
Swagger Hub - repository of OpenAPI definitions
-
SmartBear offers another set of open source and commercial test tools called SoapUI which is geared at authoring and executing test cases against APIs and can read in OpenAPI as one of its API definition sources.
Our only requirement in going down this Swagger path is to have the capability to invoke HTTP methods of our endpoints with some ease. There are at least two libraries that focus on generating the Open API spec and packaging a version of the Swagger UI to document and invoke the API in Spring Boot applications: Springfox and Springdocs.
175.3. Springfox
Springfox is focused on delivering Swagger-based solutions to Spring-based API implementations but is not an official part of Spring, Spring Boot, or Smartbear. It is hard to even find a link to Springfox on the Spring documentation web pages.
Essentially Springfox is:
Springfox has been around many years. I found the initial commit in 2012. It supported Open API 2.0 when I originally looked at it in June 2020 (Open API 3.0 was released in 2017). At that time, the Webflux branch was also still in SNAPSHOT. However, a few weeks later a flurry of releases went out that included Webflux support but no releases have occurred in the years since. Consider it deceased relative to Spring Boot 3. |
![]() Figure 58. Example Springfox Swagger UI
|
Springfox does not work with >= Spring Boot 2.6
Springfox does not work with Spring Boot >= 2.6 where a patternParser was deprecated and causes an inspection error during initialization.
We can work around the issue for demonstration — but serious use of Swagger (as of July 2022) is now limited to Springdoc.
|
Springfox is dead
There has not been a single git commit to Springfox since June 2020 and that version does not work with Spring Boot 3. We will consider Springfox dead and not speak much of it further.
|
175.4. Springdoc
Springdoc is an independent project focused on delivering Swagger-based solutions to Spring Boot APIs. Like Springfox, Springdoc has no official ties to Spring, Spring Boot, or Pivotal Software. The library was created because of Springfox’s lack of support for Open API 3.x many years after its release.
Springdoc is relatively new compared to Springfox. I found its initial commit in July 2019 and has released several versions per month since — until 2023. That indicates to me that they had a lot of catch-up to do to complete the product and now are in a relative maintenance mode. They had the advantage of coming in when the standard was more mature and were able to bypass earlier Open API versions. Springdoc targets integration with the latest Spring Web API frameworks — including Spring MVC and Spring WebFlux. The 1.x version of the library is compatible with Spring Boot 2.x. The 2.x version of the library has been updated to use jakarta dependencies and is required for Spring Boot 3.x. |
![]() Figure 59. Example Springdoc SwaggerUI
|
176. Minimal Configuration
My goal in bringing the Swagger topics into the course is solely to provide us with a convenient way to issue example calls to our API — which is driving our technology solution within the application. For that reason, I am going to show the least amount of setup required to enable a Swagger UI and have it do the default thing.
The minimal configuration will be missing descriptions for endpoint operations, parameters, models, and model properties. The content will rely solely on interpreting the Java classes of the controller, model/DTO classes referenced by the controller, and their annotations. Springdoc definitely does a better job at figuring out things automatically, but they are both functional in this state.
176.1. Springdoc Minimal Configuration
Springdoc minimal configuration is as simple as it gets. All that is required is a single Maven dependency.
176.1.1. Springdoc Maven Dependency
Springdoc has a single top-level dependency that brings in many lower-level dependencies. This specific artifact changed between Spring Boot 2 and 3
<dependency>
<groupId>org.springdoc</groupId>
<artifactId>springdoc-openapi-ui</artifactId>
</dependency>
<dependency>
<groupId>org.springdoc</groupId>
<artifactId>springdoc-openapi-starter-webmvc-ui</artifactId>
</dependency>
We will focus on using the Spring Boot 3 version, but the basics are pretty much the same with Spring Boot 2.
176.1.2. Springdoc Access
Once that is in place, you can access
The minimally configured Springdoc automatically provides an interface for our exposed web API. |
![]() |
176.1.3. Springdoc Starting Customization
The starting point for adjusting the overall interface for Springdoc is done through the definition of one or more GroupedOpenApi objects. From here, we can control the path and countless other options. The specific option shown will reduce the operations shown to those that have paths that start with "/api/".
...
import org.springdoc.core.models.GroupedOpenApi;
import org.springdoc.core.utils.SpringDocUtils;
@Configuration
public class SwaggerConfig {
@Bean
public GroupedOpenApi api() {
SpringDocUtils.getConfig();
//...
return GroupedOpenApi.builder()
.group("contests")
.pathsToMatch("/api/**")
.build();
}
}
Textual descriptions are primarily added to the annotations of each controller and model/DTO class.
177. Example Use
By this point in time we are past-ready for a live demo. You are invited to
start the Springdoc version of the Contests Application and poke around.
The following commands are being run from the parent swagger-contest-example
directory. They can also be run within the IDE.
$ mvn spring-boot:run -f springdoc-contest-svc \(1)
-Dspring-boot.run.arguments=--server.port=8080 (2)
1 | option to use custom port number |
2 | passes arguments from command line, though Maven, to the Spring Boot application |
Access the application using
-
Springdoc: http://localhost:8080/swagger-ui.html
I will show an example thread.
177.1. Access Contest Controller POST Command
|
![]() |
177.2. Invoke Contest Controller POST Command
|
![]() |
177.3. View Contest Controller POST Command Results
|
![]() |
178. Useful Configurations
I have created a set of examples under the Swagger Contest Example
that provide a significant amount of annotations to add descriptions, provide accurate responses to dynamic outcomes, etc. using Springdoc to get a sense of how they performed.
![]() Figure 60. Fully Configured Springdoc Example
|
That is a lot of detail work and too much to cover here for what we are looking for. Feel free to look at the examples (controller, dtos) for details. However, I did encounter a required modification that made a feature go from unusable to usable and will show you that customization in order to give you a sense of how you might add other changes.
178.1. Customizing Type Expressions
java.time.Duration
has a simple
ISO string format expression that looks like PT60M
or PT3H
for
periods of time.
178.1.1. OpenAPI 3 Model Property Annotations
The following snippet shows the Duration property enhanced with Open API 3 annotations, without any rendering hints.
package info.ejava.examples.svc.springdoc.contests.dto;
import com.fasterxml.jackson.annotation.JsonProperty;
import com.fasterxml.jackson.dataformat.xml.annotation.JacksonXmlProperty;
import com.fasterxml.jackson.dataformat.xml.annotation.JacksonXmlRootElement;
import io.swagger.v3.oas.annotations.media.Schema;
@JacksonXmlRootElement(localName="contest", namespace=ContestDTO.CONTEST_NAMESPACE)
@Schema(description="This class describes a contest between a home and away team, "+
"either in the past or future.")
public class ContestDTO {
@JsonProperty(required = false)
@Schema(
description="Each scheduled contest should have a period of time specified "+
"that identifies the duration of the contest. e.g., PT60M, PT2H")
private Duration duration;
178.1.2. Default Duration Example Renderings
Springdoc’s example rendering for java.util.Duration
for JSON and XML is not desirable.
It is basically trying to render an unknown type using reflection of the Duration
class.
Springdoc Default Duration JSON Expression
|
Springdoc Default Duration XML Expression
|
178.1.3. OpenAPI 3 Model Property Annotations
We can add an example
to the @Schema
annotation to override the produced value. Here we are expressing a PT60M
example value be used.
@JsonProperty(required = false)
@Schema(
example = "PT60M",
description="Each scheduled contest should have a period of time specified "+
"that identifies the duration of the contest. e.g., PT60M, PT2H")
private Duration duration;
178.1.4. Simple Duration Example Renderings
The example
attribute worked for JSON but did not render well for XML.
The example text was displayed for XML without its <duration></duration>
tags.
Springdoc-wide Duration Mapped to String JSON Expression
|
Springdoc Property-specific Duration Mapped to String XML Expression
|
178.1.5. Schema Sub-Type Renderings
I was able to correct JSON and XML examples using a "StringSchema example". The following example snippets show expressing the schema at the property and global level.
@JsonProperty(required = false)
@Schema(//position = 4,
example = "PT60M",
type = "string", (1)
description = "Each scheduled contest should have a period of time specified that " +
"identifies the duration of the contest. e.g., PT60M, PT2H")
private Duration duration;
1 | type allows us to subtype Schema for string expression |
A global override can be configured at application startup.
SpringDocUtils.getConfig()
.replaceWithSchema(Duration.class,
new StringSchema().example("PT120M")); (1)
1 | StringSchema is a subclass of Schema |
178.1.6. StringSchema Duration Example Renderings
The examples below show the payloads expressed in a usable form and potentially a valuable source default example. Global configuration overrides property-specific configuration if both are used.
Springdoc-wide Duration Mapped to String JSON Expression
|
Springdoc Property-specific Duration Mapped to String XML Expression
|
The example explored above was good enough to get my quick example usable, but shows how common it can be to encounter a bad example rendered document. Swagger-core has many options to address this that could be an entire set of lectures itself. The basic message is that Swagger provides the means to express usable examples to users, but you have to dig.
179. Client Generation
We have seen where the OpenAPI schema definition was used to generate a UI rendering. We can also use it to generate a client. I won’t be covering any details here, but will state there is a generation example in the class examples that produces a Java jar that can be used to communicate with our server — based in the OpenAPI definition produced. The example uses the OpenAPI Maven Plugin that looks extremely similar to the Swagger CodeGen Maven Plugin. There repository page has a ton of configuration options. This example uses just the basics.
179.1. API Schema Definition
The first step should be to capture the schema definition from the server into a CM artifact. Running locally, this would come from http://localhost:8080/v3/api-docs/contests.
{
"openapi": "3.1.0",
"info": {
"title": "Springdoc Swagger Contest Example",
"description": "This application provides an example of how to provide extra swagger and springfox configuration in order to better document the API.",
"contact": {
"name": "Jim Stafford",
"url": "https://jcs.ep.jhu.edu/ejava-springboot"
},
"version": "v1"
},
"servers": [
{
"url": "http://localhost:8080",
"description": "Generated server url"
}
],
"tags": [
{
"name": "contest-controller",
"description": "manages contests"
}
],
"paths": {
"/api/contests/{contestId}": {
...
179.2. API Client Source Tree
We can capture that file in a module source tree used for generation.
|-- pom.xml `-- src `-- main `-- resources `-- contests-api.json
179.3. OpenAPI Maven Plugin
We add the Maven plugin to compile the API schema definition. The following shows a minimal skeletal plugin definition (version supplied by parent). Refer to the plugin web pages for options that can control building the source.
<plugin>
<groupId>org.openapitools</groupId>
<artifactId>openapi-generator-maven-plugin</artifactId>
<executions>
<execution>
<goals>
<goal>generate</goal>
</goals>
<configuration>
<inputSpec>${project.basedir}/src/main/resources/contests-api.json</inputSpec>
<generatorName>java</generatorName>
<configOptions>
<sourceFolder>src/gen/java/main</sourceFolder>
</configOptions>
</configuration>
</execution>
</executions>
</plugin>
179.4. OpenAPI Generated Target Tree
With the plugin declared, we can execute mvn clean generate-sources
, to get a generated source tree with Java files containing some familiar names — like model.ContestDTO
, ContestListDTO
, and MessageDTO
.
`-- target `-- generated-sources `-- openapi |-- README.md ... `-- src |-- gen | `-- java | `-- main | `-- org | `-- openapitools | `-- client | |-- ApiCallback.java ... | `-- model | |-- ContestDTO.java | |-- ContestListDTO.java | `-- MessageDTO.java
179.5. OpenAPI Compilation Dependencies
To compile the generated source, we are going to have to add some dependencies to the module. In my quick read through this capability, I was surprised that the dependencies where not more obviously identified and easier to add. The following snippet shows my result of manually resolving all compilation dependencies.
<!-- com.google.gson.Gson -->
<dependency>
<groupId>io.gsonfire</groupId>
<artifactId>gson-fire</artifactId>
</dependency>
<!-- javax.annotation.Nullable -->
<dependency>
<groupId>com.google.code.findbugs</groupId>
<artifactId>jsr305</artifactId>
</dependency>
<!-- javax.annotation.Generated -->
<dependency>
<groupId>javax.annotation</groupId>
<artifactId>javax.annotation-api</artifactId>
</dependency>
<!-- okhttp3.internal.http.HttpMethod -->
<dependency>
<groupId>com.squareup.okhttp3</groupId>
<artifactId>okhttp</artifactId>
</dependency>
<!-- okhttp3.logging.HttpLoggingInterceptor -->
<dependency>
<groupId>com.squareup.okhttp3</groupId>
<artifactId>logging-interceptor</artifactId>
</dependency>
179.6. OpenAPI Client Build
With API definition in place, plugin defined and declared, and dependencies added, we can now generate the client JAR.
$ mvn clean install ... [INFO] --- openapi-generator-maven-plugin:7.8.0:generate (default) @ generated-contest-client --- [INFO] Generating with dryRun=false [INFO] OpenAPI Generator: java (client) ... [INFO] Processing operation getContest [INFO] Processing operation updateContest [INFO] Processing operation doesContestExist [INFO] Processing operation deleteContest [INFO] Processing operation getContests [INFO] Processing operation createContest [INFO] Processing operation deleteAllContests [INFO] writing file .../svc/svc-api/swagger-contest-example/generated-contest-client/target/generated-sources/openapi/src/gen/java/main/org/openapitools/client/model/ContestDTO.java ... ################################################################################ # Thanks for using OpenAPI Generator. # # Please consider donation to help us maintain this project 🙏 # # https://opencollective.com/openapi_generator/donate # ################################################################################ ... [INFO] ------------------------------------------------------------------------ [INFO] BUILD SUCCESS [INFO] ------------------------------------------------------------------------ [INFO] Total time: 6.814 s
This was light coverage of the OpenAPI client generation capability. It gives you insight into why OpenAPI is useful for building external clients as well as the Swagger UI capability.
180. Springdoc Summary
Springdoc is surprisingly functional right out of the box with minimal configuration — except for some complex types. In early June 2020, Springdoc definitely understood the purpose of the Java code better than Springfox and quickly overtook Springfox before the older option eventually stopped turning out releases. Migrating Springdoc from Spring Boot 2 to 3 was primarily a Maven dependency and a few package name changes for their configuration classes.
It took some digging, but I was able to find a solution to my specific Duration
rendering problem.
Along the way, I saw examples of how I could provide example payloads and complex objects (with values) that could be rendered into example payloads.
A custom example is quite helpful if the model class has a lot of optional fields that are rarely used and unlikely to be used by someone using the Swagger UI.
Springfox has better documentation that shows you features ahead of time in logical order. Springdoc’s documentation is primarily a Q&A FAQ that shows features in random order. I could not locate a good Springdoc example when I got started — but after implementing with Springfox first, the translation was extremely easy. Following the provided example in this lecture should provide you with a good starting point.
Springfox had been around a long time but with the change from Open API 2 to 3, the addition of Webflux, and their slow rate of making changes — that library soon showed to not be a good choice for Open API or Webflux users. Springdoc seemed like it was having some early learning pains in 2020 — where features may have worked easier but didn’t always work 100%, lack of documentation and examples to help correct, and their existing FAQ samples did not always match the code. However, it was quite usable already in early versions, already supports Spring Boot 3 in 2023, and they continue to issuing releases. By the time you read this much may have changed.
One thing I found after adding annotations for the technical frameworks (e.g., Lombok, WebMVC, Jackson JSON, Jackson XML) and then trying to document every corner of the API for Swagger in order to flesh out issues — it was hard to locate the actual code. My recommendation is to continue to make the good names for controllers, models/DTO classes, parameters, and properties that are immediately understandable to save on the extra overhead of Open API annotations. Skip the obvious descriptions one can derive from the name and type, but still make it document the interface and usable to developers learning your API.
181. Summary
In this module we:
-
learned that Swagger is a landscape of items geared at delivering HTTP-based APIs
-
learned that the company Smartbear originated Swagger and then divided up the landscape into a standard interface, open source tools, and commercial tools
-
learned that the Swagger standard interface was released to open source at version 2 and is now Open API version 3
-
learned that two tools — Springfox and Springdoc — were focused on implementing Open API for Spring and Spring Boot applications and provided a packaging of the Swagger UI
-
learned that Springfox and Springdoc have no formal ties to Spring, Spring Boot, Pivotal, Smartbear, etc. They are their own toolset and are not as polished (in 2020) as we have come to expect from the Spring suite of libraries.
-
learned that Springfox is older, originally supported Open API 2 and SpringMVC for many years, and now supports Open API 3, Spring Boot 2, and WebFlux. Springfox has stopped producing releases since July 2020.
-
learned that Springdoc is newer, active, and supports Open API 3, SpringMVC, Webflux, and Spring Boot 3
-
learned how to minimally configure Springdoc into our web application in order to provide the simple ability to invoke our HTTP endpoint operations
-
learned how to minimally setup API generation using the OpenAPI schema definition from a running application and a Maven plugin
HouseRentals Assignment 2: API
copyright © 2025 jim stafford (jim.stafford@jhu.edu)
The API assignment is a single assignment that is broken into focus areas that relate 1:1 with the lecture topics. You have the choice to start with any one area and either advance or jump repeatedly between them as you complete the overall solution. However, you are likely going to want to start out with the modules area so that you have some concrete modules to begin your early work. It is always good to be able to perform a successful root level build of all targeted modules before you begin adding detailed dependencies, plugins, and Java code.
182. Overview
The API will include three main concepts. We are going to try to keep the business rules pretty simple at this point:
-
House - an individual house that can be part of a HouseRental
-
Houses can be created, modified, listed (queried), and deleted
-
-
Renter - identification for a person that may be part of a HouseRental and is not specific to any one HouseRental
-
Renters can be created, modified, listed (queried), and deleted
-
-
HouseRental - identifies a specific House and Renter agreement for a period of time
-
HouseRentals must be created with an existing house and renter
-
HouseRentals must be created with a current or future, non-overlapping period of time for the house
-
HouseRentals must be created with a renter with a minimum age (21) for the rental timeperiod
-
HouseRental time span is modifiable as long as the house is available
-
HouseRental can be deleted
-
182.1. Grading Emphasis
Grading emphasis is focused on the demonstration of satisfying the listed learning objectives and — except the scenarios listed at the end — not on quantity. Most required capability/testing is focused on demonstration of what you know how to do. You are free to implement as much of the business model as you wish, but treat completing the listed scenarios at the end of the assignment (within the guidance of the stated static requirements) as the minimal functionality required.
182.2. HouseRenter Support
You are given a complete implementation of House and Renter as examples and building blocks in order to complete the assignment. Your primary work will be in completing HouseRentals.
182.2.1. HouseRenter Service
The houserenters-support-api-svc
module contains a full @RestController/Service/Repo thread for both Houses and Renters. The module contains two Auto-configuration definitions that will automatically activate and configure the two services within a dependent application.

The following dependency can be added to your service solution to bring in the Houses and Renters service examples to build upon.
<dependency>
<groupId>info.ejava.assignments.api.houserentals</groupId>
<artifactId>houserenters-support-api-svc</artifactId>
<version>${ejava.version}</version>
</dependency>
182.2.2. HouseRenter Client
A client module is supplied that includes the DTOs and client to conveniently communicate with the APIs. Your HouseRental solution will inject the Houses and Renters service components for interaction but your API tests will use the House and Renter http-based APIs. For demonstration,
-
the HouseAPIClient is implemented using explicit RestTemplate calls
-
the RenterAPIClient is implemented using Spring 6 Http Interface
The implementation details are available for inspection, but encapsulated such that they work the same via their HousesAPI and RentersAPI.

The following dependency can be added to your solution to bring in the Houses and Renters client artifact examples to build upon.
<dependency>
<artifactId>houserenters-support-api-client</artifactId> (1)
<version>${ejava.version}</version>
</dependency>
1 | dependency on client will bring in both client and dto modules |
182.2.3. HouseRenter Tests
You are also supplied a set of tests that are meant to assist in your early development of the end-to-end capability. You are still encouraged to write your own tests and required to do so in specific sections and for the required scenarios.
You may find it productive and helpful to address the supplied tests first and implement the scenario tests at the end. It is up to you. At any time you can break off and write special-purpose tests for your own purpose. |
The supplied tests are made available to you using the following Maven dependency.
<dependency>
<groupId>info.ejava.assignments.api.houserentals</groupId>
<artifactId>houserenters-support-api-svc</artifactId>
<version>${ejava.version}</version>
<classifier>tests</classifier> (1)
<scope>test</scope>
</dependency>
1 | tests have been packaged within a separate -tests.java |
The provided tests require that:
-
your HouseRental DTO class implement a
RentalDTO
"marker" interface provided by the support module. This interface has nothing defined and is only used to identify your DTO during the tests. -
implement a
ApiTestHelper<T extends RentalDTO>
interface and make it a component available to be injected into the provided tests. A full skeleton of this class implementation has been supplied in the starter. -
supply a
@SpringBootTest
class that pulls in theHouseRentalsApiNTest
test case as a base class from the support module. This test case evaluates your solution during several core steps of the assignment. Much of the skeletal boilerplate for this work is provided in the starter.

Enable the tests whenever you are ready to use them. This can be immediately or at the end.
Groups of Tests can be Disabled Early In Development
There are empty
|
The tests are written to execute from the subclass in your area. With adhoc navigation, sometimes the IDE can get lost — lose the context of the subclass and provide errors as if there were only the base class. If that occurs — make a more direct IDE command to run the subclass to clear the issue. |
183. Assignment 2a: Modules
183.1. Purpose
In this portion of the assignment, you will demonstrate your knowledge of establishing Maven modules for different portions of an application. You will:
-
package your implementation along proper module boundaries
183.2. Overview
In this portion of the assignment you will be establishing your source module(s) for development. Your new work should be spread between two modules:
-
a single client module for DTO and other API artifacts
-
a single application module where the Spring Boot executable JAR is built
Your client module should declare a dependency on the provided houserenters-support-api-client
to be able to make use of any DTO or API constructs.
Your service/App module should declare a dependency on houserenters-support-api-svc
to be able to host the House and Renter services.
You do not copy or clone these "support" modules.
Create a Maven dependency on these and use them as delivered.

183.3. Requirements
-
Create your overall project as two (or more) Maven modules under a single parent
-
client module(s) should contain any dependencies required by a client of the Web API. This includes the DTOs, any helpers created to implement the API calls, and unit tests for the DTOs. This module produces a regular Java JAR.
houserenters-support-api-client/dto
has been supplied for you use as an example and be part of your client modules. Create a dependency on the client module for access toHouse
andRenter
client classes. Do not copy/clone the support modules. -
svc module to include your HouseRentals controller, service, and repository work.
houserenters-support-api-svc
has been supplied for you to both be part of your solution and to use as an example. Create a Maven dependency on this support module. Do not copy/clone it. -
app module that contains the
@SpringBootApplication
class will produce a Spring Boot Executable JAR to instantiate the implemented services.The app and svc modules can be the same module. In this dual role, it will contain your HouseRental service solution and also host the @SpringBootApplication
.The Maven pom.xml in the assignment starter for the App builds both a standard library JAR and a separate executable JAR (bootexec) to make sure we retain the ability to offer the HouseRental service as a library to a downstream assignment. By following this approach, you can make this assignment immediately reusable in assignment 3. -
parent module that establishes a common groupId and version for the child modules and delegate build commands. This can be the same parent used for assignments 0 and 1. Only your app and client modules will be children of this parent.
-
-
Define the svc module as a Web Application (dependency on
spring-boot-starter-web
). -
Add a
@SpringBootApplication
class to the app module (already provided in starter for initial demo). -
Once constructed, the modules should be able to
-
build the project from the root level
-
build regular Java JARs for use in downstream modules
-
build a Spring Boot Executable JAR (bootexec) for the
@SpringBootApplication
module -
immediately be able to access the
/api/houses
and/api/renters
resource API when the application is running — because of Auto-Configuration.Example Calls to Houses and Renters Resource API$ curl -X GET http://localhost:8080/api/houses {"contents":[]} $ curl -X GET http://localhost:8080/api/renters {"contents":[]}
-
183.4. Grading
Your solution will be evaluated on:
-
package your implementation along proper module boundaries
-
whether you have divided your solution into separate module boundaries
-
whether you have created appropriate dependencies between modules
-
whether your project builds from the root level module
-
whether you have successfully activated the House and Renter API
-
183.5. Additional Details
-
Pick a Maven hierarchical groupId for your modules that is unique to your overall work on this assignment.
184. Assignment 2b: Content
184.1. Purpose
In this portion of the assignment, you will demonstrate your knowledge of designing a Data Transfer Object that is to be marshalled/unmarshalled using various internet content standards. You will:
-
design a set of Data Transfer Objects (DTOs) to render information from and to the service
-
define a Java class content type mappings to customize marshalling/unmarshalling
-
specify content types consumed and produced by a controller
-
specify content types accepted by a client
184.2. Overview
In this portion of the assignment you will be implementing a set of DTO classes that will be used to represent a HouseRental. All information expressed in the HouseRental will be derived from the House and Renter objects — except for the rental ID and any milestone properties unique to the HouseRental.
Lecture/Assignment Module Ordering
It is helpful to have a data model in place before writing your services.
However, the lectures are structured with a content-less (String) domain up front — focusing on the Web API and services before tackling content.
If you are starting this portion of the assignment before we have covered the details of content, it is suggested that you simply fill in the DTO properties required to pass the test_is_ready criteria.
Skip the Content-Type aspects of this section until we have covered the Web content lecture.
|

HouseRental.id Avoids Compound Primary Key
The HouseRentalDTO id was added to keep from having to use a compound (houseId + renterId) primary key.
This makes it an easier 1:1 example with House and Renter to follow.
|
String Primary Keys
Strings were used for the primary key type.
This will make it much easier and more portable when we use database repositories in a later assignment.
|
The provided houserenters-support-api-dto
module has the House and Renter DTO classes.
-
HouseDTO
- provides information specific to the house -
RenterDTO
- provides information specific to the renter -
StreetAddress
- provides properties specific to a location for the House -
MessageDTO - commonly used to provide error message information for request failures
-
<Type>ListDTO
- used used to conveniently express typed collection of objects -
SearchParams
- a helper class to pass several HouseRental properties as a single unit versus numerous paramters. -
TimePeriod
- a helper class used to express a start/end period of dates, perform comparisons, and other period utility functions.
MessageDTO is from ejava-dto-util Class Examples
A MessageDTO is supplied in the ejava-dto-util package and used in most of the class API examples.
You are free to create your own for use with the HouseRentals portion of the assignment.
|
184.3. Requirements
-
Create a DTO class to represent HouseRental. Use the attributes in the diagram above and descriptions below as candidate properties for each class.
-
The following attributes can be expressed both client and server-side
-
houseId
- required and an external reference toHouse
-
renterId
- required and an external reference toRenter
-
startDate
- required can be before or equal toendDate
-
endDate
- required and must be after or equal tostartDate
TimeSpan ClassI have provided aTimePeriod
utility class that can be used as an optional encapsulation ofstartDate
andendDate
methods. It can be used to help enforce consistency between start/endDate and for time span overlap comparisons.
-
-
The following attributes are only assigned server-side.
"Assigned server-side" means that at no time should your client supply this information to complete a HouseRental. The service will look up the information server-side and produce this information from the client-side properties listed above. A client should leave these null and the service should ignore input when working with an object with these properties. -
id
is a unique ID for a HouseRental -
houseName
copied from the house.name -
renterName
should be the concatenation of Renter.firstName and Renter.lastName such that an evaluation of the string will contain the original first and lastName string values -
renterAge
should be a calculation of years, rounded down, between theRenter.dob
and the date the HouseRental starts. -
amount
total cost of the Rental
-
-
streetAddress
should be a deep copy of the House.location
-
-
Create a
HouseRentalListDTO
class to provide a typed collection ofHouseRentalDTO
.I am recommending you name the collection within the class a generic content
for later reuse reasons. -
Map each DTO class to:
-
Jackson JSON (the only required form)
-
mapping to Jackson XML is optional
-
-
Create a unit test to verify your new DTO type(s) can be marshalled/unmarshalled to/from the targeted serialization type.
-
API TODO: Annotate controller methods to consume and produce supported content type(s) when they are implemented.
-
API TODO: Update clients used in unit tests to explicitly only accept supported content type(s) when they are implemented.
184.4. Grading
Your solution will be evaluated on:
-
design a set of Data Transfer Objects (DTOs) to render information from and to the service
-
whether DTO class(es) represent the data requirements of the assignment
-
-
define a Java class content type mappings to customize marshalling/unmarshalling
-
whether unit test(s) successfully demonstrate the ability to marshall and unmarshal to/from a content format
-
-
API TODO: specify content types consumed and produced by a controller
-
whether controller methods are explicitly annotated with consumes and produces definitions for supported content type(s)
-
-
API TODO: specify content types accepted by a client
-
whether the clients in the unit integration tests have been configured to explicitly supply and accept supported content type(s).
-
184.5. Additional Details
-
This portion of the assignment alone primarily produces a set of information classes that make up the primary vocabulary of your API and service classes.
-
Use of
lombok
is highly encouraged here and can tremendously reduce the amount of code you write for these classes -
The Java
Period
class can easily calculate age in years between twoLocalDates
. ATimePeriod
class has been provided in the DTO package to aggregate startDate and endDate LocalDates together and to provide convenience methods related to those values. -
The
houserenters-support-api-client
module also provides aHouseDTOFactory
,RenterDTOFactory
, andStreetAddressDTOFactory
that makes it easy for tests and other demonstration code to quickly assembly example instances. You are encouraged to follow that pattern. -
The
houserenters-support-api-client
test cases for House and Renter demonstrate marshalling and unmarshalling DTO classes within a JUnit test. You should create a similar test of yourHouseRenterDTO
class to satisfy the testing requirement. Note that those tests leverage aJsonUtil
class that is part of the class utility examples and simplifies example use of the Jackson JSON parser. -
The
houserenters-support-api-client
and supplied starter unit tests make use of JUnit@ParameterizedTest
— which allows a single JUnit test method to be executed N times with variable parameters — pretty cool feature. Try it. -
Supporting multiple content types is harder than it initially looks — especially when trying to mix different libraries. WebClient does not currently support Jackson XML and will attempt to resort to using JAXB in the client. I provide an example of this later in the semester (Spring Data JPA End-to-End) and advise you to address the optional XML mapping last after all other requirements of the assignment are complete. If you do attempt to tackle both XML and WebClient together, know to use JacksonXML mappings for the server-side and JAXB mappings for the client-side.
185. Assignment 2c: Resources
185.1. Purpose
In this portion of the assignment, you will demonstrate your knowledge of designing a simple Web API. You will:
-
identify resources
-
define a URI for a resource
-
define the proper method for a call against a resource
-
identify appropriate response code family and value to use in certain circumstances
185.2. Overview
In this portion of the assignment you will be identifying a resource to implement the HouseRental API. Your results will be documented in a @RestController class. There is nothing to test here until the DTO and service classes are implemented.

The API will include three main concepts:
-
Houses (provided) - an individual house that can be part of a house rental
-
House information can be created, modified, listed, and deleted
-
House information can be modified or deleted at any time but changes do not impact previous house rentals
-
-
Renters (provided) - identification for a person that may participate in a house rental
-
Renter information can be created, modified, listed, and deleted
-
Renter information can be modified or deleted at any time but changes do not impact previous house rentals
-
-
HouseRentals (your assignment) - a transaction for one House and one Renter for a unique period of time
-
HouseRental information can be created, modified, listed, and deleted
-
business rules will be applied for new and modified HouseRentals
-
185.3. Requirements
Capture the expression of the following requirements in a set of @RestController
class(es) to represent your resources, URIs, required methods, and status codes.
-
Identify your base resource(s) and sub-resource(s)
-
create URIs to represent each resource and sub-resource
Example Skeletal API Definitionspublic interface HousesAPI { String HOUSES_PATH="/api/houses"; String HOUSE_PATH="/api/houses/{id}"; ...
-
create a separate
@RestController
class — at a minimum — for each base resourceExample Skeletal Controller@RestController public class HousesController {
-
-
Identify the
@RestController
methods required to represent the following actions for HouseRental. Assign them specific URIs and HTTP methods.-
create new HouseRental resource (a "contract")
-
House and Renter must exist and identified using IDs
-
provided time period must be current or future dates
-
provided time period must not overlap with existing HouseRental for the same House for two different Renters (same Renter may have overlapping HouseRentals)
-
Renter must be at least 21 on startDate of rental
-
-
update an existing HouseRental resource
-
modified time period must be current or future dates
-
modified time period must not overlap with existing HouseRental for the same House for two different Renters
-
-
get a specific HouseRental resource
-
list HouseRental resources with paging
-
accept optional houseId, renterId, and time period query parameters
-
accept optional pageNumber, pageSize, and optional query parameters
-
return
HouseRentalListDTO
containing contents ofList<HouseRentalDTO>
-
-
delete a specific resource
-
delete all instances of the resource
Example Skeletal Controller Method@RequestMapping(path=HousesAPI.HOUSE_PATH, method = RequestMethod.POST, consumes = {...}, produces = {...}) public ResponseEntity<HouseDTO> createHouse(@RequestBody HouseDTO newHouse) { throw new RuntimeException("not implemented"); //or return ResponseEntity.status(HttpStatus.CREATED).body(...); }
-
-
CLIENT TODO: Identify the response status codes to be returned for each of the actions
-
account for success and failure conditions
-
authorization does not need to be taken into account at this time
-
185.4. Grading
Your solution will be evaluated on:
-
identify resources
-
whether your identified resource(s) represent thing(s)
-
-
define a URI for a resource
-
whether the URI(s) center on the resource versus actions performed on the resource
-
-
define the proper method for a call against a resource
-
whether proper HTTP methods have been chosen to represent appropriate actions
-
-
CLIENT TODO: identify appropriate response code family and value to use in certain circumstances
-
whether proper response codes been identified for each action
-
185.5. Additional Details
-
This portion of the assignment alone should produce a
@RestController
class with annotated methods that statically define your API interface (possibly missing content details). There is nothing to run or test in this portion alone. -
A simple and useful way of expressing your URIs can be through defining a set of public static attributes expressing the collection and individual instance of the resource type.
Example Template Resource DeclarationString (RESOURCE)S_PATH="(path)"; String (RESOURCE)_PATH="(path)/{identifier(s)}";
-
If you start with this portion, you may find it helpful to
-
create sparsely populated DTO classes —
HouseRentalDTO
with just anid
andHouseRentalListDTO
— to represent the payloads that are accepted and returned from the methods -
have the controller simply throw a RuntimeException indicating that the method is not yet implemented. That would be a good excuse to also establish an exception advice to handle thrown exceptions.
-
-
The details of the HouseRental will be performed server-side — based upon IDs and properties provided by the client and the House and Renter values found server-side. The client never provides more than an ID for an House or Renter and if it does — the server-side must ignore and rely on the server-side source for details.
-
There is nothing to code up relative to response codes at this point. However:
-
Finding zero resources to list is not a failure. It is a success with no resources in the collection.
-
Not finding a specific resource is a failure and the status code returned should reflect that.
-
Instances of Action Verbs can be Resource Nouns
If an action does not map cleanly to a resource+HTTP method, consider thinking of the action (e.g., cancel) as one instance of an action (e.g., cancellation) that is a sub-resource of the subject (e.g., subjects/{subjectId}/cancellations). How might you think of the action if it took days to complete? (e.g. a sub-resource with POST/create(), GET/isComplete(), PUT/changePriority(), and DELETE/terminate()) |
186. Assignment 2d: Client/API Interactions
186.1. Purpose
In this portion of the assignment, you will demonstrate your knowledge of designing and implementing the interaction between a Web client and API. You will:
-
implement a service method with Spring MVC synchronous annotated controller
-
implement a client using
RestTemplate
,RestClient
, or Spring Http Interface -
pass parameters between client and service over HTTP
-
return HTTP response details from service
-
access HTTP response details in client
186.2. Overview
In this portion of the assignment you will invoke your resource’s Web API from a client running within a JUnit test case.

There will be at least two primary tests in this portion of the assignment: handling success and handling failure. The failure will be either real or simulated through a temporary resource stub implementation.

186.3. Requirements
-
Implement stub behavior in the controller class as necessary to complete the example end-to-end calls.
Example Stub ResponseHouseDTO newRental = HouseDTO.builder().id("1").build() URI location = ServletUriComponentsBuilder.fromCurrentRequestUri() .replacePath(HOUSERENTAL_PATH) .build("1"); return ResponseEntity.created(location).body(newRental);
-
Implement a unit integration test to demonstrate a success path
-
use either a
RestTemplate
,RestClient
, or Spring HTTP Interface API client class for this test. -
make at least one call that passes parameter(s) to the service and the results of the call depend on that passed parameter value
-
access the return status and payload in the JUnit test/client
-
evaluate the result based on the provided parameter(s) and expected success status
Example Response Evaluationthen(response.getStatusCode()).isEqualTo(HttpStatus.CREATED); then(response.getHeaders().getLocation()).isNotEmpty(); then(houseResult.getId()).isNotBlank(); then(houseResult).isEqualTo(houseRequestDTO.withId(houseResult.getId()));
-
Examples use RestTemplate
The House and Renter examples only use the RestTemplate and Spring HTTP Interface approaches.
|
One Success, One Failure, and Move On
Don’t put too much work into more than a single success and failure path test before completing more of the end-to-end.
Your status and details will likely change.
|
186.4. Grading
Your solution will be evaluated on:
-
implement a service method with Spring MVC synchronous annotated controller
-
whether your solution implements the intended round-trip behavior for an HTTP API call to a service component
-
-
implement a client using
RestTemplate
orRestClient
-
whether you are able to perform an API call using either the
RestTemplate
,RestClient
, or Spring HTTP Interface APIs
-
-
pass parameters between client and service over HTTP
-
whether you are able to successfully pass necessary parameters between the client and service
-
-
return HTTP response details from service
-
whether you are able to return service response details to the API client
-
-
access HTTP response details in client
-
whether you are able to access HTTP status and response payload
-
186.5. Additional Details
-
The required end-to-end tests in the last section require many specific success and failure test scenarios. View this portion of the assignment as just an early draft work of those scenarios. If you have completed the end-to-end tests, you have completed this portion of the assignment.
-
Your DTO class(es) have been placed in your Client module in a separate section of this assignment. You may want to add an optional API client class to that Client module — to encapsulate the details of the HTTP calls. The
houserenters-support-client
module contains example client API classes for Houses and Renters usingRestTemplate
and Spring HTTP Interface. -
Avoid placing extensive business logic into the stub portion of the assignment. The controller method details are part of a separate section of this assignment.
-
This portion of the assignment alone should produce a simple, but significant demonstration of client/API communications (success and failure) using HTTP and service as the model for implementing additional resource actions.
-
Inject the dependencies for the test from the Spring context. Anything that depends on the server’s port number must be delayed (
@Lazy
)//ProvidedApiHouseRenterTestConfiguration.java @Bean @Lazy (2) @ConditionalOnMissingBean(name="testServerConfig") public ServerConfig testServerConfig(ServerConfig serverConfig, @LocalServerPort int port) { (1) return serverConfig./*...*/.withPort(port).build(); } @Bean @Lazy (3) public HousesAPI housesAPI(RestTemplate restTemplate, ServerConfig testServerConfig) { return new HousesAPIClient(restTemplate, testServerConfig, MediaType.APPLICATION_JSON); } //HouseRentalsAPINTest.java @SpringBootTest(...webEnvironment=... public class HouseRentalsAPINTest { @Autowired private HousesAPI houseAPI;
1 server’s port# is not known until runtime 2 cannot eagerly create @Bean
until server port number available3 cannot eagerly create dependents of port number
187. Assignment 2e: Service/Controller Interface
187.1. Purpose
In this portion of the assignment, you will demonstrate your knowledge of separating the Web API facade details from the service implementation details and integrating the two. You will:
-
implement a service class to encapsulate business logic
-
turn @RestController class into a facade and delegate business logic details to an injected service class
-
implement an error reporting strategy
187.2. Overview
In this portion of the assignment you will be implementing the core of the HouseRental components and integrating them as seamlessly as possible.
-
the controller will delegate commands to a service class to implement the business logic.
-
the service will use internal logic and external services to implement the details of the business logic.
-
the repository will provide storage for the service.

Your Assignment is Primarily HouseRental and Integration
You have been provided complete implementation of the House and Renter services.
You only have to implement the HouseRental components and integration that with House and Renter services .
|
A significant detail in this portion of the assignment is to design a way to convey success and failure when carrying out an API command. The controller should act only as a web facade. The service(s) will implement the details of the services and report the results.

Under the hood of the HouseRentalService
is a repository and external clients.
-
You will create a
HouseRentalService
interface that usesHouseRentalDTO
as its primary data type. This interface can be made reusable through the full semester of assignments.
This assignment will only work with DTO types (no entities/BOs) and a simulated/stub Repository.
-
You will create a repository interface and implementation that mimic the behavior of a CRUD and Pageable Repository of a future assignment.
-
You will inject and implement calls to the House and Renter services.

187.3. Requirements
-
Implement a HouseRentalDTORepository interface and implementation component to simulate necessary behavior (e.g., save, findById, find) for the base HouseRentalDTO resource type. Don’t go overboard here. We just need some place to generate IDs and hold the data in memory.
-
implement a Java interface (e.g.,
HouseRentalDTORepository
).Try to make this interface conceptually consistent with the Spring Data ListCrudRepository and ListPagingAndSortingRepository (including the use of Pageable and Page) to avoid changes later on. This is just a tip and not a requirement — implement what you need for now. Start with just save()
. -
implement a component class stub (e.g.,
HouseRentalDTORepositoryStub
) using simple, in-memory storage (e.g.,HashMap
orConcurrentHashMap
) and an ID generation mechanism (e.g.,int
orAtomicInteger
)
You are free to make use of the POJORepositoryMapImpl<T>
class in thehouserentals_support_api
module as your implementation for the repository. It comes with aPOJORepository<T>
interface and the Renter repository and service provide an example of its use. Report any bugs you find. -
-
Implement a HouseRental service to implement actions and enforce business logic on the base resources
-
implement a Java interface This will accept and return HouseRentalDTO types.
-
implement a component class for the service.
-
inject the dependencies required to implement the business logic
-
(provided)
HousesService
- to verify existence of and obtain details of houses -
(provided)
RentersService
- to verify existence of and obtain details of renters -
(your assignment)
HouseRentalDTORepository
- to store details that are important to house rentalsYou are injecting the service implementations (not the HTTP API) for the House and Renter services into your HouseRental service. That means they will be part of your application and you will have a Java ⇒ Java interface with them.
-
-
implement the business logic for the service
-
a HouseRental can only be created for an existing House and Renter. It will be populated using the values of that House and Renter on the server-side.
-
houseId
(mandatory input) — used to locate the details of the House on the server-side -
renterId
(mandatory input) — used to locate the details of the Renter on the server-side -
startDate
(mandatory input) — used to indicate when the Rental will begin. This must be in the future and before or equal toendDate
. -
endDate
(mandatory input) — used to indicate when the Rental will end. This must be after or equal tostartDate
.
-
-
HouseRental must populate the following fields from the House and Renter obtained server-side using the houseId and renterId.
-
from the server-side House
-
houseName
— derived from the House’sname
details obtained server-side -
amount
— calculated from House.dailyRate * days in time span
-
-
from the server-side
Renter
-
renterName
— derived from the Renter’sfirstName
andlastName
details on the server-side -
renterAge
— calculated form thestartDate
andRenter
dob
details on the server-side. A Renter must be at least 21 onstartDate
to be valid. The rejection shall include the text "too young".
-
-
-
startDate/endDate
time span cannot overlap with another HouseRental for the same House for a different Renter. The rejection shall include the text "conflict". -
a successful request to create a HouseRental will be returned with
-
the above checks made, id assigned, and a 201/CREATED http status returned
-
properties (
houseNamel
,renterName
renterAge
,amount
) filled in
-
-
getHouseRental returns current state of the requested HouseRental
-
implement a paged
findHouseRentals
that returns all matches. Use the Spring DataPageable
andPage
(andPageImpl
) classes to express pageNumber, pageSize, and page results (i.e.,Page findHouseRentals(Pageable)
). You do not need to implement sort. -
augment the
findHouseRentals
to optionally include a search for matching houseId, renterId, time span (startDate
andendDate
), or any combination.Implement Search Details within Repository classDelegate the gory details of searching through the data — to the repository class.
-
-
-
Design a means for service calls to
-
indicate success
-
indicate failure to include internal or client error reason. Client error reasons must include separate issues "not found" and "bad request" at a minimum.
-
-
Design a means for Controller calls to
-
separate happy paths from error paths
-
consolidate error handling
It is advised that you leverage exceptions and exception advice for this.
-
-
Integrate services into controller components
-
complete and report successful results to API client
-
report errors to API client, to include the status code and a textual message that is specific to the error that just occurred
-
-
Implement a unit integration test to demonstrate at least one success and error path
-
access the return status and payload in the client
-
evaluate the result based on the provided parameter(s) and expected success/failure status
-
187.4. Grading
Your solution will be evaluated on:
-
implement a service class to encapsulate business logic
-
whether your service class performs the actions of the service and acts as the primary enforcer of stated business rules
-
-
turn
@RestController
class into a facade and delegate business logic details to an injected service class-
whether your API tier of classes act as a thin adapter facade between the HTTP protocol and service component interactions
-
whether you have separated happy paths from error paths and made all error handling/reporting consistent
-
-
implement an error reporting strategy
-
whether your design has identified how errors are reported by the service tier and below
-
whether your API tier is able to translate errors into meaningful error responses to the client
-
187.5. Additional Details
-
This portion of the assignment alone primarily provides an implementation pattern for how services will report successful and unsuccessful requests and how the API will turn that into a meaningful HTTP response that the client can access.
-
The
houserenters-support-api-svc
module contains a set of example DTO Repository Stubs.-
The
Houses
package shows an example of a fully exploded implementation. Take this approach if you wish to write all the code yourself. -
The
Renters
package shows an example of how to use the templatedPOJORepository<T>
interface andPOJORepositoryMapImpl<T>
implementation. Take this approach if you want to delegate to an existing implementation and only provide the custom query methods.
POJORepositoryMapImpl<T>
provides a protectedfindAll(Predicate<T> predicate, Pageable pageable)
that returns aPage<T>
. All you have to provide are the predicates for the custom query methods. -
-
You are required to use the
Pageable
andPage
classes (from theorg.springframework.data.domain
Java package) for paging methods in your finder method(s) — to be forward compatible with later assignments that make use of Spring Data. You can find example use ofPageable
andPage
(andPageImpl
) in House and Renter examples. -
It is highly recommended that exceptions be used between the service and controller layers to identify error scenarios and specific exceptions be used to help identify which kind of error is occurring in order to report accurate status to the client. Leave non-exception paths for successful results. The Houses and Renters example leverage the exceptions defined in the
ejava-dto-util
module. You are free to define your own. -
It is highly recommended that
ExceptionHandlers
andRestExceptionAdvice
be used to handle exceptions thrown and report status. The Houses and Renters example leverage theExceptionHandlers
from theejava-web-util
module. You are free to define your own.
188. Assignment 2f: Required Test Scenarios
There are a minimum set of required scenarios that a complete project must specifically demonstrate in the submission.
-
Creation of HouseRental
-
success (201/
CREATED
) -
failed creation because House unknown (422/
UNPROCESSABLE_ENTITY
) -
failed creation because House unavailable for time span (422/
UNPROCESSABLE_ENTITY
) -
failed creation because Renter unknown (422/
UNPROCESSABLE_ENTITY
) -
failed creation because Renter too young (422/
UNPROCESSABLE_ENTITY
)
-
-
Update of HouseRental
-
success (200/
OK
) -
failed because HouseRental does not exist (404/
NOT_FOUND
) -
failed because HouseRental exists but change is invalid (422/
UNPROCESSABLE_ENTITY
)
-
188.1. Scenario: Creation of HouseRental
In this scenario, a HouseRental is attempted to be created.
188.1.1. Primary Path: Success
In this primary path, the House and Renter exist, all business rules are satisfied, and the API client is able to successfully create a HouseRental. The desired status in the response is a 201/CREATED. A follow-on query for HouseRentals will report the new entry.

188.1.2. Alternate Path: House unknown
In this alternate path, the House does not exist and the API client is unable to create a HouseRental. The desired response status is a 422/UNPROCESSABLE_ENTITY. The HouseRentals resource understood the request (i.e., not a 400/BAD_REQUEST or 404/NOT_FOUND), but request contained information that could not be processed.

getHouse() will return a 404/NOT_FOUND — which is not the same status requested here. HouseRentals will need to account for that difference. |
188.1.3. Alternate Path: House Unavailable
In this alternate path, the House exists but is unavailable for the requested time span. The desired response status is a 422/UNPROCESSABLE_ENTITY. The HouseRentals resource understood the request, but request contained information that could not be processed.

188.1.4. Alternate Path: Renter Unknown
In this alternate path, the Renter does not exist and the API client is unable to create a HouseRental for the Renter. The desired response status is a 422/UNPROCESSABLE_ENTITY.

getRenter() will return a 404/NOT_FOUND — which is not the same status requested here. HouseRentals will need to account for that difference. |
188.1.5. Alternate Path: Renter Too Young
In this alternate path, the Renter exists but is too young to complete a HouseRental. The desired response status is a 422/UNPROCESSABLE_ENTITY.

renterAge is calculated from houseRental startDate. |
188.2. Scenario: Update of HouseRental
In this scenario, a HouseRental is attempted to be updated.
188.2.1. Primary Path: Success
In this primary path, the API client is able to successfully update the time span for a HouseRental. This update should be performed all on the server-side. The client primarily expresses an updated proposal and the business rules pass. A follow-on query for HouseRentals will report the updated entry.

Your evaluation must verify what was stored on the server-side reflects the modifications made. |
188.2.2. Alternate Path: HouseRental does not exist
In this alternate path, the requested HouseRental does not exist.
The expected response status code should be 404/NOT_FOUND
to express that the target resource could not be found.

188.2.3. Alternate Path: Invalid Change
In this alternate path, the requested HouseRental exists but the existing House is not available for the new time span.
The expected response status code should be 422/UNPROCESSABLE_ENTITY
.

The scenario is showing that only the time span is being changed and the existing House and Renter should be used. The scenario is also showing that the existing House and Renter are being verified to still exist. |
188.3. Requirements
-
Implement the above scenarios within one or more integration unit tests.
-
Name the tests such that they are picked up and executed by the Surefire test phase of the maven build.
-
Turn in a cleaned source tree of the project under a single root parent project. The House and Renter modules do not need to be included.
-
The source tree should be ready to build in an external area that has access to the ejava-nexus-snaphots repository.
188.4. Grading
-
create an integration test that verifies a successful scenario
-
whether you implemented a set of integration unit tests that verify the primary paths for HouseRentals
-
-
create an integration test that verifies a failure scenario
-
whether you implemented a set of integration unit tests that verify the failure paths for HouseRentals.
-
188.5. Additional Details
-
Place behavior in the proper place
-
The unit integration test is responsible for populating the Houses and Renters. It will supply HouseDTOs and RenterDTOs populated on the client-side — to the Houses and Renters APIs/services.
-
The unit integration test will pass houseId, renterId, etc. values creating a rental (can be expressed using a sparsely populated HouseRentalDTO). All details to populate the returned
HouseRentalDTOs
(i.e., House and Renter info) will come from the server-side. There should never be a need for the client to self-create/fully-populate a HouseRentalDTO.
-
Unresolved directive in jhu784-notes.adoc - include::/builds/ejava-javaee/ejava-springboot-docs/courses/jhu784-notes/target/resources/docs/asciidoc/security-{security_notes}.adoc[leveloffset=0]
Unresolved directive in jhu784-notes.adoc - include::/builds/ejava-javaee/ejava-springboot-docs/courses/jhu784-notes/target/resources/docs/asciidoc/authn-{security_notes}.adoc[leveloffset=0]
Unresolved directive in jhu784-notes.adoc - include::/builds/ejava-javaee/ejava-springboot-docs/courses/jhu784-notes/target/resources/docs/asciidoc/userdetails-{users_notes}.adoc[leveloffset=0]
Unresolved directive in jhu784-notes.adoc - include::/builds/ejava-javaee/ejava-springboot-docs/courses/jhu784-notes/target/resources/docs/asciidoc/authz-{authz_notes}.adoc[leveloffset=0]
Unresolved directive in jhu784-notes.adoc - include::/builds/ejava-javaee/ejava-springboot-docs/courses/jhu784-notes/target/resources/docs/asciidoc/https-{authz_notes}.adoc[leveloffset=0]
Unresolved directive in jhu784-notes.adoc - include::/builds/ejava-javaee/ejava-springboot-docs/courses/jhu784-notes/target/resources/docs/asciidoc/assignment3-security-{assignment3}.adoc[]
Unresolved directive in jhu784-notes.adoc - include::/builds/ejava-javaee/ejava-springboot-docs/courses/jhu784-notes/target/resources/docs/asciidoc/aop-{aop_notes}.adoc[leveloffset=0]
Unresolved directive in jhu784-notes.adoc - include::/builds/ejava-javaee/ejava-springboot-docs/courses/jhu784-notes/target/resources/docs/asciidoc/failsafe-it-{it_notes}.adoc[leveloffset=0]
Unresolved directive in jhu784-notes.adoc - include::/builds/ejava-javaee/ejava-springboot-docs/courses/jhu784-notes/target/resources/docs/asciidoc/docker-{it-notes}.adoc[leveloffset=0]
Unresolved directive in jhu784-notes.adoc - include::/builds/ejava-javaee/ejava-springboot-docs/courses/jhu784-notes/target/resources/docs/asciidoc/docker-it-{it_notes}.adoc[leveloffset=0]
Unresolved directive in jhu784-notes.adoc - include::/builds/ejava-javaee/ejava-springboot-docs/courses/jhu784-notes/target/resources/docs/asciidoc/dockercompose-{it_notes}.adoc[leveloffset=0]
Unresolved directive in jhu784-notes.adoc - include::/builds/ejava-javaee/ejava-springboot-docs/courses/jhu784-notes/target/resources/docs/asciidoc/dockercompose-it-{it_notes}.adoc[leveloffset=0]
Unresolved directive in jhu784-notes.adoc - include::/builds/ejava-javaee/ejava-springboot-docs/courses/jhu784-notes/target/resources/docs/asciidoc/testcontainers-ntest-{it_notes}.adoc[leveloffset=0]
Unresolved directive in jhu784-notes.adoc - include::/builds/ejava-javaee/ejava-springboot-docs/courses/jhu784-notes/target/resources/docs/asciidoc/assignment4-it-{assignment4}.adoc[]
Unresolved directive in jhu784-notes.adoc - include::/builds/ejava-javaee/ejava-springboot-docs/courses/jhu784-notes/target/resources/docs/asciidoc/rdbms-{jpa_notes}.adoc[leveloffset=0]
Unresolved directive in jhu784-notes.adoc - include::/builds/ejava-javaee/ejava-springboot-docs/courses/jhu784-notes/target/resources/docs/asciidoc/jpa-{jpa_notes}.adoc[leveloffset=0]
Unresolved directive in jhu784-notes.adoc - include::/builds/ejava-javaee/ejava-springboot-docs/courses/jhu784-notes/target/resources/docs/asciidoc/jparepo-{jpa_notes}.adoc[leveloffset=0]
Unresolved directive in jhu784-notes.adoc - include::/builds/ejava-javaee/ejava-springboot-docs/courses/jhu784-notes/target/resources/docs/asciidoc/jpa-app-{jpa_notes}.adoc[leveloffset=0]
Unresolved directive in jhu784-notes.adoc - include::/builds/ejava-javaee/ejava-springboot-docs/courses/jhu784-notes/target/resources/docs/asciidoc/mongodb-{mongo_notes}.adoc[leveloffset=0]
Unresolved directive in jhu784-notes.adoc - include::/builds/ejava-javaee/ejava-springboot-docs/courses/jhu784-notes/target/resources/docs/asciidoc/mongotemplate-{mongo_notes}.adoc[leveloffset=0]
Unresolved directive in jhu784-notes.adoc - include::/builds/ejava-javaee/ejava-springboot-docs/courses/jhu784-notes/target/resources/docs/asciidoc/mongorepo-{mongo_notes}.adoc[leveloffset=0]
Unresolved directive in jhu784-notes.adoc - include::/builds/ejava-javaee/ejava-springboot-docs/courses/jhu784-notes/target/resources/docs/asciidoc/mongo-app-{mongo_notes}.adoc[leveloffset=0]
Unresolved directive in jhu784-notes.adoc - include::/builds/ejava-javaee/ejava-springboot-docs/courses/jhu784-notes/target/resources/docs/asciidoc/heroku-db-{jpa_notes}.adoc[leveloffset=0]
Unresolved directive in jhu784-notes.adoc - include::/builds/ejava-javaee/ejava-springboot-docs/courses/jhu784-notes/target/resources/docs/asciidoc/assignment5-db-{assignment5}.adoc[]
Unresolved directive in jhu784-notes.adoc - include::/builds/ejava-javaee/ejava-springboot-docs/courses/jhu784-notes/target/resources/docs/asciidoc/validation-{validation_notes}.adoc[leveloffset=0]
Unresolved directive in jhu784-notes.adoc - include::/builds/ejava-javaee/ejava-springboot-docs/courses/jhu784-notes/target/resources/docs/asciidoc/assignment6-async-{assignment6}.adoc[]
Porting to Spring Boot 3 / Spring 6
copyright © 2025 jim stafford (jim.stafford@jhu.edu)
189. Introduction
This write-up documents key aspects encountered when porting the Ejava course examples from Spring Boot 2.7.x/Spring 5 to version 3.x/Spring 6.
189.1. Goals
The student will learn:
-
specific changes required to port from Spring Boot 2.x to 3.x
-
recognize certain error messages and map them to solutions
189.2. Objectives
At the conclusion of this lecture, the student will be able to:
-
update package dependencies
190. Background
Spring Boot 3.0.0 (with Spring 6) was released in late Nov 2022. I initially ported the course examples from Spring Boot 2.7.0 (with Spring 5) to Spring Boot 3.0.2 (released Jan 20, 2023). Incremental releases of Spring Boot have been released in 2 to 4 week time periods since then. This writeup documents issues encountered — to include the initial signal of error and resolution taken.
Spring provides an official Migration Guide for Spring Boot 3 and Spring 6 that should be used as primary references.
The Spring Migration Guide identifies ways to enable some backward compatibility with Spring 5 or force upcoming compliance with Spring 6 with their BeanInfoFactory
setting.
I will not be discussing those options.
The change from Oracle (javax*
) to Jakarta (jakarta.*
) enterprise APIs presents the simplest but most pervasive changes in the repository.
Although the change is trivial and annoying — the enterprise javax.*
APIs are frozen.
All new enterprise API features will be added to the jakarta.*
flavor of the libraries from here forward.
Refs:
191. Preparation
There were two primary recommendations in the migration guide that where luckily addressed in the existing repository.
-
migrate to Spring Boot 2.7.x
-
use Java 17
Spring Boot 2.7.0 contained some deprecations that were also immediately addressed that significantly helped speed up the transition:
-
Deprecation of
WebSecurityConfigurerAdapter
in favor of Component-based Web SecurityWebSecurityConfigurerAdapter
is now fully removed from Spring Boot 3/Spring 6.
192. Dependency Changes
192.1. Spring Boot Version
The first and most obvious change was to change the springboot.version
from 2.7.x
to 3.x
.
This setting was in both ejava-build-bom (identifying dependencyManagement) and ejava-build-parent (identifying pluginManagement)
Spring Boot 2 Setting
|
Spring Boot 3 Setting
|
The version setting is used to import the targeted dependency definitions from spring-boot-dependencies
.
<dependencyManagement>
<dependencies>
<dependency>
<groupId>org.springframework.boot</groupId>
<artifactId>spring-boot-dependencies</artifactId>
<version>${springboot.version}</version>
<type>pom</type>
<scope>import</scope>
</dependency>
192.2. JAXB DependencyManagement
The JAXB dependency definitions had to be spelled out in Spring 2.x like the following:
<properties>
<jaxb-api.version>2.3.1</jaxb-api.version>
<jaxb-core.version>2.3.0.1</jaxb-core.version>
<jaxb-impl.version>2.3.2</jaxb-impl.version>
<dependencyManagement>
<dependencies>
<dependency>
<groupId>javax.xml.bind</groupId>
<artifactId>jaxb-api</artifactId>
<version>${jaxb-api.version}</version>
</dependency>
<dependency>
<groupId>com.sun.xml.bind</groupId>
<artifactId>jaxb-core</artifactId>
<version>${jaxb-core.version}</version>
</dependency>
<dependency>
<groupId>com.sun.xml.bind</groupId>
<artifactId>jaxb-impl</artifactId>
<version>${jaxb-impl.version}</version>
</dependency>
However, Spring Boot 3.x spring-boot-dependencies
BOM includes a jaxb-bom
that takes care of the JAXB dependencyManagement for us.
<dependencyManagement>
<dependencies>
<dependency>
<groupId>org.springframework.boot</groupId>
<artifactId>spring-boot-dependencies</artifactId> (1)
<version>${springboot.version}</version>
<type>pom</type>
<scope>import</scope>
</dependency>
1 | ejava-build-bom imports spring-boot-dependencies |
<properties>
<glassfish-jaxb.version>4.0.1</glassfish-jaxb.version>
<dependencyManagement>
<dependencies>
<dependency>
<groupId>org.glassfish.jaxb</groupId>
<artifactId>jaxb-bom</artifactId> (1)
<version>${glassfish-jaxb.version}</version>
<type>pom</type>
<scope>import</scope>
</dependency>
1 | spring-boot-dependencies imports jaxb-bom |
The jaxb-bom
defines the replacement for the JAXB API using the jakarta
naming.
It also defines two versions of the com.sun.xml.bind:jaxb-impl
.
One uses the "old" com.sun.xml.bind:jaxb-impl
naming construct and the other uses the "new" org.glassfish.jaxb:jaxb-runtine
naming construct.
<dependencyManagement>
<dependencies>
<dependency> <!--JAXB-API-->
<groupId>jakarta.xml.bind</groupId>
<artifactId>jakarta.xml.bind-api</artifactId> (1)
<version>${xml.bind-api.version}</version>
<classifier>sources</classifier>
</dependency>
<!-- new -->
<dependency>
<groupId>org.glassfish.jaxb</groupId>
<artifactId>jaxb-runtime</artifactId> (2)
<version>${project.version}</version>
<classifier>sources</classifier>
</dependency>
<!--OLD-->
<dependency>
<groupId>com.sun.xml.bind</groupId>
<artifactId>jaxb-impl</artifactId> (2)
<version>${project.version}</version>
<classifier>sources</classifier>
</dependency>
1 | jaxb-bom defines artifact for JAXB API |
2 | jaxb-bom defines old and new versions of artifact for JAXB runtime implementation |
I am assuming the two ("old" and "new") are copies of the same artifact — and updated all runtime dependencies to the "new" org.glassfish.jaxb
naming scheme.
192.3. Groovy
Class examples use a limited amount of groovy for Spock test framework examples.
Version 3.0.x of org.codehaus.groovy:groovy
was explicitly specified in ejava-build-bom
.
<properties>
<groovy.version>3.0.8</groovy.version>
<dependencyManagement>
<dependencies>
<dependency> (1)
<groupId>org.codehaus.groovy</groupId>
<artifactId>groovy</artifactId>
<version>${groovy.version}</version>
</dependency>
1 | legacy ejava-build-parent explicitly defined groovy dependency |
I noticed after the fact that Spring Boot 2.7.0 defined a version of org.codehaus.groovy:groovy
that would have made the above unnecessary.
However, the move to Spring Boot 3 also caused a move in groups for groovy — from org.codehaus.groovy to org.apache.groovy.
The explicit dependency was removed from ejava-build-bom and dependencies updated to groupId org.apache.groovy
.
<properties>
<groovy.version>4.0.7</groovy.version>
<dependencyManagement>
<dependencies>
<dependency> (1)
<groupId>org.apache.groovy</groupId>
<artifactId>groovy-bom</artifactId>
<version>${groovy.version}</version>
<type>pom</type>
<scope>import</scope>
</dependency>
1 | spring-boot-dependencies imports groovy-bom |
<dependencyManagement>
<dependencies>
<dependency> (1)
<groupId>org.apache.groovy</groupId>
<artifactId>groovy</artifactId>
<version>4.0.7</version>
</dependency>
1 | groovy-bom now used to explicitly define groovy dependency |
[ERROR] 'dependencies.dependency.version' for org.codehaus.groovy:groovy:jar is missing. @ info.ejava.examples.build:ejava-build-parent:6.1.0-SNAPSHOT, /Users/jim/proj/ejava-javaee/ejava-springboot/build/ejava-build-parent/pom.xml, line 438, column 29
192.4. Spock
Using Spock test framework with Spring Boot 3.x requires the use of Spock version >= 2.4-M1 and groovy 4.0.
I also noted that the M1
version for 2.4
was required to work with @SpringBootTest
.
Spring Boot 2 ejava-build-bom Spock property spec
|
Spring Boot 3 ejava-build-bom Spock property spec
|
The above property definition is seamlessly used to define the necessary dependencies in the following snippet in order to use Spock test framework.
<properties>
<spock.version>...</spock.version>
<dependencyManagement>
<dependencies>
<dependency>
<groupId>org.spockframework</groupId>
<artifactId>spock-bom</artifactId>
<version>${spock.version}</version>
<type>pom</type>
<scope>import</scope>
</dependency>
<dependency>
<groupId>org.spockframework</groupId>
<artifactId>spock-spring</artifactId>
<version>${spock.version}</version>
<scope>test</scope>
</dependency>
192.5. Flapdoodle
Direct support for the Flapdoodle embedded Mongo database was removed from Spring Boot 3, but can be manually brought in with the following definition for "spring30x".
<properties>
<flapdoodle.spring30x.version>4.5.2</flapdoodle.spring30x.version>
<dependencyManagement>
<dependencies>
<dependency> (1)
<groupId>de.flapdoodle.embed</groupId>
<artifactId>de.flapdoodle.embed.mongo.spring30x</artifactId>
<version>${flapdoodle.spring30x.version}</version>
</dependency>
1 | spring-boot-dependencies no longer defines the flapdoodle dependency.
New Spring Boot 3.x flapdoodle dependency now defined by ejava-build-bom |
Of course the dependency declaration groupId must be changed from de.flapdoodle.embed.mongo
to de.flapdoodle.embed.mongo.spring30x
in the child projects as well.
<dependency>
<groupId>de.flapdoodle.embed</groupId>
<artifactId>de.flapdoodle.embed.mongo</artifactId>
<scope>test</scope>
</dependency>
<dependency>
<groupId>de.flapdoodle.embed</groupId>
<artifactId>de.flapdoodle.embed.mongo.spring30x</artifactId>
<scope>test</scope>
</dependency>
192.6. HttpClient / SSL
The ability to define property features to outgoing HTTP connections requires use of the org.apache.httpcomponents
libraries.
<properties>
<httpclient.version>4.5.13</httpclient.version>
<dependencyManagement>
<dependencies>
<dependency> (1)
<groupId>org.apache.httpcomponents</groupId>
<artifactId>httpclient</artifactId>
<version>${httpclient.version}</version>
</dependency>
1 | Spring Boot 2.x spring-boot-dependencies defined dependency on httpclient |
Spring Boot 3 has migrated to "client5" version of the libraries.
The older version gets replaced with the following.
The dependencyManagement definition for httpclient(anything) can be removed from our local ejava-build-bom
.
<properties>
<httpclient5.version>5.1.4</httpclient5.version>
<dependencyManagement>
<dependencies>
<dependency> (1)
<groupId>org.apache.httpcomponents.client5</groupId>
<artifactId>httpclient5</artifactId>
<version>${httpclient5.version}</version>
</dependency>
1 | Spring Boot 3.x spring-boot-dependencies defines dependency on httpclient5 |
However, httpclient5
requires a secondary library to configure SSL connections.
ejava-build-bom
now defines the dependency for that.
<properties>
<sslcontext-kickstart.version>7.4.9</sslcontext-kickstart.version>
<dependencyManagement>
<dependencies>
<dependency>
<groupId>io.github.hakky54</groupId> (1)
<artifactId>sslcontext-kickstart-for-apache5</artifactId>
<version>${sslcontext-kickstart.version}</version>
</dependency>
1 | ejava-build-bom defines necessary dependency to configure httpclient5 SSL connections |
192.7. Javax /Jakarta Artifact Dependencies
With using the spring-boot-starters, there are very few direct dependencies on enterprise artifacts.
However, for the direct API references — simply change the javax.*
groupId to jakarta.*
.
Spring Boot 2.x API Dependency Definition
|
Spring Boot 3.x API Dependency Definition
|
192.8. jakarta.inject
javax.inject
does not have a straight replacement and is not defined within the Spring Boot BOM.
Replace any javax.inject
dependencies with jakarta.inject-api
.
<dependency>
<groupId>javax.inject</groupId>
<artifactId>javax.inject</artifactId>
<version>1</version>
</dependency>
<dependency>
<groupId>jakarta.inject</groupId>
<artifactId>jakarta.inject-api</artifactId>
<version>2.0.1</version>
</dependency>
Since spring-boot-dependencies
does not provide a dependencyManagement entry for inject — it was difficult to determine which version would be best appropriate.
I went with 2.0.1
and added to the ejava-build-bom
.
<properties>
<jakarta.inject-api.version>2.0.1</jakarta.inject-api.version>
<build>
<dependencyManagement>
<dependencies>
<dependency>
<groupId>jakarta.inject</groupId>
<artifactId>jakarta.inject-api</artifactId>
<version>${jakarta.inject-api.version}</version>
</dependency>
192.9. ActiveMQ / Artemis Dependency Changes
ActiveMQ does not yet support jakarta
packaging, but its artemis
sibling does.
Modify all local pom dependency definitions to the artemis
variant to first get things compiling.
Dependency management will be taken care of by the Spring Boot Dependency POM.
<dependency> <groupId>org.springframework.boot</groupId> <artifactId>spring-boot-starter-activemq</artifactId> </dependency>
<dependency> <groupId>org.springframework.boot</groupId> <artifactId>spring-boot-starter-artemis</artifactId> </dependency>
193. Package Changes
Once maven artifact dependencies are addressed, resolvable Java package imports can be put in place.
javax
APIs added to the Java language (e.g., javax.sql.*
) are still in the javax
structure.
javax
APIs that are part of independent Enterprise APIs have been moved to jakarta
.
The table below summarizes the APIs encountered in the EJava course examples repository.
Whether through command-line (e.g., find
, sed
) or IDE search/replace commands — it is well worth the time to identify a global way to make these mindless javax.(package)
to jakarta.(package)
package name changes.
Spring Boot 2.x Enterprise Package Imports
|
Spring Boot 3.x Enterprise Package Imports
|
For example, the following bash script will locate all Java source files with import javax
and change those occurrences to import jakarta
.
Baseline changes prior to bulk file changes
Baseline all in-progress changes prior to making bulk file changes so that you can easily revert to the previous state.
|
$ for file in `find . -name "*.java" -exec grep -l 'import javax' {} \;`; do sed -i '' 's/import javax/import jakarta/' $file; done
However, not all javax
packages are part of JavaEE.
We now need to execute the following to correct javax.sql
, javax.json
, and javax.net
, imports caught up in the mass change.
$ for file in `find . -name "*.java" -exec grep -l 'import jakarta.sql' {} \;`; do sed -i '' 's/import jakarta.sql/import javax.sql/' $file; done
$ for file in `find . -name "*.java" -exec grep -l 'import jakarta.json' {} \;`; do sed -i '' 's/import jakarta.json/import javax.json/' $file; done
$ for file in `find . -name "*.java" -exec grep -l 'import jakarta.net' {} \;`; do sed -i '' 's/import jakarta.net/import javax.net/' $file; done
194. AssertJ Template Changes
AssertJ test assertion library has the ability to generate type-specific assertions.
However, some of the generated classes make reference to deprecated javax.*
packages …
@javax.annotation.Generated(value="assertj-assertions-generator") (1)
public class BddAssertions extends org.assertj.core.api.BDDAssertions {
...
1 | javax package name prefix must be renamed |
... and must be updated to jakarta.*
.
@jakarta.annotation.Generated(value="assertj-assertions-generator") (1)
public class BddAssertions extends org.assertj.core.api.BDDAssertions {
...
1 | jakarta package name prefix must be used in place of javax |
However, AssertJ assertions generator releases have been idle since Feb 2021 (version 2.2.1
) and our only option is to manually edit the templates ourself.
The testing with AssertJ assertions lecture notes covers how to customize the generator.
$ ls app/app-testing/apptesting-testbasics-example/src/test/resources/templates/ | sort
ejava_bdd_assertions_entry_point_class_template.txt (1)
1 | template was defined for custom type |
<!-- generate custom AssertJ assertions -->
<plugin>
<groupId>org.assertj</groupId>
<artifactId>assertj-assertions-generator-maven-plugin</artifactId>
<configuration>
<classes> (1)
<param>info.ejava.examples.app.testing.testbasics.Person</param>
</classes>
<templates>
<!-- local customizations -->
<templatesDirectory>${basedir}/src/test/resources/templates/</templatesDirectory>
<bddEntryPointAssertionClass>ejava_bdd_assertions_entry_point_class_template.txt</bddEntryPointAssertionClass>
</templates>
</configuration>
</plugin>
1 | custom template and type was declared with AssertJ plugin |
The following listing show we can host downloaded and modified template files.
$ ls app/app-testing/apptesting-testbasics-example/src/test/resources/templates/ | sort
ejava_bdd_assertions_entry_point_class_template.txt
jakarta_bdd_soft_assertions_entry_point_class_template.txt
jakarta_custom_abstract_assertion_class_template.txt
jakarta_custom_assertion_class_template.txt
jakarta_custom_hierarchical_assertion_class_template.txt
jakarta_junit_soft_assertions_entry_point_class_template.txt
jakarta_soft_assertions_entry_point_class_template.txt
jakarta_standard_assertions_entry_point_class_template.txt
The following snippet shows how we can configure the plugin to use the additional custom template files.
<!-- Spring Boot 3.x / AspectJ jakarta customizations -->
<!-- https://github.com/assertj/assertj-assertions-generator-maven-plugin/issues/93 -->
<assertionClass>jakarta_custom_assertion_class_template.txt</assertionClass>
<assertionsEntryPointClass>jakarta_standard_assertions_entry_point_class_template.txt</assertionsEntryPointClass>
<hierarchicalAssertionAbstractClass>jakarta_custom_abstract_assertion_class_template.txt</hierarchicalAssertionAbstractClass>
<hierarchicalAssertionConcreteClass>jakarta_custom_hierarchical_assertion_class_template.txt</hierarchicalAssertionConcreteClass>
<softEntryPointAssertionClass>jakarta_soft_assertions_entry_point_class_template.txt</softEntryPointAssertionClass>
<junitSoftEntryPointAssertionClass>jakarta_junit_soft_assertions_entry_point_class_template.txt</junitSoftEntryPointAssertionClass>
195. Spring Boot Configuration Property
@ConstructorBinding is used to designate how to populate the properties object with values. In Spring Boot 2.x, the annotation could be applied to the class or constructor.
import org.springframework.boot.context.properties.ConstructorBinding;
@ConstructorBinding (1)
public class AddressProperties {
private final String street;
public AddressProperties(String street, String city, String state, String zip) { ... }
1 | annotation could be applied to class or constructor |
In Spring Boot 3.x, the annotation has been moved one Java package level lower — into the bind package — and the new definition can only be legally applied to constructors.
import org.springframework.boot.context.properties.bind.ConstructorBinding; (1)
public class AddressProperties {
private final String street;
@ConstructorBinding (2)
public AddressProperties(String street, String city, String state, String zip) { ... }
1 | annotation moved to new package |
2 | annotation can only be applied to a specific constructor |
However, it is technically only needed when there are multiple constructors.
@ConstructorBinding //only required for multiple constructors
public BoatProperties(String name) {
this.name = name;
}
//not used for ConfigurationProperties initialization
public BoatProperties() { this.name = "default"; }
196. HttpStatus
HttpStatus
represents the status returned from an HTTP call.
Responses are primarily in the 1xx, 2xx, 3xx, 4xx, and 5xx ranges with some well-known values.
When updating to Spring Boot 3, you may encounter the following compilation problem:
incompatible types: org.springframework.http.HttpStatusCode cannot be converted to org.springframework.http.HttpStatus
196.1. Spring Boot 2.x
Spring Boot 2.x used an Enum type to represent these well-known values and properties and all interfaces accepted and returned that enum type.
public enum HttpStatus {
OK(200, Series.SUCCESSFUL, "OK")
CREATED(201, Series.SUCCESSFUL, "Created"),
...
The following are two code examples for acquiring an HttpStatus object:
public class ResponseEntity<T> extends HttpEntity<T> {
public HttpStatus getStatusCode() {
- - -
ClientHttpResponse response = ...
HttpStatus status = response.getStatusCode();
//when
HttpStatus status;
try {
status = homesClient.hasHome("anId").getStatusCode();
} catch (HttpStatusCodeException ex) {
status = ex.getStatusCode();
}
The following is an example of inspecting the legacy HttpStatus object.
then(response.getStatusCode().series()).isEqualTo(HttpStatus.Series.SUCCESSFUL);
The problem was that the HttpStatus enum could not represent custom HTTP status values.
196.2. Spring Boot 3.x
Spring 6 added a breaking change by having methods accept and return a new HttpStatusCode
interface.
The HttpStatus
enum now implements that interface but cannot be directly resolved to an HttpStatus
without an additional lookup.
public enum HttpStatus implements HttpStatusCode {
OK(200, Series.SUCCESSFUL, "OK")
CREATED(201, Series.SUCCESSFUL, "Created"),
...
One needs to call a lookup method to convert to an HttpStatus
instance if the HttpStatusCode
object is needed.
Use resolve()
if null is acceptable (e.g., log statements) and valueOf()
if required.
public class ResponseEntity<T> extends HttpEntity<T> {
public HttpStatusCode getStatusCode() {
- - -
ClientHttpResponse response = ...
HttpStatus status = HttpStatus.resolve(response.getStatusCode().value()); (1)
//or
HttpStatus status = HttpStatus.valueOf(response.getStatusCode().value()); (2)
1 | returns null if value is not resolved |
2 | throws IllegalArgumentException is value is not resolved |
HttpStatusCode status;
try {
status = homesClient.hasHome("anId").getStatusCode();
} catch (HttpStatusCodeException ex) {
status = ex.getStatusCode();
}
then(response.getStatusCode().is2xxSuccessful()).isTrue();
Most of the same information is available — just not as easy to get to.
197. HttpMethod
The common values for HttpMethod are also very well-known.
197.1. Spring Boot 2.x
Spring Boot 2.x used an enum to represent these well-known values and associated properties.
public enum HttpMethod {
GET, HEAD, POST, PUT, PATCH, DELETE, OPTIONS, TRACE;
...
@ParameterizedTest
@EnumSource(value = HttpMethod.class, names = {"GET", "POST"})
void anonymous_user(HttpMethod method) {
The rigid aspects of the enum made it not usable for custom HTTP methods.
197.2. Spring Boot 3.x
Spring Boot 3.x changed HttpMethod from an enum to a regular class as well.
public final class HttpMethod implements Comparable<HttpMethod>, Serializable {
public static final HttpMethod GET = new HttpMethod("GET");
public static final HttpMethod POST = new HttpMethod("POST");
...
The following shows the @ParameterizedTest
from above, updated to account for the change.
@EnumSource was changed to @CsvSource
and the provided String was converted to an HttpMethod type within the method.
@ParameterizedTest
@ValuesSource(strings={"GET","POST"})
void anonymous_user(String methodName) {
HttpMethod method = HttpMethod.valueOf(methodName);
198. Spring Factories Changes
The location for AutoConfiguration bootstrap classes has changed from the general-purpose META-INF/spring.factories
…
org.springframework.boot.autoconfigure.EnableAutoConfiguration=\ info.ejava.examples.app.hello.HelloAutoConfiguration, \ info.ejava.examples.app.hello.HelloResourceAutoConfiguration
to the bootstrap-specific META-INF/spring/org.springframework.boot.autoconfigure.AutoConfiguration.imports
file
info.ejava.examples.app.hello.HelloAutoConfiguration info.ejava.examples.app.hello.HelloResourceAutoConfiguration
The same information is conveyed in the import
file — just expressed differently.
META-INF/spring.factories
still exists.
It is no longer used to express this information.
199. Spring WebSecurityConfigurerAdapter
Spring had deprecated WebSecurityConfigurerAdapter
by the time Spring Boot 2.7.0 was released.
@Configuration
@Order(100)
@ConditionalOnClass(WebSecurityConfigurerAdapter.class)
public static class SwaggerSecurity extends WebSecurityConfigurerAdapter {
@Override
protected void configure(HttpSecurity http) throws Exception {
http.requestMatchers(cfg->cfg
.antMatchers("/swagger-ui*", "/swagger-ui/**", "/v3/api-docs/**"));
http.csrf().disable();
http.authorizeRequests(cfg->cfg.anyRequest().permitAll());
}
}
The deprecated WebSecurityConfigurerAdapter
approach was replaced with the Component-based @Bean
factory mechanism. Spring 6 has completely eliminated the adapter approach.
@Bean
@Order(100)
public SecurityFilterChain swaggerSecurityFilterChain(HttpSecurity http) throws Exception {
http.securityMatchers(cfg->cfg
.requestMatchers("/swagger-ui*", "/swagger-ui/**", "/v3/api-docs/**"));
http.csrf().disable();
http.authorizeHttpRequests(cfg->cfg.anyRequest().permitAll());
return http.build();
}
199.1. SecurityFilterChain securityMatcher
One or more request matchers can be applied to the SecurityFilterChain, primarily for the cases when there are multiple SecurityFilterChains.
Lacking a request matcher — the highest priority SecurityFilterChain will likely process all requests.
For Spring Boot 2.x/Spring 5, this was expressed with a requestMatchers()
builder call on the injected HttpSecurity
object.
@Bean
@Order(50)
public SecurityFilterChain h2Configuration(HttpSecurity http) throws Exception {
http.requestMatchers(cfg->...); (1)
...
1 | SecurityFilterChain.requestMatchers() determined what filter chain will process |
In Spring Boot 3/Spring 6, the request matcher for the SecurityFilterChain is now expressed with a securityMatchers()
call.
They function the same with a different name to help distinguish the call from the ones made to configure RequestMatcher
.
@Bean
@Order(50)
public SecurityFilterChain h2Configuration(HttpSecurity http) throws Exception {
http.securityMatchers(cfg->...); (1)
...
1 | securityMatchers() replaces requestMatchers() for SecurityFilterChain |
A simple search for requestMatchers
and replace with securityMatchers
is a suitable solution.
for file in `find . -name "*.java" -exec grep -l 'requestMatchers(' {} \;`; do sed -i '' 's/requestMatchers(/securityMatchers(/' $file; done
199.2. antMatchers/requestMatchers
The details of the RequestMatcher
for both the SecurityFilterChain
and WebSecurityCustomizer
were defined by a antMatchers()
builder.
The mvcMatchers()
builder also existed, but were not used in the course examples.
@Bean
@Order(50)
public SecurityFilterChain h2Configuration(HttpSecurity http) throws Exception {
http.requestMatchers(cfg->cfg.antMatchers( (1)
"/h2-console/**","/login","/logout"));
...
@Bean
public WebSecurityCustomizer authzStaticResources() {
return (web) -> web.ignoring().antMatchers( (1)
"/content/**");
}
1 | legacy antMatchers() defined details of legacy requestMatchers() |
Documentation states that legacy antMatchers()
have simply been replaced with requestMatchers()
and then warn that /foo
matches no longer match /foo/
URIs.
One must explicitly express /foo
and /foo/
to make that happen.
@Bean
@Order(50)
public SecurityFilterChain h2Configuration(HttpSecurity http) throws Exception {
http.securityMatchers(cfg->cfg.requestMatchers((1)
"/h2-console/**","/login","/logout"));
...
@Bean
public WebSecurityCustomizer authzStaticResources() {
return (web) -> web.ignoring().requestMatchers( (1)
"/content/**");
}
1 | requestMatchers() now defines the match details |
In reality, the requestMatchers()
will resolve to the mvcMatchers()
when using WebMVC and that is simply how the mvcMatchers() work.
I assume that is what Spring Security wants you to use.
Otherwise the convenient alternate builders would not have been removed or at least the instructions would have more prominently identified how to locate the explicit builders in the new API.
import org.springframework.security.web.util.matcher.AntPathRequestMatcher;
import org.springframework.security.web.util.matcher.RegexRequestMatcher;
http.authorizeHttpRequests(cfg->cfg
.requestMatchers(AntPathRequestMatcher.antMatcher("...")).hasRole("...")
.requestMatchers(RegexRequestMatcher.regexMatcher("...")).hasRole("...")
.requestMatchers("/h2-console/**").authenticated()); //MvcRequestMatcher
A simple search and replace can be performed for this update as long as mvcMatchers()
is a suitable solution.
for file in `find . -name "*.java" -exec grep -l 'antMatchers(' {} \;`; do sed -i '' 's/antMatchers(/requestMatchers(/' $file; done
199.3. ignoringAntMatchers/ignoringRequestMatchers
The same is true for the ignoring case.
Just replace the ignoringAntMatchers()
builder method with ignoringRequestMatchers()
.
http.csrf(cfg->cfg.ignoringAntMatchers("/h2-console/**"));
...
http.csrf(cfg->cfg.ignoringRequestMatchers("/h2-console/**"));
for file in `find . -name "*.java" -exec grep -l 'ignoringAntMatchers(' {} \;`; do sed -i '' 's/ignoringAntMatchers(/ignoringRequestMatchers(/' $file; done
199.4. authorizeRequests/authorizeHttpRequests
Spring Boot 2.x/Spring 5 used the authorizeRequests()
builder to define access restrictions for a URI.
http.authorizeRequests(cfg->cfg.requestMatchers(
"/api/whoami", "/api/authorities/paths/anonymous/**").permitAll());
The builder still exists, but has been deprecated for authorizeHttpRequests()
.
http.authorizeHttpRequests(cfg->cfg.requestMatchers(
"/api/whoami", "/api/authorities/paths/anonymous/**").permitAll());
A simple search and replace can address this issue.
for file in `find . -name "*.java" -exec grep -l 'authorizeRequests(' {} \;`; do sed -i '' 's/authorizeRequests(/authorizeHttpRequests(/' $file; done
200. Role Hierarchy
Early Spring Security 3.x omission left off automatic support for role inheritance.
200.1. Spring Boot 2.x Role Inheritance
The following shows the seamless integration of role access constraints and role hierarchy definition for security mechanisms that support hierarchies.
@Bean
public RoleHierarchy roleHierarchy() {
RoleHierarchyImpl roleHierarchy = new RoleHierarchyImpl();
roleHierarchy.setHierarchy(StringUtils.join(List.of(
"ROLE_ADMIN > ROLE_CLERK",
"ROLE_CLERK > ROLE_CUSTOMER"
),System.lineSeparator()));
return roleHierarchy;
http.authorizeRequests(cfg->cfg.antMatchers(
"/api/authorities/paths/customer/**")
.hasAnyRole("CUSTOMER"));
http.authorizeRequests(cfg->cfg.antMatchers(HttpMethod.GET,
"/api/authorities/paths/price")
.hasAnyAuthority("PRICE_CHECK", "ROLE_ADMIN", "ROLE_CLERK"));
200.2. Spring Boot 3.x Role Inheritance
The role hierarchies are optionally stored within an AuthorizationManager.
Early Spring Boot 3 left that automatic registration out but was available in an up-coming merge request.
An interim solution was to manually supply the SecurityFilterChain
an AuthorizationManager
pre-registered with a RoleHierarchy
definition.
http.authorizeHttpRequests(cfg->cfg.requestMatchers(
"/api/authorities/paths/customer/**")
.access(anyRoleWithRoleHierarchy(roleHierarchy, "CUSTOMER"))
);
http.authorizeHttpRequests(cfg->cfg.requestMatchers(HttpMethod.GET,
"/api/authorities/paths/price")
.access(anyAuthorityWithRoleHierarchy(roleHierarchy, "PRICE_CHECK", "ROLE_ADMIN", "ROLE_CLERK"))
);
The following snippets show the definition of the RoleHierarchy
injected into the SecurityChainFilter
builder.
Two have been defined — one for roleInheritance
profile and one for otherwise.
@Bean
@Profile("roleInheritance")
public RoleHierarchy roleHierarchy() {
RoleHierarchyImpl roleHierarchy = new RoleHierarchyImpl();
roleHierarchy.setHierarchy(StringUtils.join(List.of(
"ROLE_ADMIN > ROLE_CLERK",
"ROLE_CLERK > ROLE_CUSTOMER"
),System.lineSeparator()));
return roleHierarchy;
}
@Bean
@Profile("!roleInheritance")
public RoleHierarchy nullHierarchy() {
return new NullRoleHierarchy();
}
//temporary work-around until this fix is available
//https://github.com/spring-projects/spring-security/issues/12473
private AuthorizationManager anyRoleWithRoleHierarchy(RoleHierarchy roleHierarchy, String...roles) {
AuthorityAuthorizationManager<Object> authzManager = AuthorityAuthorizationManager.hasAnyRole(roles);
authzManager.setRoleHierarchy(roleHierarchy);
return authzManager;
}
private AuthorizationManager anyAuthorityWithRoleHierarchy(RoleHierarchy roleHierarchy, String...authorities) {
AuthorityAuthorizationManager<Object> authzManager = AuthorityAuthorizationManager.hasAnyAuthority(authorities);
authzManager.setRoleHierarchy(roleHierarchy);
return authzManager;
}
201. Annotated Method Security
@EnableGlobalMethodSecurity
has been renamed to @EnableMethodSecurity
and prePostEnabled
has been enabled by default.
@EnableGlobalMethodSecurity(prePostEnabled = true) (1)
public class AuthoritiesTestConfiguration {
1 | prePostEnabled had to be manually enabled |
@EnableMethodSecurity //(prePostEnabled = true) now default
public class AuthoritiesTestConfiguration {
}
A simple search and replace solution should be enough to satisfy the deprecation.
for file in `find . -name "*.java" -exec grep -l 'EnableGlobalMethodSecurity(' {} \;`; do sed -i '' 's/EnableGlobalMethodSecurity(/EnableMethodSecurity(/' $file; done
202. @Secured
Spring Boot 3.x @Secured
annotation now supports non-ROLE authorities
@Secured({"ROLE_ADMIN", "ROLE_CLERK", "PRICE_CHECK"}) @GetMapping(path = "price", produces = {MediaType.TEXT_PLAIN_VALUE}) public ResponseEntity<String> checkPrice(
203. JSR250 RolesAllowed
Spring Boot 2.x Jsr250 ROLE
-s started with the ROLE_
prefix when defined.
Permissions (PRICE_CHECK
) did not.
203.1. Spring Boot 2.x
@RolesAllowed("ROLE_CLERK")
public ResponseEntity<String> doClerk(
@RolesAllowed("ROLE_CUSTOMER")
public ResponseEntity<String> doCustomer(
@RolesAllowed({"ROLE_ADMIN", "ROLE_CLERK", "PRICE_CHECK"})
public ResponseEntity<String> checkPrice(
203.2. Spring Boot 3.x
Spring Boot 3.x Jsr250 ROLE
-s definition no longer start with ROLE_
prefix — just like Permissions (PRICE_CHECK
).
@RolesAllowed("CLERK")
public ResponseEntity<String> doClerk(
@RolesAllowed("CUSTOMER")
public ResponseEntity<String> doCustomer(
@RolesAllowed({"ADMIN", "CLERK", "PRICE_CHECK"})
public ResponseEntity<String> checkPrice(
204. HTTP Client
Lower-level client networking details for RestTemplate
is addressed using HTTP Client.
This primarily includes TLS (still referred to as SSL) but can also include other features like caching and debug logging.
204.1. Spring Boot 2 HTTP Client
Spring Boot 2 used httpclient
.
The following snippet shows how the TLS could be optionally configured for HTTPS communications.
import org.apache.http.client.HttpClient;
import org.apache.http.impl.client.HttpClientBuilder;
import org.apache.http.ssl.SSLContextBuilder;
import javax.net.ssl.SSLContext;
We first need to establish an SSLContext
with the definition of protocols and an optional trustStore.
The trustStore is optional to communicate with globally trusted sites, but necessary if we communicate using HTTPS with self-generated certs.
The following Spring Boot 2 example, uses an injected definition of the external server to load the trustStore and build the SSLContext
.
@Bean
public SSLContext sslContext(ServerConfig serverConfig) {
try {
URL trustStoreUrl = null;
if (serverConfig.getTrustStore()!=null) {
trustStoreUrl = ClientITConfiguration.class.getResource("/" + serverConfig.getTrustStore());
if (null==trustStoreUrl) {
throw new IllegalStateException("unable to locate truststore:/" + serverConfig.getTrustStore());
}
}
SSLContextBuilder builder = SSLContextBuilder.create()
.setProtocol("TLSv1.2");
if (trustStoreUrl!=null) {
builder.loadTrustMaterial(trustStoreUrl, serverConfig.getTrustStorePassword());
}
return builder.build();
} catch (Exception ex) {
throw new IllegalStateException("unable to establish SSL context", ex);
}
}
The SSLContext
and remote server definition are used to build a HttpClient
to insert into the ClientRequestFactory
used to establish client connections.
@Bean
public ClientHttpRequestFactory httpsRequestFactory(SSLContext sslContext,
ServerConfig serverConfig) {
HttpClient httpsClient = HttpClientBuilder.create()
.setSSLContext(serverConfig.isHttps() ? sslContext : null)
.build();
return new HttpComponentsClientHttpRequestFactory(httpsClient);
}
204.2. Spring Boot 3.x HttpClient5
Spring Boot updated the networking in RestTemplate
to use httpclient5
and a custom SSL Context library.
import nl.altindag.ssl.SSLFactory;
import nl.altindag.ssl.util.Apache5SslUtils;
import org.apache.hc.client5.http.classic.HttpClient;
import org.apache.hc.client5.http.impl.classic.HttpClients;
import org.apache.hc.client5.http.impl.io.PoolingHttpClientConnectionManager;
import org.apache.hc.client5.http.impl.io.PoolingHttpClientConnectionManagerBuilder;
import org.springframework.boot.autoconfigure.condition.ConditionalOnExpression;
httpclient5
uses a SSLFactory
TLS definition that is similar to its httpclient
counterpart.
The biggest difference in the @Bean
factory in the example code is that we have decided to disable the bean if the ServerConfig
trustStore property is empty.
@Bean (1)
@ConditionalOnExpression("!T(org.springframework.util.StringUtils).isEmpty('${it.server.trust-store:}')")
public SSLFactory sslFactory(ServerConfig serverConfig) throws IOException {
try (InputStream trustStoreStream = Thread.currentThread()
.getContextClassLoader().getResourceAsStream(serverConfig.getTrustStore())) {
if (null==trustStoreStream) {
throw new IllegalStateException("unable to locate truststore: " + serverConfig.getTrustStore());
}
return SSLFactory.builder()
.withProtocols("TLSv1.2")
.withTrustMaterial(trustStoreStream, serverConfig.getTrustStorePassword())
.build();
}
}
1 | SSLFactory will not be created when it.server.trust-store is empty |
With our design change, we then make the injected SSLFactory
into the ClientRequestFactory
@Bean method optional.
From there we use httpsclient5
constructs to build the proper components.
@Bean
public ClientHttpRequestFactory httpsRequestFactory(
@Autowired(required = false) SSLFactory sslFactory) { (1)
PoolingHttpClientConnectionManagerBuilder builder =
PoolingHttpClientConnectionManagerBuilder.create();
PoolingHttpClientConnectionManager connectionManager =
Optional.ofNullable(sslFactory)
.map(sf -> builder.setSSLSocketFactory(Apache5SslUtils.toSocketFactory(sf)))
.orElse(builder)
.build();
HttpClient httpsClient = HttpClients.custom()
.setConnectionManager(connectionManager)
.build();
return new HttpComponentsClientHttpRequestFactory(httpsClient);
}
1 | SSLFactory defined to be optional and checked for null during ConnectionManager creation |
Note that httpclient5
and its TLS extensions require two new dependencies.
<dependency>
<groupId>org.apache.httpcomponents.client5</groupId>
<artifactId>httpclient5</artifactId>
</dependency>
<dependency>
<groupId>io.github.hakky54</groupId>
<artifactId>sslcontext-kickstart-for-apache5</artifactId>
</dependency>
The caching extensions caching extensions are made available through the following dependency. Take a look at CachingHttpClientBuilder.
<dependency>
<groupId>org.apache.httpcomponents.client5</groupId>
<artifactId>httpclient5-cache</artifactId>
</dependency>
205. Subject Alternative Name (SAN)
Java HTTPS has always had a hostname check that verified the reported hostname matched the DN within the SSL certificate.
For local testing, that use to mean only having to supply a CN=localhost
.
Now, the SSL security matches against the subject alternative name ("SAN").
We will get the following error when the service we are calling using HTTPS returns a certificate that does not list a valid subject alternative name (SAN) consistent with the hostname used to connect.
ResourceAccess I/O error on GET request for "https://localhost:63848/api/authn/hello": Certificate for <localhost> doesn't match any of the subject alternative names: []
A valid subject alternative name (SAN) can be generated with the -ext
parameter within keytool.
#https://stackoverflow.com/questions/50928061/certificate-for-localhost-doesnt-match-any-of-the-subject-alternative-names
#https://ultimatesecurity.pro/post/san-certificate/
keytool -genkeypair -keyalg RSA -keysize 2048 -validity 3650 \
-ext "SAN:c=DNS:localhost,IP:127.0.0.1" \(1)
-dname "CN=localhost,OU=Unknown,O=Unknown,L=Unknown,ST=Unknown,C=Unknown" \
-keystore keystore.p12 -alias https-hello \
-storepass password
1 | clients will accept localhost or 127.0.0.1 returned from the SSL connection provided by this trusted certificate |
206. Swagger Changes
206.1. Spring Doc
206.1.1. Spring Boot 2.x
Spring Doc supported Spring Boot 2.x with their 1.x version.
<dependency>
<groupId>org.springdoc</groupId>
<artifactId>springdoc-openapi-ui</artifactId>
<version>1.6.9</version>
</dependency>
206.2. Spring Boot 3.x
Spring Doc supports Spring Boot 3.x with their 2.x version.
<dependency>
<groupId>org.springdoc</groupId>
<artifactId>springdoc-openapi-starter-webmvc-ui</artifactId>
<version>2.1.0</version>
</dependency>
207. JPA Dependencies
207.1. Spring Boot 3.x/Hibernate 6.x
Spring Boot 3.x/Hibernate 6.x requires a dependency on a Validator.
jakarta.validation.NoProviderFoundException: Unable to create a Configuration, because no Jakarta Bean Validation provider could be found. Add a provider like Hibernate Validator (RI) to your classpath.
To correct, add the validation starter.
<dependency>
<groupId>org.springframework.boot</groupId>
<artifactId>spring-boot-starter-validation</artifactId>
</dependency>
208. JPA Default Sequence
One mechanism for generating a primary key value is to use a sequence.
208.1. Spring Boot 2.x/Hibernate 5.x
Spring Boot 2.x/Hibernate 5.x used to default the sequence to hibernate_sequence
.
@Entity
public class Song {
@Id @GeneratedValue(strategy = GenerationType.SEQUENCE)
private int id;
enum Dialect {
H2("call next value for hibernate_sequence"),
POSTGRES("select nextval('hibernate_sequence')");
drop sequence IF EXISTS hibernate_sequence;
create sequence hibernate_sequence start with 1 increment 1;
208.2. Spring Boot 3.x/Hibernate 6.x
Spring Boot 3.x/Hibernate 6.x no longer permit an unnamed sequence generator. It must be named.
Default increment has changed
The default increment for the sequence has also changed from 1 to 50.
|
@Entity
public class Song {
@Id @GeneratedValue(strategy = GenerationType.SEQUENCE, generator = "REPOSONGS_SONG_SEQUENCE")
private int id;
enum Dialect {
H2("call next value for REPOSONGS_SONG_SEQUENCE"),
POSTGRES("select nextval('REPOSONGS_SONG_SEQUENCE')");
drop sequence IF EXISTS REPOSONGS_SONG_SEQUENCE;
create sequence REPOSONGS_SONG_SEQUENCE start with 1 increment 50; (1)
1 | default increment is 50 |
209. JPA Property Changes
209.1. Spring Boot 2.x/Hibernate 5.x
The legacy JPA persistence properties used a javax
prefix.
spring.jpa.properties.javax.persistence.schema-generation.create-source=metadata
spring.jpa.properties.javax.persistence.schema-generation.scripts.action=drop-and-create
spring.jpa.properties.javax.persistence.schema-generation.scripts.create-target=target/generated-sources/ddl/drop_create.sql
spring.jpa.properties.javax.persistence.schema-generation.scripts.drop-target=target/generated-sources/ddl/drop_create.sql
Hibernate moved some classes.
org.hibernate.type
logging changed to org.hibernate.orm.jdbc.bind
in later versions.
logging.level.org.hibernate.type=TRACE
209.2. Spring Boot 3.x/Hibernate 6.x
With Spring Boot 3.x/Hibernate 6.x, the property prefix has changed to jakarta
.
spring.jpa.properties.jakarta.persistence.schema-generation.create-source=metadata
spring.jpa.properties.jakarta.persistence.schema-generation.scripts.action=drop-and-create
spring.jpa.properties.jakarta.persistence.schema-generation.scripts.create-target=target/generated-sources/ddl/drop_create.sql
spring.jpa.properties.jakarta.persistence.schema-generation.scripts.drop-target=target/generated-sources/ddl/drop_create.sql
logging.level.org.hibernate.orm.jdbc.bind=TRACE
210. Embedded Mongo
210.1. Embedded Mongo AutoConfiguration
Spring Boot 3.x has removed direct support for Flapdoodle in favor of configuring it yourself or using testcontainers
.
The legacy EmbeddedMongoAutoConfiguration
can now be found in a flapdoodle package.
import org.springframework.boot.autoconfigure.mongo.embedded.EmbeddedMongoAutoConfiguration;
import de.flapdoodle.embed.mongo.spring.autoconfigure.EmbeddedMongoAutoConfiguration;
210.2. Embedded Mongo Properties
The mandatory mongodb.embedded.version
property has been renamed
-
from:
spring.mongodb.embedded.version
-
to:
de.flapdoodle.mongodb.embedded.version
It works exactly the same as before.
spring.mongodb.embedded.version=4.4.0
de.flapdoodle.mongodb.embedded.version=4.4.0
A simple search and replace of property files addresses this change. YAML file changes would have been more difficult.
for file in `find . -name "*.properties" -exec egrep -l 'spring.mongodb.embedded.version' {} \;`; do sed -i '' 's/spring.mongodb.embedded.version/de.flapdoodle.mongodb.embedded.version/' $file; done
211. ActiveMQ/Artemis
ActiveMQ and Artemis are two branches within the ActiveMQ baseline.
I believe Artemis came from a JBoss background.
Only Artemis has been updated to support jakarta
constructs.
211.1. Spring Boot 2.x
The following snippet shows the Maven dependency for ActiveMQ, with its javax.jms
support.
<dependency>
<groupId>org.springframework.boot</groupId>
<artifactId>spring-boot-starter-activemq</artifactId>
</dependency>
The following snippet shows a few example ActiveMQ properties used in the simple example within the course tree.
spring.activemq.broker-url=tcp://activemq:61616
spring.activemq.in-memory=true
spring.activemq.pool.enabled=false
211.2. Spring Boot 3.x
The following snippet shows the Maven dependencies for Artemis and its jakarta.jms
support.
The Artemis server dependency had to be separately added in order to run an embedded JMS server.
JMSTemplate also recommended the Pooled JMS dependency to tune the use of connections.
<dependency>
<groupId>org.springframework.boot</groupId>
<artifactId>spring-boot-starter-artemis</artifactId>
</dependency>
<!-- jmsTemplate connection polling -->
<dependency>
<groupId>org.messaginghub</groupId>
<artifactId>pooled-jms</artifactId>
</dependency>
<!-- dependency added a runtime server to allow running with embedded topic -->
<dependency>
<groupId>org.apache.activemq</groupId>
<artifactId>artemis-jakarta-server</artifactId>
</dependency>
The following snippet shows a few example Artemis properties and configuring the JMS connection pool.
spring.artemis.broker-url=tcp://activemq:61616
#requires org.messaginghub:pooled-jms dependency
#https://activemq.apache.org/spring-support
spring.artemis.pool.enabled=true
spring.artemis.pool.max-connections=5
212. Summary
In this module we:
-
Identified dependency definition and declaration changes between Spring Boot 2.x and 3.x
-
Identified code changes required to migrate from Spring Boot 2.x to 3.x
With a Spring Boot 3/Spring 6 baseline, we can now move forward with some of the latest changes in the Spring Boot ecosystem.
213. Porting to Spring Boot 3.3.2
213.1. JarLauncher
Spring Boot changed the Java package name for the JarLancher.
-
from:
org.springframework.boot.loader.JarLauncher
-
to:
org.springframework.boot.loader.launch.JarLauncher
This is the class that invokes our main(). This primarily has an impact to Dockerfiles
#ENTRYPOINT ["./run_env.sh", "java","org.springframework.boot.loader.JarLauncher"]
#https://github.com/spring-projects/spring-boot/issues/37667
ENTRYPOINT ["./run_env.sh", "java","org.springframework.boot.loader.launch.JarLauncher"]
It is also visible in the MANIFEST.MF
$ unzip -p target/springboot-app-example-*-SNAPSHOT-bootexec.jar META-INF/MANIFEST.MF
Manifest-Version: 1.0
Created-By: Maven JAR Plugin 3.3.0
Build-Jdk-Spec: 17
Main-Class: org.springframework.boot.loader.launch.JarLauncher
Start-Class: info.ejava.examples.app.build.springboot.SpringBootApp
Spring-Boot-Version: 3.3.2
Spring-Boot-Classes: BOOT-INF/classes/
Spring-Boot-Lib: BOOT-INF/lib/
Spring-Boot-Classpath-Index: BOOT-INF/classpath.idx
Spring-Boot-Layers-Index: BOOT-INF/layers.idx
213.2. Role Inheritance
@Secured and Jsr250 (@RolesAllowed) now again support Role inheritance. Role Inheritance has also gained a first class builder versus the legacy XML-ish approach.
The following shows the basic syntax of how to declare each role restriction.
@PreAuthorize("hasRole('CUSTOMER')")
@GetMapping(path = "customer", produces = {MediaType.TEXT_PLAIN_VALUE})
public ResponseEntity<String> doCustomer( ...
//@Secured-based
@Secured("ROLE_CUSTOMER")
@GetMapping(path = "customer", produces = {MediaType.TEXT_PLAIN_VALUE})
public ResponseEntity<String> doCustomer( ...
//Jsr250-based
@RolesAllowed("CUSTOMER")
@GetMapping(path = "customer", produces = {MediaType.TEXT_PLAIN_VALUE})
public ResponseEntity<String> doCustomer( ...
//path-based
@GetMapping(path = "customer", produces = {MediaType.TEXT_PLAIN_VALUE})
public ResponseEntity<String> doCustomer( ...
@Bean
public SecurityFilterChain authzSecurityFilters(HttpSecurity http,
MvcRequestMatcher.Builder mvc) throws Exception {
http.authorizeHttpRequests(cfg->cfg.requestMatchers(
mvc.pattern("/api/authorities/paths/customer/**"))
.hasAnyRole("CUSTOMER"));
...
The following is how we defined the role inheritance — which is now honored by @Secured and Jsr250.
@Bean
@Profile("roleInheritance")
static RoleHierarchy roleHierarchy() {
RoleHierarchyImpl roleHierarchy = new RoleHierarchyImpl();
roleHierarchy.setHierarchy(StringUtils.join(List.of(
"ROLE_ADMIN > ROLE_CLERK",
"ROLE_CLERK > ROLE_CUSTOMER"
),System.lineSeparator()));
return roleHierarchy;
}
The new upgrades supply a new builder for the RoleHierarchy
versus the klunky XML-ish legacy approach.
@Bean
@Profile("roleInheritance")
static RoleHierarchy roleHierarchy() {
return RoleHierarchyImpl.withDefaultRolePrefix()
.role("ADMIN").implies("CLERK")
.role("CLERK").implies("CUSTOMER")
.build();
}
213.3. Flyway 10: Unsupported Database: PostgreSQL
Flyway 10 has refactored their JARs such that individual database support, with the exception of H2, no longer comes from the flyway-core dependency. The following snippet shows the error when running against PostgresSQL (any version).
21:07:06.127 main WARN o.s.w.c.s.GenericWebApplicationContext#refresh:633 Exception encountered during context initialization - cancelling refresh attempt: org.springframework.beans.factory.BeanCreationException: Error creating bean with name 'entityManagerFactory' defined in class path resource [org/springframework/boot/autoconfigure/orm/jpa/HibernateJpaConfiguration.class]: Failed to initialize dependency 'flywayInitializer' of LoadTimeWeaverAware bean 'entityManagerFactory': Error creating bean with name 'flywayInitializer' defined in class path resource [org/springframework/boot/autoconfigure/flyway/FlywayAutoConfiguration$FlywayConfiguration.class]: Unsupported Database: PostgreSQL 12.3
To correct the issue, add an extra dependency on org.flywaydb:flyway-database-postgresql
or whatever your specific database requires.
<dependency>
<groupId>org.flywaydb</groupId>
<artifactId>flyway-core</artifactId>
<scope>runtime</scope>
</dependency>
<dependency>
<groupId>org.flywaydb</groupId>
<artifactId>flyway-database-postgresql</artifactId>
<scope>runtime</scope>
</dependency>
H2 support is still bundled within flyway-core
, so there is no flyway-database-h2
dependency to add.
213.4. MongoHealthIndicator
Spring Boot added actuator UP/DOWN health support for MongoDB.
However, the command it issues to determine if the server is UP is not supported by all versions and not supported by the 4.4.0-bionic
typically used for class.
This results in the /actuator/health
endpoint to report the overall application as DOWN.
Several of the pre-integration-test phases rely on the /actuator/health
endpoint as a generic test for the application to have started and finished initialization.
There are two or more solutions
-
turn off the MongoHealthIndicator
#MongoHealthIndicator is not compatible with 4.4.0. #https://github.com/spring-projects/spring-boot/issues/41101 #https://stackoverflow.com/questions/41803253/application-status-down-when-mongo-is-down-with-spring-boot-actuator management.health.mongo.enabled=false
-
upgrade the MongoDB to a supported version
# or use more modern version of mongodb to support MongoHealthIndicator #https://github.com/spring-projects/spring-boot/issues/41101 #docker-compose services: mongodb: # image: mongo:4.4.0-bionic image: mongo:4.4.28
-
override the MongoHealthIndicator bean with your own definition
I have successfully tested with a later version of MongoDB but chose to turn off the feature until I have time to address a MongoDB and PostgresSQL upgrade together across all projects.
213.5. Spring MVC @Validated
The Spring @Validated annotation is no longer required to trigger Jakarta validation.
The way I found it was a little esoteric — driven by a class example looking to demonstrate validation in the controller versus service, using the same implementation classes, and configure them using inheritance overrides during profile-based @Bean
construction.
Legacy Spring MVC would not trigger Jakarta validation without a Spring @Validated annotation at the class level.
Now, without the presence of Spring’s @Validated, Spring MVC will automatically activate Jakarta validation in the controller and throw MethodArgumentNotValidException
exception when violated.
@RestController
//no @Validated annotation here
public class ContactsController extends ContactsController {
@RequestMapping(path= CONTACT_PATH,
method=RequestMethod.GET,
produces={MediaType.APPLICATION_JSON_VALUE, MediaType.APPLICATION_XML_VALUE})
public ResponseEntity<PersonPocDTO> createPOC(
@Validated(PocValidationGroups.CreatePlusDefault.class)
@RequestBody PersonPocDTO personDTO) {
return super.createPOC(personDTO);
}
With legacy Spring MVC, the above controller would not trigger validation unless annotated with @Validated
using a derived class.
@RestController
@Validated
public class ValidatingContactsController extends ContactsController {
The way I was able to restore the override (i.e., turn off Jakarta validation in the base controller class) was to set the validated profile to something that did not exist.
static interface NoValidation {}
@Validated(NoValidation.class) //turning off default activation
public class NonValidatingContactsController extends ContactsController {
public ResponseEntity<PersonPocDTO> createPOC(
@Validated(NoValidation.class) //overriding parent with non-existant group
PersonPocDTO personDTO) {
return super.createPOC(personDTO);
}
This was class example-driven, but it does mean that the need for @Validated to trigger Jakarta validation no longer exists in Spring MVC.
Unresolved directive in jhu784-notes.adoc - include::/builds/ejava-javaee/ejava-springboot-docs/courses/jhu784-notes/target/resources/docs/asciidoc/jwt-{authz_notes}.adoc[leveloffset=0]
Unresolved directive in jhu784-notes.adoc - include::/builds/ejava-javaee/ejava-springboot-docs/courses/jhu784-notes/target/resources/docs/asciidoc/integration-unittest-{it_notes}.adoc[leveloffset=0]
Unresolved directive in jhu784-notes.adoc - include::/builds/ejava-javaee/ejava-springboot-docs/courses/jhu784-notes/target/resources/docs/asciidoc/testcontainers-votes{it_notes}.adoc[leveloffset=0]
Unresolved directive in jhu784-notes.adoc - include::/builds/ejava-javaee/ejava-springboot-docs/courses/jhu784-notes/target/resources/docs/asciidoc/testcontainers-spock-votes{it_notes}.adoc[leveloffset=0]