1. Introduction
We have seen where we already have many of the tools we need to be able to develop, test, and deploy a functional application. However, there will become a point where things will get complicated.
-
What if everything is not a Spring Boot application and requires a unique environment?
-
What if you end up with dozens of applications and many versions?
-
Will everyone on your team be able to understand how to instantiate them?
-
Let’s take a user-level peek at the Docker container to create a more standardized look to all our applications.
1.1. Goals
You will learn:
-
the purpose of an application container
-
to identify some open standards in the Docker ecosystem
-
to build a Docker images using different techniques
-
to build a layered Docker image
1.2. Objectives
At the conclusion of this lecture and related exercises, you will be able to:
-
build a basic Docker image with an executable JAR using a Dockerfile and docker commands
-
build a basic Docker image with the Spring Boot Maven Plugin and buildpack
-
build a layered Docker image with the Spring Boot Maven Plugin and buildpack
-
build a layered Docker image using a Dockerfile and docker commands
-
run a docker image hosting a Spring Boot application
2. Containers
A container is a standard unit of software that packages up code and all its dependencies, so the application runs quickly and reliably from one computing environment to another. A Docker container image is a lightweight, standalone, executable package of software that includes everything needed to run an application: code, runtime, system tools, system libraries and settings.
"What is a Container" A standardized unit of software
2.1. Container Deployments
The following diagrams represent three common application deployment strategies: native, virtual machine, and container.
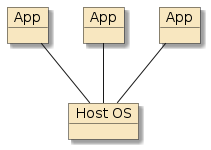
Figure 1. Native Deployment
|
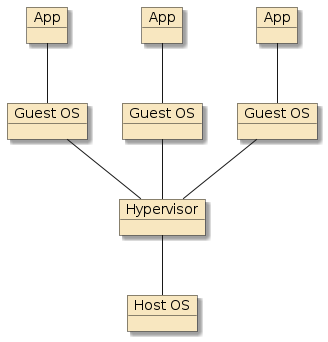
Figure 2. VM Deployment
|
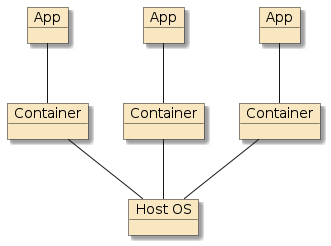
Figure 3. Container Deployment
|
-
native - has the performance advantage of running on bare metal but the disadvantage of having full deployment details exposed and the vulnerability of directly sharing the same host operating system with other processes.
-
virtual machine - (e.g., VMWare, VirtualBox) has the advantage of isolation from other processes and potential encapsulation of installation details but the disadvantage of a separate and distinct guest operating systems running on the same host with limited sharing of resources.
-
container - has the advantage of isolation from other processes, encapsulation of installation details, and runs in a lightweight container runtime that efficiently shares the resources of the host OS with each container.
3. Docker Ecosystem
Docker is an ecosystem of tooling that covers a lot of topics. Two of which are the image and runtime container. The specifications of these have been initiated by Docker — the company — and transitioned to the Open Container Initiative (OCI) — a standards body — that maintains the definition of the image and runtime specs and certifications.
This has allowed independent toolsets (for building Docker images) and runtimes (for running Docker images under different runtime and security conditions). For example, the following is a sample of the alternative builders and runtimes available.
3.1. Container Builders
Docker — the company — offers a Docker image builder. However, the builder requires a daemon with a root-level installation. Some of the following simply implement a builder tool:
I use kaniko daily to build images within a CI/CD build pipeline. Since the jobs within the pipeline all run within Docker images, it helps avoid having to set up Docker within Docker and running the images in privileged mode.
3.2. Container Runtimes
Docker — the company — offers a container runtime. However, this container runtime has a complex lifecycle that includes daemons and extra processes. Some of the following simply run an image.
4. Docker Images
A Docker image is a tar file of layered, intermediate levels of the application. A layer within a Docker image contains a tar file of the assigned artifacts for that layer. If two or more Docker files share the same base layer — there is no need to repeat the base layer in that repository. If we change the upper levels of a Docker file, there is no need to rebuild the lower levels. These aspects will be demonstrated within this lecture and optimized in the tooling available to use within Spring Boot.
5. Basic Docker Image
We can build a basic Docker image from a normal executable JAR created from the Spring Boot Maven Plugin.
To prove that — we will use the hello-docker-example — which issues a simple hello.
|
Example Requires Docker Installed
Implementing the first example as written, will require docker — the product — to be installed.
Please see the development environment Docker setup for references.
Alternate solutions can be used with product-specific options.
|
|
Enable Docker Examples from Parents
Docker Desktop changed recently and impacted the class automated build design.
Docker Desktop used to create a This defeats the Maven auto-activation for the Docker-based examples in the source tree. Parent pom.xml
For environments lacking a $HOME/.m2/settings.xml
The alternative is to manually link the local file to the root area. This will require root access to perform and will likely be reported to you by Docker as a security risk. Alternative: Re-enable legacy link
|
The following shows us starting with a typical example web application that listens to port 8080 when built and launched.
The build happens to automatically invoke the spring-boot:repackage goal.
However, if that is not the case, just run mvn spring-boot:repackage to build the Spring Boot executable JAR.
$ mvn clean package (1)
...
target/
|-- [ 31M]  docker-hello-example-6.1.1-SNAPSHOT-SNAPSHOT-bootexec.jar
|-- [9.7K]  docker-hello-example-6.1.1-SNAPSHOT.jar

$ java -jar target/docker-hello-example-6.1.1-SNAPSHOT-bootexec.jar (2)
...
Tomcat started on port(s): 8080 (http) with context path ''
Started DockerHelloExampleApp in 3.058 seconds (JVM running for 3.691)| 1 | building the executable Spring Boot JAR |
| 2 | running the application |
5.1. Basic Dockerfile
We can build a basic Docker image manually by adding a Dockerfile and issuing a Docker command to build it.
The basic Dockerfile below extends a base JDK image from the global Docker repository, adds the executable JAR, and registers the default commands to use when running the image.
It happens to have the custom name Dockerfile.execjar, which will be referenced by a later command.
FROM eclipse-temurin:21-jre (1)
COPY target/*-bootexec.jar application.jar (2)
ENTRYPOINT ["java", "-jar", "application.jar"] (3)| 1 | building off a base eclipse-temurin Java 21 image |
| 2 | copying executable JAR into the image |
| 3 | establishing default command to run the executable JAR |
5.2. Basic Docker Image Build Output
The Docker build command processes the Dockerfile
and produces an image. We supply the Dockerfile,
the directory (.) of the source files referenced by the Dockerfile,
and an image name and tag.
$ docker build . -f Dockerfile.execjar -t docker-hello-example:execjar (1) (2) (3) (4)
...
=> [1/2] FROM docker.io/library/eclipse-temurin:21-jre@sha256:af68bcb9474937... 6.8s
...
=> [2/2] COPY target/*-bootexec.jar application.jar                                1.0s
...
=> => naming to docker.io/library/docker-hello-example:execjar 0.0s| 1 | build - command to build Docker image |
| 2 | . - current directory is default source |
| 3 | -f - path to Dockerfile, if not Dockerfile in current directory |
| 4 | name:tag - name and tag of image to create |
|
Dockerfile is default name for Dockerfile
Default Docker file name is Dockerfile.
This example will use multiple Dockerfiles, so the explicit -f naming has been used.
|
5.3. Local Docker Registry
Once the build is complete, the image is available in our local repository with the name and tag we assigned.
$ docker images | egrep 'docker-hello-example|REPO'
REPOSITORY             TAG     IMAGE ID       CREATED            SIZE
docker-hello-example execjar 5e34415518fc About a minute ago 356MB-
REPOSITORY - names the primary name of the Docker image
-
TAG - primarily used to identify versions and variants of repository name.
latestis the default tag -
IMAGE ID - is a hex string value that identifies the image. The repository:tag label just happens to point to that version right now, but will advance in a future change/build.
-
SIZE - is total size if exported. Since Docker images are layered, multiple images sharing the same base image will supply much less overhead than reported here while staged in a repository
5.4. Running Docker Image
We can run the image with the docker run command.
The following example shows
running the docker-hello-image with tag execjar,
exposing port 8080 within the image as port 9090 on localhost (-p 9090:8080),
running in interactive mode (-it; optional here, but important when using as interactive shell), and
removing the runtime image when complete (--rm).
$ docker run --rm -it -p 9090:8080 docker-hello-example:execjar (1) (2) (3) (4)
  .   ____          _            __ _ _ (5)
 /\\ / ___'_ __ _ _(_)_ __  __ _ \ \ \ \
( ( )\___ | '_ | '_| | '_ \/ _` | \ \ \ \
 \\/  ___)| |_)| | | | | || (_| |  ) ) ) )
  '  |____| .__|_| |_|_| |_\__, | / / / /
 =========|_|==============|___/=/_/_/_/
 :: Spring Boot ::                (3.5.5)
...
Tomcat started on port(s): 8080 (http) with context path ''
Started DockerHelloExampleApp in 4.049 seconds (JVM running for 4.784)| 1 | run - run a command in a new Docker image |
| 2 | --rm - remove the image instance when complete |
| 3 | -it allocate a pseudo-TTY (-t) for an interactive (-i) shell |
| 4 | -p - map external port 9090 to 8080 of the internal process |
| 5 | Spring Boot App launched with no arguments |
5.5. Docker Run Command with Arguments
Arguments can also be passed into the image. The example below passes in a standard Spring Boot property to turn off printing of the startup banner.
$ docker run --rm -it -p 9090:8080 docker-hello-example:execjar --spring.main.banner-mode=off
... (1)
Tomcat started on port(s): 8080 (http) with context path ''
Started DockerHelloExampleApp in 4.049 seconds (JVM running for 4.784)| 1 | spring.main.banner-mode property passed to Spring Boot App and disabled banner printing |
5.6. Running Docker Image
We can verify the process is running using the Docker ps command.
docker ps Command$ docker ps
CONTAINER ID IMAGE STATUS PORTS NAMES
8078f6369a59 docker-hello-example:execjar Up 4 min 0.0.0.0:9090->8080/tcp practical_agnesi-
CONTAINER ID - hex string we can use to refer to this running (or later terminated) instance
-
IMAGE - REPO:TAG executed
-
COMMAND - command executed upon entry (not shown)
-
CREATED - when image created (not shown)
-
STATUS - run status. Use
docker ps -ato locate all images and not just running images -
PORTS - lists ports exposed within image and what they are mapped to externally on the host
-
NAMES - textual name alias for instance. It can be used interchangeably with containerId. Can be explicitly set with
--name foooption prior to the image parameter, but must be unique
5.7. Using the Docker Image
We can call our Spring Boot process within the image using the mapped 9090 port.
$ curl http://localhost:9090/api/hello?name=jim
hello, jim
5.8. Docker Image is Layered
The Docker image is a TAR file made up of layers. The layers will be shown in 2 formats:
-
legacy Docker format and
-
modern OCI format
The legacy Docker format is from a version of the notes written and accurate just a few years ago. The OCI format is what Docker Desktop is building today.
5.8.1. Legacy Docker Image Format
The following shows the legacy Docker format. The image is saved to a single TAR file for examination. Within the outer TAR file are layers of TAR files.
$ docker save docker-hello-example:execjar > target/image.tar
$ tar tf image.tar
27dcc15ccaaac941791ba5826356a254e70c85d4c9c8954e9c4eb2873506a4c8/
27dcc15ccaaac941791ba5826356a254e70c85d4c9c8954e9c4eb2873506a4c8/VERSION
27dcc15ccaaac941791ba5826356a254e70c85d4c9c8954e9c4eb2873506a4c8/json
27dcc15ccaaac941791ba5826356a254e70c85d4c9c8954e9c4eb2873506a4c8/layer.tar
304740117a5a0c15c8ea43b7291479207b357b9fc08cc47a5e4a357f5e9a1768/
304740117a5a0c15c8ea43b7291479207b357b9fc08cc47a5e4a357f5e9a1768/VERSION
304740117a5a0c15c8ea43b7291479207b357b9fc08cc47a5e4a357f5e9a1768/json
304740117a5a0c15c8ea43b7291479207b357b9fc08cc47a5e4a357f5e9a1768/layer.tar
...
a3651512f2a9241ae11ad8498df67b4f943ea4943f4fae8f88bcb0b81168803d/
a3651512f2a9241ae11ad8498df67b4f943ea4943f4fae8f88bcb0b81168803d/VERSION
a3651512f2a9241ae11ad8498df67b4f943ea4943f4fae8f88bcb0b81168803d/json
a3651512f2a9241ae11ad8498df67b4f943ea4943f4fae8f88bcb0b81168803d/layer.tar
...
manifest.json
repositories
This specific example has seven (7) layers.
$ tar tf image.tar | grep layer.tar | wc -l
       7
5.8.2. Modern OCI Docker Image Format
The following shows a modern OCI format. It uses the TAR file of TAR files layer format as well. However, the naming is different. Each layer TAR file is named after what I believe to be the sha256 of its contents. None have the .tar suffix.
$ shasum -a 256 blobs/sha256/12d0df09273a5e80a371c5cb5c7554acf503bb15c1d7f22f6e76bdf6e3067f6d

12d0df09273a5e80a371c5cb5c7554acf503bb15c1d7f22f6e76bdf6e3067f6d blobs/sha256/12d0df09273a5e80a371c5cb5c7554acf503bb15c1d7f22f6e76bdf6e3067f6d$ tar tf target/image.tar
blobs/
blobs/sha256/
blobs/sha256/12d0df09273a5e80a371c5cb5c7554acf503bb15c1d7f22f6e76bdf6e3067f6d
blobs/sha256/25cc22fd22a019dcdee69f20150d0e05bf3d8c4553047f664df0f39c215504cd
blobs/sha256/2790d664d2d8fc3ffe1cc14e541ba7d735d9e65d70d43476c5b390f6af12bc66
blobs/sha256/466012871ba9565f06c94f0e7df6195849a49218583b3535caaacf8135586510
blobs/sha256/4c93dd7e7d7b120fb4164fcbd5b980d3f490741a77815b54e761b731c363481a
blobs/sha256/5c45d3fb405340b0ac947aeeafc1385f38756af67ca88ecc495dd989c118c4a8
blobs/sha256/5e34415518fcc0085fc799909c4af0b0c00409c9e05cd1b2e78694db437f4525
blobs/sha256/63ca1fbb43ae5034640e5e6cb3e083e05c290072c5366fcaa9d62435a4cced85
blobs/sha256/97af61b0757492b6bc75b40d8fb24a32db7de93c994b511997121990bb10b786
blobs/sha256/a8a5d72c52b062beb9bad9ed4e0c87d77482fd8b6d2652c79185ce187e1c6f9c
blobs/sha256/ae3acc363225955fa75fd8c64a7d995ea34091794b4bdd11c9496feb1363a705
blobs/sha256/b480ad7bdbcc0e0ca8e17fe87bb30928a89ed7c4c77655e5db5daa61f6f7842f
blobs/sha256/c8ccdf366af2a48db344a17493335c5e2903ea449f37bad995b335b7391b3e46
blobs/sha256/e29c7d3c65688e41696de408b3739f9815ddb7c4330339829fd0aec85f538d31
index.json
manifest.json
oci-layout
repositoriesThis image has 16 layers. The exact number is not important, but the contents and order are. We will get into the details of that shortly.
$ tar tf target/image.tar | grep blobs | wc -l
16 (1)
| 1 | 16 layers |
5.9. Application Layer
If we untar the Docker image and poke around, we can locate the layer that contains our executable JAR file. It was all placed in one layer.
5.9.1. Legacy Docker Image Format
The following shows a 25M Spring Boot executable JAR in a single layer within the legacy Docker format.
ls -lh ./a3651512f2a9241ae11ad8498df67b4f943ea4943f4fae8f88bcb0b81168803d/layer.tar
25M ./a3651512f2a9241ae11ad8498df67b4f943ea4943f4fae8f88bcb0b81168803d/layer.tar

$ tar tf ./a3651512f2a9241ae11ad8498df67b4f943ea4943f4fae8f88bcb0b81168803d/layer.tar
application.jar (1)| 1 | one of the layers contains our application layer and is made up of a single Spring Boot executable JAR |
5.9.2. OCI Docker Image Format
The following shows a 37M Spring Boot executable JAR in a single layer.
| These are separate examples generated years apart. The size of the application is impacted by changes in the example and the version of Spring Boot used — not the image format used. The legacy format was kept here just to highlight the transition from Docker to OCI. |
$ ls -lh target/docker-hello-example-*-bootexec.jar | awk '{printf "%s\t%s\n",$5,$9}'

37M        target/docker-hello-example-6.1.1-SNAPSHOT-SNAPSHOT-bootexec.jar
$ ls -lh blobs/sha256/ | awk '{printf "%s\t%s\n",$5,$9}'
1.0K 12d0df09273a5e80a371c5cb5c7554acf503bb15c1d7f22f6e76bdf6e3067f6d
266M 25cc22fd22a019dcdee69f20150d0e05bf3d8c4553047f664df0f39c215504cd
477B 2790d664d2d8fc3ffe1cc14e541ba7d735d9e65d70d43476c5b390f6af12bc66
1.1K 466012871ba9565f06c94f0e7df6195849a49218583b3535caaacf8135586510
477B 4c93dd7e7d7b120fb4164fcbd5b980d3f490741a77815b54e761b731c363481a
477B 5c45d3fb405340b0ac947aeeafc1385f38756af67ca88ecc495dd989c118c4a8
4.4K 5e34415518fcc0085fc799909c4af0b0c00409c9e05cd1b2e78694db437f4525
7.7M 63ca1fbb43ae5034640e5e6cb3e083e05c290072c5366fcaa9d62435a4cced85
401B 97af61b0757492b6bc75b40d8fb24a32db7de93c994b511997121990bb10b786
6.5K a8a5d72c52b062beb9bad9ed4e0c87d77482fd8b6d2652c79185ce187e1c6f9c
477B ae3acc363225955fa75fd8c64a7d995ea34091794b4bdd11c9496feb1363a705
3.0K b480ad7bdbcc0e0ca8e17fe87bb30928a89ed7c4c77655e5db5daa61f6f7842f
37M c8ccdf366af2a48db344a17493335c5e2903ea449f37bad995b335b7391b3e46 <== app
31M e29c7d3c65688e41696de408b3739f9815ddb7c4330339829fd0aec85f538d31
$ tar tf blobs/sha256/c8ccdf366af2a48db344a17493335c5e2903ea449f37bad995b335b7391b3e46
application.jar (1)
| 1 | layer blob contains our Spring Boot executable JAR as we built it |
There are a few things to note about what we uncovered in this section
-
the Docker image is not a closed, binary representation. It is an openly accessible layer of files as defined by the OCI Image Format Specification.
-
our application is currently implemented as a single 37MB layer with a single Spring Boot executable JAR. Our code was likely only a few KBytes of that 37MB.
Hold onto both of those points when covering the next topic.
5.10. Spring Boot Plugin
Starting with Spring Boot 2.3 and its enhanced support for cloud technologies, the Spring Boot Maven Plugin now provides support for building a Docker image using buildpack — not Docker and no Dockerfile.
$ mvn spring-boot:help
...
spring-boot:build-image
  Package an application into a OCI image using a buildpack.
Buildpack is an approach to building Docker images based on strict layering concepts that Docker has always prescribed. The main difference with buildpack is that the layers are more autonomous — backed by a segment of industry — allowing for higher level application layers to be quickly rebased on top of patched operating system layers without fully rebuilding the image.
Joe Kutner from Heroku stated at a Spring One Platform conference that they were able to patch 10M applications overnight when a serious bug was corrected in a base layer. This was due to being able to rebase the application-specific layers with a new base image using buildpack technology and without having to rebuild the images. [1]
5.11. Building Docker Image using Buildpack
If we look at the portions of the generated output, we will see
-
candidate buildpacks being downloaded
-
one of the buildpacks is specific to spring-boot
-
various layers are generated and reused to build the image
-
our application still ends up in a single layer
-
the image is generated by default using the Maven artifactId as the image name and version number as the tag
$ mvn clean package spring-boot:build-image -DskipTests
...
[INFO] --- spring-boot-maven-plugin:3.5.5:build-image (default-cli) @ docker-hello-example ---
[INFO] Building image 'docker.io/library/docker-hello-example:6.1.1-SNAPSHOT'
[INFO]
[INFO]  > Pulling builder image 'gcr.io/paketo-buildpacks/builder:base-platform-api-0.3' 6%
...
[INFO]  > Pulling builder image 'gcr.io/paketo-buildpacks/builder:base-platform-api-0.3' 100%
[INFO]  > Pulled builder image 'gcr.io/paketo-buildpacks/builder@sha256:6d625fe00a2b5c4841eccb6863ab3d8b6f83c3138875f48ba69502abc593a62e'
[INFO]  > Pulling run image 'gcr.io/paketo-buildpacks/run:base-cnb' 100%
[INFO]  > Pulled run image 'gcr.io/paketo-buildpacks/run@sha256:087a6a98ec8846e2b8d75ae1d563b0a2e0306dd04055c63e04dc6172f6ff6b9d'
[INFO]  > Executing lifecycle version v0.8.1
[INFO]  > Using build cache volume 'pack-cache-2432a78c0232.build'
[INFO]
[INFO]  > Running creator
[INFO]     [creator]     ===> DETECTING
[INFO]     [creator]     5 of 16 buildpacks participating
...
[INFO]     [creator]     paketo-buildpacks/spring-boot       2.4.1
...
[INFO]     [creator]     ===> EXPORTING
[INFO]     [creator]     Reusing layer 'launcher'
[INFO]     [creator]     Adding layer 'paketo-buildpacks/bellsoft-liberica:class-counter'
[INFO]     [creator]     Reusing layer 'paketo-buildpacks/bellsoft-liberica:java-security-properties'
...
[INFO]     [creator]     Adding 1/1 app layer(s)
[INFO]     [creator]     Adding layer 'config'
[INFO]     [creator]     *** Images (10a764b20812):
[INFO]     [creator]           docker.io/library/docker-hello-example:6.1.1-SNAPSHOT
[INFO]
[INFO] Successfully built image 'docker.io/library/docker-hello-example:6.1.1-SNAPSHOT'
5.12. Buildpack Image in Local Docker Repository
The newly built image is now installed into the local Docker registry. It is using the Maven GAV artifactId for the repository and version for the tag.
$ docker images | egrep 'docker-hello-example|REPO'
REPOSITORY                 TAG              IMAGE ID       CREATED             SIZE
docker-hello-example       execjar          880c9e5dd5c6   About a minute ago  356MB (1)
docker-hello-example 6.1.1-SNAPSHOT 3a3848c7fe4f 44 years ago 337MB (1)| 1 | NOTE: sizes were from a later build using newer versions of Spring Boot |
| One odd thing is the timestamp used (40+ years ago) for the created date with the build pack image. Since it is referring to the year 1970 (new java.util.Date(0) UTC), we can likely assume there was a 0 value in a timestamp field somewhere. |
5.13. Buildpack Image Execution
Notice that when we run the newly built image that was built with buildpack, we get a little different behavior at the beginning where some base level memory tuning is taking place. I will not be exploring that, but know that Spring Boot adds some custom JVM management to the default Docker images.
$ docker run --rm -it -p 9090:8080 docker-hello-example:6.1.1-SNAPSHOT

Calculating JVM memory based on 3329308K available memory
For more information on this calculation, see https://paketo.io/docs/reference/java-reference/#memory-calculator
Calculated JVM Memory Configuration: -XX:MaxDirectMemorySize=10M -Xmx2725290K -XX:MaxMetaspaceSize=92017K -XX:ReservedCodeCacheSize=240M -Xss1M (Total Memory: 3329308K, Thread Count: 250, Loaded Class Count: 13832, Headroom: 0%)
Enabling Java Native Memory Tracking
Adding 146 container CA certificates to JVM truststore
Spring Cloud Bindings Enabled
Picked up JAVA_TOOL_OPTIONS: -Djava.security.properties=/layers/paketo-buildpacks_bellsoft-liberica/java-security-properties/java-security.properties -XX:+ExitOnOutOfMemoryError -XX:MaxDirectMemorySize=10M -Xmx2725290K -XX:MaxMetaspaceSize=92017K -XX:ReservedCodeCacheSize=240M -Xss1M -XX:+UnlockDiagnosticVMOptions -XX:NativeMemoryTracking=summary -XX:+PrintNMTStatistics -Dorg.springframework.cloud.bindings.boot.enable=true
...
Tomcat started on port(s): 8080 (http) with context path ''
Started DockerHelloExampleApp in 3.589 seconds (JVM running for 4.3)
The following shows we are able to call the new running image.
$ curl http://localhost:9090/api/hello?name=jim
hello, jim
5.14. Inspecting Buildpack Image
If we save off the newly built image and briefly inspect, we will see that it contains the same TAR-based layering scheme but with 38 versus 16 layers in this specific example.
$ tar tf target/image.tar | grep blobs | wc -l
      38
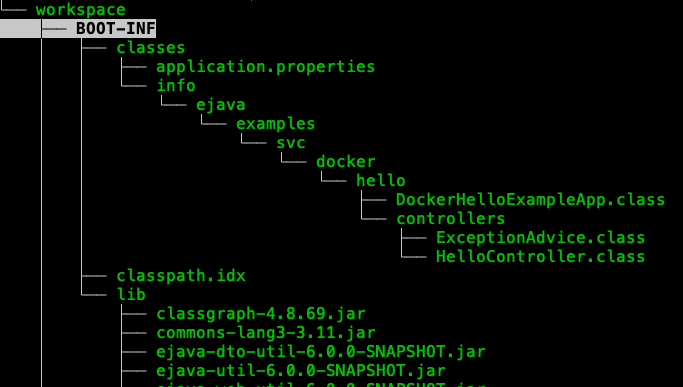
If we untar the image and poke around, we can eventually locate our application and notice that it happens to be in exploded form versus executable JAR form. We can see our code and dependency libraries separately.
$ ls -lh blobs/sha256/5e402fddb98bbc31e96655bb873919ee230a02baeab00b1f636e423ff9531cbb | awk '{printf "%s\t%s\n", $5, $9}'
37M	blobs/sha256/5e402fddb98bbc31e96655bb873919ee230a02baeab00b1f636e423ff9531cbb
$ tar tf blobs/sha256/5e402fddb98bbc31e96655bb873919ee230a02baeab00b1f636e423ff9531cbb
...
/workspace/BOOT-INF/classes/application.properties
/workspace/BOOT-INF/classes/info/ejava/examples/svc/docker/hello/DockerHelloExampleApp.class
/workspace/BOOT-INF/classes/info/ejava/examples/svc/docker/hello/controllers
/workspace/BOOT-INF/classes/info/ejava/examples/svc/docker/hello/controllers/HelloController.class
...
/workspace/BOOT-INF/lib/commons-lang3-3.14.0.jar
/workspace/BOOT-INF/lib/ejava-dto-util-6.1.1-SNAPSHOT.jar
/workspace/BOOT-INF/lib/ejava-util-6.1.0-SNAPSHOT.jar
/workspace/BOOT-INF/lib/ejava-web-util-6.1.1-SNAPSHOT.jar
...
/workspace/org/springframework/boot/loader/launch/JarLauncher.class
As a reminder, when we built the Docker image with a Docker file and vanilla docker commands — we ended up with an application layer with a single, Spring Boot executable JAR (with a few KBytes of our code and 36.9 MB of dependency artifacts).
$ tar tf blobs/sha256/c8ccdf366af2a48db344a17493335c5e2903ea449f37bad995b335b7391b3e46
application.jar

$ ls -lh blobs/sha256/ | awk '{printf "%s\t%s\n",$5,$9}'
37M            c8ccdf366af2a48db344a17493335c5e2903ea449f37bad995b335b7391b3e46 <== app
With Spring Boot Maven Plugin, we are getting a layer with an exploded form of the executable JAR. That in itself is not a big deal. The big deal is when we get to breaking up that single layer into multiple layers.
6. Layers
Dockerfile layers are an important concept when it comes to efficiency of storage and distribution. Any images built on common base images or intermediate commands that produce the same result do not have to be replicated within a repository. For example, 100 images all extending from the same JDK image do not need to have the JDK portions repeated.
To make it easier to view and analyze the layers of the Dockerfile — we can use a simple inspection tool called dive. This shows us how the image is constructed, where we may have wasted space, and potentially how to optimize. Since these images are brand new and based on production base images — we will not see much wasted space at this time. However, it will help us better understand the Docker image and how cloud features added to Spring Boot can help us.
|
Dive Not Required
There is no need to install the dive tool to learn about layers and how Spring Boot provides support for layers.
All necessary information to understand the topic is contained in this lecture.
|
$ dive [imageId or name:tag]With the image displayed, I find it helpful to:
-
hit [CNTL]+L if "Show Layer Changes is not yet selected"
-
hit [TAB] to switch to "Current Layer Contents" pane on the right
-
hit [CNTL]+U,R,M, and B to turn off all except "Added"
-
hit [TAB] to switch back to "Layers" pane on the left
In the "Layers" pane, we can scroll up and down the layers to see which files where added because of which ordered command in the Dockerfile. If all the layers look the same, make sure you are only displaying the "Added" artifacts.
|
Dive within Docker
Or — of course — you could run dive within Docker to inspect a Docker image.
This requires that you map the image’s Docker socket to the host machine’s Docker socket with the docker run --rm -it -v /var/run/docker.sock:/var/run/docker.sock wagoodman/dive [imageId or name:tag] |
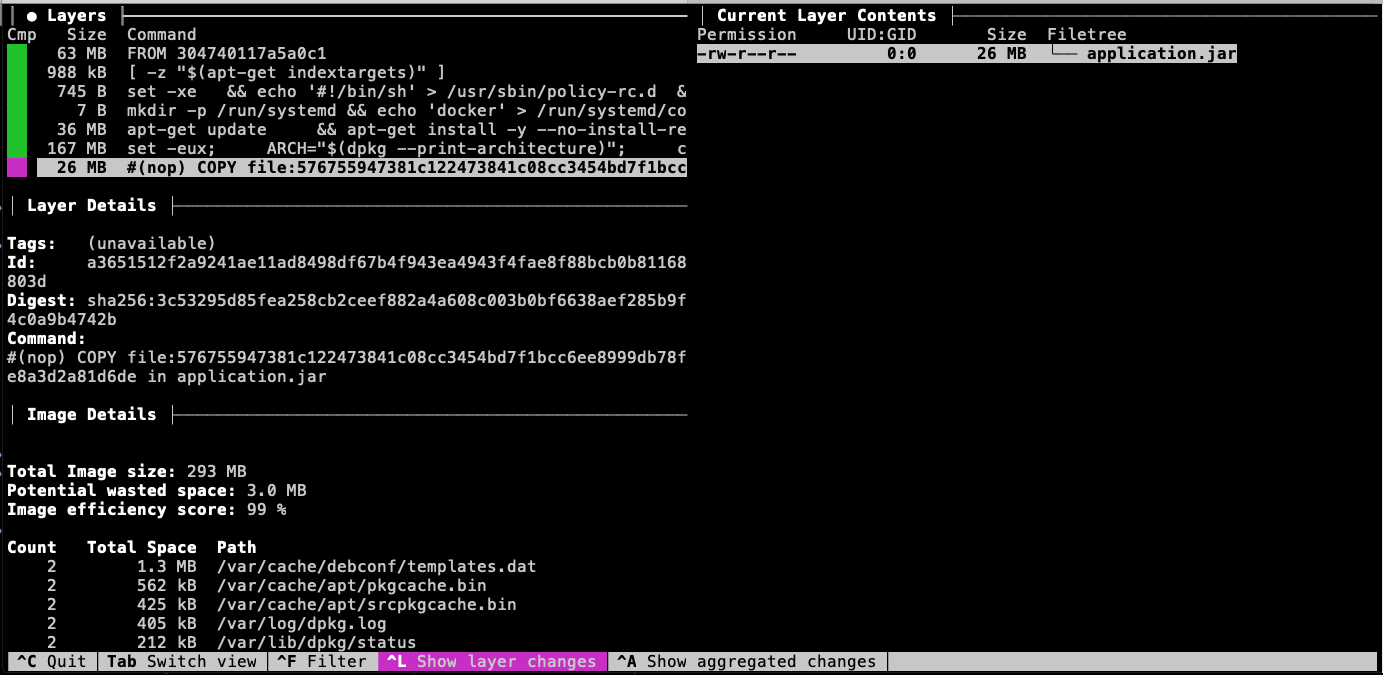
6.1. Analyzing Basic Docker Image
In this first example, we are looking at the layers of the basic Dockerfile. Notice:
-
a majority of the size was the result of extending the JDK image. That space represents content that a Dockerfile repository does not have to replicate.
-
the last layer contains the 26MB executable JAR. Because that technically contains our custom application. This is content a Dockerfile repository has to replicate.
$ dive docker-hello-example:execjar|
Use Dive Images Conceptually - Not Updated
The dive images are from older builds.
There are some physical differences (e.g., 26MB size versus 37MB), but conceptually everything of interest is the same.
|
6.2. Analyzing Basic Buildpack Image
If we look at the Docker image built with buildpack, through the Maven plugin, we will see the same 26MB exploded as separate files towards the end of the image. From a layering perspective — the exploded structure has not saved us anything.
$ dive docker-hello-example:6.1.1-SNAPSHOT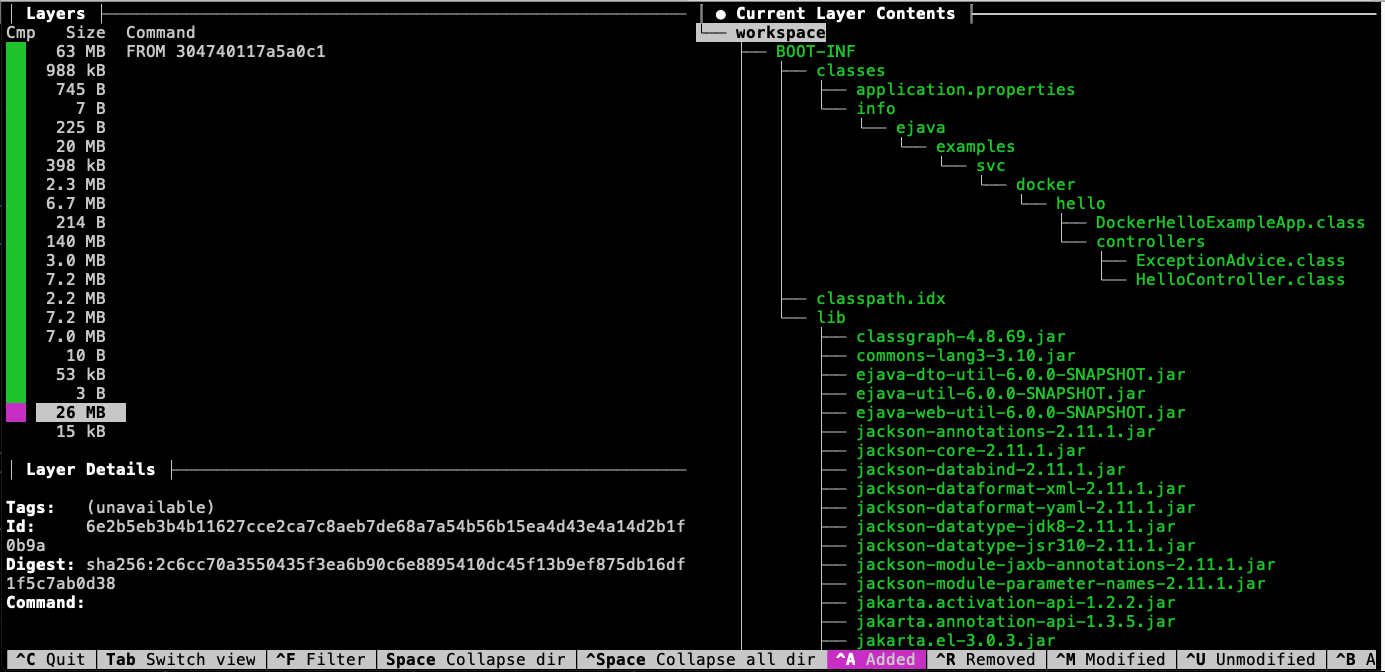
However, now that we have it exploded — we will be able to break it into further layers.
7. Adding Fine-grain Layering
Having all 26MB of our Spring Boot application in a single layer can be wasteful — especially if we push new images to a repository many times during development. We end up with 26MB.version1, 26MB.version2, etc. when each push is more than likely a few modifications of class files within the application and a complete change in library dependencies not as common.
7.1. Configure Layer-ready Executable JAR
The Spring Boot plugin and buildpack provide support for creating finer-grain layers from the executable JAR by enabling the layers plugin configuration property.
<plugin>
    <groupId>org.springframework.boot</groupId>
    <artifactId>spring-boot-maven-plugin</artifactId>
    <configuration>
        <layers>
            <enabled>true</enabled>
        </layers>
    </configuration>
</plugin>
7.2. Building and Inspecting Layer-ready Executable JAR
If we rebuild the executable JAR with the layered option, an extra wrapper is added to the executable JAR file that can be activated with the -Djarmode=tools option to the java -jar command.
This option takes one of two arguments: list or extract.
$ mvn clean package spring-boot:repackage -Dlayered=true -DskipTests (1)

$ java -Djarmode=tools -jar target/docker-hello-example-6.1.1-SNAPSHOT-bootexec.jar
Usage:
  java -Djarmode=tools -jar docker-hello-example-6.1.1-SNAPSHOT-bootexec.jar

Available commands:
  extract      Extract the contents from the jar
  list-layers  List layers from the jar that can be extracted
help Help about any command| 1 | -Dlayered=true activates layering within the Maven pom.xml |
7.3. Default Executable JAR Layers
Spring Boot automatically configures four (4) layers by default: (released) dependencies, spring-boot-loader, snapshot-dependencies, and application. These layers are ordered from the most stable (dependencies) to the least stable (application). We can change the layers — but I won’t go into that here.
$ java -Djarmode=tools -jar target/docker-hello-example-*-bootexec.jar list-layers

dependencies
spring-boot-loader
snapshot-dependencies
application
8. Layered Buildpack Image
With the layers configuration property enabled, the next build will result in a layered image posted to the local Docker repository.
$ mvn package spring-boot:build-image -Dlayered=true -DskipTests
...
Successfully built image 'docker.io/library/docker-hello-example:6.1.1-SNAPSHOT'
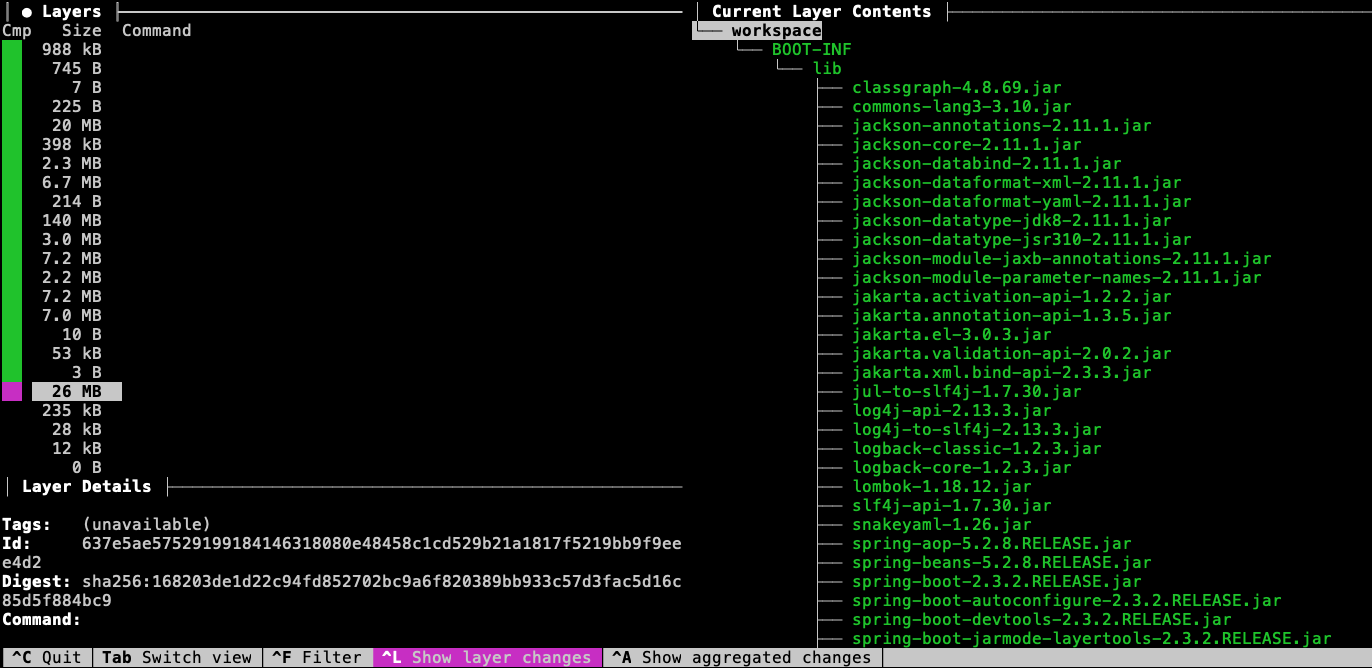
8.1. Dependency Layer
The dependency layer contains all the released dependencies. This happens to make up most of the 26MB we had for the executable JAR. This 26MB does not need to be replicated in the image repository if consistent with follow-on publications of our image.
8.2. Snapshot Layer
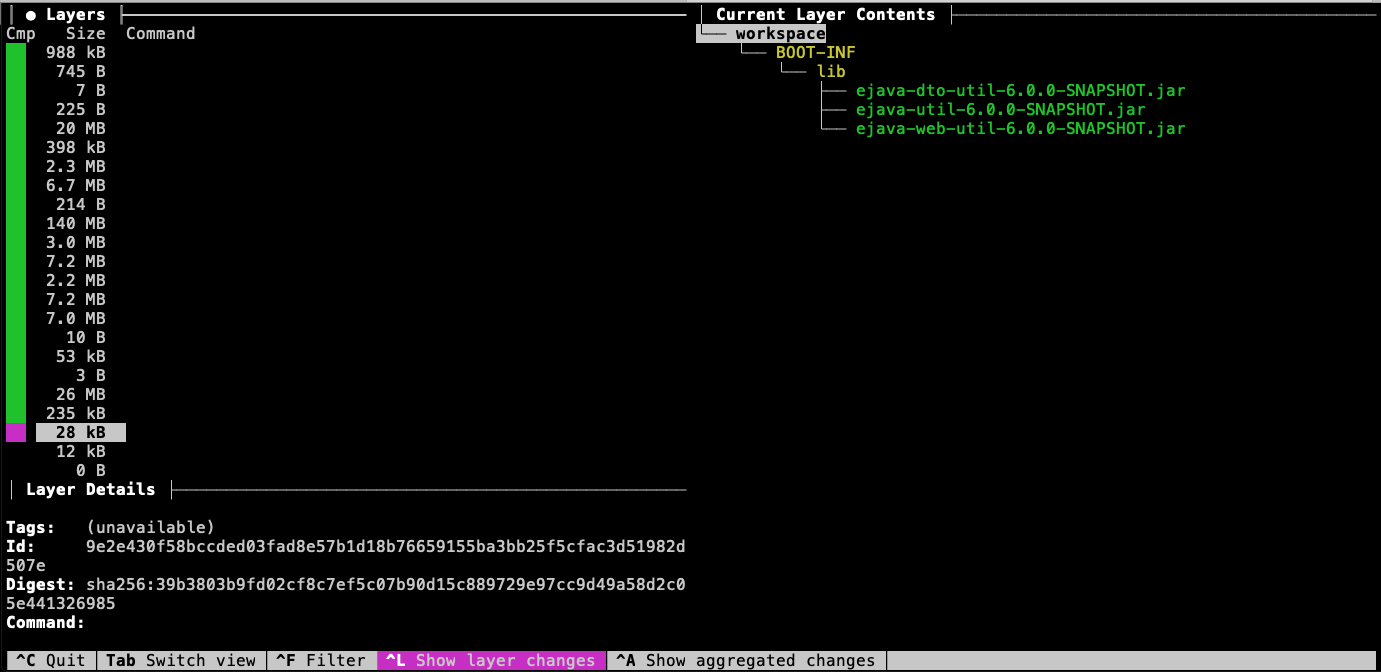
The snapshot layer contains dependency artifacts that have not been released. This is an indication that the artifact is slightly more stable than our application code but not as stable as the released dependencies.
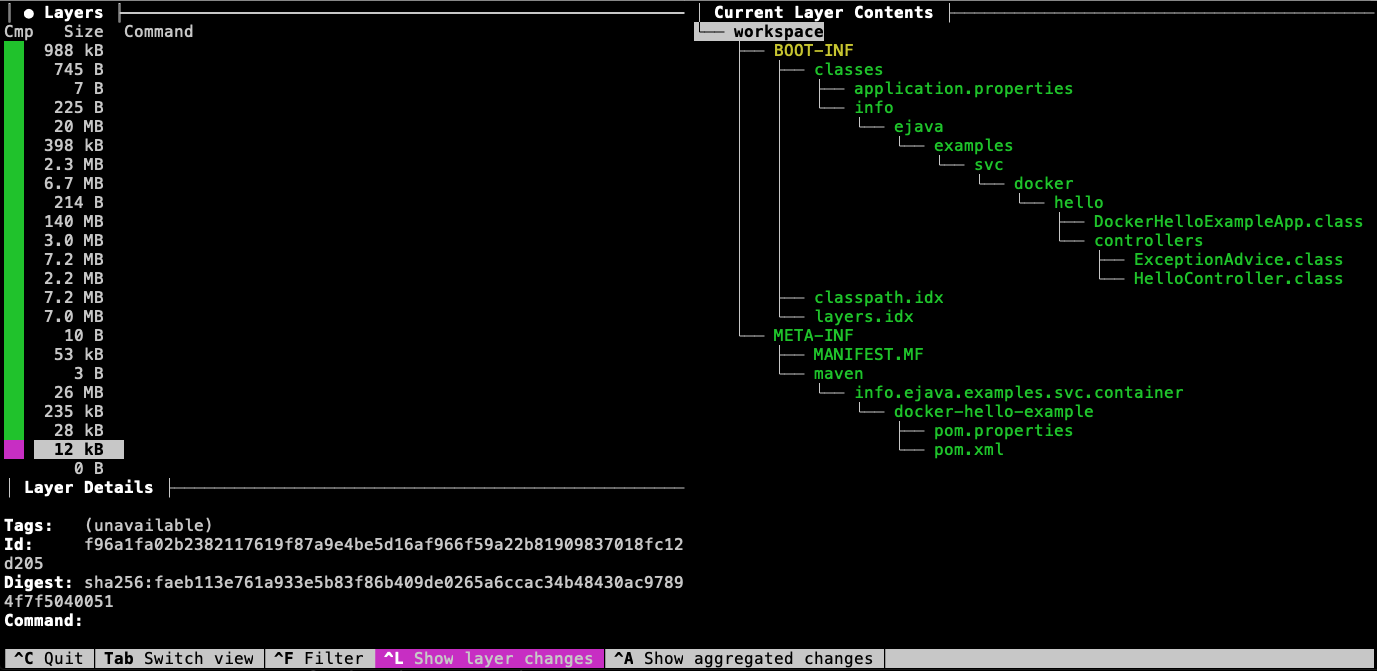
8.3. Application Layer
The application layer contains the code for the local module — which should be the most volatile. Notice that in this example, the application code is 12KB out of the total 26MB for the executable JAR. If we change our application code and redeploy the image somewhere — only this small portion of the code needs to change.
8.4. Review: Single Layer Application
If you remember … before we added multiple layers, all the library stable JARs and semi-stable SNAPSHOT dependencies were in the same layers as our potentially changing application code. We now have them in separate layers.
 ]
]
9. Layered Docker Image
Since buildpack may not be for everyone, Spring Boot provides a means for standard Docker users to create layered images with a standard Dockerfile and standard docker commands.
The following example is based on the
Example Dockerfile on the Spring Boot features page.
9.1. Example Layered Dockerfile
The Dockerfile is written in two parts: builder and image construction. The first, builder half of the file copies in the executable JAR and extracts the layer directories into a temporary portion of the image.
The second, construction half builds the final image by extending off what could be an independent parent image and the products of the builder phase. Notice how the four (4) layers are copied in separately - forming distinct boundaries.
#https://docs.spring.io/spring-boot/reference/packaging/container-images/dockerfiles.html
# Perform the extraction in a separate builder container
FROM eclipse-temurin:21-jre AS builder (1)
WORKDIR /builder
# Identify bootexec with application
ARG JAR_FILE=target/*-bootexec.jar
# Copy bootexec to working directory in builder and generalize name to application.jar
COPY ${JAR_FILE} application.jar
# Extract layers into /builder/extracted
RUN java -Djarmode=tools -jar application.jar extract --layers --launcher --destination extracted

# This is the runtime container
FROM eclipse-temurin:21-jre (2)
WORKDIR /application
# Copy layers into the runtime container - each COPY is a Docker layer
COPY --from=builder /builder/extracted/dependencies/ ./
COPY --from=builder /builder/extracted/spring-boot-loader/ ./
COPY --from=builder /builder/extracted/snapshot-dependencies/ ./
COPY --from=builder /builder/extracted/application/ ./
ENV PORT=8080
#https://github.com/spring-projects/spring-boot/issues/37667
ENTRYPOINT ["java", "org.springframework.boot.loader.launch.JarLauncher"]
CMD ["--server.port=${PORT}"]| 1 | commands used to set up building the image |
| 2 | commands used to build the image |
9.2. Example Build
The following shows the output of building our example using the docker build command and the Dockerfile above.
Notice:
-
that it copies in the executable JAR and extracts the layers into the temporary image.
-
how it is building separate, distinct layers by using separate COPY commands for each layer directory.
$ docker build . -f Dockerfile.layered -t docker-hello-example:layered
 => [builder 1/4] FROM docker.io/library/eclipse-temurin:21-jre
...
=> CACHED [builder 2/4] WORKDIR /builder
 => [builder 3/4] COPY target/*-bootexec.jar application.jar
 => [builder 4/4] RUN java -Djarmode=tools -jar application.jar extract --layers --launcher --destination extracted
 => CACHED [stage-1 2/6] WORKDIR /application
 => CACHED [stage-1 3/6] COPY --from=builder /builder/extracted/dependencies/ ./
 => CACHED [stage-1 4/6] COPY --from=builder /builder/extracted/spring-boot-loader/ ./
 => CACHED [stage-1 5/6] COPY --from=builder /builder/extracted/snapshot-dependencies/ ./
 => CACHED [stage-1 6/6] COPY --from=builder /builder/extracted/application/ ./
 ...
=> => naming to docker.io/library/docker-hello-example:layered
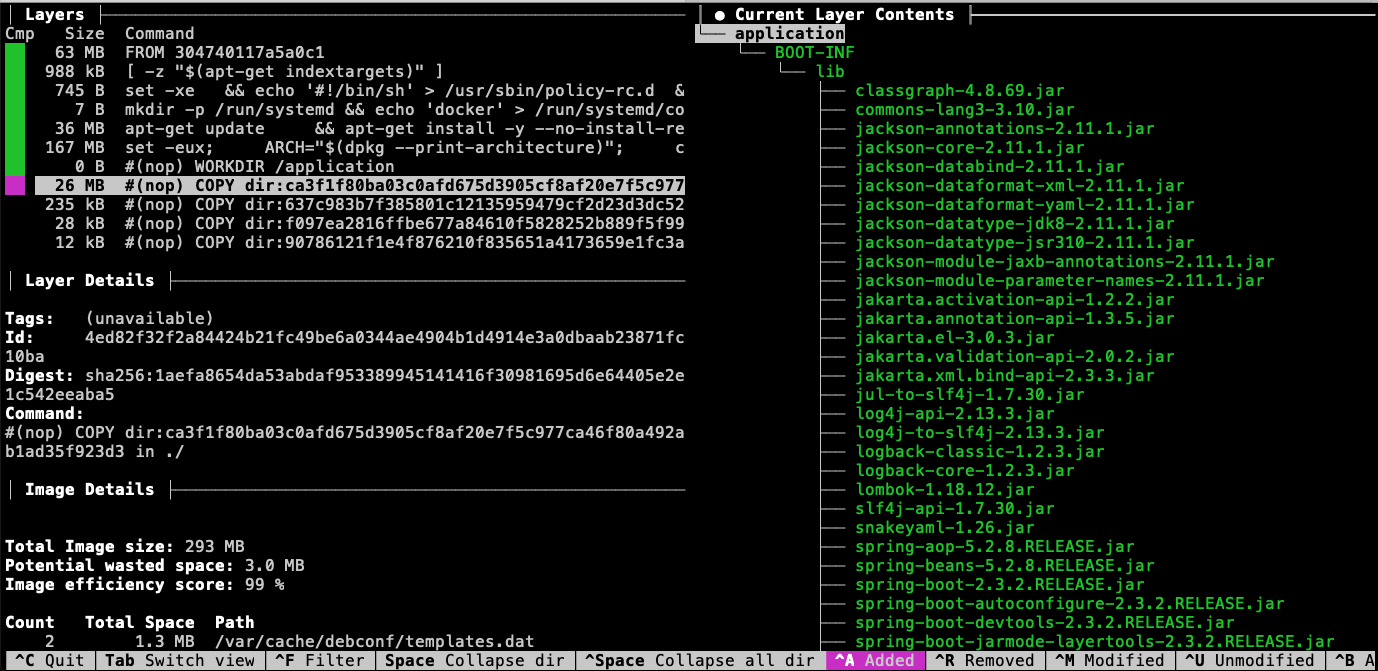
9.3. Dependency Layer
The dependency layer — like with the buildpack version — contains 26MB of the released JARs. This makes up the bulk of what was in our executable JAR.
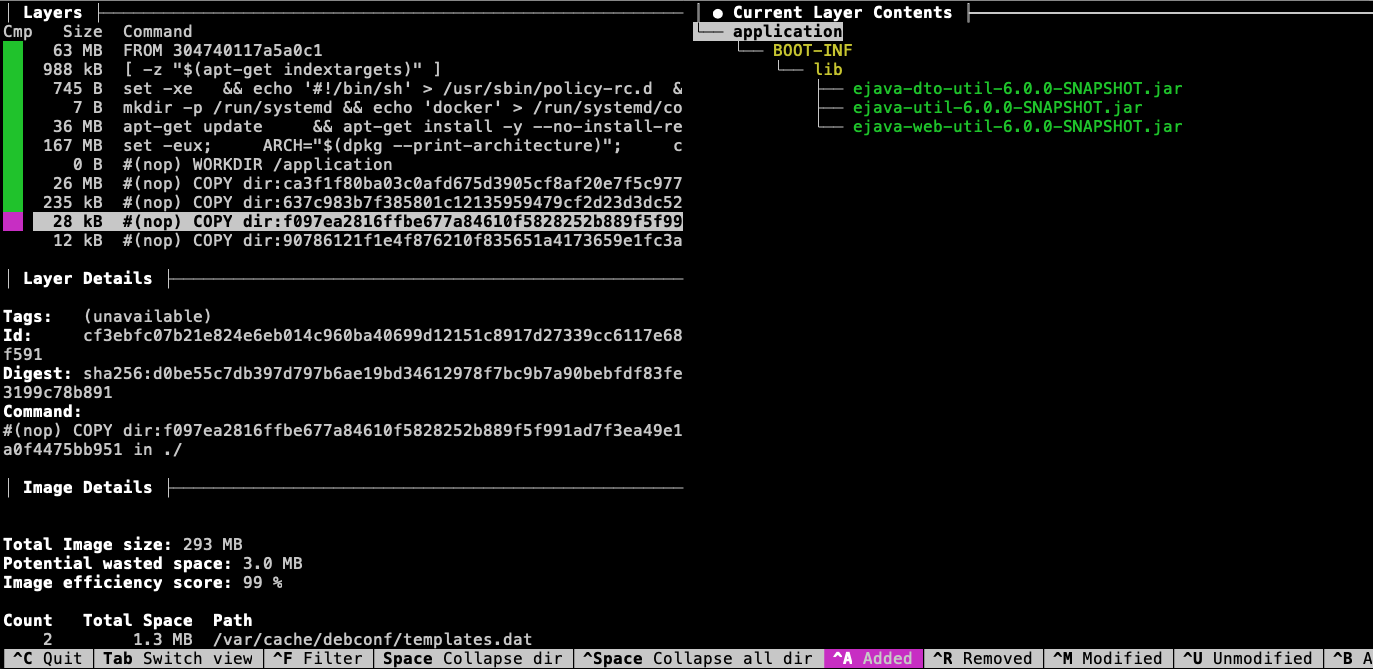
9.4. Snapshot Layer
The snapshot layer contains dependencies that have not yet been released. These are believed to be more stable than our application code but less stable than the released dependencies.
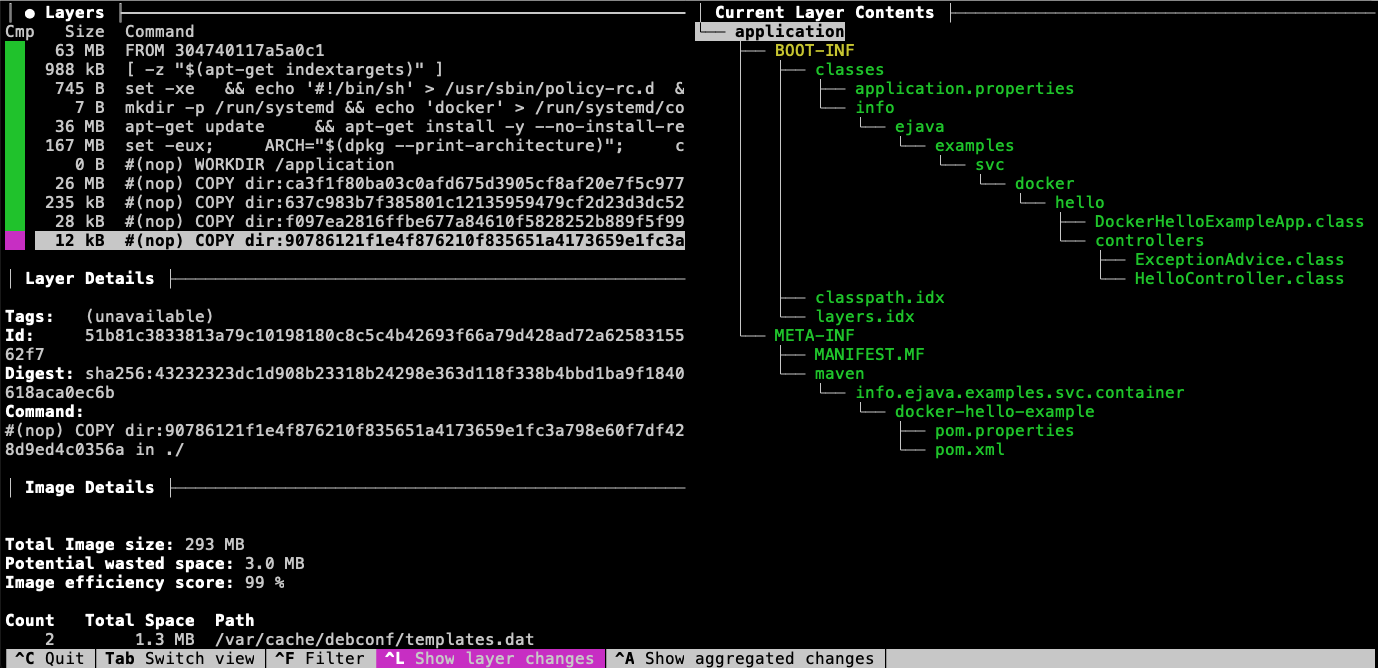
9.5. Application Layer
The application layer contains our custom application code. This layer is thought to be the most volatile and is in the top-most layer.
10. Summary
In this module, we learned:
-
Docker is an ecosystem of concepts, tools, and standards
-
Docker — the company — provides an implementation of those concepts, tools, and standards
-
Docker images can be created using different tools and technologies
-
the
docker buildcommand uses a Dockerfile -
buildpack uses knowledgeable inspection of the codebase
-
-
Docker images have ordered layers — from a common operating system to custom application
-
buildpack layers are rigorous enough that they can be rebased upon freshly patched images — making hundreds to millions of image patches possible within a short amount of time
-
intelligent separation of code into layers and proper ordering can lead to storage and complexity savings
-
Spring Boot provides a means to separate the executable JAR into layers that match certain criteria