1. Introduction
This material provides an introduction to configuring an application using a factory method. This is the most basic use of separation between the interface used by the application and the decision of what the implementation will be.
The configuration choice shown will be part of the application, but as you will see later, configurations can be deeply nested — far away from the details known to the application writer.
1.1. Goals
The student will learn:
-
to decouple an application through the separation of interface and implementation
-
to configure an application using dependency injection and factory methods of a configuration class
1.2. Objectives
At the conclusion of this lecture and related exercises, the student will be able to:
-
implement a service interface and implementation component
-
package a service within a Maven module separate from the application module
-
implement a Maven module dependency to make the component class available to the application module
-
use a
@Beanfactory method of a@Configurationclass to instantiate a Spring-managed component
2. Hello Service
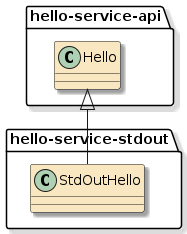
To get started, we are going to create a simple Hello service. We are going to implement an interface and a single implementation right off the bat.
They will be housed in two separate modules:
-
hello-service-api
-
hello-service-stdout

We will start out by creating two separate module directories.
2.1. Hello Service API
The Hello Service API module will contain a single interface and pom.xml.
hello-service-api/
|-- pom.xml
`-- src
    `-- main
        `-- java
            `-- info
                `-- ejava
                    `-- examples
                        `-- app
                            `-- hello
`-- Hello.java (1)| 1 | Service interface |
2.2. Hello Service StdOut
The Hello Service StdOut module will contain a single implementation class and pom.xml.
hello-service-stdout/
|-- pom.xml
`-- src
    `-- main
        `-- java
            `-- info
                `-- ejava
                    `-- examples
                        `-- app
                            `-- hello
                                `-- stdout
`-- StdOutHello.java (1)| 1 | Service implementation |
2.3. Hello Service API pom.xml
We will be building a normal Java JAR with no direct dependencies on Spring Boot or Spring.
#pom.xml
...
    <groupId>info.ejava.examples.app</groupId>
    <version>6.1.1-SNAPSHOT</version>
    <artifactId>hello-service-api</artifactId>
    <packaging>jar</packaging>
...
2.4. Hello Service StdOut pom.xml
The implementation will be similar to the interface’s pom.xml except it requires a dependency on the interface module.
#pom.xml
...
    <groupId>info.ejava.examples.app</groupId>
    <version>6.1.1-SNAPSHOT</version>
    <artifactId>hello-service-stdout</artifactId>
    <packaging>jar</packaging>

    <dependencies>
        <dependency>
            <groupId>${project.groupId}</groupId> (1)
            <artifactId>hello-service-api</artifactId>
            <version>${project.version}</version> (1)
        </dependency>
    </dependencies>
...| 1 | Dependency references leveraging ${project} variables module shares with dependency |
Since we are using the same source tree, we can leverage ${project} variables.
This will not be the case when declaring dependencies on external modules.
|
2.5. Hello Service Interface
The interface is quite simple, just pass in the String name for what you want the service to say hello to.
package info.ejava.examples.app.hello;

public interface Hello {
    void sayHello(String name);
}
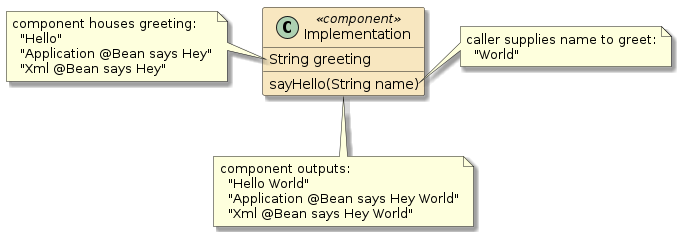
The service instance will be responsible for
-
the greeting
-
the implementation — how we say hello

2.7. Hello Service Modules Complete
We are now done implementing our sample service interface and implementation. We just need to build and install it into the repository to make available to the application.
2.8. Hello Service API Maven Build
$ mvn clean install -f hello-service-api
[INFO] Scanning for projects...
[INFO]
[INFO] -------------< info.ejava.examples.app:hello-service-api >--------------
[INFO] Building App::Config::Hello Service API 6.1.1-SNAPSHOT
[INFO] --------------------------------[ jar ]---------------------------------
[INFO]
[INFO] --- maven-clean-plugin:3.1.0:clean (default-clean) @ hello-service-api ---
[INFO]
[INFO] --- maven-resources-plugin:3.1.0:resources (default-resources) @ hello-service-api ---
[INFO] Using 'UTF-8' encoding to copy filtered resources.
[INFO] skip non existing resourceDirectory .../app-config/hello-service-api/src/main/resources
[INFO]
[INFO] --- maven-compiler-plugin:3.8.1:compile (default-compile) @ hello-service-api ---
[INFO] Changes detected - recompiling the module!
[INFO] Compiling 1 source file to .../app-config/hello-service-api/target/classes
[INFO]
[INFO] --- maven-resources-plugin:3.1.0:testResources (default-testResources) @ hello-service-api ---
[INFO] Using 'UTF-8' encoding to copy filtered resources.
[INFO] skip non existing resourceDirectory .../app-config/hello-service-api/src/test/resources
[INFO]
[INFO] --- maven-compiler-plugin:3.8.1:testCompile (default-testCompile) @ hello-service-api ---
[INFO] No sources to compile
[INFO]
[INFO] --- maven-surefire-plugin:2.12.4:test (default-test) @ hello-service-api ---
[INFO] No tests to run.
[INFO]
[INFO] --- maven-jar-plugin:3.1.2:jar (default-jar) @ hello-service-api ---
[INFO] Building jar: .../app-config/hello-service-api/target/hello-service-api-6.1.1-SNAPSHOT.jar
[INFO]
[INFO] --- maven-install-plugin:3.0.0-M1:install (default-install) @ hello-service-api ---
[INFO] Installing .../app-config/hello-service-api/target/hello-service-api-6.1.1-SNAPSHOT.jar to .../.m2/repository/info/ejava/examples/app/hello-service-api/6.1.1-SNAPSHOT/hello-service-api-6.1.1-SNAPSHOT.jar
[INFO] Installing .../app-config/hello-service-api/pom.xml to .../.m2/repository/info/ejava/examples/app/hello-service-api/6.1.1-SNAPSHOT/hello-service-api-6.1.1-SNAPSHOT.pom
[INFO] ------------------------------------------------------------------------
[INFO] BUILD SUCCESS
[INFO] ------------------------------------------------------------------------
[INFO] Total time:  2.070 s
2.9. Hello Service StdOut Maven Build
$ mvn clean install -f hello-service-stdout
[INFO] Scanning for projects...
[INFO]
[INFO] ------------< info.ejava.examples.app:hello-service-stdout >------------
[INFO] Building App::Config::Hello Service StdOut 6.1.1-SNAPSHOT
[INFO] --------------------------------[ jar ]---------------------------------
[INFO]
[INFO] --- maven-clean-plugin:3.1.0:clean (default-clean) @ hello-service-stdout ---
[INFO]
[INFO] --- maven-resources-plugin:3.1.0:resources (default-resources) @ hello-service-stdout ---
[INFO] Using 'UTF-8' encoding to copy filtered resources.
[INFO] skip non existing resourceDirectory .../app-config/hello-service-stdout/src/main/resources
[INFO]
[INFO] --- maven-compiler-plugin:3.8.1:compile (default-compile) @ hello-service-stdout ---
[INFO] Changes detected - recompiling the module!
[INFO] Compiling 1 source file to .../app-config/hello-service-stdout/target/classes
[INFO]
[INFO] --- maven-resources-plugin:3.1.0:testResources (default-testResources) @ hello-service-stdout ---
[INFO] Using 'UTF-8' encoding to copy filtered resources.
[INFO] skip non existing resourceDirectory .../app-config/hello-service-stdout/src/test/resources
[INFO]
[INFO] --- maven-compiler-plugin:3.8.1:testCompile (default-testCompile) @ hello-service-stdout ---
[INFO] No sources to compile
[INFO]
[INFO] --- maven-surefire-plugin:2.12.4:test (default-test) @ hello-service-stdout ---
[INFO] No tests to run.
[INFO]
[INFO] --- maven-jar-plugin:3.1.2:jar (default-jar) @ hello-service-stdout ---
[INFO] Building jar: .../app-config/hello-service-stdout/target/hello-service-stdout-6.1.1-SNAPSHOT.jar
[INFO]
[INFO] --- maven-install-plugin:3.0.0-M1:install (default-install) @ hello-service-stdout ---
[INFO] Installing .../app-config/hello-service-stdout/target/hello-service-stdout-6.1.1-SNAPSHOT.jar to .../.m2/repository/info/ejava/examples/app/hello-service-stdout/6.1.1-SNAPSHOT/hello-service-stdout-6.1.1-SNAPSHOT.jar
[INFO] Installing .../app-config/hello-service-stdout/pom.xml to .../.m2/repository/info/ejava/examples/app/hello-service-stdout/6.1.1-SNAPSHOT/hello-service-stdout-6.1.1-SNAPSHOT.pom
[INFO] ------------------------------------------------------------------------
[INFO] BUILD SUCCESS
[INFO] ------------------------------------------------------------------------
[INFO] Total time:  2.658 s
3. Application Module
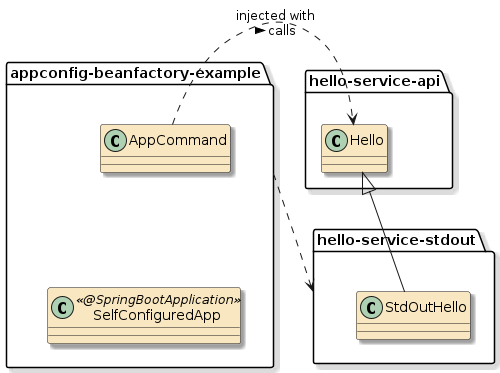
We now move on to developing our application within its own module containing two (2) classes similar to earlier examples.
|-- pom.xml
`-- src
    ``-- main
        `-- java
            `-- info
                `-- ejava
                    `-- examples
                        `-- app
                            `-- config
                                `-- beanfactory
                                    |-- AppCommand.java (2)
`-- SelfConfiguredApp.java (1)| 1 | Class with Java main() that starts Spring |
| 2 | Class containing our first component that will be the focus of our injection |
3.1. Application Maven Dependency
We make the Hello Service visible to our application by adding a dependency
on the hello-service-api and hello-service-stdout artifacts. Since the
implementation already declares a compile dependency on the interface, we
can get away with only declaring a direct dependency just on the implementation.
<groupId>info.ejava.examples.app</groupId>
<artifactId>appconfig-beanfactory-example</artifactId>
<name>App::Config::Bean Factory Example</name>

<dependencies>
  <dependency>
      <groupId>org.springframework.boot</groupId>
      <artifactId>spring-boot-starter</artifactId>
  </dependency>
  <dependency>
      <groupId>${project.groupId}</groupId>
      <artifactId>hello-service-stdout</artifactId> (1)
      <version>${project.version}</version>
  </dependency>
</dependencies>| 1 | Dependency on implementation creates dependency on both implementation and interface |
In this case, the module we depend on is in the same groupId and shares the same version.
For simplicity of reference and versioning, I used the ${project} variables to reference it.
That will not always be the case.
|

3.2. Viewing Dependencies
You can verify the dependencies exist using the tree goal of the dependency plugin.
$ mvn dependency:tree -f hello-service-stdout
...
[INFO] --- maven-dependency-plugin:3.1.1:tree (default-cli) @ hello-service-stdout ---
[INFO] info.ejava.examples.app:hello-service-stdout:jar:6.1.1-SNAPSHOT
[INFO] \- info.ejava.examples.app:hello-service-api:jar:6.1.1-SNAPSHOT:compile
3.3. Application Java Dependency
Next, we add a reference to the Hello interface and define how we can get it injected. In this case, we are using contructor injection where the instance is supplied to the class through a parameter to the constructor.
The component class now has a non-default
constructor to allow the Hello implementation to be injected and the
Java attribute is defined as final to help assure that the value
is assigned during the constructor.
|
package info.ejava.examples.app.config.beanfactory;

import org.springframework.boot.CommandLineRunner;
import org.springframework.stereotype.Component;

import info.ejava.examples.app.hello.Hello;

@Component
public class AppCommand implements CommandLineRunner {
    private final Hello greeter; (1)

    public AppCommand(Hello greeter) { (2)
        this.greeter = greeter;
    }

    public void run(String... args) {
        greeter.sayHello("World");
    }
}| 1 | Add a reference to the Hello interface. Java attribute defined as final
to help assure that the value is assigned during the constructor. |
| 2 | Using contructor injection where the instance is supplied to the class through a parameter to the constructor |
4. Dependency Injection
Our AppCommand class has been defined only with the interface to Hello and not a
specific implementation.
This Separation of Concerns helps improve modularity, testability, reuse, and many other desirable features of an application. The interaction between the two classes is defined by an interface.
But how do does our client class (AppCommand) get an instance of the implementation (StdOutHello)?
-
If the client class directly instantiates the implementation — it is coupled to that specific implementation.
public AppCommand() {
    this.greeter = new StdOutHello("World");
}-
If the client class procedurally delegates to a factory — it runs the risk of violating Separation of Concerns by adding complex initialization code to its primary business purpose
public AppCommand() {
    this.greeter = BeanFactory.makeGreeter();
}
Traditional procedural code normally makes calls to libraries in order to perform a specific purpose. If we instead remove the instantiation logic and decisions from the client and place that elsewhere, we can keep the client more focused on its intended purpose. With this inversion of control (IoC), the application code is part of a framework that calls the application code when it is time to do something versus the other way around. In this case, the framework is for application assembly.
Most frameworks, including Spring, implement dependency injection through a form of IoC.
5. Spring Dependency Injection
We defined the dependency using the Hello interface and have three primary ways
to have dependencies injected into an instance.
import org.springframework.beans.factory.annotation.Autowired;

public class AppCommand implements CommandLineRunner {
    //@Autowired -- FIELD injection (3)
    private Hello greeter;

    @Autowired //-- Constructor injection (1)
    public AppCommand(Hello greeter) {
        this.greeter = greeter;
    }

    //@Autowired -- PROPERTY injection (2)
    public void setGreeter(Hello hello) {
        this.greeter = hello;
}| 1 | constructor injection - injected values required prior to instance being created |
| 2 | field injection - value injected directly into attribute |
| 3 | setter or property injection - setter() called with value |
5.1. @Autowired Annotation
The @Autowired(required=…)
annotation
-
may be applied to fields, methods, constructors
-
@Autowired(required=true)- default value forrequiredattribute-
successful injection is mandatory when applied to a property
-
specific constructor use required when applied to a constructor
-
only a single constructor per class may have this annotation
-
-
-
@Autowired(required=false)-
injected is not required to exist when applied to a property
-
specific constructor an option for container to use
-
multiple constructors may have this annotation applied
-
container will determine best based on number of matches
-
-
single constructor has an implied
@Autowired(required=false)
-
There are more details to learn about injection and the lifecycle of a bean. However, we know that we are using constructor injection at this point in time since the dependency is required for the instance to be valid.
5.2. Dependency Injection Flow
In our example:
-
Spring will detect the AppCommand component and look for ways to instantiate it
-
The only constructor requires a Hello instance
-
Spring will then look for a way to instantiate an instance of Hello
6. Bean Missing
When we go to run the application, we get the following error
$ mvn clean package
...
***************************
APPLICATION FAILED TO START
***************************

Description:

Parameter 0 of constructor in AppCommand required a bean of type 'Hello' that could not be found.

Action:

Consider defining a bean of type 'Hello' in your configuration.
The problem is that the container has no knowledge of any beans that can satisfy the
only available constructor. The StdOutHello class is not defined in a way that
allows Spring to use it.
6.1. Bean Missing Error Solution(s)
We can solve this in at least two (2) ways.
-
Add @Component to the StdOutHello class. This will trigger Spring to directly instantiate the class.
@Component public class StdOutHello implements Hello {-
problem: It may be one of many implementations of Hello
-
-
Define what is needed using a
@Beanfactory method of a@Configurationclass. This will trigger Spring to call a method that is in charge of instantiating an object of the type identified in the method return signature.@Configuration public class AConfigurationClass { @Bean public Hello hello() { return new StdOutHello("..."); } }
7. @Configuration classes
@Configuration classes are classes that Spring expects to have one or more @Bean factory
methods. If you remember back, our Spring Boot application class was annotated with
@SpringBootApplication
@SpringBootApplication (1)
//==> wraps @SpringBootConfiguration (2)
//  ==> wraps @Configuration
public class SelfConfiguredApp {
    public static void main(String...args) {
        SpringApplication.run(SelfConfiguredApp.class, args);
    }
    //...
}| 1 | @SpringBootApplication is a wrapper around a few annotations including
@SpringBootConfiguration |
| 2 | @SpringBootConfiguration is an alternative annotation to using @Configuration
with the caveat that there be only one @SpringBootConfiguration per application |
Therefore, we have the option to use our Spring Boot application class to host the configuration and
the @Bean factory.
8. @Bean Factory Method
There is more to @Bean factory methods than we will cover here, but at its
simplest and most functional level — this is a series of factory methods the container will call to instantiate components for the application.
By default, they are all eagerly instantiated and the dependencies between them are resolved (if resolvable) by the container.
Adding a @Bean factory method to our Spring Boot application class will
result in the following in our Java class.
@SpringBootApplication (4) (5)
public class SelfConfiguredApp {
    public static void main(String...args) {
        SpringApplication.run(SelfConfiguredApp.class, args);
    }

    @Bean (1)
    public Hello hello() { (2)
        return new StdOutHello("Application @Bean says Hey"); (3)
    }
}| 1 | method annotated with @Bean implementation |
| 2 | method returns Hello type required by container |
| 3 | method returns a fully instantiated instance. |
| 4 | method hosted within class with @Configuration annotation |
| 5 | @SpringBootConfiguration annotation included the capability defined for
@Configuration |
| Anything missing to create instance gets declared as an input to the method, and it will get created in the same manner and passed as a parameter. |
9. @Bean Factory Used
With the @Bean factory method in place, all comes together at runtime to produce the following:
$ java -jar target/appconfig-beanfactory-example-*-SNAPSHOT-bootexec.jar
...
Application @Bean says Hey World-
the container
-
obtained an instance of a
Hellobean -
passed that bean to the
AppCommandclass' constructor to instantiate that@Component
-
-
the
@Beanfactory method-
chose the implementation of the
Helloservice (StdOutHello) -
chose the greeting to be used ("Application @Bean says Hey")
return new StdOutHello("Application @Bean says Hey");
-
-
the AppCommand CommandLineRunner determined who to say hello to ("World")
greeter.sayHello("World");
11. @Configuration Alternatives
With the basics of @Configuration classes understood, I want to introduce two other common options for a @Bean factory:
-
scope
-
proxyBeanMethods
By default,
-
Spring will instantiate a single component to represent the bean (singleton)
-
Spring will create a (CGLIB) proxy for each
@Configurationclass to assure the result is processed by Spring and that each bean client for singleton-scoped beans get the same copy. This proxy can add needless complexity depending on how sibling methods are designed.
The following concepts and issues will be discussed:
-
shared (singleton) or unique (prototype) component instances
-
(unnecessary) role of the Spring proxy (
proxyBeanMethods) -
potential consequences of calling sibling @Bean methods over injection
11.1. Example Lifecycle POJO
To demonstrate, I created an example POJO that identifies its instance and tracks its component lifecycle.
-
the Java constructor is called for each POJO instance created
-
@PostConstructmethods are called by Spring after dependencies have been injected. If and when you see debug from theinit(), you know the POJO has been made into a component, with the potential for Spring container interpose.
public class Example {
    private final int exampleValue;
    public Example(int value) { this.exampleValue = value; } (1)
    @PostConstruct (2)
    void init() {
        System.out.println("@PostConstruct called for: " + exampleValue);
    }
    public String toString() { return Integer.toString(exampleValue); }
}| 1 | Constructor will be called for every instance created |
| 2 | @PostConstruct will only get called by when POJO becomes a component |
11.2. Example Lifecycle @Configuration Class
To further demonstrate, I have added a @Configuration class with some options that will be changed during the example.
@Configuration //default proxyBeanMethods=true
//@Configuration(proxyBeanMethods = true)
//@Configuration(proxyBeanMethods = false)
public class BeanFactoryProxyBeansConfiguration {
    private int value = 0;

    @Bean //default is singleton
    //@Scope(ConfigurableBeanFactory.SCOPE_SINGLETON) //"singleton"
    Example bean() {
        return new Example(value++);
    }
11.3. Consuming @Bean Factories within Same Class
There are two pairs of Example-consuming @Bean factories: calling and injected.
-
Calling
@Beanfactories make a direct call to the supporting@Beanfactory method. -
Injected
@Beanfactories simply declare their requirement in method input parameters.
    @Bean (1)
    String calling1()              { return "calling1=" + bean(); }
    @Bean (1)
    String calling2()              { return "calling2=" + bean(); }
    @Bean (2)
    String injected1(Example bean) { return "injected1=" + bean; }
    @Bean (2)
String injected2(Example bean) { return "injected2=" + bean; }| 1 | calling consumers call the sibling @Bean factory method directly |
| 2 | injected consumers are passed an instance of requirements when called |
11.4. Using Defaults (Singleton, Proxy)
By default:
-
@Beanfactories use singleton scope -
@Configurationclasses useproxyBeanMethods=true
That means that:
-
@Bean factory method will be called only once by Spring
-
@Configurationclass instance will be proxied and direct calls (calling1andcalling2) will receive the same singleton result
@PostConstruct called for: 0 (2)
calling1=0 (1)
calling2=0 (1)
injected1=0 (1)
injected2=0 (1)| 1 | only one POJO instance was created |
| 2 | only one component was initialized |
11.5. Prototype Scope, Proxy True
If we change component scope created by the bean() method to "prototype"…
@Bean
@Scope(ConfigurableBeanFactory.SCOPE_PROTOTYPE) //"prototype"
Example bean() {
    return new Example(value++);
}…we get a unique POJO instance/component for each consumer (calling and injected) while proxyBeanMethods is still true.
@PostConstruct called for: 0 (2)
@PostConstruct called for: 1 (2)
@PostConstruct called for: 2 (2)
@PostConstruct called for: 3 (2)
calling1=0 (1)
calling2=1 (1)
injected1=2 (1)
injected2=3 (1)| 1 | unique POJO instances were created |
| 2 | each instance was a component |
11.6. Prototype Scope, Proxy False
If we drop the CGLIB proxy, our configuration instance gets lighter, but …
@Configuration(proxyBeanMethods = false)
public class BeanFactoryProxyBeansConfiguration {
    @Bean @Scope(ConfigurableBeanFactory.SCOPE_PROTOTYPE) //"prototype"
Example bean() {…only injected consumers are given "component" beans. The "calling" consumers are given "POJO" beans that lack the potential for interpose.
@PostConstruct called for: 2 (2)
@PostConstruct called for: 3 (2)
calling1=0 (1)
calling2=1 (1)
injected1=2 (1)
injected2=3 (1)
| 1 | each consumer is given a unique instance |
| 2 | only the injected callers are given components (with interpose potential) |
11.7. Singleton Scope, Proxy False
Keeping the proxy eliminated and reverting back to the default singleton scope for the bean …
@Configuration(proxyBeanMethods = false)
public class BeanFactoryProxyBeansConfiguration {

    @Bean @Scope(ConfigurableBeanFactory.SCOPE_SINGLETON) //"singleton" - default
Example bean() {…shows that only the injected consumers are receiving a singleton instance — initialized as a component, with the potential for interpose.
@PostConstruct called for: 0 (3)
calling1=1 (2)
calling2=2 (2)
injected1=0 (1)
injected2=0 (1)
| 1 | injected consumers get the same instance |
| 2 | calling consumers get unique instances independent of @Scope |
| 3 | only the injected consumers are getting a component (with interpose potential) |
11.8. @Configuration Takeaways
-
Spring instantiates all components, by default, as singletons — with the option to instantiate unique instances on demand when
@Scopeis set to "prototype". -
Spring, by default, constructs a CGLIB proxy to enforce those semantics for both calling and injected consumers.
-
Since
@Configurationclasses are only called once at start-up, it can be a waste of resources to construct a CGLIB proxy.-
Using injection-only consumers, with no direct calls to
@Configurationclass methods, eliminates the need for the proxy. -
adding
proxyFactoryBeans=falseeliminates the CGLIB proxy. Spring will enforce semantics for injected consumers
-
-
11.9. @Configuration and Interpose
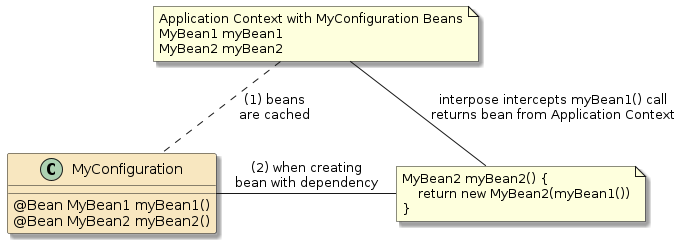
Spring uses Interpose to intercept requests to the @Bean method and enforce the scope requirements — even for buddy methods from the same @Configuration class.
@Configuration is a special @Component.
Spring does not offer Interpose between buddy methods of non-@Configuration @Components.
The @Configuration case is a special case where this is done.
This shows you that proxies can be built to intercept calls between buddy methods of the same class but Spring has chosen not to do so for normal @Components.

12. Summary
In this module we
-
decoupled part of our application into three Maven modules (app, iface, and impl1)
-
decoupled the implementation details (
StdOutHello) of a service from the caller (AppCommand) of that service -
injected the implementation of the service into a component using constructor injection
-
defined a
@Beanfactory method to make the determination of what to inject -
showed an alternative using XML-based configuration and
@ImportResource -
explored the differences between calling and injected sibling component consumers
In future modules, we will look at more detailed aspects of Bean lifecycle and @Bean factory methods. Right now we are focused on following a path to explore decoupling our application even further.