Enterprise Java Development@TOPIC@
Revision: v2013-09-02Built on: 2014-03-07 00:43 EST
Copyright © 2014 jim stafford (jcstaff@apl.jhu.edu)
Abstract
This paper contains setup information required to begin building, deploying, running, and modifying examples. It also provides a basis for building class projects to be turned in.
Establish a build environment for
Building and deploying class examples
Developing class projects
Exposure to various JavaEE build environment tools
Translate example syntax to your OS shell
Many of the command line examples listed in these instructions use bash syntax on Linux. You will need to translate the specific commands into the shell syntax that is appropriate for your environment. Linux is not a requirement for class. Many students have taken this class and used various versions of Windows and Mac systems.
Don't use directories with spaces in path
It is never a good idea to install software in a directory with spaces in the fully qualified path name if the software contains jar files that will eventually be part of a classpath. I strongly recommend your working directory, the JDK, JBoss, and all repository locations comply with this critical guideline or you may suffer classpath issues at some point.
You will need a copy of either Java 6 or Java 7 SDK installed. JavaEE 6 only requires JDK 6 but but JDK 6 will soon hit its end-of-life. The instructions describe downloading JDK 7.
Java 6 source environment/Java 7 target environment
The Maven configuration for class will default to Java 6-compliant source while targeting a Java 7 runtime. This should give us a decent fallback option between the two versions during this transition period. To use a Java 6 runtime, simply override the default "java.target.version=1.7" property using your Maven .m2/settings.xml.
Keep 32/64-bit choices consistent
Keep the 32/64-bit choice consistent with what you download later for Eclipse.
Linux Users: The alternate JDKs (e.g., OpenJDK) available from your package manager will work fine for class.
Windows Users: Install the Java 7 JDK from Sun/Oracle
Download a copy of the Java 7 JDK http://www.oracle.com/technetwork/java/javase/downloads/index.html . Choose Java SE 7 Update (latest) JDK. We will only be using the JDK portion in class so avoid the alternate downloads that add in the Glassfish JavaEE Application Server and NetBeans. We will be using JBoss and Eclipse.
Install the JDK and associated JRE in a directory that does not have spaces in its path.
Windows/Oracle JDK Users: stay awake here!!!
The Oracle Windows JDK installer will attempt to place the JDK and JRE in a directory with spaces. Be sure to override the installer defaults when it prompts you for installation directory.
Define an environment variable JAVA_HOME to reference the JDK
Add JAVA_HOME/bin to your PATH if necessary
Depending on how you performed the installation, you may need to add the JDK to your PATH
Figure 1.1. Fedora Example
$ java -version
java version "1.7.0_25"
OpenJDK Runtime Environment (fedora-2.3.10.3.fc17-x86_64)
OpenJDK 64-Bit Server VM (build 23.7-b01, mixed mode)

$ javac -version
javac 1.7.0_25
Figure 1.2. Windows XP Example (TODO:update])
> java -version
java version "1.7.0_11"
Java(TM) SE Runtime Environment (build 1.7.0_11-b21)
Java HotSpot(TM) Client VM (build 23.6-b04, mixed mode, sharing)

>javac -version
javac 1.7.0_11
You will use Git in this class to perform an initial checkout and get updates for source files. Any Git client should be able to perform that function. You can determine if you have a command line Git client already installed using the following simple command.
Figure 2.1. Verifying if Git is Installed
//my fedora system
$ git --version
git version 1.7.11.7

//my win8/msysGit system
$ git --version
git version 1.8.0.msysgit.0
There are a number of options and some are going to be based on on your platform. Your basic options include command line or using an Eclipse plugin
Linux Command-Line Users: Use your package installer. Select git-core, gitk, and git-gui packages.
Cygwin Command-Line Users: Use the cygwin setup tool to locate the git packages
Windows Command-Line Users: Git comes in a core layer and then OS-layer add-ons. The core layer is sufficient for class and can be found at http://msysgit.github.com/
Download Full Installer
Accept the default installation option of "Use Git Bash bash only". As the prompt states, it has the least risk and will be suitable for the minor amount of use required in class.
Chose your checkout style. Don't worry about commit style you will only be performing read-only checkouts. I chose "Checkout as-is, commit Unix-style line endings" since I used all linux-style editors on Windows. You may want the Window checkout format.
Click on the "Git Bash" icon after the installation is complete.
Eclipse GUI Users: There is a git plugin for Eclipse available called EGit. You can install it by going to
Help->Eclipse Marketplace, typing Git in the search field, and clicking Install for EGit.
The class repository is located on github and can be browsed using the following http URL https://github.com/jcstaff/ejava-javaee. With a cloned copy, you can receive file updates during the semester.
CD to a directory you wish to place source code. Make sure the path to this directory contains no spaces.
Clone the class repository using the following URL git://github.com/jcstaff/ejava-javaee.git
git clone git://github.com/jcstaff/ejava-javaee.git
...

$ ls ejava-javaee/
...

$ cd ejava-javaee
$ git branch -a    //list all branches -- local and remote
* master
  ...
  remotes/origin/HEAD -> origin/master
  remotes/origin/master
  remotes/origin/working
Note
Git leaves you with all branches fetched and a local master branch referencing the class' master branch on github. You will be using the master branch for the duration of the semester. The other branch of interest is 'working'. This contains my in-progress daily changes. The master branch is usually updated the evening before or the day of class and should always be stable.
Perform a mock update. This is what you will be doing several times this semester to get file updates.
$ git checkout master //switches to master branch
$ git pull            //downloads changes and attempts merge
Already up-to-date.
Note
There are many modules within the class repository. Some are ready for use, some are still being worked, and some are not for use this semester. The ones ready for your use will be wired into the build and will be compiled during a follow-on section. The list will increase as the semester moves forward. Please ignore these extra modules. Keeping them within the baseline helps me keep related things centralized.
Note
If you ever make changes to the class examples and would like to keep those changes separate from the updates. Store them in a new branch at any time using the following git commands.
$ git checkout -b new-branch master  //creates new branch from master
                                     //and switches to that branch
$ git commit -a -m "saving my stuff" //commits all dirty files to new branch
$ git checkout master                //switches back to the master branch
If you simply want to throw away any changes you made, you can discard those changes to tracked files using the following git commands.
$ git reset --hard master
$ git clean -rn  //shows you what it would delete without deleting
$ git clean -rf  //deletes files not managed or specifically ignored by git
Download Maven 3 http://maven.apache.org/download.html
Unzip the contents into a directory with no spaces in its path.
$ ls apache-maven-3.1.0/
bin  boot  conf  lib  LICENSE.txt  NOTICE.txt  README.txt
Add an environment variable for MAVEN_HOME and add MAVEN_HOME/bin to your PATH
//my linux system -- should be done in .bashrc
export MAVEN_HOME=/opt/apache-maven-3.1.0
export PATH=$MAVEN_HOME/bin:$PATH

//my windows system -- should be done in Advanced System Settings->Environment Variables
set MAVEN_HOME=/apps/apache-maven-3.1.0
set PATH=%MAVEN_HOME%\bin;%PATH%
Verify maven is installed and in the path (TODO:Update Windows Example)
//my fedora system
$ mvn --version
Apache Maven 3.1.0 (893ca28a1da9d5f51ac03827af98bb730128f9f2; 2013-06-27 22:15:32-0400)
Maven home: /opt/apache-maven-3.1.0
Java version: 1.7.0_25, vendor: Oracle Corporation
Java home: /usr/lib/jvm/java-1.7.0-openjdk-1.7.0.25.x86_64/jre
Default locale: en_US, platform encoding: UTF-8
OS name: "linux", version: "3.8.13-100.fc17.x86_64", arch: "amd64", family: "unix"

//my windows xp system
> mvn --version
Apache Maven 3.0.4 (r1232337; 2012-01-17 03:44:56-0500)
Maven home: C:\apps\apache-maven-3.0.4\bin\..
Java version: 1.7.0_11, vendor: Oracle Corporation
Java home: C:\apps\Java\jdk1.7.0_11\jre
Default locale: en_US, platform encoding: Cp1252
OS name: "windows xp", version: "5.1", arch: "x86", family: "windows"
Add a skeletal settings.xml file that will be used to provide local overrides for the build. This is the place where you can customize the build for local environment specifics like directory locations, server address, server ports, etc.
Add the following to the
.m2/settings.xmlfile in your HOME directory.
<?xml version="1.0"?>

<settings xmlns="http://maven.apache.org/POM/4.0.0"

    xmlns:xsi="http://www.w3.org/2001/XMLSchema-instance"

    xsi:schemaLocation="http://maven.apache.org/POM/4.0.0 http://maven.apache.org/xsd/settings-1.0.0.xsd">


    <offline>false</offline>


    <profiles>

    </profiles>


    <activeProfiles>

    </activeProfiles>

</settings>
You can test whether your settings.xml file is seen by Maven by temporarily making it an invalid XML file and verifying that the next Maven build command fails with a parsing error.
$ mvn clean
[ERROR] Error executing Maven.
[ERROR] 1 problem was encountered while building the effective settings
[FATAL] Non-parseable settings /home/user/.m2/settings.xml: only whitespace content allowed before start tag and not s (position: START_DOCUMENT seen <?xml version="1.0"?>\ns... @2:2)  @ /home/user/.m2/settings.xml, line 2, column 2
Add a default specification for the database profile we will be using for class at the bottom of the
.m2/settings.xmlfile in your HOME directory.
    <activeProfiles>

        <activeProfile>h2db</activeProfile>

    </activeProfiles>
If your operating system HOME directory has spaces in the path (e.g., Windows XP's Documents and Settings) then add a
localRepositorypath specification to the.m2/settings.xmlfile and have it point to a location that does not have spaces in the path. The path does not have to exist. It will be created during the next build.
    <offline>false</offline>

    <!-- this overrides the default $HOME/.m2/repository location. -->

    <localRepository>c:/jhu/repository</localRepository>
Each week you will be asked to update your cloned copy of the class examples and perform a test build. This will give both of us some comfort that your environment is setup correctly and act as a baseline for debugging your class assignments. Therefore, do the following to test your initial installation and repeat each week.
Change your current directory to the root of the cloned repository and make sure you have a current copy.
$ ls
pom.xml ejava-build ejava-common ...
$ git pull
Already up-to-date.
Test your configuration using
$ mvn clean install
[INFO] Scanning for projects...
...
There are a few cases where dependencies cannot be hosted in public repositories and must be downloaded and installed manually. Oracle DB Client is one example.
Figure 3.1. Missing Maven Dependency Error/Warning Message
Failure to find com.oracle:ojdbc6:pom:11.2.0.3 in ...
was cached in the local repository, resolution will not be reattempted until the update interval of
... has elapsed or updates are forced.
If the message is a warning (i.e., for site/javadoc documentation -- it can be ignored). If you want to eliminate the warning or it is coming up as an error, you can download the artifact directly from the vendor and manually install it in your local repository.
Download the driver jar from Oracle accept the license agreement.
Install it manually into your localRepository
$ mvn install:install-file -Dfile=/home/jcstaff/Downloads/ojdbc6.jar -DgroupId=com.oracle -DartifactId=ojdbc6 -Dversion=11.2.0.3 -Dpackaging=jar
[INFO] Scanning for projects...
...
[INFO] --- maven-install-plugin:2.4:install-file (default-cli) @ standalone-pom ---
[INFO] Installing /home/jcstaff/Downloads/ojdbc6.jar to /home/jcstaff/.m2/repository/com/oracle/ojdbc6/11.2.0.3/ojdbc6-11.2.0.3.jar
[INFO] ------------------------------------------------------------------------
[INFO] BUILD SUCCESS
...
Artifacts are Best Placed in Network Repositories
This artifact would ideally be placed within a network cache/repository (i.e., Nexus) and not into individual localRepositories. In the next chapter you will be shown how could could setup a Maven Nexus for team use. If you go that route -- it would be better to upload the file to that archive.
Rogue Internet Repositories
Probably violating license restrictions, but the following network repository does contain the missing Oracle driver. One could add that as an upstream repository in their Nexus or define it as an artifact repository in the pom to avoid having to manually import the artifact.
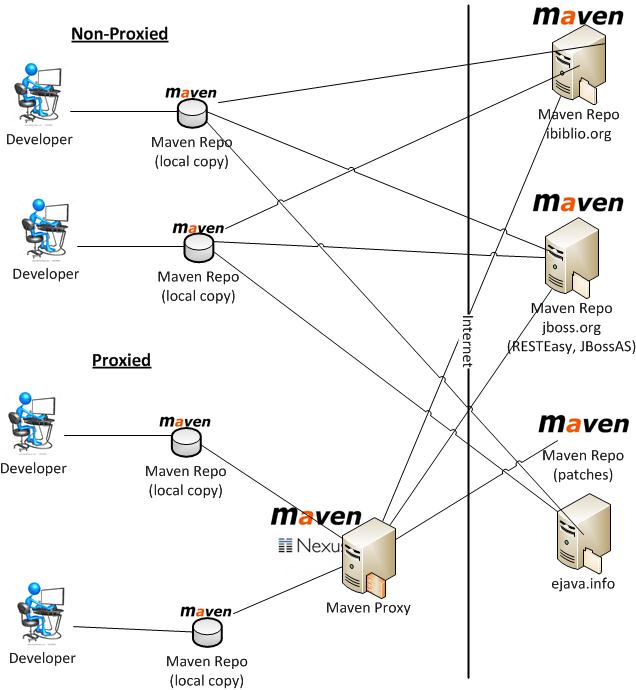
As you should have noticed in the previous section, you can
function just fine as a developer connected to the Internet as
long as the critical Internet resources are available when they
are needed to populate your localRepository cache.
However, if you were part of a larger development team you would
not want each separate developer reaching out the Internet to
locate a common dependency. There is both a speed and failure
issue with that type of setup.
The steps listed in this chapter are not necessary
for class because you work alone and you have a localRepository
cache. In fact -- I urge you not to follow them unless you feel
the strong desire to dig deeper in this enterprise development
setup. However, it does provide you with some experience in
setting up and using a realistic production maven environment.
Still here? Okay -- lets get started...
In the previous section we installed and setup Maven in a stand-alone client mode. In that mode the individual environment communicated directly with the external Internet organizations to obtain missing artifacts. In this section we will add a proxy server between the developer and the Internet so that one or more developers can share what has already been downloaded and be completely isolated from network and remote outages. Ideally this proxy would be placed on a shared server somewhere on your local Intranet with access to the outside Internet. The instructions will act as though you are installing it locally. It is your decision whether to use it and where to install it. If you do not install and configure a proxy -- you will notice small delays in your builds while your local maven client checks Internet sources for new artifacts and updates to existing artifacts.
This procedure will take you through a manual download and setup of the Nexus OSS software and have you go thru a manual setup of all items. Use this approach if you want a minor amount of experience in setting up the sever.
Download the Nexus OSS Software from Sonatype http://www.sonatype.org/nexus/go
Unzip the the compressed file to your filesystem. There will be two directories created; one for the software (
nexus-(version)) and another for the repository caches (sonatype-work)$ tar tzf ~/Downloads/nexus-2.6.1-02-bundle.tar.gz nexus-2.6.1-02/nexus/WEB-INF/plugin-repository/nexus-healthcheck-oss-plugin-2.6.1-02/nexus-healthcheck-oss-plugin-2.6.1-02.jar ... $ ls nexus-2.6.1-02/ sonatype-work/ nexus-2.6.1-02/: bin conf lib LICENSE.txt logs nexus NOTICE.txt tmp sonatype-work/: nexus README.txt
The server will listen on port 8081 on all interfaces (0.0.0.0) by default. Modify
nexus-2.6.1-02/conf/nexus.propertiesif you want something different.$ more nexus-2.6.1-02/conf/nexus.properties ... # Jetty section application-port=8081 application-host=0.0.0.0 ...
Locate the startup script in the NEXUS_HOME/bin directory.
$ ls nexus-2.6.1-02/bin/
jsw  nexus  nexus.bat
Tip
Linux users might want to register this script in /etc/init.d. If you also configure it to automatically start at boot -- supply a value for
RUN_AS_USERto keep the server from running as root. I also needed to change "su - $RUN_AS_USER" to "su -m $RUN_AS_USER..." because of the way my legacy nexus account was setup for nologin.Use the script appropriate for your platform to start and perform other controls on the server.
$ nexus-2.6.1-02/bin/nexus
Usage: nexus-2.6.1-02/bin/nexus { console | start | stop | restart | status | dump }

$ nexus-2.6.1-02/bin/nexus start
Starting Nexus OSS...
Started Nexus OSS.
Note
The above command attempts to run Nexus as a service. If you do not have the permission on your system to register nexus as a service, you can optionally run it as an interactive command.
$ nexus-2.6.1-02/bin/nexus console
/etc/init.d/nexus console
Running Nexus OSS...
wrapper  | --> Wrapper Started as Console
wrapper  | Launching a JVM...
jvm 1    | Wrapper (Version 3.2.3) http://wrapper.tanukisoftware.org
jvm 1    |   Copyright 1999-2006 Tanuki Software, Inc.  All Rights Reserved.
jvm 1    |
jvm 1    | 2012-04-26 12:14:38.531:INFO:oejs.Server:jetty-7.5.4.v20111024
The specific error observed on Windows was
wrapper | The nexus-webapp service is not installed - The specified service does not exist as an installed service. (0x424)
Access the Web UI for Nexus OSS http://localhost:8081/nexus
Login with the default account of admin/admin123
Change the admin password (or not) using Security->Change Password
Add remote repositories
Click on Views/Repositories->Repositories
Click the +Add...Proxy Repository
Fill in the data for the repositories in the following Repositories table. Use default values for anything not included in the table.
Press Save
Table 4.1. Repositories
Repository ID Repository Name Repository Policy Remote Storage Location jboss-nexus JBoss Nexus Release https://repository.jboss.org/nexus/content/repositories/releases/ exoplatform Exoplatform Release http://maven2.exoplatform.org/maven/ webdev-snapshot Webdev Snapshot Snapshot http://webdev.apl.jhu.edu/~jcs/maven2-snapshot webdev-releases Webdev Releases Release http://webdev.apl.jhu.edu/~jcs/maven2/ Note
If the provided list is missing any sources, check for a current list of repositories and plugin repositories in ejava-build/dependencies/pom.xml from the class source tree and add those as well.
Note
Nexus will check each repository as they are added. Try restarting if things get stuck.
$ service nexus restart
Stopping Nexus OSS...
Stopped Nexus OSS.
Starting Nexus OSS...
Started Nexus OSS.
Add the created repositories to the Public Repositories
Select
Public Repositoriesline towards the top of the repositories list.Select repositories form the right Available column and add them to the left column. Specify them last in the following order
JBoss Nexus
Exoplatform
Ejava Nexus
Webdev Snapshots
Webdev Releases
Press Save
Add the following to the
.m2/settings.xmlfile in your HOME directory to enable use of the proxy
...

    <offline>false</offline>

...

    <mirrors>

        <mirror>

          <id>nexus</id>

          <mirrorOf>*</mirrorOf>

          <url>http://localhost:8081/nexus/content/groups/public</url>

        </mirror>

    </mirrors>


    <profiles

        ...
Test your configuration using
$ mvn clean test
[INFO] Scanning for projects...
Downloading: http://localhost:8081/nexus/content/groups/public/org/eclipse/wst/css/core/maven-metadata.xml
Downloaded: http://localhost:8081/nexus/content/groups/public/org/eclipse/wst/css/core/maven-metadata.xml (376 B at 0.4 KB/sec)
If you have Eclipse installed at this point, have it re-process your settings.xml by going to
Window->Preferences->Maven->User Settings->Update Settings
JBoss Application Server (AS) and JBoss Enterprise Application Platform (EAP)
JBoss has a community version (JBoss AS) and commercial version (JBoss EAP) of their JavaEE application server. Both are open source and built off the same code base. In theory, changes propagate through the community version first in daily changes and short iterations. In theory, commercial version is a roll-up of a stable version of the community version with the ability to purchase support on that specific version. With commercial version support -- you can receive patches for a specific issue prior to upgrading to the latest release. With the community version -- you pretty much need to keep up with the latest release to get any patches. Of course, with either version you are free to perform your own support and code changes, but you can only get this commercially with the EAP release.
JBoss has recently changed its distribution policy. It now makes the EAP version available for *development* use. You will be asked to download EAP and accept licensing terms that forbids you from using the software in production and using whatever support you receive from them on that product from setting up your own re-selling business.
JBoss AS version numbers are ahead of JBoss EAP because not every community version becomes a commercial version. JBoss AS 6 was skipped entirely by EAP. There is a good article on the pairings between the two product lines on the RedHat Customer Portal
JBoss AS 7.2.0.Final <= JBoss EAP 6.1.0.Final
We will be downloading JBoss EAP server for class use since that is the most stable release available. Build dependencies will use the community version since those versions are available from an Internet-accessible Nexus repository. If that becomes an issue, we can switch versions without much issue.
Download JBoss 6.1.0 EAP http://www.jboss.org/jbossas/downloads. The 'Quickstarts' examples are also helpful but class notes, exercises, and guidance may have simplified, generalized, or alternative approaches to what is contained in the guides.
Install JBoss into a directory that does not have any spaces in its path.
$ unzip ~/Downloads/jboss-eap-6.1.0.Final.zip

$ ls jboss-eap-6.1.0.Final/
Test the installation by starting the default configuration installation.
$ ./jboss-eap-6.1.0.Final/bin/standalone.sh
=========================================================================

  JBoss Bootstrap Environment

  JBOSS_HOME: /opt/jboss-eap-6.1

  JAVA: /usr/bin/java

  JAVA_OPTS:  -server -XX:+UseCompressedOops -Xms1303m -Xmx1303m -XX:MaxPermSize=256m -Djava.net.preferIPv4Stack=true
      -Djboss.modules.system.pkgs=org.jboss.byteman -Djava.awt.headless=true

=========================================================================

13:26:53,149 INFO  [org.jboss.modules] (main) JBoss Modules version 1.2.0.Final-redhat-1
13:26:53,423 INFO  [org.jboss.msc] (main) JBoss MSC version 1.0.4.GA-redhat-1
13:26:53,554 INFO  [org.jboss.as] (MSC service thread 1-3) JBAS015899: JBoss EAP 6.1.0.GA (AS 7.2.0.Final-redhat-8) starting
...
13:26:59,008 INFO  [org.jboss.as] (Controller Boot Thread) JBAS015961: Http management interface listening on http://127.0.0.1:9990/management
13:26:59,009 INFO  [org.jboss.as] (Controller Boot Thread) JBAS015951: Admin console listening on http://127.0.0.1:9990
13:26:59,010 INFO  [org.jboss.as] (Controller Boot Thread) JBAS015874: JBoss EAP 6.1.0.GA (AS 7.2.0.Final-redhat-8) started in 6349ms -
    Started 146 of 217 services (70 services are passive or on-demand)
Note
There are .sh version of scripts for *nix platforms and .bat forms of the scripts for Windows platforms. Use the one that is appropriate for your environment.
Verify you can access the server
Main Page:http://localhost:8080
Admin Page:http://localhost:9990/console This will fail until the admin account is added.
Shutdown the server using Control-C
Copy over the class example server files from what you cloned and built from github earlier.
#using the built .zip file from the module target directory
$ cd .../jboss-eap-6.1.0.Final/
$ ls
standalone  domain  ...

$ unzip .../ejava-javaee/servers/ejava-jboss61eap/target/ejava-jboss61eap-xxx-server.zip
Restart the server
Use the batch script to add an admin user to the system. Note the password must have at least one digit and one non-alphanumeric character.
/opt$ ./jboss-eap-6.1.0.Final/bin/add-user.sh

What type of user do you wish to add?
 a) Management User (mgmt-users.properties)
 b) Application User (application-users.properties)
(a): a

Enter the details of the new user to add.
Realm (ManagementRealm) :
Username : admin
Password :
Re-enter Password :
The username 'admin' is easy to guess
Are you sure you want to add user 'admin' yes/no? yes
About to add user 'admin' for realm 'ManagementRealm'
Is this correct yes/no? yes
Added user 'admin' to file '/opt/jboss-eap-6.1.0.Final/standalone/configuration/mgmt-users.properties'
Added user 'admin' to file '/opt/jboss-eap-6.1.0.Final/domain/configuration/mgmt-users.properties'
Retry logging into the Admin Application http://localhost:9990/console
Prepare your server for remote debugging for later.
Uncomment the following line in either bin/standalone.conf (Linux) or bin/standalone.conf.bat (Windows)
# Sample JPDA settings for remote socket debugging
JAVA_OPTS="$JAVA_OPTS -Xrunjdwp:transport=dt_socket,address=8787,server=y,suspend=n"
Restart the server and notice the additional listen output. Use control-C to stop the server.
$ ./jboss-eap-6.1.0.Final/bin/standalone.sh
=========================================================================
...

Listening for transport dt_socket at address: 8787
13:26:53,149 INFO  [org.jboss.modules] (main) JBoss Modules version 1.2.0.Final-redhat-1
13:26:53,423 INFO  [org.jboss.msc] (main) JBoss MSC version 1.0.4.GA-redhat-1
If you already have a process listening on 8080 or any of the other JBoss ports on 127.0.0.1, you can switch addresses by editing the
interfacessection of standandalone.xml. You can also do this at runtime by adding-Djboss.bind.address.management=...and/or-Djboss.bind.address=...on the command line.
    <interfaces>

        <interface name="management">

            <loopback-address value="${jboss.bind.address.management:127.0.0.5}"/>

        </interface>

        <interface name="public">

            <loopback-address value="${jboss.bind.address:127.0.0.5}"/>

        </interface>

        <interface name="unsecure">

            <inet-address value="${jboss.bind.address.unsecure:127.0.0.5}"/>

        </interface>

    </interfaces>
Note
Note that I said "If..." above. You only need to modify the network information if you are running into a conflict on your development platform. Change is not hard, but keeping the default is the simplest way to go.
Provide a specification to maven where your JBoss server has been installed in the
.m2/settings.xmlfile using thejboss.homeproperty. *If* you have changed the address -- you can specify that using thejboss.hostproperty.
        <profile>

            <id>jboss7</id>

            <properties>

                <jboss.host>127.0.0.1</jboss.host>

                <jboss.home>/opt/jboss-eap-6.1.0.Final</jboss.home>

            </properties>

        </profile>

    </profiles>

        ...

    <activeProfiles>

        <activeProfile>jboss7</activeProfile>

        <activeProfile>h2db</activeProfile>

    </activeProfiles>

</settings>
The application server and application clients used in class require a relational database. Application server vendors generally package a lightweight database with their downloads so that the server can be used immediately for basic scenarios. JBoss comes packaged with the H2 database. This database can run in one of three modes
Embedded/in-memory
Embedded/file
Server-based
File-based versus in-memory allows you to do post-mortem analysis of the database after a test completes. File-based also allows you to initialize the database schema in one process and use the database within another. Using server-based mode allows you to inspect the database while the application is running.
JBoss and the class examples come setup with embedded drivers. You can change the configuration at any time to a server-based configuration using the following instructions.
Choose Right Mode for Right Need
Using embedded mode requires less administration overhead in the test environment.
Using server mode provides access to database state during application execution -- which is good for debugging.
Obtain a copy of the H2 database jar from one of the following sources
Within the JBoss installation
jboss-xxx-x.x.x.Final/modules/.../com/h2database/h2/main/
Internet Maven Repository ( http://repo2.maven.org/maven2/com/h2database/h2/)
Local Maven Repository: HOME/.m2/repository/com/h2database/h2/ if previously downloaded by a DB example module
Product Web Site ( http://h2database.com/html/download.html)
Start database, web server, and launch browser page
java -jar h2.jar
Start database and server only
java -jar h2.jar -tcp -web
Connect to URL http://127.0.1.1:8082 from a browser
Use JDBC URL: jdbc:h2:tcp://127.0.0.1:9092/h2db/ejava;LOCK_MODE=0
Log in as user "sa" and empty password
Note
This will create a database folder called "ejava" relative to where you started the database server.
Note
LOCK_MODE refers to how you want your connection impacted by other transactions in progress. A normal application would want some isolation between transactions, but it is useful to have the UI be able to watch in-progress transactions (i.e., perform dirty reads). The options include:
0 - Read Uncommitted - transaction isolation disabled
1 - Serializable - database is (read and write) locked until transaction commits
3 - Read Committed (default) - read locks released after statement completes
Do one of the following
add -P\!Ph2db -Ph2srv to the command line of each build
Note
The bang ("!") character turns off a profile. Unix shells require the bang ("!") character to be escaped. Windows DOS does not.
change the settings.xml activeProfile specification from embedded mode (h2db)
<activeProfile>h2db</activeProfile>
to server mode (h2srv)
<activeProfile>h2srv</activeProfile>
If you look at the root pom.xml, the database server profile defines the following
<profile> <!-- H2 server-based DB -->

    <id>h2srv</id>

    <properties>

          <jdbc.driver>org.h2.Driver</jdbc.driver>

          <jdbc.url>jdbc:h2:tcp://127.0.0.5:9092/ejava</jdbc.url>

          <jdbc.user>sa</jdbc.user>

          <jdbc.password/>

          <hibernate.dialect>

              org.hibernate.dialect.H2Dialect

          </hibernate.dialect>

    </properties>

    <dependencies>

        <dependency>

            <groupId>com.h2database</groupId>

            <artifactId>h2</artifactId>

            <scope>test</scope>

        </dependency>

    </dependencies>

</profile>
Change standalone/configuration/standalone.xml from
<connection-url>jdbc:h2:mem:test;DB_CLOSE_DELAY=-1</connection-url>

        ...

                    <security>

                        <user-name>sa</user-name>

                        <password>sa</password>

                    </security>
to
<connection-url>jdbc:h2:tcp://${jboss.bind.address:127.0.0.1}:9092/h2db/ejava;DB_CLOSE_DELAY=-1</connection-url>

        ...

                    <security>

                        <user-name>sa</user-name>

                        <password></password>

                    </security>
Note
This will create a database folder called "ejava" relative to where you started the database server.
The most current version of Eclipse is Kepler. I am just now starting to use it and so far it is fantastic. If we run into issues, we could drop back to Juno SR2, but at this point I do not anticipate any issues.
Download Eclipse IDE for JavaEE Developers http://eclipse.org/downloads
Unzip the downloaded archive.
$ tar xzf ~/Downloads/eclipse-jee-kepler-R-linux-gtk-x86_64.tar.gz

$ ls eclipse
about_files  about.html  artifacts.xml  configuration  dropins  eclipse  eclipse.ini
epl-v10.html  features  icon.xpm  notice.html  p2  plugins  readme
Create a shortcut for starting Eclipse
Start Eclipse
Eclipse will default to the JRE when launching most tools/applications. Sometimes this can be an issue and requires a JDK. Add the JDK and make it your default JRE.
Window->Preferences->Java->Installed JREs
press Add..->Standard VM and reference the JDK instance you installed earlier
Make the new JDK VM your default
m2e is a plugin installed into Eclipse that configures Eclipse based on the Maven pom.xml configuration. When adjusting your builds, you should always define changes within the Maven pom.xml and rely on m2e to translate that into Eclipse. Any changes added directly to Eclipse will not be seen by the command-line build.
M2E is now part of Eclipse JavaEE
m2e was pre-installed in my download of kepler. Nothing more needs to be done to install it. The rest of these instructions are concerned with using it and demonstrating it.
Add the Java Package Explorer to the JavaEE Perspective. I find this easier to work with than the Project Explorer used by default in the JavaEE perspective.
Select Window->Show View->Other->Java->Package Explorer.
Drag the Package Explorer to the panel with the Project Explorer
Select Top Level Elements->Working Sets from the down-facing triangle in the top-right corner of the Package Explorer.
Create a New Java Working Set and call it "class-examples"
Press OK
Import the class examples into Eclipse as a Maven Project
Right click on "class-examples" in the Package Explorer and select Import...->Maven->Existing Maven Projects
Browse to the project area where you performed the Git checkout earlier and select the javase5Enhancements folder.
Select Next to have the current project(s) added to the selected working set.
Note
There will be an extra panel that appears the first time you import a project with a new maven plugin. Allow Eclipse to setup any that it knows about, discover ones that may be new, or resolve later for those that it cannot find. There will be unsigned content warnings for most of the plugins. Eclipse will want to restart after installing any new plugins.
Build and test the application using Run As->Maven Install by right clicking on any of the project folders.
Note
If you receive the following error
[ERROR] No compiler is provided in this environment. Perhaps you are running on a JRE rather than a JDK?
add the following '-vm' option to your eclipse.ini file -- pointing to your javaw executable in the JDK directory, restart Eclipse, and retry.
-vm C:\apps\Java\jdk1.7.0_11/bin/javaw.exe
--launcher.defaultAction
openFile
-vm C:\apps\Java\jdk1.7.0_11/bin/javaw.exe
-vmargs
-Dosgi.requiredJavaVersion=1.5
-Dhelp.lucene.tokenizer=standard
-Xms40m
-Xmx512m
Try also Run As->JUnit Test.
You can use the command line Git to functionally clone the remote repository and update your local copy. However, having Git integrated into Eclipse allows the plugin to make Eclipse transition easier between one checked out branch to another or correctly react to an updated branch. To do this -- install the EGit plugin.
Git and EGit is now part of Eclipse JavaEE
Git and EGit was pre-installed in my download of kepler. Nothing more needs to be done to install it. The rest of these instructions are concerned with using it and demonstrating it.
Right click on the
ejavase5Enhancementsproject imported earlier and selectTeam->Share Project...->Git->Use of create repository in parent folder of project->Finish[(branch-name)]should now be displayed to the right of the project name
Add the following repository to your Eclipse instance and install the plugin
Open the Eclipse Marketplace panel using
Help->Eclipse MarketplaceType JBoss into the seach field and press Go
Click Install for the
JBoss Tools (Kepler)Complete the installation steps for JBoss Tools. There are many tools in the repository. Not all of them are needed for class or obvious how to use them without more investigation. Choose the following suggested minimal set.
Context and Dependency Injection Tools
Hibernate Tools
JBoss JAX-RS Tools
JBoss AS Tools
JBoss WebServices Tools
Note
You will receive a warning about the content within the plugin being unsigned.
Note
You will receive a warning after restarting Eclipse about the reporting anonymous use to JBoss. They use those callbacks to determine where and when their tools are being used (for bragging rights?). I disable that.
Define a Server Instance for JBoss
Open the JavaEE Perspective
Select "new server wizard..." in the Servers panel
Select Enterprise Application Platform 6.1 under the JBoss Enterprise Middleware folder
Set HOME to your jboss-eap-6.1.0.Final directory using the Browse button on the next panel
Name the server "standalone" and leave the to match the default "standalone.xml" configuration file.
Set the JRE to the default 'real' JRE
Review options. Note that I generally start my server externally so that standard output does not compete with my other actions within Eclipse. However, there are pros and cons to both methods and I will start you with internally launched here.
Start the server by right clicking on it and selecting Start
Ant is used in class to wrap command lines and encapsulate the building of classpaths for stand-alone applications. Just download and add Ant to your PATH here.
Note
The latest version of Ant is 1.9.2. The latest version I have tested with is 1.8.4. Until told otherwise, please download and configure the 1.8.4 version from the Ant archive until I get a chance to try things with the newer release.
Linux users - use your package installer
Windows users
Download Apache Ant from http://ant.apache.org/
Unzip the archive to directory without spaces in its path
Set ANT_HOME to the where you unzipped the archive
Add ANT_HOME to your PATH
Verify Ant is in your PATH
>ant -version
Apache Ant(TM) version 1.8.4 compiled on May 22 2012